Eclipse Jetty Operations Guide
The Eclipse Jetty Operations Guide targets sysops, devops, and developers who want to install Eclipse Jetty as a standalone server to deploy web applications.
Getting Started
If you are new to Eclipse Jetty, read on to download, install, start and deploy web applications to Jetty.
Quick Setup
Jetty is distributed in an artifact that expands in a directory called $JETTY_HOME, which should not be modified.
Configuration for Jetty is typically done in a directory called $JETTY_BASE.
There may be more than one $JETTY_BASE directories with different configurations.
Jetty supports the deployment of EE8, EE9 and EE10 standard web applications, as well as the deployment of Jetty-specific web applications.
For example, the following commands can be used to set up a $JETTY_BASE directory that supports deployment of EE10 *.war files and a clear-text HTTP connector:
$ export JETTY_HOME=/path/to/jetty-home
$ mkdir /path/to/jetty-base
$ cd /path/to/jetty-base
$ java -jar $JETTY_HOME/start.jar --add-modules=server,http,ee10-deploy
The last command creates a $JETTY_BASE/start.d/ directory and other directories that contain the configuration of the server, including the $JETTY_BASE/webapps/ directory, in which standard EE10 *.war files can be deployed.
To deploy Jetty’s demo web applications, run this command:
$ java -jar $JETTY_HOME/start.jar --add-module=demos
Now you can start the Jetty server with:
$ java -jar $JETTY_HOME/start.jar
Point your browser at http://localhost:8080 to see the demo web applications deployed in Jetty.
The Jetty server can be stopped with ctrl+c in the terminal window.
The following sections will guide you in details about downloading, installing and starting Jetty, and deploying your web applications to Jetty.
Read the Jetty architecture section for more information about Jetty modules, $JETTY_HOME, $JETTY_BASE and how to customize and start Jetty.
Downloading Jetty
The Jetty distribution is a file of the form jetty-home-<version>.<ext>, available for download from https://eclipse.dev/jetty/download.php
The Jetty distribution is available in both zip and gzip formats; download the one most appropriate for your system, typically zip for Windows and gzip for other operating systems.
Installing Jetty
After the download, unpacking Jetty will extract the files into a directory called jetty-home-<version>, where <version> is the version of Jetty that you downloaded.
For example, installing Jetty 12.0.9-SNAPSHOT will create a directory called jetty-home-12.0.9-SNAPSHOT.
| It is important that only stable release versions are used in production environments. Versions that have been deprecated or are released as Milestones (M), Alpha, Beta or Release Candidates (RC) are not suitable for production as they may contain security flaws or incomplete/non-functioning feature sets. |
Unpack Jetty file into a convenient location, such as /opt.
The rest of the instructions in this documentation will refer to this location as $JETTY_HOME, or ${jetty.home}.
| For Windows users, you should unpack Jetty to a path that does not contain spaces. |
If you are new to Jetty, you should read the Jetty architecture section to become familiar with the terms used in this documentation. Otherwise, you can jump to the section on starting Jetty.
Starting Jetty
Jetty as a standalone server has no graphical user interface; configuring and running the server is done from the command line.
First, create a $JETTY_BASE directory.
$ JETTY_BASE=/path/to/jetty.base
$ mkdir $JETTY_BASE
$ cd $JETTY_BASE
You will typically start Jetty by executing $JETTY_HOME/start.jar from this directory.
However, if you try to start Jetty from an empty $JETTY_BASE, it will complain that you haven’t enabled any modules:
$ java -jar $JETTY_HOME/start.jar
ERROR : No enabled jetty modules found!
INFO  : ${jetty.home} = /path/to/jetty.home
INFO  : ${jetty.base} = /path/to/jetty.base
ERROR : Please create and/or configure a ${jetty.base} directory.

Usage: java -jar $JETTY_HOME/start.jar [options] [properties] [configs]
       java -jar $JETTY_HOME/start.jar --help  # for more information
Jetty uses a module system to configure and assemble the server; these modules are enabled and configured in $JETTY_BASE.
Since the $JETTY_BASE directory you just created is empty, Jetty has no configuration it can use to assemble the server.
| See the architecture section of this document for more information on the design of Jetty’s module system. |
You can explore what modules are available with the --list-modules flag:
$ java -jar $JETTY_HOME/start.jar --list-modules=*
Now try to enable the http module.
| If you want to enable support for protocols like secure HTTP/1.1 or HTTP/2 or HTTP/3, or want to configure Jetty behind a load balancer, read this section. |
$ java -jar $JETTY_HOME/start.jar --add-modules=http
INFO  : mkdir ${jetty.base}/start.d
INFO  : server          transitively enabled, ini template available with --add-modules=server
INFO  : logging-jetty   transitively enabled
INFO  : http            initialized in ${jetty.base}/start.d/http.ini
INFO  : resources       transitively enabled
INFO  : threadpool      transitively enabled, ini template available with --add-modules=threadpool
INFO  : logging/slf4j   dynamic dependency of logging-jetty
INFO  : bytebufferpool  transitively enabled, ini template available with --add-modules=bytebufferpool
INFO  : mkdir ${jetty.base}/resources
INFO  : copy ${jetty.home}/modules/logging/jetty/resources/jetty-logging.properties to ${jetty.base}/resources/jetty-logging.properties
INFO  : Base directory was modified
When Jetty enables the http module, it also automatically enables a number of transitive dependencies of the http module, such as the server module, the logging-jetty module, and so on.
You can now start Jetty:
$ java -jar $JETTY_HOME/start.jar
2024-04-18 05:00:28.548:INFO :oejs.Server:main: jetty-12.0.9-SNAPSHOT; built: 2024-04-18T04:55:28.954Z; git: 0f04d4ef429f34935b1f9f1119e460225a3eb774; jvm 17.0.10+7
2024-04-18 05:00:28.574:INFO :oejs.AbstractConnector:main: Started ServerConnector@192cbb5d{HTTP/1.1, (http/1.1)}{0.0.0.0:8080}
2024-04-18 05:00:28.582:INFO :oejs.Server:main: Started oejs.Server@2667f029{STARTING}[12.0.9-SNAPSHOT,sto=5000] @784ms
Jetty is listening on port 8080 for clear-text HTTP/1.1 connections.
But since it has no web applications deployed, it will just reply with 404 Not Found to every request.
Before you deploy your first web application, take a moment to see what happened to the $JETTY_BASE directory once you enabled the http module:
$JETTY_BASE
├── resources
│   └── jetty-logging.properties (1)
└── start.d (2)
└── http.ini (3)| 1 | The resources/jetty-logging.properties file configures the server’s logging level; this file was auto-generated when the jetty-logging module was activated as a transitive dependency of the http module. |
| 2 | The start.d/ directory contains the *.ini configuration files for any modules you have explicitly activated. |
| 3 | The start.d/http.ini file is the http module configuration file, where you can specify values for the http module properties. |
|
By default, Jetty does not generate |
In the http.ini file you can find the following (among other contents):
--module=http (1)
# jetty.http.port=8080 (2)
...| 1 | This line enables the http module and should not be modified. |
| 2 | This commented line specifies the default value for the jetty.http.port property, which is the network port that Jetty uses to listen for clear-text HTTP connections. |
Try changing the default port.
Open http.ini, uncomment the line containing jetty.http.port=, and change its value to 9999:
--module=http
jetty.http.port=9999
...
If you restart Jetty, it will use this new value:
$ java -jar $JETTY_HOME/start.jar
2024-04-18 05:00:29.702:INFO :oejs.Server:main: jetty-12.0.9-SNAPSHOT; built: 2024-04-18T04:55:28.954Z; git: 0f04d4ef429f34935b1f9f1119e460225a3eb774; jvm 17.0.10+7
2024-04-18 05:00:29.730:INFO :oejs.AbstractConnector:main: Started ServerConnector@192cbb5d{HTTP/1.1, (http/1.1)}{0.0.0.0:9999}
2024-04-18 05:00:29.744:INFO :oejs.Server:main: Started oejs.Server@2667f029{STARTING}[12.0.9-SNAPSHOT,sto=5000] @822ms
You can also specify the value of a module property when you start up Jetty.
A property value specified on the command-line in this way will override the value configured in a module’s *.ini file.
$ java -jar $JETTY_HOME/start.jar jetty.http.port=8080
2024-04-18 05:00:30.804:INFO :oejs.Server:main: jetty-12.0.9-SNAPSHOT; built: 2024-04-18T04:55:28.954Z; git: 0f04d4ef429f34935b1f9f1119e460225a3eb774; jvm 17.0.10+7
2024-04-18 05:00:30.826:INFO :oejs.AbstractConnector:main: Started ServerConnector@36902638{HTTP/1.1, (http/1.1)}{0.0.0.0:8080}
2024-04-18 05:00:30.835:INFO :oejs.Server:main: Started oejs.Server@2667f029{STARTING}[12.0.9-SNAPSHOT,sto=5000] @758ms
For more detailed information about the Jetty start mechanism, you can read the Jetty start mechanism section.
Deploying Web Applications
You can deploy two types of web application resources with Jetty:
-
Standard Web Application Archives, in the form of
*.warfiles or web application directories, defined by the Servlet specification. Their deployment is described in this section. -
Jetty context XML files, that allow you to customize the deployment of standard web applications, and also allow you to use Jetty components — and possibly custom components written by you — to assemble and deploy your web applications. Their deployment is described in this section.
Jetty supports the deployment of both standard web applications and Jetty context XML files in a specific EE environment, such as the old Java EE 8, or Jakarta EE 9, or Jakarta EE 10.
Jetty supports simultaneous deployment of web applications each to a possibly different environment, for example an old Java EE 8 web application alongside a new Jakarta EE 10 web application.
Refer to the section about deployment for further information about how to deploy to different environments.
In the following sections you can find simple examples of deployments of Jakarta EE 10 web applications.
Deploying *.war Files
A standard Servlet web application is packaged in either a *.war file or in a directory with the structure of a *.war file.
|
Recall that the structure of a
|
To deploy a standard web application, you need to enable the ee10-deploy module.
|
The following examples assume you’re deploying a Jakarta EE 10 application; for other versions of Jakarta EE, make sure to activate the corresponding Refer to the section about deployment for further information about how to deploy to different environments. |
$ java -jar $JETTY_HOME/start.jar --add-modules=ee10-deployINFO : sessions transitively enabled, ini template available with --add-modules=sessions
INFO : security transitively enabled
INFO : ee10-deploy initialized in ${jetty.base}/start.d/ee10-deploy.ini
INFO : ee10-security transitively enabled
INFO : ee-webapp transitively enabled, ini template available with --add-modules=ee-webapp
INFO : ee10-webapp transitively enabled, ini template available with --add-modules=ee10-webapp
INFO : ee10-servlet transitively enabled
INFO : deploy transitively enabled
INFO : mkdir ${jetty.base}/webapps
INFO : Base directory was modifiedThe ee10-deploy module creates $JETTY_BASE/webapps, which is the directory where Jetty looks for any *.war files or web application directories to deploy.
Activating one of Jetty’s ee{8,9,10}-deploy modules enables web application deployment.
Whether these web applications are served via clear-text HTTP/1.1, or secure HTTP/1.1, or secure HTTP/2, or HTTP/3 (or even all of these protocols) depends on whether the correspondent Jetty protocol modules have been enabled.
Refer to the section about protocols for further information.
Now you’re ready to copy a web application to the $JETTY_BASE/webapps directory.
You can use one of the demos shipped with Jetty:
$ java -jar $JETTY_HOME/start.jar --add-modules=ee10-demo-simpleThe $JETTY_BASE directory is now:
$JETTY_BASE
├── resources
│   └── jetty-logging.properties
├── start.d
│   ├── deploy.ini
│   ├── ee10-demo-simple.ini
│   └── http.ini
└── webapps
    └── ee10-demo-simple.war
Now start Jetty:
$ java -jar $JETTY_HOME/start.jar
2024-04-18 05:00:33.281:WARN :oejx.XmlConfiguration:main: Deprecated method public static void org.eclipse.jetty.ee.WebAppClassLoading.addHiddenClasses(org.eclipse.jetty.util.Attributes,java.lang.String[]) in file:///path/to/jetty.home/etc/jetty-ee-webapp.xml
2024-04-18 05:00:33.334:INFO :oejs.Server:main: jetty-12.0.9-SNAPSHOT; built: 2024-04-18T04:55:28.954Z; git: 0f04d4ef429f34935b1f9f1119e460225a3eb774; jvm 17.0.10+7
2024-04-18 05:00:33.351:INFO :oejdp.ScanningAppProvider:main: Deployment monitor ee10 in [file:///path/to/jetty.base/webapps/] at intervals 0s
2024-04-18 05:00:33.358:INFO :oejd.DeploymentManager:main: addApp: App@77f80c04[ee10,null,/path/to/jetty.base/webapps/ee10-demo-simple.war]
2024-04-18 05:00:33.499:INFO :oejew.StandardDescriptorProcessor:main: NO JSP Support for /ee10-demo-simple, did not find org.eclipse.jetty.ee10.jsp.JettyJspServlet
2024-04-18 05:00:33.522:INFO :oejsh.ContextHandler:main: Started oeje10w.WebAppContext@3cce5371{EE10 Demo Simple WebApp,/ee10-demo-simple,b=file:///path/to/jetty.base/work/jetty-0_0_0_0-8080-ee10-demo-simple_war-_ee10-demo-simple-any-/webapp/,a=AVAILABLE,h=oeje10s.SessionHandler@17bffc17{STARTED}}{/path/to/jetty.base/webapps/ee10-demo-simple.war}
2024-04-18 05:00:33.543:INFO :oejes.ServletContextHandler:main: Started oeje10w.WebAppContext@3cce5371{EE10 Demo Simple WebApp,/ee10-demo-simple,b=file:///path/to/jetty.base/work/jetty-0_0_0_0-8080-ee10-demo-simple_war-_ee10-demo-simple-any-/webapp/,a=AVAILABLE,h=oeje10s.SessionHandler@17bffc17{STARTED}}{/path/to/jetty.base/webapps/ee10-demo-simple.war}
2024-04-18 05:00:33.545:INFO :oejs.DefaultSessionIdManager:main: Session workerName=node0
2024-04-18 05:00:33.555:INFO :oejs.AbstractConnector:main: Started ServerConnector@24105dc5{HTTP/1.1, (http/1.1)}{0.0.0.0:8080}
2024-04-18 05:00:33.567:INFO :oejs.Server:main: Started oejs.Server@3fc2959f{STARTING}[12.0.9-SNAPSHOT,sto=5000] @1104ms
Note the highlighted line that logs the deployment of ee10-demo-simple.war.
Now you can access the web application by pointing your browser to http://localhost:8080/ee10-demo-simple.
Advanced Deployment
If you want to customize the deployment of your web application — for example, by specifying a contextPath different from the file/directory name, or by specifying JNDI entries, or by specifying virtual hosts — read this section.
Eclipse Jetty Features
If you know Eclipse Jetty already, jump to a feature:
- Protocols
- Technologies
- Clustering
- Performance
Architecture Overview
Main Concepts
Jetty is an HTTP server and Servlet Container, and supports deployments of web applications.
The Jetty server listens on one or more network ports using one or more protocol connectors.
Clients send HTTP requests for specific URIs, such as https://host/store/cart.
The HTTP requests arrive to the connectors through the network; the Jetty server processes the requests and, based on their URIs, forwards them to the appropriate deployed web application.
There are three main concepts on which the Jetty standalone server is based:
-
The Jetty module system, where Jetty modules provides Jetty features.
-
The
$JETTY_BASEdirectory, that provides a place where you configure which Jetty modules you want to enable, configure the properties of each enabled module, and therefore configure the features you need for your web applications. -
The Jetty start mechanism, that starts a JVM that runs Jetty with the configuration you specified.
After installing Jetty, you will want to set up a $JETTY_BASE directory where you configure Jetty modules.
Jetty Modules
The Jetty standalone server is made of Java components that are assembled together, configured and started to provide different features.
A Jetty module provides one or more components that work together to provide typically one feature, although they may provide more than one feature.
A Jetty module is nothing more than Jetty components assembled together like you would do using Java APIs, just done in a declarative way using configuration files. What you can do in Java code to assemble Jetty components can be done using Jetty modules.
A Jetty module may be dependent on other Jetty modules: for example, the http Jetty module depends on the server Jetty module which in turn depends on the threadpool and logging Jetty modules.
Every feature in a Jetty server is enabled by enabling the corresponding Jetty module(s).
For example, if you enable only the http Jetty module, then your Jetty standalone server will only be able to listen to a network port for clear-text HTTP requests.
It will not be able to process secure HTTP (i.e. https) requests, it will not be able to process WebSocket, or HTTP/2, or HTTP/3 or any other protocol because the correspondent modules have not been enabled.
You can even start a Jetty server without listening on a network port — for example because you have enabled a custom module you wrote that provides the features you need.
This allows the Jetty standalone server to be as small as necessary: modules that are not enabled are not loaded, don’t waste memory, and you don’t risk a client using a module that you did not know was even there.
For more detailed information about the Jetty module system, see this section.
$JETTY_HOME and $JETTY_BASE
Instead of managing multiple Jetty distributions out of many locations, it is possible to maintain a separation between the binary installation of the standalone Jetty, known as $JETTY_HOME, and the customizations for your specific environment(s), known as $JETTY_BASE.
This separation between the binary installation directory and the specific configuration directory allows managing multiple, different, server configurations, and allows for quick, drop-in upgrades of Jetty.
There should always only be one $JETTY_HOME (per version of Jetty), but there can be many $JETTY_BASE directories that reference it.
This separation between $JETTY_HOME and $JETTY_BASE allows Jetty upgrades without affecting your web applications.
$JETTY_HOME contains the Jetty runtime and libraries and the default configuration, while a $JETTY_BASE contains your web applications and any override of the default configuration.
For example, with the $JETTY_HOME installation the default value for the network port for clear-text HTTP is 8080.
However, you may want that port to be 6060, because Jetty is behind a load balancer that is configured to forward to the backend on port 6060.
In this case, you configure the clear-text HTTP port in $JETTY_BASE, not in $JETTY_HOME.
When you upgrade Jetty, you will upgrade only the files in $JETTY_HOME, and all the configuration in $JETTY_BASE will remain unchanged, keeping your clear-text HTTP port at 6060.
Installing the Jetty runtime and libraries in $JETTY_HOME also allows you to leverage file system permissions: $JETTY_HOME may be owned by an administrator user (so that only administrators can upgrade it), while $JETTY_BASE directories may be owned by a less privileged user.
If you had changed the default configuration in $JETTY_HOME, when you upgrade Jetty, say from version 10.0.0 to version 10.0.1, your changes would be lost.
Maintaining all the changes in $JETTY_HOME, and having to reconfigure these with each upgrade results in a massive commitment of time and effort.
To recap:
$JETTY_HOME-
This is the location for the Jetty binaries.
$JETTY_BASE-
This is the location for your configurations and customizations to the Jetty binaries.
Start Mechanism
The Jetty start mechanism provides two features:
-
The mean to configure your
$JETTY_BASEby enabling the desired modules, and to display the configuration of your$JETTY_BASE. -
The mean to start Jetty itself, by starting a JVM that reads the Jetty configuration in
$JETTY_BASE, which is then executed to assemble and start the Jetty components.
The Jetty start mechanism is invoked by executing $JETTY_HOME/start.jar from within your $JETTY_BASE, and you can think of it as the Jetty command line program, similar to many Unix/Windows command line programs.
For example, you can ask for help:
$ java -jar $JETTY_HOME/start.jar --help
Or you can list all available modules (or only those with a specific tag):
# List all the modules.
$ java -jar $JETTY_HOME/start.jar --list-modules=*

# List all the modules tagged as "demo".
$ java -jar $JETTY_HOME/start.jar --list-modules=demo
You can enable a module, for example the http module:
$ java -jar $JETTY_HOME/start.jar --add-modules=http
Once you have one or more module enabled, you can display the current configuration, to verify that the configuration is correct:
$ java -jar $JETTY_HOME/start.jar --list-config
You can enable a Jetty demo module, which will deploy a demo web application:
$ java -jar $JETTY_HOME/start.jar --add-modules=demo-simple
Finally, you can start Jetty:
$ java -jar $JETTY_HOME/start.jar
Read more information at the Jetty start mechanism section.
Jetty Start Mechanism
| Make sure you have read the Jetty architecture section if you are not familiar with the terms used in this section. |
The Jetty start mechanism is invoked by executing $JETTY_HOME/start.jar, from within a $JETTY_BASE directory, with zero or more command line options:
$ cd $JETTY_BASE
$ java -jar $JETTY_HOME/start.jar ...
The Jetty start mechanism has two main modes of operation:
-
The tool mode, detailed in this section, when it is used as a command line tool to configure the
$JETTY_BASEdirectory by enabling modules, creating sub-directories and files, downloading files, etc. In this mode, the JVM started withjava -jar $JETTY_HOME/start.jarperforms the specified command and then exits. -
The start mode, detailed in this section, when it is used to start the JVM that runs Jetty with the specified configuration. In this mode, the JVM started with
java -jar $JETTY_HOME/start.jarstarts Jetty and does not exit until stopped, for example by hitting Ctrl+C on the terminal.
Refer to the Jetty start mechanism reference section for the complete list of the available command line options.
You want to use the Jetty start mechanism to configure your $JETTY_BASE and then to start Jetty.
Configuring $JETTY_BASE
Within the Jetty start mechanism, the source of configurations is layered in this order, from higher priority to lower priority:
-
The command line options.
-
The
$JETTY_BASEdirectory, and its files. -
The directory specified with the
--include-jetty-diroption, and its files. -
The
$JETTY_HOMEdirectory, and its files.
Enabling Modules
You can enable Jetty modules persistently across restarts with the --add-modules command:
$ java -jar $JETTY_HOME/start.jar --add-modules=server,http
The Jetty start mechanism will look for the specified modules following the order specified above.
In the common case (without a --include-jetty-dir directory), it will look in $JETTY_BASE/modules/ first and then in $JETTY_HOME/modules/.
Since the server and http modules are standard Jetty modules, they are present in $JETTY_HOME/modules/ and loaded from there.
When you enable a Jetty module, the Jetty start mechanism:
-
Creates the correspondent
$JETTY_BASE/start.d/*.inimodule configuration file. The content of these*.inifiles is copied from the[ini-template]section of the correspondent*.modfile. -
Executes the directives specified in
[files]section (if present) of the*.modfile. This may simply create a file or a directory, or download files from the Internet. This step is performed transitively for all module dependencies.
For example, enabling the server and http modules results in the $JETTY_BASE directory to have the following structure:
$JETTY_BASE
├── resources
│   └── jetty-logging.properties
└── start.d
    ├── http.ini
    └── server.ini
The $JETTY_BASE/resources/jetty-logging.properties is created by the [files] directives of the logging-jetty module, which is a transitive dependency of the server module.
Disabling Modules
A module is enabled because the correspondent $JETTY_BASE/start.d/*.ini file contains a --module=<name> directive.
Commenting out the --module=<name> directive effectively disables the module.
Deleting the correspondent $JETTY_BASE/start.d/*.ini file also disables the module.
Editing *.ini Files
You can now edit the $JETTY_BASE/start.d/*.ini configuration files, typically by uncommenting properties to change their default value.
The $JETTY_BASE/start.d/*.ini configuration file may be missing, if the correspondent module is a transitive dependency.
You can easily generate the configuration file by explicitly enabling the module, for example to generate the $JETTY_BASE/start.d/logging-jetty.ini configuration file you would issue the following command (the module order does not matter):
$ java -jar $JETTY_HOME/start.jar --add-modules=server,http,logging-jetty
The $JETTY_BASE directory structure is now:
$JETTY_BASE
├── resources
│   └── jetty-logging.properties
└── start.d
    ├── http.ini
    ├── logging-jetty.ini
    └── server.ini
You want to edit the $JETTY_BASE/start.d/*.ini configuration files so that the configuration is applied every time Jetty is started (or re-started).
For example, $JETTY_BASE/start.d/http.ini contains the following property, commented out:
# jetty.http.port=8080
You can change the clear-text HTTP port Jetty listens to by uncommenting that property and changing its value:
jetty.http.port=9876
When Jetty is started (or re-started) this configuration is applied and Jetty will listen for clear-text HTTP/1.1 on port 9876.
Enabling Modules on Command Line
You can also enable a module transiently, only for the current execution of the java -jar $JETTY_HOME/start.jar command.
If you have an empty $JETTY_BASE, the following command enables the server and http modules, but does not create any $JETTY_BASE/start.d/*.ini files.
$ java -jar $JETTY_HOME/start.jar --module=server,http
Since there are no $JETTY_BASE/start.d/*.ini files, you can only customize the properties via the command line, for example:
$ java -jar $JETTY_HOME/start.jar --module=server,http jetty.http.port=9876
Enabling modules on the command line is useful to verify that the modules work as expected, or to try different configurations.
It is possible to enable some module persistently via --add-modules and some other module transiently via --module.
|
Remember that once the current execution terminates, the modules enabled transiently on the command line via --module and their configuration are not saved and will not be enabled on the next execution (unless you specify them again on the command line).
Adding Your Own Modules
| Refer to the custom module section for the details about how to create your own modules. |
You can add your own modules by adding a $JETTY_BASE/modules/*.mod file.
For example, you may want to add a Postgres JDBC driver to the server class-path, to avoid that each deployed web application bring its own version. This allows you to control the exact Postgres JDBC driver version for all web applications.
Create the $JETTY_BASE/modules/postgresql.mod file:
[description]
Postgres JDBC Driver Module

[lib]
lib/postgresql-${postgresql-version}.jar

[files]
maven://org.postgresql/postgresql/${postgresql-version}|lib/postgresql-${postgresql-version}.jar

[ini]
postgresql-version?=42.6.0

[ini-template]
## Postgres JDBC version.
# postgresql-version=42.6.0
Then enable it:
$ java -jar $JETTY_HOME/start.jar --add-modules=postgresql
Enabling the postgresql module will execute the [files] directive (downloading the *.jar file from Maven Central if not already present) and create the $JETTY_BASE/start.d/postgresql.ini with the content of the [ini-template] section.
The [lib] section ensures that the specified file is in the server class-path when Jetty is started.
You can display the Jetty configuration to verify that the server class-path is correct.
Custom Module with JVM Options
Using a custom Jetty module, you can customize the JVM startup options.
This is useful if you need to start Jetty and want to specify JVM options such as:
-
-Xmx, to specify the max heap size -
-Xlog:gc, to specify the GC log file and options -
-javaagent, to specify Java agents -
-XX:options, for example to specify the GC implementation -
--enable-preview, to enable Java preview features
Start by creating $JETTY_BASE/modules/jvm.mod:
[description]
JVM Options Module

[exec]
-Xmx1g
-Xlog:gc*,gc+stats=off:file=logs/gc.log:time,level,tags
Enable it:
$ java -jar $JETTY_HOME/start.jar --add-modules=jvm
Since the module defines an [exec] section, it will fork another JVM when Jetty is started.
This means that when you start Jetty, there will be two JVMs running: one created by you when you run java -jar $JETTY_HOME/start.jar, and another forked by the Jetty start mechanism with the JVM options you specified (that cannot be applied to an already running JVM).
Again, you can display the JVM command line to verify that it is correct.
|
The second JVM forked by the Jetty start mechanism when one of the modules requires forking, for example a module that contains an |
Displaying the Configuration
Once you have enabled and configured the $JETTY_BASE, you can display the configuration to verify that it is correct.
Using the standard server and http Jetty modules, and the postgresql and jvm custom Jetty module defined above, you obtain:
$ java -jar $JETTY_HOME/start.jar --list-config
Enabled Modules:
----------------
  0) resources                 transitive provider of resources for logging-jetty
  1) logging/slf4j             transitive provider of logging/slf4j for logging-jetty
                               dynamic dependency of logging-jetty
  2) logging-jetty             transitive provider of logging for threadpool
                               transitive provider of logging for bytebufferpool
                               transitive provider of logging for server
  3) bytebufferpool            transitive provider of bytebufferpool for server
                               ini template available with --add-modules=bytebufferpool
  4) threadpool                transitive provider of threadpool for server
                               ini template available with --add-modules=threadpool
  5) jvm                       ${jetty.base}/start.d/jvm.ini
  6) server                    ${jetty.base}/start.d/server.ini
  7) http                      ${jetty.base}/start.d/http.ini
  8) postgresql                ${jetty.base}/start.d/postgresql.ini

JVM Version & Properties:
-------------------------
 java.home = /path/to/java.home
 java.vm.vendor = Eclipse Adoptium
 java.vm.version = 17.0.10+7
 java.vm.name = OpenJDK 64-Bit Server VM
 java.vm.info = mixed mode, sharing
 java.runtime.name = OpenJDK Runtime Environment
 java.runtime.version = 17.0.10+7
 java.io.tmpdir = /path/to/jetty.base/work
 user.dir = /path/to/jetty.base
 user.language = en
 user.country = null

Jetty Version & Properties:
---------------------------
 jetty.version = 12.0.9-SNAPSHOT
 jetty.tag.version = jetty-12.0.9-SNAPSHOT
 jetty.build = 0f04d4ef429f34935b1f9f1119e460225a3eb774
 jetty.home = /path/to/jetty.home
 jetty.base = /path/to/jetty.base

Config Search Order:
--------------------
 <command-line>
 ${jetty.base} -> /path/to/jetty.base
 ${jetty.home} -> /path/to/jetty.home

Forked JVM Arguments:
---------------------
 -Xmx1g
 -Xlog:gc*,gc+stats=off:file=logs/gc.log:time,level,tags

System Properties:
------------------
 (no system properties specified)

Properties: Jetty
-----------------
 java.version = 17.0.10
 java.version.major = 17
 java.version.micro = 10
 java.version.minor = 0
 java.version.platform = 17
 jetty.base = /path/to/jetty.base
 jetty.base.uri = file:///path/to/jetty.base
 jetty.home = /path/to/jetty.home
 jetty.home.uri = file:///path/to/jetty.home
 jetty.webapp.addHiddenClasses = org.eclipse.jetty.logging.,${jetty.home.uri}/lib/logging/,org.slf4j.
 postgresql-version = 42.6.0
 runtime.feature.alpn = true
 slf4j.version = 2.0.12

Classpath: Jetty
----------------
Version Information on 9 entries in the classpath.
Note: order presented here is how they would appear on the classpath.
      changes to the --module=name command line options will be reflected here.
 0:                    (dir) | ${jetty.base}/resources
 1:                   2.0.12 | ${jetty.home}/lib/logging/slf4j-api-2.0.12.jar
 2:          12.0.9-SNAPSHOT | ${jetty.home}/lib/logging/jetty-slf4j-impl-12.0.9-SNAPSHOT.jar
 3:          12.0.9-SNAPSHOT | ${jetty.home}/lib/jetty-http-12.0.9-SNAPSHOT.jar
 4:          12.0.9-SNAPSHOT | ${jetty.home}/lib/jetty-server-12.0.9-SNAPSHOT.jar
 5:          12.0.9-SNAPSHOT | ${jetty.home}/lib/jetty-xml-12.0.9-SNAPSHOT.jar
 6:          12.0.9-SNAPSHOT | ${jetty.home}/lib/jetty-util-12.0.9-SNAPSHOT.jar
 7:          12.0.9-SNAPSHOT | ${jetty.home}/lib/jetty-io-12.0.9-SNAPSHOT.jar
 8:                   42.6.0 | ${jetty.base}/lib/postgresql-42.6.0.jar

Active XMLs: Jetty
------------------
 ${jetty.home}/etc/jetty-bytebufferpool.xml
 ${jetty.home}/etc/jetty-threadpool.xml
 ${jetty.home}/etc/jetty.xml
 ${jetty.home}/etc/jetty-http.xml
Note how the configuration displayed above includes:
-
In the list of enabled modules, the
postgresqlandjvmmodules -
In the list of JVM arguments, those specified by the
jvmmodule -
In the server class-path, the
*.jarfile specified by thepostgresqlmodule
Displaying the JVM Command Line
The Jetty start mechanism can display a full JVM command line that will start Jetty with the configuration you specified, with the --dry-run option:
$ java -jar $JETTY_HOME/start.jar --dry-run
The full JVM command line generated by --dry-run can be split in various parts that can be used individually, for example in scripts.
Furthermore, Jetty modules may specify the --exec option that will fork a second JVM to start Jetty, which may not be desirable.
Some option, such as --jpms, imply --exec, as it won’t be possible to modify the module-path in the already started JVM.
To start Jetty without forking a second JVM, the --dry-run option can be used to generate a command line that is then executed so that starting Jetty only spawns one JVM.
You can use the --dry-run option as explained below to avoid forking a second JVM when using modules that have the [exec] section, or the --exec option, or when using the --jpms option.
|
For example, using the --dry-run option with the jvm.mod introduced in this section produces the following command line:
$ java -jar $JETTY_HOME/start.jar --dry-run
/path/to/java.home/bin/java \
-Djava.io.tmpdir=/path/to/jetty.base/work \
-Djetty.home=/path/to/jetty.home \
-Djetty.base=/path/to/jetty.base \
-Xmx1g \
'-Xlog:gc*,gc+stats=off:file=logs/gc.log:time,level,tags' \
--class-path \
/path/to/jetty.base/resources:/path/to/jetty.home/lib/logging/slf4j-api-2.0.12.jar:/path/to/jetty.home/lib/logging/jetty-slf4j-impl-12.0.9-SNAPSHOT.jar:/path/to/jetty.home/lib/jetty-http-12.0.9-SNAPSHOT.jar:/path/to/jetty.home/lib/jetty-server-12.0.9-SNAPSHOT.jar:/path/to/jetty.home/lib/jetty-xml-12.0.9-SNAPSHOT.jar:/path/to/jetty.home/lib/jetty-util-12.0.9-SNAPSHOT.jar:/path/to/jetty.home/lib/jetty-io-12.0.9-SNAPSHOT.jar \
org.eclipse.jetty.xml.XmlConfiguration \
java.version=17.0.10 \
jetty.base=/path/to/jetty.base \
jetty.base.uri=file:///path/to/jetty.base \
jetty.home=/path/to/jetty.home \
jetty.home.uri=file:///path/to/jetty.home \
jetty.webapp.addHiddenClasses=org.eclipse.jetty.logging.,file:///path/to/jetty.home/lib/logging/,org.slf4j. \
runtime.feature.alpn=true \
slf4j.version=2.0.12 \
/path/to/jetty.home/etc/jetty-bytebufferpool.xml \
/path/to/jetty.home/etc/jetty-threadpool.xml \
/path/to/jetty.home/etc/jetty.xml \
/path/to/jetty.home/etc/jetty-http.xml
You can then run the generated command line.
For example, in the Linux bash shell you can run it by wrapping it into $(...):
$ $(java -jar $JETTY_HOME/start.jar --dry-run)
The --dry-run option is quite flexible and below you can find a few examples of how to use it to avoid forking a second JVM, or generating scripts or creating an arguments file that can be passed to (a possibly alternative) java executable.
To display the java executable used to start Jetty:
$ java -jar $JETTY_HOME/start.jar --dry-run=java/path/to/java.home/bin/javaTo display the JVM options:
$ java -jar $JETTY_HOME/start.jar --dry-run=opts-Djava.io.tmpdir=/path/to/jetty.base/work \
-Djetty.home=/path/to/jetty.home \
-Djetty.base=/path/to/jetty.base \
-Xmx1g \
'-Xlog:gc*,gc+stats=off:file=logs/gc.log:time,level,tags'To display the JVM class-path:
$ java -jar $JETTY_HOME/start.jar --dry-run=path--class-path \
/path/to/jetty.base/resources:\
/path/to/jetty.home/lib/logging/slf4j-api-2.0.12.jar:\
/path/to/jetty.home/lib/logging/jetty-slf4j-impl-12.0.9-SNAPSHOT.jar:\
/path/to/jetty.home/lib/jetty-http-12.0.9-SNAPSHOT.jar:\
/path/to/jetty.home/lib/jetty-server-12.0.9-SNAPSHOT.jar:\
/path/to/jetty.home/lib/jetty-xml-12.0.9-SNAPSHOT.jar:\
/path/to/jetty.home/lib/jetty-util-12.0.9-SNAPSHOT.jar:\
/path/to/jetty.home/lib/jetty-io-12.0.9-SNAPSHOT.jarTo display the JVM class-path and module-path, if you want to start Jetty using JPMS with the --jpms option:
$ java -jar $JETTY_HOME/start.jar --jpms --dry-run=path--module-path \
/path/to/jetty.home/lib/jetty-io-12.0.9-SNAPSHOT.jar:\
/path/to/jetty.home/lib/jetty-xml-12.0.9-SNAPSHOT.jar:\
/path/to/jetty.home/lib/jetty-server-12.0.9-SNAPSHOT.jar:\
/path/to/jetty.home/lib/jetty-util-12.0.9-SNAPSHOT.jar:\
/path/to/jetty.home/lib/logging/slf4j-api-2.0.12.jar:\
/path/to/jetty.home/lib/logging/jetty-slf4j-impl-12.0.9-SNAPSHOT.jar:\
/path/to/jetty.home/lib/jetty-http-12.0.9-SNAPSHOT.jar \
--class-path \
/path/to/jetty.base/resources \
--add-modules \
ALL-MODULE-PATHTo display the JVM main class:
$ java -jar $JETTY_HOME/start.jar --dry-run=mainorg.eclipse.jetty.xml.XmlConfigurationTo display the JVM main class when starting Jetty using JPMS:
$ java -jar $JETTY_HOME/start.jar --jpms --dry-run=main--module org.eclipse.jetty.xml/org.eclipse.jetty.xml.XmlConfigurationThe main class is typically Jetty’s XmlConfiguration class that accepts, as program arguments, a list of properties and a list of Jetty XML files to process.
The Jetty XML files compose together the Jetty components that are then configured with the values from the command line properties.
To display the program arguments passed to the main class:
$ java -jar $JETTY_HOME/start.jar --dry-run=argsjava.version=17.0.10 \
jetty.base=/path/to/jetty.base \
jetty.base.uri=file:///path/to/jetty.base \
jetty.home=/path/to/jetty.home \
jetty.home.uri=file:///path/to/jetty.home \
jetty.webapp.addHiddenClasses=org.eclipse.jetty.logging.,file:///path/to/jetty.home/lib/logging/,org.slf4j. \
runtime.feature.alpn=true \
slf4j.version=2.0.12 \
/path/to/jetty.home/etc/jetty-bytebufferpool.xml \
/path/to/jetty.home/etc/jetty-threadpool.xml \
/path/to/jetty.home/etc/jetty.xml \
/path/to/jetty.home/etc/jetty-http.xmlNote how the program arguments are a list of properties in the form <name>=<value> and a list of Jetty XML files.
The various parts of the full JVM command line can be combined to leverage the arguments file feature (that is, specify the JVM options in a file rather than on the command line) that is built-in in the java executable:
$ java -jar $JETTY_HOME/start.jar --dry-run=opts,path,main,args > /tmp/jvm_cmd_line.txt
$ /some/other/java @/tmp/jvm_cmd_line.txt
Using --dry-run=opts,path,main,args can be used to avoid that the Jetty start mechanism forks a second JVM when using modules that require forking:
$ java $(java -jar $JETTY_HOME/start.jar --dry-run=opts,path,main,args)
The output of different --dry-run executions can be creatively combined in a shell script:
$ OPTS=$(java -jar start.jar --dry-run=opts,path)
$ MAIN=$(java -jar start.jar --dry-run=main)
$ ARGS=$(java -jar start.jar --dry-run=args)
$ java $OPTS -Dextra=opt $MAIN $ARGS extraProp=value extra.xml
Starting Jetty
After you have configured the $JETTY_BASE directory, as explained in this section, you can start Jetty as a standalone server.
In the start mode, the Jetty start mechanism computes a JVM command line with JVM options, system properties, class-path, module-path, main class and program arguments, and then executes it, forking a new JVM if necessary.
The Jetty start mechanism performs these steps:
-
Loads all the Jetty modules files (that have extension
*.mod) from themodules/subdirectory of each configuration source directory (see this section for the list of configuration sources). In this way, a Jetty module graph can be built in memory, where the module dependencies form the edges of the graph and each node contains the metadata information declared by each module (for example, the libraries that it needs, the XML files to process, and so on), in preparation for the next step. -
Reads the Jetty module configuration files (that have extension
*.ini) from thestart.d/subdirectory of each configuration source directory and from the command line. This step produces a list of enabled modules; for each enabled module all its dependencies are transitively resolved by navigating the graph built in the previous steps. -
Processes the list of enabled (explicitly and transitively) modules, gathering the list of libraries to add to the class-path, the JPMS directives to add to the command line, the properties and XML files to add as program arguments, etc., so that a full JVM command line can be generated.
-
Executes the command line, either in-JVM or by forking a second JVM (if the
--execoption is present or implied by other options such as--jpms), and waits for the JVM, or the forked JVM, to exit.
Server Class-Path
When the Jetty server is started in-JVM, the server class-path gathered by processing the enabled modules is organized in a URLClassLoader, the Jetty Start ClassLoader, that is a child of the System ClassLoader:

The System ClassLoader only has $JETTY_HOME/start.jar in its class-path, since the JVM was started with java -jar $JETTY_HOME/start.jar.
The Jetty Start ClassLoader has in its class-path the *.jar files gathered by processing the enabled modules, typically from $JETTY_HOME/lib/jetty-*.jar, but possibly also from $JETTY_BASE/lib/*.jar if custom modules extend the server class-path with their own *.jar files.
When the Jetty server is started in a forked JVM, there will be two JVMs: one started by you with java -jar $JETTY_HOME/start.jar and one forked by the Jetty start mechanism.
In the forked JVM, the System ClassLoader has the server class-path and/or module-path in its class-path, since the forked JVM is started with java --class-path $JETTY_HOME/lib/jetty-server-<version>.jar:...:

It is worth mentioning that there are two standard Jetty modules that allow you to easily add entries to the Jetty server class-path:
-
The
resourcesmodule, which adds the$JETTY_BASE/resourcesdirectory to the server class-path. This is useful if you have third party libraries that lookup resources from the class-path: just put those resources in the$JETTY_BASE/resources/directory.
Logging libraries often perform class-path lookup of their configuration files (for example,log4j.properties,log4j.xml,logging.properties, andlogback.xml), so$JETTY_BASE/resources/is the ideal place to add those files. -
The the
extmodule, that adds all the*.jarfiles under the$JETTY_BASE/lib/ext/directory, and subdirectories recursively, to the server class-path.On one hand, the
extmodule provides a handy place to put third party libraries and their dependencies; on the other hand, the$JETTY_BASE/lib/ext/directory may become a confused mixture of many*.jarfiles from different third party libraries.Prefer to group third party libraries and their dependencies into their own directories using custom modules, or at least group them into
$JETTY_BASE/lib/ext/subdirectories such as$JETTY_BASE/lib/ext/util/or$JETTY_BASE/lib/ext/acme/.
Assembling Jetty Components
The Jetty start mechanism eventually invokes, by default, main class org.eclipse.jetty.xml.XmlConfiguration, passing properties and Jetty XML files as program arguments.
The Jetty XML files are nothing more than Java code in XML format.
The XML files are processed to instantiate Jetty components such as org.eclipse.jetty.server.Server or org.eclipse.jetty.util.ssl.SslContextFactory$Server.
The components are then assembled together to provide the configured Jetty features.
The Jetty XML files are parametrized using properties, and a property is just a name/value pair.
This parametrization of the XML files allows an XML file that resides in $JETTY_HOME/etc/ to declare a property such as jetty.http.port, and allow this property to be set in a $JETTY_BASE/start.d/http.ini file, so that you don’t need to change the XML files in $JETTY_HOME, but only change files in your $JETTY_BASE.
You can write your own custom modules with your own Jetty XML files, and your own properties, to further customize Jetty.
Starting Jetty using JPMS
Jetty modules are proper JPMS modules: each Jetty module has a module-info.class file.
This makes possible to run Jetty from the module-path, rather than the class-path.
To start Jetty on the module-path rather than the class-path, it is enough to add the --jpms option to the command line, for example:
$ java -jar $JETTY_HOME/start.jar --jpms
|
The When running on the module-path using the Therefore, you will have two JVMs running: one that runs Forking a second JVM may be avoided as explained in this section. |
When Jetty is started in JPMS mode, all JPMS modules in the module-path are added to the set of JPMS root modules through the JVM option --add-modules ALL_MODULE_PATH.
For a *.jar file that is not a JPMS module, but is on the module-path, the JVM will assume internally it is an automatic JPMS module, with a JPMS module name derived from the *.jar file name.
Rather than adding the --jpms option to the command line, you can use a custom Jetty module to centralize your JPMS configuration, where you can specify additional JPMS directives.
Create the $JETTY_BASE/modules/jpms.mod file:
[description]
JPMS Configuration Module

[ini]
--jpms

[jpms]
# Additional JPMS configuration.
The [ini] section with --jpms is equivalent to passing the --jpms option to the command line (see also this section).
The [jpms] section allows you to specify additional JPMS configuration, for example additional --add-modules options, or --add-opens options, etc. (see also this section).
Then enable it:
$ java -jar $JETTY_HOME/start.jar --add-modules=jpms
Now you can start Jetty without extra command line options, and it will start in JPMS mode because you have enabled the jpms module.
Advanced JPMS Configuration
Web applications may need additional services from the Servlet Container, such as JDBC DataSource references or JTA UserTransaction references.
For example, for JDBC it is typical to store, in JNDI, a reference to the connection pool’s DataSource or directly a reference to the JDBC driver’s DataSource (for example, org.postgresql.ds.PGConnectionPoolDataSource).
Jetty needs to be able to instantiate those classes and therefore needs to be able to load those classes and all their super-classes, among which includes javax.sql.DataSource.
When Jetty runs on the class-path, this is easily achieved by using a custom module as explained in this section.
However, when running on the module-path, things are quite different.
When Jetty tries to load, for example, class org.postgresql.ds.PGConnectionPoolDataSource, it must be in a JPMS module that is resolved in the run-time module graph.
Furthermore, any dependency, for example classes from the java.sql JPMS module, must also be in a module present in the resolved module graph.
Thanks to the fact that when Jetty starts in JPMS mode the --add-modules ALL_MODULE_PATH option is added to the JVM command line, every *.jar file in the module-path is also present in the module graph.
There are now two cases for the postgresql-<version>.jar file: either it is a proper JPMS module, or it is an automatic JPMS module (either an explicit automatic JPMS module with the Automatic-Module-Name attribute in the manifest, or an implicit automatic JPMS module whose name is derived from the *.jar file name).
If the postgresql-<version>.jar file is a proper JPMS module, then there is nothing more that you should do: the postgresql-<version>.jar file is in the module-path, and all the modules in the module-path are in the module graph, and any dependency declared in the module-info.class will be added to the module graph.
Otherwise, postgresql-<version>.jar file is an automatic module, and will likely have a dependency on the JDK-bundled java.sql JPMS module.
However, the java.sql JPMS module is not in the module graph, because automatic modules do not have a way to declare their dependencies.
For this reason, you have to manually add the java.sql dependency to the module graph.
Using the postgresql.mod introduced in this section as an example, modify your custom module in the following way:
...

[jpms]
add-modules: java.sql
The [jpms] section is only used when Jetty is started on the module-path.
Stopping Jetty
When Jetty is started, the Jetty components that you have configured by enabling Jetty modules are assembled and started.
If you have started Jetty from a terminal, you can exit the Jetty JVM by hitting Ctrl+C on the same terminal.
Similarly, from a different terminal, you can exit the Jetty JVM using kill -INT <pid> or kill -TERM <pid>.
In the three cases above, the JVM is exited, but by default Jetty components are not stopped. If you want to stop the Jetty components, to stop Jetty more gracefully, you can start Jetty with this property:
$ java -jar $JETTY_HOME/start.jar jetty.server.stopAtShutdown=trueThis property can also be set in $JETTY_BASE/start.d/server.ini so that it is persistently configured across Jetty restarts (see also the server module).
The jetty.server.stopAtShutdown property configures a JVM shutdown hook that is run, stopping the Server instance, when the JVM exits.
Obviously, the JVM can also be stopped with kill -KILL <pid> that exits the process abruptly without running the JVM shutdown hooks.
Stopping Jetty from Remote
You can configure a Jetty server so that it can be stopped by remote clients using a command sent through a TCP socket.
You can start Jetty with the following properties:
-
stop.host, the host name Jetty will bind to listen for stop commands. Defaults to127.0.0.1which means that the stop command can be issued only clients that run on the same host as Jetty. -
stop.port, the port number Jetty will listen to for stop commands. Defaults to-1, which means that Jetty will not listen to any port. -
stop.key, the password to verify when a stop command is received. Defaults to a password that is randomly generated and printed when Jetty starts.
$ java -jar $JETTY_HOME/start.jar stop.port=8181STOP.KEY=1pl3aky4kvpq8
2024-04-18 05:00:45.071:INFO :oejs.Server:main: jetty-12.0.9-SNAPSHOT; built: 2024-04-18T04:55:28.954Z; git: 0f04d4ef429f34935b1f9f1119e460225a3eb774; jvm 17.0.10+7
2024-04-18 05:00:45.090:INFO :oejs.AbstractConnector:main: Started ServerConnector@4efbca5a{HTTP/1.1, (http/1.1)}{0.0.0.0:8080}
2024-04-18 05:00:45.099:INFO :oejs.Server:main: Started oejs.Server@c267ef4{STARTING}[12.0.9-SNAPSHOT,sto=5000] @826msIn the example above, Jetty is started with just the stop.port property, and the stop.key is printed on the terminal when Jetty starts.
You can choose your own stop.key, but make sure it’s a strong password.
|
A remote client can now use the Jetty start mechanism to stop the remote Jetty server:
$ java -jar $JETTY_HOME/start.jar --stop stop.port=8181 stop.key=<stop.key>Note the --stop command along with the stop.port and stop.key properties.
The stop.key must be the same as the one of remote Jetty server, either the one you chose, or the one printed on the terminal when Jetty starts.
Remote clients can wait for the remote Jetty server to shut down by specifying the stop.wait property with the number of seconds to wait:
$ java -jar $JETTY_HOME/start.jar --stop stop.port=8181 stop.key=<stop.key> stop.wait=15
If the time specified elapses, without the confirmation that the remote Jetty server stopped, then the --stop command exits with a non-zero return code.
Start Mechanism Logging
The steps performed by the Jetty start mechanism are logged by the StartLog class, that outputs directly, by default, to System.err.
This is necessary to avoid that the Jetty start mechanism depend on logging libraries that may clash with those defined by Jetty logging modules, when Jetty is started in-VM.
|
This section is about the logging performed by the Jetty start mechanism before it configures and starts Jetty. See the logging section for information about logging when Jetty starts. |
You can enable DEBUG level logging with the --debug command line option, for both the tool and start modes:
$ java -jar $JETTY_HOME/start.jar --debug ...
You can send the start log output to a file, by default relative to $JETTY_BASE, with the --start-log-file=<file> option:
$ java -jar $JETTY_HOME/start.jar --debug --start-log-file=start.log ...
This is useful for capturing startup issues where the Jetty-specific logger has not yet kicked in due to a possible startup configuration error.
Usage Reference
Usage:

$ java -jar $JETTY_HOME/start.jar [command] [options...]

Commands can be of two types: report commands or configuration commands.
Commands execute and then exit the JVM.
Options can be specified with or without commands.
When no command is specified, Jetty is started with the given options.

Report Commands:
----------------

  --help
                   Prints this help / usage information.

  --version
                   Prints the version information for Jetty and
                   dependent jars, then exits.

  --list-classpath
                   Prints the class-path (or module-path) information that
                   will be used to start Jetty.

  --list-config
                   Lists the resolved configuration that will be used to
                   start Jetty.
                   Output includes:
                     o  Enabled Jetty modules
                     o  Java environment
                     o  Jetty environment
                     o  Config file search order
                     o  JVM arguments
                     o  System properties
                     o  Properties
                     o  Java class-path or module-path
                     o  XML configuration files

  --list-modules
                   Lists the modules defined in ${jetty.base}/modules/*.mod
                   and then in ${jetty.home}/modules/*.mod.

  --list-modules=<tag>(,<tag>)*
                   Lists the modules by tag. Use '*' for all tags.
                   Prefix a tag with '-' to exclude the tag.
                   The special tag "internal" is always excluded unless it is
                   explicitly included.

  --list-all-modules
                   Lists all modules.

  --show-modules=<module>(,<module>)*
                   Shows the detail of the listed modules, including
                   dependencies, tags, libraries and XMLs.

  --stop
                   Sends a stop signal to the running Jetty instance.
                   The running Jetty instance must have been started with a
                   stop.port=<port> property and the --stop command must
                   be executed with the same property.

  --dry-run
                   Prints the command line that start.jar generates,
                   in a format usable by a POSIX compliant shell, then exits.
                   This may be used to generate command lines into scripts:
                     $ java -jar start.jar --dry-run > jetty.sh

  --dry-run=<part>(,<part>)*
                   Prints specific parts of the command line in a format usable by
                   a POSIX compliant shell. The parts are:
                     o  "java" - the JVM to run
                     o  "opts" - the JVM options (e.g. -D, -X and -XX flags)
                     o  "path" - the JVM class-path and/or the JPMS module-path
                     o  "main" - the main class to run
                     o  "args" - the arguments passed to the main class
                     o  "envs" - the generated XML files to create the environments

Configure Commands:
-------------------

  --add-modules=<moduleName>(,<moduleName>)*
                   Adds the given modules to the list of modules enabled at
                   when Jetty starts.
                   Transitive dependencies are followed and dependent
                   modules may also explicitly added.
                   Modules are added by creating an *.ini file in the
                   ${jetty.base}/start.d/ directory.
                   The *.ini file contains the --module option that enables
                   the module, and any other option defined in the module's
                   [ini-template] section.
                   If the *.ini file specifies properties, these may be
                   overridden by specifying the same properties on the
                   command line.

                   If a module is transitively enabled, its *.ini file will
                   not be generated.
                   To generate the *.ini file, the module must be explicitly
                   listed in the --add-modules=... command.

                   This option replaces the deprecated --add-to-start and
                   --add-to-startd commands.

  --create-start-d
                   Creates a ${jetty.base}/start.d directory.
                   If the ${jetty.base}/start.ini file exists, then it is
                   moved into the ${jetty.base}/start.d/ directory.
                   Using a ${jetty.base}/start.d/ directory is the default and
                   this option is only needed to either force the creation of
                   the ${jetty.base}/start.d/ directory, or to move a
                   ${jetty.base}/start.ini file to ${jetty.base}/start.d/.

  --create-start-ini
                   Creates a ${jetty.base}/start.ini file.
                   If a ${jetty.base}/start.d/ directory exists, then all
                   the contained *.ini files are concatenated into the
                   ${jetty.base}/start.ini file.

  --update-ini
                   Scans all the ${jetty.base}/start.d/*.ini files and updates
                   any property with values specified on the command line.
                   For example:
                     $ java -jar ${jetty.host}/start.jar --update-ini jetty.http.port=8888

  --create-files
                   Creates any missing files that are required by enabled
                   modules, as specified in their [files] section.
                   This may download a file from the network if a HTTP URI
                   is specified in the [files] section.

  --write-module-graph=<filename>
                   Creates a graphviz *.dot file of the module graph as it
                   is configured for the current ${jetty.base}.
                   See https://graphviz.org/ for details on how to post-process
                   this file into the output best suited for your needs.

Options:
--------

  --modules=<moduleName>(,<moduleName>)*
                   Enables a module for this execution.
                   To enable a module for all future executions, use the
                   --add-modules command.
                   Note: this option is used in the ${jetty.base}/start.ini
                   file or in ${jetty.base}/start.d/*.ini files created by
                   the --add-modules command.

  --libs=<classpath>
                   Adds the specified class-path entries to the the server
                   class-path (or module-path).

  --download=<http-uri>|<location>
                   Downloads a file from the given HTTP URI, if it does
                   not already exist at the given location.
                   Note: the location is always relative to ${jetty.base}.
                   You might need to escape the pipe "\|" to use it in
                   some shell environments.

  --exec
                   Executes the generated command line in a forked JVM
                   (see the --dry-run command).
                   This can be used when ${jetty.base}/start.d/*.ini files
                   contain -D, -X or -XX arguments, but creates an extra
                   JVM process.

  --exec-properties=<filename>
                   Assigns a fixed name to the file used to transfer
                   properties to the sub process. This allows the
                   generated properties file to be saved and reused.
                   Without this option, a temporary file is used.

  --commands=<filename>
                   Uses each line of the specified file as arguments on the
                   JVM command line.

  --jpms
                   Starts Jetty in JPMS mode in a forked JVM (see also the
                   --dry-run command).
                   The library *.jar files are set on the forked JVM module-path
                   (rather than the forked JVM class-path), while directories
                   are set on the forked JVM class-path.
                   The main class is specified with the JPMS option
                   --module <moduleName>/<mainClassName>.

  --debug
                   Enables debug output of the startup execution.
                   Note: this does not setup debug logging for Jetty itself,
                   only for the startup execution.
                   If you want debug logging for Jetty, configure one of the
                   available logging modules using the --add-modules command.

  --start-log-file=<filename>
                   A filename, relative to ${jetty.base}, where all startup
                   output will be sent.  This is useful for capturing startup
                   issues when the Jetty logging module has not yet started
                   due to configuration errors.

  --allow-insecure-http-downloads
                   Allow the use of insecure `http://` scheme for content download.

  --approve-all-licenses
                   Approves all license questions from modules that have
                   particular license requirements.
                   Useful for enabling modules from a script, so that it
                   does not require user interaction.

  --skip-file-validation=<moduleName>(,<moduleName>)*
                   Disables the creation of files as specified by the
                   [files] section of the specified modules.
                   Useful if a logging module specifies a *.properties
                   config file, but you want to use that module with an
                   *.xml config file instead.

  --include-jetty-dir=<path>
                   Includes the specified directory as a configuration source.
                   This directory behaves similarly to ${jetty.base} but sits
                   at a layer between ${jetty.home} and ${jetty.base}.
                   Useful when you want to apply a common "corporate"
                   configuration to all specific ${jetty.base} directories
                   without having to modify ${jetty.home}.

  jetty.home=<directory>
                   Sets the ${jetty.home} directory.
                   By default it is resolved from the start.jar file path.

  jetty.base=<directory>
                   Sets the ${jetty.base} directory.
                   By default it is resolved from the current directory path.

  stop.host=<string>
                   Used with the --stop command.
                   Specifies the host where the Jetty server to stop is
                   running (defaults to 127.0.0.1).

  stop.port=<number>
                   Used with the --stop command.
                   Specifies the port to use to contact the Jetty server
                   to stop.

  stop.key=<alphanumeric>
                   Used with the --stop command.
                   The passphrase required to stop the Jetty server.

  stop.wait=<number>
                   Used with the --stop command.
                   The time, in seconds, to wait for confirmation that the
                   running Jetty server has stopped.
                   If not specified, the stopper will not wait.

  maven.repo.uri=<url>
                  The base URL to use to download Maven dependencies.
                  Defaults to: https://repo1.maven.org/maven2/.

  <name>=<value>
                  Specifies a property value that overrides the same
                  property defined in a ${jetty.base}/start.d/*.ini file,
                  or in the [ini] section of a *.mod file.

                  <name>=<value>
                    Sets the property value unconditionally.
                  <name>+=<value>
                    Appends the given value to the existing value.
                  <name>?=<value>
                    Sets the property value only if it is not already set.

  -D<name>=<value>
                  Specifies a system property, as well as a start property.
                  Note: this is a program argument that is interpreted and
                  added to the existing JVM system properties.

  <xml-file>
                  Specifies a Jetty XML file relative to ${jetty.base}.
                  This file is in addition to the Jetty XML files resolved
                  from the [xml] sections of the enabled modules.
Jetty Modules
A Jetty module provides one or more Java components that work together to implement one or more features. Such features could be listening for clear-text HTTP/1.1 requests, exposing Jetty components to JMX, provide hot-deployment of web applications, etc.
Every Jetty feature is provided by a Jetty module.
A Jetty module is defined in a <name>.mod file, where <name> is the module name (see also the section about module names).
Jetty module files are read from the typical configuration source directories, under the modules/ subdirectory; from higher priority to lower priority:
-
The
$JETTY_BASE/modules/directory. -
If a directory is specified with the
--include-jetty-diroption, itsmodules/subdirectory. -
The
$JETTY_HOME/modules/directory.
The standard Jetty modules that Jetty provides out-of-the-box are under $JETTY_HOME/modules/.
Custom Jetty modules should be put under $JETTY_BASE/modules/.
Module Names
A Jetty module has a unique name.
The module name is by default derived from the file name, so module file acme.mod identifies a module named acme.
However, a module file may specify a [provides] directive for a virtual module, so that many modules may provide a different implementation for the same feature.
For example, among the standard modules provided by Jetty, the server module depends on the logging module, but there is no correspondent logging.mod file.
However, the logging-jetty.mod file has, among others, this section:
[provides]
logging|default
This section means that the logging-jetty.mod file provides the virtual module logging, and it is the default provider.
The logging-log4j2.mod file has a similar section:
[provides]
logging
If there are no enabled modules that provide the logging virtual module, either explicitly or transitively, then the default provider is used, in this case logging-jetty.mod.
Otherwise, a module that provides the logging virtual module is explicitly or transitively enabled, and the default provider is not used.
Module Components
A Jetty module may provide one or more Java components that implement a feature. These Java components are nothing more than regular Java classes that are instantiated and configured via Jetty XML files.
The Jetty XML file of a Jetty module may instantiate and assemble together its own components, or reference existing components from other Jetty modules to enhance or reconfigure them.
The Jetty module’s XML files are read from the typical configuration source directories, under the etc/ subdirectory; from higher priority to lower priority:
-
The
$JETTY_BASE/etc/directory. -
If a directory is specified with the
--include-jetty-diroption, itsetc/subdirectory. -
The
$JETTY_HOME/etc/directory.
The standard Jetty modules XML files that Jetty provides out-of-the-box are under $JETTY_HOME/etc/.
For example, a Jetty XML file that allocates Jetty’s QueuedThreadPool could be as simple as:
<?xml version="1.0"?>
<!DOCTYPE Configure PUBLIC "-//Jetty//Configure//EN" "https://eclipse.dev/jetty/configure_10_0.dtd">
<Configure>
  <New id="threadPool" class="org.eclipse.jetty.util.thread.QueuedThreadPool">
    <Set name="maxThreads" type="int">
      <Property name="jetty.threadPool.maxThreads" default="256"/>
    </Set>
  </New>
</Configure>
Note how the Jetty XML file above is allocating (with the <New> element) a QueuedThreadPool instance, giving it the unique id of threadPool (so that other modules can reference it, if they need to).
It is then calling the setter method QueuedThreadPool.setMaxThreads(int) with the value defined by the module property jetty.threadPool.maxThreads; if the property value is not defined, it will have the default value of 256.
This is nothing more than Java code in XML format with configurable properties support that can be leveraged by the Jetty start mechanism.
The Jetty module’s XML files make easy to instantiate and assemble Java components (just write the equivalent Java code in XML format), and make easy to configure them by declaring module properties that can be easily customized elsewhere (for example, in *.ini files as described in this section, or on the command line as described in this section).
|
Remember that the standard Jetty XML files in Even if you need to modify a standard Jetty component, write a new Jetty XML file, save it under |
Module Properties
A Jetty module property is declared in the module XML file(s) via the <Property> element.
Modules properties are used to parametrize Jetty components so that you can customize their values when Jetty starts, rather than hard-coding it in the XML files.
You can declare your own properties, but the jetty.* namespace is reserved.
|
A module property can be given a value in a Jetty module [ini] section (see here), in a *.ini file as described in this section, or on the command line as described in this section.
The syntax to specify a property value is the following:
- <name>=<value>
-
Sets the property value unconditionally.
- <name>+=<value>
-
Appends the value to the existing value. This is useful to append a value to properties that accept a comma separated list of values, for example:
jetty.webapp.addProtectedClasses+=,com.acme
- <name>?=<value>
-
Sets the property value only if it is not already set. This is useful to define default values, for example for "version" properties, where the "version" property can be explicitly configured to a newer version, but if it is not explicitly configured it will have a default version (see also here). For example:
conscrypt.version?=2.5.1
jetty.sslContext.provider?=Conscrypt
Module Directives
Lines that start with # are comments.
[description]
A text that describes the module.
This text will be shown by the Jetty start mechanism when using the --list-modules command.
[tags]
A list of words that characterize the module.
Modules that have the same tags will be shown by the Jetty start mechanism when using the --list-modules=<tag> command.
[tags]
demo
webapp
jsp
[provides]
A module name with an optional default specifier.
As explained in the module name section, there can be many module files each providing a different implementation for the same feature.
The format is:
[provides]
<module_name>[|default]
where the |default part is optional and specifies that the module is the default provider.
[depends]
A list of module names that this module depends on.
For example, the standard module http depends on module server.
Enabling the http module also enables, transitively, the server module, since the http module cannot work without the server module; when the server module is transitively enabled, the modules it depends on will be transitively enabled, and so on recursively.
The [depends] directive establishes a partial order relationship among modules so that enabled modules can be sorted and organized in a graph.
Circular dependencies are not allowed.
[after]
This directive indicates that this module is ordered after the listed module names, if they are enabled.
For example, module https is [after] module http2.
Enabling the https module does not enable the http2 module.
However, if the http2 module is enabled (explicitly or transitively), then the https module is sorted after the http2 module.
In this way, you are guaranteed that the https module is processed after the http2 module.
[before]
This directive indicates that this module is ordered before the listed module names, if they are enabled.
One use of this directive is to create a prerequisite module without the need to modify the depends directive of an existing module.
For example, to create a custom org.eclipse.jetty.server.Server subclass instance to be used by the standard server module, without modifying the existing server.mod file nor the jetty.xml file that it uses. This can be achieved by creating the custom-server Jetty custom module:
[description]
This module creates a custom Server subclass instance.

[before]
server

[xml]
etc/custom-server.xml
The custom-server.xml file is the following:
<?xml version="1.0"?>
<!DOCTYPE Configure PUBLIC "-//Jetty//Configure//EN" "https://eclipse.dev/jetty/configure_10_0.dtd">
<Configure id="Server" class="com.acme.server.CustomJettyServer">
</Configure>
The presence of the [before] directive in custom-server.mod causes the processing of the custom-server.xml file to happen before the processing of the standard jetty.xml file referenced by the standard server.mod Jetty module.
Thus, the instance assigned to the Server identifier is your custom com.acme.server.CustomJettyServer instance from the custom-server.xml file; this instance is then used while processing the jetty.xml file.
[files]
A list of paths (directories and/or files) that are necessary for the module, created or resolved when the module is enabled.
Each path may be of the following types:
- Path Name
-
A path name representing a file, or a directory if the path name ends with
/, such aswebapps/. The file or directory will be created relative to$JETTY_BASE, if not already present.For example:
[files]
logs/
- Maven Artifact
-
An URI representing a Maven artifact to be downloaded from Maven Central, if not already present. Property expansion is supported.
The format is:
[files]
maven://<groupId>/<artifactId>/<version>[/<type>]|<pathName>
where
<type>is optional, and<pathName>after the|is the path under$JETTY_BASEwhere the downloaded file should be saved.For example:
[files] maven://org.postgresql/postgresql/${postgresql-version}|lib/postgresql-${postgresql-version}.jar - BaseHome
-
An URI representing a
$JETTY_HOMEresource to be copied in$JETTY_BASE, if not already present. URIs of this type are typically only used by standard Jetty modules; custom modules should not need to use it.The format is:
[files]
basehome:<jettyHomePathName>|<pathName>
For example:
[files]
basehome:modules/demo.d/demo-moved-context.xml|webapps/demo-moved-context.xml
- HTTP URL
-
An
http://orhttps://URL to be downloaded, if not already present.The format is:
[files]
<httpURL>|<pathName>
For example:
[files]
https://acme.com/favicon.ico|webapps/acme/favicon.ico
[libs]
A list of paths, relative to the configuration source directories, of *.jar library files and/or directories that are added to the server class-path (or module-path when running in JPMS mode).
The [libs] section if often used in conjunction with the [files] section.
For example:
[files]
maven://org.postgresql/postgresql/${postgresql-version}|lib/postgresql-${postgresql-version}.jar

[libs]
lib/postgresql-${postgresql-version}.jar
The postgresql-<version>.jar artifact is downloaded from Maven Central, if not already present, into the $JETTY_BASE/lib/ directory when the module is enabled.
When Jetty starts, the $JETTY_BASE/lib/postgresql-<version>.jar will be in the server class-path (or module-path).
[xml]
A list of paths, relative to the configuration source directories, of Jetty *.xml files that are passed as program arguments to be processed when Jetty starts (see the section about assembling Jetty components).
Jetty XML files are read from the typical configuration source directories, under the etc/ subdirectory.
Standard Jetty XML files are under $JETTY_HOME/etc/, while custom Jetty XML files are typically under $JETTY_BASE/etc/.
For example:
[xml]
etc/custom/components.xml
[ini]
A list of program arguments to pass to the command line when Jetty is started.
The program arguments may include any command line option (see here for the list of command line options), module properties and/or module XML files.
A property defined in the [ini] section is available in the *.mod module file for property expansion, for example:
[ini]
postgresql-version?=42.6.0

[lib]
lib/postgresql-${postgresql-version}.jar
In the example above, the [lib] section contains ${postgresql-version}, a reference to property postgresql-version whose value is defined in the [ini] section.
The expression ${<property>} expands the property replacing the expression with the property value.
See also the JPMS section for additional examples about the [ini] section.
[ini-template]
A list of properties to be copied in the *.ini file generated when the module is enabled.
The list of properties is derived from the module XML file(s) that declare them.
The properties are typically assigned their default value and commented out, so that it is evident which properties have been uncommented and customized with a non-default value.
[exec]
A list of JVM command line options and/or system properties passed to a forked JVM.
When the [exec] section is present, the JVM running the Jetty start mechanism will fork another JVM, passing the JVM command line options and system properties listed in the [exec] sections of the enabled modules.
This is necessary because JVM options such as -Xmx (that specifies the max JVM heap size) cannot be changed in a running JVM.
For an example, see this section.
You can avoid that the Jetty start mechanism forks the second JVM, as explained in this section.
[jpms]
A list of JVM command line options related to the Java Module System.
This section is processed only when Jetty is started in JPMS mode.
The directives are:
- add-modules
-
Equivalent to the JVM option
--add-modules. The format is:[jpms] add-modules: <module>(,<module>)*
where
moduleis a JPMS module name. - patch-module
-
Equivalent to the JVM option
--patch-module. The format is:[jpms] patch-module: <module>=<file>(:<file>)*
where
moduleis a JPMS module name. - add-opens
-
Equivalent to the JVM option
--add-opens. The format is:[jpms] add-opens: <module>/<package>=<target-module>(,<target-module>)*
where
moduleandtarget-moduleare a JPMS module names. - add-exports
-
Equivalent to the JVM option
--add-exports. The format is:[jpms] add-exports: <module>/<package>=<target-module>(,<target-module>)*
where
moduleandtarget-moduleare a JPMS module names. - add-reads
-
Equivalent to the JVM option
--add-exports. The format is:[jpms] add-reads: <module>=<target-module>(,<target-module>)*
where
moduleandtarget-moduleare a JPMS module names.
[license]
The license under which the module is released.
A Jetty module may be released under a license that is different from Jetty’s, or use libraries that require end-users to accept their licenses in order to be used.
You can put the license text in the [license] section, and when the Jetty module is enabled the license text will be printed on the terminal, and the user prompted to accept the license.
If the user does not accept the license, the module will not be enabled.
For example:
[license]
Acme Project is an open source project hosted on GitHub
and released under the Apache 2.0 license.
https://www.apache.org/licenses/LICENSE-2.0.txt
[version]
The minimum Jetty version for which this module is valid.
For example, a module may only be valid for Jetty 10 and later, but not for earlier Jetty versions (because it references components that have been introduced in Jetty 10).
For example:
[version]
10.0
A Jetty module with such a section will only work for Jetty 10.0.x or later.
Custom Jetty Modules
In addition to the modules that come packaged with Jetty, you can create your own custom modules.
| Make sure you have read the Jetty modules section if you are not familiar with the concepts used in this section. |
Custom modules can be used for a number of reasons — they can extend Jetty features, or add new features, or make additional libraries available to the server, etc.
Modifying an Existing Module
The standard Jetty modules typically come with a number of configurable properties that can be easily customized without the need of writing a custom module.
However, there may be cases where the customization is more complex than a simple property, and a custom module is necessary.
For example, let’s assume that you want to modify the order of the TLS cipher suites offered by the server when a client connects, using the OpenSSL cipher list format.
The Jetty class that handles the TLS configuration is SslContextFactory, and it already has a method setCipherComparator(Comparator<String>); however, you need to pass your custom implementation, which cannot be represented with a simple module property.
The SslContextFactory component is already allocated by the standard Jetty module ssl, so what you need to do is the following:
-
Write the custom cipher
Comparatorand package it into a*.jarfile (exercise left to reader). -
Write a custom Jetty XML file that calls the
SslContextFactory.setCipherComparator(Comparator<String>)method. -
Write a custom Jetty module file that depends on the standard
sslmodule.
Start with the custom Jetty XML file, $JETTY_BASE/etc/custom-ssl.xml:
<?xml version="1.0" encoding="UTF-8"?>
<!DOCTYPE Configure PUBLIC "-//Jetty//Configure//EN" "https://eclipse.dev/jetty/configure_10_0.dtd">
<Configure>
  <Ref refid="sslContextFactory"> (1)
    <Set name="CipherComparator"> (2)
      <New class="com.acme.ssl.CustomCipherComparator"> (3)
        <Arg>
          <Property name="com.acme.ssl.cipherList"> (4)
            <Default>ECDH+AESGCM:ECDH+AES256:!aNULL:!MD5:!DSS:!ADH</Default>
          </Property>
        </Arg>
      </New>
    </Set>
  </Ref>
</Configure>| 1 | Reference the existing SslContextFactory object created by the standard ssl module using its id. |
| 2 | Call the setCipherComparator() method. |
| 3 | Instantiate your custom cipher comparator. |
| 4 | Pass to the constructor the ordering string in OpenSSL format, reading it from the module property com.acme.ssl.cipherList. |
| The cipher list used above may not be secure — it’s just an example. |
Then write your custom module in the $JETTY_BASE/modules/custom-ssl.mod file:
[description]
Customizes the standard ssl module.

[tags] (1)
acme

[depends] (2)
ssl

[lib] (3)
lib/custom-cipher-comparator.jar

[xml] (4)
etc/custom-ssl.xml

[ini-template] (5)
## The cipher list in OpenSSL format.
# com.acme.ssl.cipherList=ECDH+AESGCM:ECDH+AES256:!aNULL:!MD5:!DSS:!ADH| 1 | A tag that characterizes this custom module (see here). |
| 2 | This custom module depends on the standard ssl module. |
| 3 | The custom cipher comparator class is compiled and packaged into this *.jar file. |
| 4 | The custom Jetty XML file from above. |
| 5 | The text that will be copied in the custom-ssl.ini file when this custom module will be enabled. |
Now you can enable the custom module with the following command issued from the $JETTY_BASE directory:
$ java -jar $JETTY_HOME/start.jar --add-modules=https,custom-ssl
The command above will produce the following $JETTY_BASE directory structure:
$JETTY_BASE
├── etc
│   └── custom-ssl.xml
├── modules
│   └── custom-ssl.mod
├── resources
│   └── jetty-logging.properties
└── start.d
    ├── https.ini
    └── custom-ssl.ini
In the custom XML file you have used a custom module property to parametrize your custom cipher comparator.
This custom module property was then referenced in the [ini-template] section of the custom module file, so that when the custom module is enabled, a correspondent custom-ssl.ini file is created.
In this way, updating the cipher list won’t require you to update the XML file, but just the custom-ssl.ini file.
Creating a New Module
In the cases where you need to enhance Jetty with a custom functionality, you can write a new Jetty module that provides it.
For example, let’s assume that you need to add a custom auditing component that integrates with the auditing tools used by your company. This custom auditing component should measure the HTTP request processing times and record them (how they are recorded is irrelevant here — could be in a local log file or sent via network to an external service).
The Jetty libraries already provide a way to measure HTTP request processing times via EventsHandler: you write a custom EventsHandler subclass that overrides the methods corresponding to the events you are interested in.
The steps to create a Jetty module are similar to those necessary to modify an existing module:
-
Write the auditing component and package it into a
*.jarfile. -
Write a custom Jetty XML file that wires the auditing component to the
Handlertree. -
Write a custom Jetty module file that puts everything together.
Let’s start with the auditing component, sketched below:
package com.acme.audit;

public class AuditingEventsHandler extends EventsHandler {
    // Auditing is implemented here.
}
Let’s assume that this class is compiled and packaged into acme-audit.jar, and that it has a dependency on acme-util.jar.
Both *.jar files will be put in the $JETTY_BASE/lib/ directory.
Next, let’s write the Jetty XML file that wires the auditing component to the ServerConnector, $JETTY_BASE/etc/acme-audit.xml:
<?xml version="1.0" encoding="UTF-8"?>
<!DOCTYPE Configure PUBLIC "-//Jetty//Configure//EN" "https://eclipse.dev/jetty/configure_10_0.dtd">
<Configure>
  <Ref refid="Server"> (1)
    <Call name="insertHandler"> (2)
      <Arg>
        <New class="com.acme.audit.AuditingEventsHandler"> (3)
          <Set name="someProperty">
            <Property name="com.acme.audit.some.property" default="42" /> (4)
          </Set>
        </New>
      </Arg>
    </Call>
  </Ref>
</Configure>| 1 | Reference Server instance. |
| 2 | Call insertHandler() on the Server so that the auditing component will be inserted just after the Server and just before its child Handler. |
| 3 | Instantiate the auditing component. |
| 4 | Configure the auditing component with a property. |
The last step is to create the custom Jetty module file for the auditing component, $JETTY_BASE/modules/acme-audit.mod:
[description]
Adds ACME auditing to the Jetty Server.

[tags] (1)
acme
audit

[depends] (2)
server

[libs] (3)
lib/acme-audit.jar
lib/acme-util.jar

[xml] (4)
etc/acme-audit.xml

[ini-template] (5)
## An auditing property.
# com.acme.audit.some.property=42
| 1 | The tags that characterize this custom module (see here). |
| 2 | This custom module depends on the standard server module. |
| 3 | The *.jar files that contains the custom auditing component, and its dependencies. |
| 4 | The custom Jetty XML file from above. |
| 5 | The text that will be copied in the acme-audit.ini file when this custom module will be enabled. |
Now you can enable the custom auditing module with the following command issued from the $JETTY_BASE directory:
$ java -jar $JETTY_HOME/start.jar --add-modules=http,acme-auditThe command above will produce the following $JETTY_BASE directory structure:
$JETTY_BASE
├── etc
│   └── acme-audit.xml
├── modules
│   └── acme-audit.mod
├── resources
│   └── jetty-logging.properties
└── start.d
    ├── http.ini
    └── acme-audit.ini
Enabling the custom auditing component will create the $JETTY_BASE/start.d/acme-audit.ini module configuration file that you can edit to configure auditing properties.
Standard Modules
Module alpn
The alpn module enables support for the ALPN negotiation mechanism of the TLS protocol.
You can configure the list of application protocols negotiated by the ALPN mechanism, as well as the default protocol to use if the ALPN negotiation fails (for example, the client does not support ALPN).
The module properties are:
## Specifies the ordered list of application protocols supported by the server.
## The default list is specified by the list of the protocol modules that have
## been enabled, and the order is specified by the module dependencies.
# jetty.alpn.protocols=h2,http/1.1

## Specifies the protocol to use when the ALPN negotiation fails.
# jetty.alpn.defaultProtocol=http/1.1
Module bytebufferpool
The bytebufferpool module allows you to configure the server-wide ByteBuffer pool.
Pooling ByteBuffers results in less memory usage and less pressure on the Garbage Collector.
ByteBuffers are pooled in buckets; each bucket as a capacity that is a multiple of a capacity factor that you can configure.
For example, if a request for a ByteBuffer of capacity 2000 is requested, and the capacity factor is 1024, then the pool will allocate a buffer from the second bucket, of capacity 2048 (1024 * 2).
Applications that need to sustain many concurrent requests — or load spikes — may require many buffers during peak load. These buffers will remain pooled once the system transitions to a lighter load (or becomes idle), and it may be undesirable to retain a lot of memory for an idle system.
It is possible to configure the max heap memory and the max direct memory that the pool retains. Excess buffers will not be pooled and will be eventually garbage collected.
The module file is $JETTY_HOME/modules/bytebufferpool.mod:
[description]
Configures the ByteBufferPool used by ServerConnectors.
The bucket sizes increase linearly.
Use module "bytebufferpool-quadratic" for a pool that holds more coarse sized buffers.

[depends]
logging

[xml]
etc/jetty-bytebufferpool.xml

[ini-template]
## Minimum capacity of a single ByteBuffer.
#jetty.byteBufferPool.minCapacity=0

## Maximum capacity of a single ByteBuffer.
## Requests for ByteBuffers larger than this value results
## in the ByteBuffer being allocated but not pooled.
#jetty.byteBufferPool.maxCapacity=65536

## Bucket capacity factor.
## ByteBuffers are allocated out of buckets that have
## a capacity that is multiple of this factor.
#jetty.byteBufferPool.factor=4096

## Maximum size for each bucket (-1 for unbounded).
#jetty.byteBufferPool.maxBucketSize=-1

## Maximum heap memory held idle by the pool (0 for heuristic, -1 for unlimited).
#jetty.byteBufferPool.maxHeapMemory=0

## Maximum direct memory held idle by the pool (0 for heuristic, -1 for unlimited).
#jetty.byteBufferPool.maxDirectMemory=0

## Whether statistics are enabled.
#jetty.byteBufferPool.statisticsEnabled=false
Among the configurable properties, the most relevant are:
jetty.byteBufferPool.maxHeapMemory-
This property allows you to cap the max heap memory retained by the pool.
jetty.byteBufferPool.maxDirectMemory-
This property allows you to cap the max direct memory retained by the pool.
Module console-capture
The console-capture module captures System.out and System.err output and appends it to a rolling file.
The file is rolled every day at the midnight of the configured timezone.
Old, rolled files are kept for the number of days specified by the jetty.console-capture.retainDays property.
The module properties are:
## Logging directory (relative to $JETTY_BASE).
# jetty.console-capture.dir=./logs

## Whether to append to existing file.
# jetty.console-capture.append=true

## How many days to retain old log files.
# jetty.console-capture.retainDays=90

## Timezone ID of the log timestamps, as specified by java.time.ZoneId.
# jetty.console-capture.timezone=GMT
Module core-deploy
This module enables webapp deployment from the $JETTY_BASE/webapps directory.
Deployment is managed via a DeploymentManager component that watches a directory for changes.
See how to deploy web applications for more information.
TODO
Module cross-origin
The cross-origin module provides support for the CORS protocol implemented by browsers when performing cross-origin requests.
This module installs the CrossOriginHandler in the Handler tree; CrossOriginHandler inspects cross-origin requests and adds the relevant CORS response headers.
CrossOriginHandler should be used when an application performs cross-origin requests to your domain, to protect from cross-site request forgery attacks.
The module properties are:
## Whether cross-origin requests can include credentials such as cookies or authentication headers.
# jetty.crossorigin.allowCredentials=false

## A comma-separated list of headers allowed in cross-origin requests.
# jetty.crossorigin.allowedHeaders=Content-Type

## A comma-separated list of HTTP methods allowed in cross-origin requests.
# jetty.crossorigin.allowedMethods=GET,POST,HEAD

## A comma-separated list of origins regex patterns allowed in cross-origin requests.
# jetty.crossorigin.allowedOriginPatterns=

## A comma-separated list of timing origins regex patterns allowed in cross-origin requests.
# jetty.crossorigin.allowedTimingOriginPatterns=

## Whether preflight requests are delivered to the child Handler of CrossOriginHandler.
# jetty.crossorigin.deliverPreflightRequests=false

## Whether requests whose origin is not allowed are delivered to the child Handler of CrossOriginHandler.
# jetty.crossorigin.deliverNonAllowedOriginRequests=true

## Whether WebSocket upgrade requests whose origin is not allowed are delivered to the child Handler of CrossOriginHandler.
# jetty.crossorigin.deliverNonAllowedOriginWebSocketUpgradeRequests=false

## A comma-separated list of headers allowed in cross-origin responses.
# jetty.crossorigin.exposedHeaders=

## How long the preflight results can be cached by browsers, in seconds.
# jetty.crossorigin.preflightMaxAge=60
You must configure at least the property jetty.crossorigin.allowedOriginPatterns to allow one or more origins.
It is recommended that you consider configuring also the property jetty.crossorigin.allowCredentials.
When set to true, clients send cookies and authentication headers in cross-origin requests to your domain.
When set to false, cookies and authentication headers are not sent.
Module ee{8,9,10}-deploy
This module enables webapp deployment from the $JETTY_BASE/webapps directory.
Deployment is managed via a DeploymentManager component that watches a directory for changes.
See how to deploy web applications for more information.
Adding files or directories to this monitored directory will cause the DeploymentManager to deploy them as web applications; updating files already existing in this monitored directory will cause the DeploymentManager to re-deploy the corresponding web application; removing files in this monitored directory will cause the DeploymentManager to "undeploy" the corresponding web application.
(You can find a more detailed discussion of these rules in the deployment rules section.)
Multiple versions of this module exist (ee{8,9,10}-deploy) to support each Jakarta EE platform’s version of the Java Servlet specification.
Jetty’s configuration properties are nearly identical across these versions; the configuration properties for the ee10-deploy Jetty module are:
## Monitored directory name (relative to $jetty.base)
# jetty.deploy.monitoredDir=webapps

## Defaults Descriptor for all deployed webapps
# jetty.deploy.defaultsDescriptorPath=${jetty.base}/etc/webdefault-ee10.xml

## Monitored directory scan period (seconds)
# jetty.deploy.scanInterval=0

## Whether to extract *.war files
# jetty.deploy.extractWars=true

## Whether to give the parent classloader priority
# jetty.deploy.parentLoaderPriority=true

## Comma separated list of configuration classes to set.
# jetty.deploy.configurationClasses=

## Pattern to select jars from the container classloader to be scanned (or null to scan no jars)
# jetty.deploy.containerScanJarPattern=.*/jakarta.servlet-api-[^/]*\.jar$|.*jakarta.servlet.jsp.jstl-.*\.jar$

## Pattern to select jars from the container classloader to be scanned (or null to scan all jars).
# jetty.deploy.webInfScanJarPattern=

## Pattern to exclude discovered ServletContainerInitializers
# jetty.deploy.servletContainerInitializerExclusionPattern=

## Order of discovered ServletContainerInitializers
# jetty.deploy.servletContainerInitializerOrder=
Among the configurable properties, the most relevant are:
jetty.deploy.monitoredDir-
The name of the monitored directory.
jetty.deploy.scanInterval-
The scan period in seconds, that is how frequently the
DeploymentManagerwakes up to scan the monitored directory for changes. Settingjetty.deploy.scanInterval=0disabled hot deployment so that only static deployment will be possible (see also here for more information).
Module http
The http module provides the clear-text connector and support for the clear-text HTTP/1.1 protocol, and depends on the server module.
The module properties to configure the clear-text connector are:
### Clear-Text HTTP Connector Configuration

## The host/address to bind the connector to.
# jetty.http.host=0.0.0.0

## The port the connector listens on.
# jetty.http.port=8080

## The connector idle timeout, in milliseconds.
# jetty.http.idleTimeout=30000

## The number of acceptors (-1 picks a default value based on number of cores).
# jetty.http.acceptors=1

## The number of selectors (-1 picks a default value based on number of cores).
# jetty.http.selectors=-1

## The ServerSocketChannel accept queue backlog (0 picks the platform default).
# jetty.http.acceptQueueSize=0

## The thread priority delta to give to acceptor threads.
# jetty.http.acceptorPriorityDelta=0

## Whether to enable the SO_REUSEADDR socket option.
# jetty.http.reuseAddress=true

## Whether to enable the SO_REUSEPORT socket option.
# jetty.http.reusePort=false

## Whether to enable the TCP_NODELAY socket option on accepted sockets.
# jetty.http.acceptedTcpNoDelay=true

## The SO_RCVBUF socket option to set on accepted sockets.
## A value of -1 indicates that the platform default is used.
# jetty.http.acceptedReceiveBufferSize=-1

## The SO_SNDBUF socket option to set on accepted sockets.
## A value of -1 indicates that the platform default is used.
# jetty.http.acceptedSendBufferSize=-1
Among the configurable properties, the most relevant are:
jetty.http.port-
The network port that Jetty listens to for clear-text HTTP/1.1 connections — default
8080. jetty.http.idleTimeout-
The amount of time a connection can be idle (i.e. no bytes received and no bytes sent) until the server decides to close it to save resources — default
30seconds. jetty.http.acceptors-
The number of threads that compete to accept connections — default 1. Use -1 to let the accept heuristic decides the value; the current heuristic calculates a value based on the number of cores). Refer to this section for more information about acceptor threads.
jetty.http.selectors-
The number of NIO selectors (with an associated thread) that manage connections — default -1 (i.e. a select heuristic decides the value; the current heuristic calculates a value based on the number of cores).
Configuration of Acceptors
Accepting connections from remote clients may be configured as a blocking operation, or a non-blocking operation.
When accepting connections is configured as a blocking operation (the number of acceptors is greater than zero), a thread is blocked in the accept() call until a connection is accepted, and other acceptor threads (if any) are blocked on the lock acquired by the accepting thread just before the accept() call.
When the accepting thread accepts a connection, it performs a little processing of the just accepted connection, before forwarding it to other components.
During this little processing other connections may be established; if there is only one accepting thread, the newly established connections are waiting for the accepting thread to finish the processing of the previously accepted connection and call again accept().
Servers that manage a very high number of connections that may (naturally) come and go, or that handle inefficient protocols that open and close connections very frequently (such as HTTP/1.0) may benefit of an increased number of acceptor threads, so that when one acceptor thread processes a just accepted connection, another acceptor thread can immediately take over accepting connections.
When accepting connections is configured as a non-blocking operation (the number of acceptors is zero), then the server socket is set in non-blocking mode and added to a NIO selector. In this way, no dedicated acceptor threads exist: the work of accepting connections is performed by the selector thread.
Configuration of Selectors
Performing a NIO select() call is a blocking operation, where the selecting thread is blocked in the select() call until at least one connection is ready to be processed for an I/O operation.
There are 4 I/O operations: ready to be accepted, ready to be connected, ready to be read and ready to be written.
A single NIO selector can manage thousands of connections, with the assumption that not many of them will be ready at the same time.
For a single NIO selector, the ratio between the average number of selected connections over the total number of connections for every select() call depends heavily on the protocol but also on the application.
Multiplexed TCP protocols such as HTTP/2 tend to be busier than duplex protocols such as HTTP/1.1, leading to a higher ratio.
REST applications that exchange many little JSON messages tend to be busier than file server applications, leading to a higher ratio.
The higher the ratio, the higher the number of selectors you want to have, compatibly with the number of cores — there is no point in having 64 selector threads on a single core hardware.
Module http2
The http2 module enables support for the secure HTTP/2 protocol.
The module properties are:
## Specifies the maximum number of concurrent requests per session.
# jetty.http2.maxConcurrentStreams=128

## Specifies the initial stream receive window (client to server) in bytes.
# jetty.http2.initialStreamRecvWindow=524288

## Specifies the initial session receive window (client to server) in bytes.
# jetty.http2.initialSessionRecvWindow=1048576

## Specifies the maximum number of keys in all SETTINGS frames received by a session.
# jetty.http2.maxSettingsKeys=64

## Specifies the maximum number of bad frames and pings per second,
## after which a session is closed to avoid denial of service attacks.
# jetty.http2.rateControl.maxEventsPerSecond=50
The jetty.http2.rateControl.maxEventsPerSecond property controls the number of "bad" or "unnecessary" frames that a client may send before the server closes the connection (with code ENHANCE_YOUR_CALM) to avoid a denial of service.
For example, an attacker may send empty SETTINGS frames to a server in a tight loop.
While the SETTINGS frames don’t change the server configuration and each of them is somehow harmless, the server will be very busy processing them because they are sent by the attacker one after the other, causing a CPU spike and eventually a denial of service (as all CPUs will be busy processing empty SETTINGS frames).
The same attack may be performed with PRIORITY frames, empty DATA frames, PING frames, etc.
Module http2c
The http2c module enables support for the clear-text HTTP/2 protocol.
The module properties are:
## Specifies the maximum number of concurrent requests per session.
# jetty.http2c.maxConcurrentStreams=128

## Specifies the initial stream receive window (client to server) in bytes.
# jetty.http2c.initialStreamRecvWindow=524288

## Specifies the initial session receive window (client to server) in bytes.
# jetty.http2c.initialSessionRecvWindow=1232896

## Specifies the maximum number of keys in all SETTINGS frames received by a session.
# jetty.http2c.maxSettingsKeys=64

## Specifies the maximum number of bad frames and pings per second,
## after which a session is closed to avoid denial of service attacks.
# jetty.http2c.rateControl.maxEventsPerSecond=50
The jetty.http2.rateControl.maxEventsPerSecond property controls the number of "bad" or "unnecessary" frames that a client may send before the server closes the connection (with code ENHANCE_YOUR_CALM) to avoid a denial of service.
For example, an attacker may send empty SETTINGS frames to a server in a tight loop.
While the SETTINGS frames don’t change the server configuration and each of them is somehow harmless, the server will be very busy processing them because they are sent by the attacker one after the other, causing a CPU spike and eventually a denial of service (as all CPUs will be busy processing empty SETTINGS frames).
The same attack may be performed with PRIORITY frames, empty DATA frames, PING frames, etc.
Module http3
The http3 module enables support for the HTTP/3 protocol.
The module properties are:
## The host/address to bind the connector to.
# jetty.quic.host=0.0.0.0

## The port the connector listens on.
# jetty.quic.port=8444

## The connector idle timeout, in milliseconds.
# jetty.quic.idleTimeout=30000

## Specifies the maximum number of concurrent requests per session.
# jetty.quic.maxBidirectionalRemoteStreams=128

## Specifies the session receive window (client to server) in bytes.
# jetty.quic.sessionRecvWindow=4194304

## Specifies the stream receive window (client to server) in bytes.
# jetty.quic.bidirectionalStreamRecvWindow=2097152

## Specifies the stream idle timeout, in milliseconds.
# jetty.http3.streamIdleTimeout=30000
Module http-forwarded
The http-forwarded module provides support for processing the Forwarded HTTP header (defined in RFC 7239) and the now obsoleted X-Forwarded-* HTTP headers.
The module properties are:
### ForwardedRequestCustomizer Configuration

## Whether to process only the RFC7239 "Forwarded" header.
## "X-Forwarded-*" headers are not processed.
# jetty.httpConfig.forwardedOnly=false

## Whether the address obtained from "Forwarded: by=" or
## "X-Forwarded-Server" is used in the request authority.
# jetty.httpConfig.forwardedProxyAsAuthority=false

## Whether the "X-Forwarded-Port" header is used in the request authority,
## or else it is the remote client port.
# jetty.httpConfig.forwardedPortAsAuthority=true

## The name of the RFC 7239 HTTP header.
# jetty.httpConfig.forwardedHeader=Forwarded

## The name of the obsolete forwarded host HTTP header.
# jetty.httpConfig.forwardedHostHeader=X-Forwarded-Host

## The name of the obsolete forwarded server HTTP header.
# jetty.httpConfig.forwardedServerHeader=X-Forwarded-Server

## The name of the obsolete forwarded scheme HTTP header.
# jetty.httpConfig.forwardedProtoHeader=X-Forwarded-Proto

## The name of the obsolete forwarded for HTTP header.
# jetty.httpConfig.forwardedForHeader=X-Forwarded-For

## The name of the obsolete forwarded port HTTP header.
# jetty.httpConfig.forwardedPortHeader=X-Forwarded-Port

## The name of the obsolete forwarded https HTTP header.
# jetty.httpConfig.forwardedHttpsHeader=X-Proxied-Https

## The name of the obsolete forwarded SSL session ID HTTP header.
# jetty.httpConfig.forwardedSslSessionIdHeader=Proxy-ssl-id

## The name of the obsolete forwarded SSL cipher HTTP header.
# jetty.httpConfig.forwardedCipherSuiteHeader=Proxy-auth-cert
Module https
The https module provides the HTTP/1.1 protocol to the ssl module.
The module file is $JETTY_HOME/modules/https.mod:
# DO NOT EDIT THIS FILE - See: https://eclipse.dev/jetty/documentation/

[description]
Adds HTTPS protocol support to the TLS(SSL) Connector.

[tags]
connector
https
http
ssl

[depend]
ssl

[after]
alpn
http2
http-forwarded

[xml]
etc/jetty-https.xml
Module jmx
This module enables deployment of Java Servlet web applications.
This configuration is useful for local development and testing.
If you need to enable remote access, use the jmx-remote module.
Module jmx-remote
The jmx-remote module provides remote access to JMX clients.
The module properties to configure remote JMX connector are:
## The host/address to bind the RMI server to.
# jetty.jmxremote.rmiserverhost=localhost

## The port the RMI server listens to (0 means a random port is chosen).
# jetty.jmxremote.rmiserverport=1099

## The host/address to bind the RMI registry to.
# jetty.jmxremote.rmiregistryhost=localhost

## The port the RMI registry listens to.
# jetty.jmxremote.rmiregistryport=1099

## The host name exported in the RMI stub.
-Djava.rmi.server.hostname=localhost
The system property java.rmi.server.hostname is specified with the usual notation, prepending a -D in front of the system property name.
The system property java.rmi.server.hostname is uncommented because it is necessary in the default configuration — most systems do not have the local name resolution configured properly for remote access.
As an example, in a Linux machine named beryl, the /etc/hosts file may contain these entries:
127.0.0.1 localhost
127.0.1.1 beryl
If the system property java.rmi.server.hostname is not specified, the RMI implementation uses the host name beryl to figure out the IP address to store in the RMI stub, in this case 127.0.1.1.
However, we the RMI server is configured to bind to localhost, i.e. 127.0.0.1.
If the system property java.rmi.server.hostname is not specified, the RMI client will try to connect to 127.0.1.1 (because that’s what in the RMI stub) and fail because nothing is listening on that address.
Module requestlog
The requestlog module provides HTTP request/response logging in the standard NCSA format, or in a custom format of your choice.
The module properties are:
## Format string
# jetty.requestlog.formatString=%{client}a - %u %{dd/MMM/yyyy:HH:mm:ss ZZZ|GMT}t "%r" %s %O "%{Referer}i" "%{User-Agent}i"

## Logging directory (relative to $jetty.base)
# jetty.requestlog.dir=logs

## File path
# jetty.requestlog.filePath=${jetty.requestlog.dir}/yyyy_mm_dd.request.log

## Date format for rollovered files (uses SimpleDateFormat syntax)
# jetty.requestlog.filenameDateFormat=yyyy_MM_dd

## How many days to retain old log files
# jetty.requestlog.retainDays=90

## Whether to append to existing file
# jetty.requestlog.append=false

## Timezone of the log file rollover
# jetty.requestlog.timezone=GMT
The property jetty.requestlog.formatString can be customized using format codes.
Format codes are specified with the syntax %MODIFIERS{PARAM}CODE as follows:
MODIFIERS-
Optional list of comma separated HTTP status codes which may be preceded by a single "!" to indicate negation. If the status code is not in the list the literal string "-" will be logged instead of the resulting value from the percent code.
{PARAM}-
Parameter string which may be optional depending on the percent code used.
CODE-
A one or two character code specified by the table of format codes below.
| Format String | Description |
|---|---|
X |
The X character. |
%% |
The percent character. |
%{format}a |
The address or host name. Valid format values are: "server", "client", "local", "remote". The format parameter is optional and defaults to "server". Values "server" and "client" are the logical addresses which can be modified in the request headers, while "local" and "remote" are the physical addresses so may be the addresses of a proxy between the end-user and the server. |
%{format}p |
The port. Valid format values are: "server", "client", "local", "remote". The format parameter is optional and defaults to "server". Values "server" and "client" are the logical ports which can be modified in the request headers, while "local" and "remote" are the physical ports so may be the ports of a proxy between the end-user and the server. |
%{CLF}I |
The size of request in bytes, excluding HTTP headers. The parameter is optional.
When the parameter value is "CLF" the Common Log Format is used, i.e. a |
%{CLF}O |
The size of response in bytes, excluding HTTP headers. The parameter is optional.
When the parameter value is "CLF" the Common Log Format is used, i.e. a |
%{CLF}S |
The bytes transferred (received and sent). This is the combination of The parameter is optional.
When the parameter value is "CLF" the Common Log Format is used, i.e. a |
%{VARNAME}C |
The value of the request cookie VARNAME. The parameter is optional. Only version 0 cookies are fully supported. When the parameter is missing, all request cookies will be logged. |
%D |
The time taken to serve the request, in microseconds. |
%{VARNAME}e |
The value of the environment variable VARNAME. |
%f |
The file system path of the requested resource. |
%H |
The name and version of the request protocol, such as "HTTP/1.1". |
%{VARNAME}i |
The value of the VARNAME request header. |
%k |
The number of requests handled on a connection. The initial request on a connection yields a value 0, the first request after the initial on the same connection yields the value 1, the second request on the same connection yields the value 2, etc. |
%m |
The HTTP request method. |
%{VARNAME}o |
The value of the VARNAME response header. |
%q |
The query string, prepended with a ? if a query string exists, otherwise an empty string. |
%r |
First line of an HTTP/1.1 request (or equivalent information for HTTP/2 or later). |
%R |
The name of the Handler or Servlet generating the response (if any). |
%s |
The HTTP response status code. |
%{format|timeZone|locale}t |
The time at which the request was received. The parameter is optional and may have the following values: {format}, {format|timeZone} or {format|timeZone|locale}.
|
%{UNIT}T |
The time taken to serve the request. The parameter UNIT is optional and defaults to "s".
The parameter UNIT indicates the unit of time: "s" for seconds, "ms" for milliseconds, "us" for microseconds.
|
%{d}u |
The remote user if the request was authenticated with servlet authentication. May be an invalid value if response status code ( The parameter is optional. When the parameter value is "d", deferred authentication will also be checked. |
%U |
The URL path requested, not including any query string. |
%X |
The connection status when response is completed:
|
%{VARNAME}ti |
The value of the VARNAME request trailer. |
%{VARNAME}to |
The value of the VARNAME response trailer. |
Module resources
This module adds the $JETTY_BASE/resources directory to the server’s classpath.
A common use-case for this module is to provide resources for third-party libraries via the server classpath. For instance, many logging libraries (including Log4j2 and Logback) look for their configuration files on the classpath.
Jetty provides a logging library implementation — enabled via the logging-jetty module — whose configuration file is $JETTY_BASE/resources/jetty-logging.properties.
Module server
The server module provides generic server support, and configures generic HTTP properties that apply to all HTTP protocols, the scheduler properties and the server specific properties.
The server module depends on the threadpool module, the bytebufferpool module and the logging module.
|
The See also the protocols section for more information about the supported protocols. |
HTTP Configuration Properties
The module properties to configure generic HTTP properties are listed below. Mostly they frequently apply to HTTP/1, HTTP/2 and HTTP/3, but some parameters are version specific:
### Common HTTP configuration
## Scheme to use to build URIs for secure redirects
# jetty.httpConfig.secureScheme=https

## Port to use to build URIs for secure redirects
# jetty.httpConfig.securePort=8443

## Response content buffer size (in bytes)
# jetty.httpConfig.outputBufferSize=32768

## Max response content write length that is buffered (in bytes)
# jetty.httpConfig.outputAggregationSize=8192

## If HTTP/1.x persistent connections should be enabled
# jetty.httpConfig.persistentConnectionsEnabled=true

## Max request headers size (in bytes)
# jetty.httpConfig.requestHeaderSize=8192

## Max response headers size (in bytes)
# jetty.httpConfig.responseHeaderSize=8192

## Whether to send the Server: header
# jetty.httpConfig.sendServerVersion=true

## Whether to send the Date: header
# jetty.httpConfig.sendDateHeader=false

## Max per-connection header cache size (in nodes)
# jetty.httpConfig.headerCacheSize=1024

## Whether, for requests with content, delay dispatch until some content has arrived
# jetty.httpConfig.delayDispatchUntilContent=true

## Maximum number of error dispatches to prevent looping
# jetty.httpConfig.maxErrorDispatches=10

## Relative Redirect Locations allowed
# jetty.httpConfig.relativeRedirectAllowed=true

## Whether to use direct ByteBuffers for reading or writing
# jetty.httpConfig.useInputDirectByteBuffers=true
# jetty.httpConfig.useOutputDirectByteBuffers=true
Among the configurable properties, the most relevant are:
jetty.httpConfig.headerCacheSize-
The header cache is used when parsing HTTP/1 to more efficiently handle fields that are repeated in every request on a connection. If the server does not receive persistent connection or infrequent repeated fields, then there may be a performance gain in reducing the cache size. If large fields are frequently repeated, then a large cache may be beneficial.
jetty.httpConfig.delayDispatchUntilContent-
It is not uncommon for the network packets containing a request header to arrive before packets that contain the data of any request body. In such cases it may be beneficial for overall performance to delay dispatching the request to be handled until the first data packet arrives, as this may avoid blocking the handling thread. However, if minimum latency for receiving the request without content is important, then this parameter can be set to false.
jetty.httpConfig.sendServerVersion-
Whether you want to send the
Serverheader in every HTTP response:HTTP/1.1 200 OK Content-Length: 0 Server: Jetty(12.0.9-SNAPSHOT)
Server Configuration Properties
The module properties to configure the Jetty server are:
### Server configuration
## Whether ctrl+c on the console gracefully stops the Jetty server
# jetty.server.stopAtShutdown=true

## Timeout in ms to apply when stopping the server gracefully
# jetty.server.stopTimeout=5000

## Dump the state of the Jetty server, components, and webapps after startup
# jetty.server.dumpAfterStart=false

## The temporary directory used by the Jetty server and as a root for its contexts
# jetty.server.tempDirectory=

## Dump the state of the Jetty server, components, and webapps before shutdown
# jetty.server.dumpBeforeStop=false
Among the configurable properties, the most relevant are:
jetty.server.dumpAfterStart-
Whether to perform a
Server.dump()operation after theServerhas started. The output of the dump operation is sent toSystem.err. See also the Jetty Server Dump section for more information. jetty.server.dumpBeforeStop-
Whether to perform a
Server.dump()operation before theServerstops. The output of the dump operation is sent toSystem.err. See also the Jetty Server Dump section for more information. jetty.server.stopAtShutdown-
Whether to call
Server.stop()through a JVM shutdown hook when the JVM exits.
Server Compliance Properties
The Jetty server strives to keep up with the latest IETF RFCs for compliance with internet specifications, which are periodically updated. When possible, Jetty will support backwards compatibility by providing compliance modes that can be configured to allow violations of the current specifications that may have been allowed in obsoleted specifications. The module properties to configure the Jetty server compliance are:
## HTTP Compliance: RFC7230, RFC7230_LEGACY, RFC2616, RFC2616_LEGACY, LEGACY
# jetty.httpConfig.compliance=RFC7230

## URI Compliance: DEFAULT, LEGACY, RFC3986, RFC3986_UNAMBIGUOUS, UNSAFE
# jetty.httpConfig.uriCompliance=DEFAULT

## Cookie compliance mode for parsing request Cookie headers: RFC6265_STRICT, RFC6265, RFC6265_LEGACY, RFC2965, RFC2965_LEGACY
# jetty.httpConfig.requestCookieCompliance=RFC6265

## Cookie compliance mode for generating response Set-Cookie: RFC2965, RFC6265
# jetty.httpConfig.responseCookieCompliance=RFC6265
Among the configurable properties, the most relevant are:
jetty.httpConfig.compliance-
Configures the compliance to HTTP specifications. The value could be:
-
One of the predefined
HttpComplianceconstants, such asRFC7230orRFC2616. For example:jetty.httpConfig.compliance=RFC2616. -
A comma-separated list of violations to allow or forbid, as specified by the
HttpCompliance.from(String)method. For example,jetty.httpConfig.compliance=RFC7230,MULTIPLE_CONTENT_LENGTHSmeans that the HTTP compliance is that defined byRFC7230, but also allows theHttpCompliance.Violation.MULTIPLE_CONTENT_LENGTHS, so that requests that have multipleContent-Lengthheaders are accepted (they would be rejected when using justHttpCompliance.RFC7230).For more information about
HttpCompliancesee also this section.
-
jetty.httpConfig.uriCompliance-
Configures the compliance to URI specifications. The value could be:
-
One of the predefined
UriComplianceconstants, such asDEFAULTorRFC3986. For example:jetty.httpConfig.compliance=RFC3986. -
A comma-separated list of violations to allow or forbid, as specified by the
UriCompliance.from(String)method. For example,jetty.httpConfig.uriCompliance=RFC3986,-AMBIGUOUS_PATH_SEPARATORmeans that the URI compliance is that defined byRFC3986, but also does not allow theUriCompliance.Violation.AMBIGUOUS_PATH_SEPARATOR, so that requests that have URIs such as/foo/bar%2Fbaz(where%2Fis the URL-encoded/character) are rejected (they would be accepted when using justUriCompliance.RFC3986).For more information about
UriCompliancesee also this section.
-
jetty.httpConfig.requestCookieCompliancejetty.httpConfig.responseCookieCompliance-
Configures the compliance to HTTP cookie specifications. The value could be:
-
One of the predefined
CookieComplianceconstants, such asRFC6265. For example:jetty.httpConfig.compliance=RFC6265. -
A comma-separated list of violations to allow or forbid, as specified by the
CookieCompliance.from(String)method. For example,jetty.httpConfig.requestCookieCompliance=RFC6265,-RESERVED_NAMES_NOT_DOLLAR_PREFIXEDmeans that the cookie compliance is that defined byRFC6265, but also does not allow theCookieCompliance.Violation.RESERVED_NAMES_NOT_DOLLAR_PREFIXED, so that requests that have cookie headers such asCookie: $foo=barare rejected (they would be accepted when using justCookieCompliance.RFC6265).For more information about
CookieCompliancesee also this section.
-
Server Scheduler Configuration Properties
The module properties to configure the Jetty server scheduler are:
### Server Scheduler Configuration
## The scheduler thread name, defaults to "Scheduler-{hashCode()}" if blank.
# jetty.scheduler.name=

## Whether the server scheduler threads are daemon.
# jetty.scheduler.daemon=false

## The number of server scheduler threads.
# jetty.scheduler.threads=1
Module ssl
The ssl module provides the secure connector, and allows you to configure the KeyStore properties and the TLS parameters, and depends on the server module.
Secure Connector Properties
The module properties to configure the secure connector are:
### TLS (SSL) Connector Configuration

## The host/address to bind the connector to.
# jetty.ssl.host=0.0.0.0

## The port the connector listens on.
# jetty.ssl.port=8443

## The connector idle timeout, in milliseconds.
# jetty.ssl.idleTimeout=30000

## The number of acceptors (-1 picks a default value based on number of cores).
# jetty.ssl.acceptors=1

## The number of selectors (-1 picks a default value based on number of cores).
# jetty.ssl.selectors=-1

## The ServerSocketChannel accept queue backlog (0 picks the platform default).
# jetty.ssl.acceptQueueSize=0

## The thread priority delta to give to acceptor threads.
# jetty.ssl.acceptorPriorityDelta=0

## Whether to enable the SO_REUSEADDR socket option.
# jetty.ssl.reuseAddress=true

## Whether to enable the SO_REUSEPORT socket option.
# jetty.ssl.reusePort=false

## Whether to enable the TCP_NODELAY socket option on accepted sockets.
# jetty.ssl.acceptedTcpNoDelay=true

## The SO_RCVBUF socket option to set on accepted sockets.
## A value of -1 indicates that the platform default is used.
# jetty.ssl.acceptedReceiveBufferSize=-1

## The SO_SNDBUF socket option to set on accepted sockets.
## A value of -1 indicates that the platform default is used.
# jetty.ssl.acceptedSendBufferSize=-1

## Whether client SNI data is required for all secure connections.
## When SNI is required, clients that do not send SNI data are rejected with an HTTP 400 response.
# jetty.ssl.sniRequired=false

## Whether client SNI data is checked to match CN and SAN in server certificates.
## When SNI is checked, if the match fails the connection is rejected with an HTTP 400 response.
# jetty.ssl.sniHostCheck=true

## The max age, in seconds, for the Strict-Transport-Security response header.
# jetty.ssl.stsMaxAgeSeconds=31536000

## Whether to include the subdomain property in any Strict-Transport-Security header.
# jetty.ssl.stsIncludeSubdomains=true
Among the configurable properties, the most relevant are:
jetty.ssl.port-
The network port that Jetty listens to for secure connections — default
8443. jetty.ssl.idleTimeout-
The amount of time a connection can be idle (i.e. no bytes received and no bytes sent) until the server decides to close it to save resources — default
30000milliseconds. jetty.ssl.acceptors-
The number of threads that compete to accept connections — default 1. Use -1 to let the accept heuristic decides the value; the current heuristic calculates a value based on the number of cores). Refer to this section for more information about acceptor threads.
jetty.ssl.selectors-
The number of NIO selectors (with an associated thread) that manage connections — default -1 (i.e. a select heuristic decides the value; the current heuristic calculates a value based on the number of cores). Refer to this section for more information about selector threads.
The module properties to configure the KeyStore and TLS parameters are:
### SslContextFactory Configuration
## Note that OBF passwords are not secure, just protected from casual observation.

## Whether client SNI data is required for all secure connections.
## When SNI is required, clients that do not send SNI data are rejected with a TLS handshake error.
# jetty.sslContext.sniRequired=false

## The Endpoint Identification Algorithm.
## Same as javax.net.ssl.SSLParameters#setEndpointIdentificationAlgorithm(String).
# jetty.sslContext.endpointIdentificationAlgorithm=

## The JSSE Provider.
# jetty.sslContext.provider=

## The KeyStore file path, either an absolute path or a relative path to $JETTY_BASE.
# jetty.sslContext.keyStorePath=etc/keystore.p12

## The TrustStore file path, either an absolute path or a relative path to $JETTY_BASE.
# jetty.sslContext.trustStorePath=etc/keystore.p12

## The KeyStore password.
# jetty.sslContext.keyStorePassword=

## The Keystore type.
# jetty.sslContext.keyStoreType=PKCS12

## The KeyStore provider.
# jetty.sslContext.keyStoreProvider=

## The KeyManager password.
# jetty.sslContext.keyManagerPassword=

## The TrustStore password.
# jetty.sslContext.trustStorePassword=

## The TrustStore type.
# jetty.sslContext.trustStoreType=PKCS12

## The TrustStore provider.
# jetty.sslContext.trustStoreProvider=

## Whether client certificate authentication is required.
# jetty.sslContext.needClientAuth=false

## Whether client certificate authentication is desired, but not required.
# jetty.sslContext.wantClientAuth=false

## Whether cipher order is significant.
# jetty.sslContext.useCipherSuitesOrder=true

## The SSLSession cache size.
# jetty.sslContext.sslSessionCacheSize=-1

## The SSLSession cache timeout (in seconds).
# jetty.sslContext.sslSessionTimeout=-1

## Whether TLS renegotiation is allowed.
# jetty.sslContext.renegotiationAllowed=true

## The max number of TLS renegotiations per connection.
# jetty.sslContext.renegotiationLimit=5
KeyStore Properties and TLS Properties
Among the configurable properties, the most relevant are:
jetty.sslContext.keyStorePath-
The KeyStore path on the file system, either an absolute path or a relative path to
$JETTY_BASE— defaults to$JETTY_BASE/etc/keystore.p12. jetty.sslContext.keyStorePassword-
The KeyStore password, which you want to explicitly configure. The password may be obfuscated with the Jetty Password tool.
If you need to configure client certificate authentication, you want to configure one of these properties (they are mutually exclusive):
jetty.sslContext.needClientAuth-
Whether client certificate authentication should be required.
jetty.sslContext.wantClientAuth-
Whether client certificate authentication should be requested.
If you configure client certificate authentication, you need to configure and distribute a client KeyStore as explained in this section.
Module ssl-reload
The ssl-reload module provides a periodic scanning of the directory where the KeyStore file resides.
When the scanning detects a change to the KeyStore file, the correspondent SslContextFactory.Server component is reloaded with the new KeyStore configuration.
The module properties are:
# Monitored directory scan period, in seconds.
# jetty.sslContext.reload.scanInterval=1
Module test-keystore
The test-keystore module creates on-the-fly a KeyStore containing a self-signed certificate for domain localhost.
The KeyStore file is automatically deleted when the JVM exits, and re-created when you restart Jetty, to enforce the fact that it is a test KeyStore that should not be reused if not for testing.
The module file is $JETTY_HOME/modules/test-keystore.mod:
[description]
Test keystore with self-signed SSL Certificate.
DO NOT USE IN PRODUCTION!!!

[tags]
demo
ssl

[before]
ssl

[files]
maven://org.bouncycastle/bcpkix-jdk15to18/${bouncycastle.version}|lib/bouncycastle/bcpkix-jdk15to18-${bouncycastle.version}.jar
maven://org.bouncycastle/bcprov-jdk15to18/${bouncycastle.version}|lib/bouncycastle/bcprov-jdk15to18-${bouncycastle.version}.jar
maven://org.bouncycastle/bcutil-jdk15to18/${bouncycastle.version}|lib/bouncycastle/bcutil-jdk15to18-${bouncycastle.version}.jar

[lib]
lib/jetty-keystore-${jetty.version}.jar
lib/bouncycastle/bcpkix-jdk15to18-${bouncycastle.version}.jar
lib/bouncycastle/bcprov-jdk15to18-${bouncycastle.version}.jar
lib/bouncycastle/bcutil-jdk15to18-${bouncycastle.version}.jar

[xml]
etc/jetty-test-keystore.xml

[ini]
bouncycastle.version?=1.77
jetty.webapp.addHiddenClasses+=,${jetty.base.uri}/lib/bouncycastle/
jetty.sslContext.keyStorePath?=etc/test-keystore.p12
jetty.sslContext.keyStoreType?=PKCS12
jetty.sslContext.keyStorePassword?=OBF:1vny1zlo1x8e1vnw1vn61x8g1zlu1vn4
Note how properties jetty.sslContext.keyStorePath and jetty.sslContext.keyStorePassword are configured, only if not already set (via the ?= operator), directly in the module file, rather than in a *.ini file.
This is done to avoid that these properties accidentally overwrite a real KeyStore configuration.
Module threadpool
The threadpool module allows you to configure the server-wide thread pool.
The thread pool creates threads on demand up to maxThreads, and idles them out if they are not used.
Since Jetty uses the thread pool internally to execute critical tasks, it is not recommended to constrain the thread pool to small values of maxThreads with the purpose of limiting HTTP request concurrency, as this could very likely cause a server lockup when Jetty needs to run a critical task but there are no threads available.
Start with the default value of maxThreads, and tune for larger values if needed.
The module properties to configure the thread pool are:
## Thread name prefix.
#jetty.threadPool.namePrefix=qtp<hashCode>

## Minimum number of pooled threads.
#jetty.threadPool.minThreads=10

## Maximum number of pooled threads.
#jetty.threadPool.maxThreads=200

## Number of reserved threads (-1 for heuristic).
#jetty.threadPool.reservedThreads=-1

## Whether to use virtual threads, if the runtime supports them.
## Deprecated, use Jetty module 'threadpool-virtual' instead.
#jetty.threadPool.useVirtualThreads=false

## Thread idle timeout (in milliseconds).
#jetty.threadPool.idleTimeout=60000

## The max number of idle threads that are evicted in one idleTimeout period.
#jetty.threadPool.maxEvictCount=1

## Whether to output a detailed dump.
#jetty.threadPool.detailedDump=false
Among the configurable properties, the most relevant are:
jetty.threadPool.namePrefix-
The name prefix to use for the thread names.
jetty.threadPool.detailedDump-
Whether the thread pool should dump the whole stack trace of each thread, or just the topmost stack frame — defaults to
false. jetty.threadPool.idleTimeout-
The time, in milliseconds, after which an idle thread is released from the pool — defaults to 60000, i.e. 60 seconds.
jetty.threadPool.maxThreads-
The max number of threads pooled by the thread pool — defaults to 200.
If you want to use virtual threads, introduced as a preview feature in Java 19 and Java 20, and become an official feature since Java 21, use the following modules:
-
The
threadpool-virtualJetty module for Java 21 or later. -
The
threadpool-virtual-previewJetty module for Java 19 and Java 20.
See also the section about configuring the thread pool.
Module threadpool-virtual
The threadpool-virtual module allows you to configure the server-wide thread pool, similarly to what you can do with the threadpool Jetty module, but also specify to use virtual threads, introduced as an official feature since Java 21.
Only use this module if you are using Java 21 or later.
If you are using Java 19 or Java 20, use the threadpool-virtual-preview Jetty module instead.
|
Refer to the threadpool Jetty module for the general features provided by that Jetty module that also this Jetty module provides.
The module properties to configure the thread pool are:
## Platform threads name prefix.
#jetty.threadPool.namePrefix=qtp<hashCode>

## Minimum number of pooled threads.
#jetty.threadPool.minThreads=10

## Maximum number of pooled threads.
#jetty.threadPool.maxThreads=200

## Number of reserved threads (-1 for heuristic).
#jetty.threadPool.reservedThreads=-1

## Thread idle timeout (in milliseconds).
#jetty.threadPool.idleTimeout=60000

## The max number of idle threads that can be evicted in one idleTimeout period.
#jetty.threadPool.maxEvictCount=1

## Whether to output a detailed dump.
#jetty.threadPool.detailedDump=false

## Virtual threads name prefix.
#jetty.threadPool.virtual.namePrefix=qtp<hashCode>-virtual-

## Whether virtual threads inherits the values of inheritable thread locals.
#jetty.threadPool.virtual.inheritInheritableThreadLocals=true
The specific properties to configure virtual threads are:
jetty.threadPool.virtual.namePrefix-
The name prefix to use for the virtual thread names.
jetty.threadPool.virtual.inheritInheritableThreadLocals-
Whether virtual threads inherit the values of
InheritableThreadLocalvariables.
Module threadpool-virtual-preview
The threadpool-virtual-preview module allows you to configure the server-wide thread pool, similarly to what you can do with the threadpool Jetty module, but also specify to use virtual threads, introduced as a preview feature in Java 19 and in Java 20.
Only use this module if you are using Java 19 or Java 20.
If you are using Java 21 or later, use the threadpool-virtual Jetty module instead.
|
To enable preview features, this module needs to specify the --enable-preview command line option using the [exec] directive, and as such it will fork another JVM.
|
Refer to the threadpool Jetty module for the general features provided by that Jetty module that also this Jetty module provides.
The module properties to configure the thread pool are:
## Platform threads name prefix.
#jetty.threadPool.namePrefix=qtp<hashCode>

## Minimum number of pooled threads.
#jetty.threadPool.minThreads=10

## Maximum number of pooled threads.
#jetty.threadPool.maxThreads=200

## Number of reserved threads (-1 for heuristic).
#jetty.threadPool.reservedThreads=-1

## Thread idle timeout (in milliseconds).
#jetty.threadPool.idleTimeout=60000

## The max number of idle threads that can be evicted in one idleTimeout period.
#jetty.threadPool.maxEvictCount=1

## Whether to output a detailed dump.
#jetty.threadPool.detailedDump=false

## Virtual threads name prefix.
#jetty.threadPool.virtual.namePrefix=qtp<hashCode>-virtual-

## Whether virtual threads are allowed to set thread locals.
#jetty.threadPool.virtual.allowSetThreadLocals=true

## Whether virtual threads inherits the values of inheritable thread locals.
#jetty.threadPool.virtual.inheritInheritableThreadLocals=true
The specific properties to configure virtual threads are:
jetty.threadPool.virtual.namePrefix-
The name prefix to use for the virtual thread names.
jetty.threadPool.virtual.allowSetThreadLocals-
Whether virtual threads are allowed to set thread locals.
jetty.threadPool.virtual.inheritInheritableThreadLocals-
Whether virtual threads inherit the values of
InheritableThreadLocalvariables.
Module ee{8,9,10}-webapp
This module enables deployment of Java Servlet web applications.
Multiple versions of this module exist (ee{8,9,10}-webapp) to support each Jakarta EE platform’s version of the Java Servlet specification.
Jetty’s configuration properties are identical across all versions of this module, and are as follows:
## Add to the environment wide default jars and packages protected or hidden from webapps.
## Protected (aka System) classes cannot be overridden by a webapp.
## Hidden (aka Server) classes cannot be seen by a webapp
## Lists of patterns are comma separated and may be either:
##  + a qualified classname e.g. 'com.acme.Foo'
##  + a package name e.g. 'net.example.'
##  + a jar file e.g. '${jetty.base.uri}/lib/dependency.jar'
##  + a directory of jars,resource or classes e.g. '${jetty.base.uri}/resources'
##  + A pattern preceded with a '-' is an exclusion, all other patterns are inclusions
##
## The +=, operator appends to a CSV list with a comma as needed.
##
#jetty.webapp.addProtectedClasses+=,org.example.
#jetty.webapp.addHiddenClasses+=,org.example.
Module well-known
The well-known Jetty module creates a ResourceHandler deployed at the /.well-known context path which serves files from a directory.
By default, the directory created at $JETTY_BASE/.well-known is used, but it can be configured from well-known.ini to anywhere in the filesystem.
Note that the .well-known directory may be seen as a hidden directory by the filesystem.
The concept of well-known URIs has been defined in RFC5785. This module can be used for things like the automatic renewal of Let’s Encrypt certificates. See IANA Well-Known URIs for more possible examples of how this can be used.
The module properties are:
## Well Known Directory (relative to $JETTY_BASE if relative path, otherwise it is an absolute path).
# jetty.wellknown.dir=.well-known
Web Application Deployment
Most of the time you want to be able to customize the deployment of your web applications, for example by changing the contextPath, or by adding JNDI entries, or by configuring virtual hosts, etc.
Jetty supports the deployment of each web application to a specific environment. The available environments are:
-
Java EE 8 — Supports Servlet 4.0 (and associated specifications) in the
javax.*packages. -
Jakarta EE 9 — Supports Servlet 5.0 (and associated specifications) in the
jakarta.*packages. -
Jakarta EE 10 — Supports Servlet 6.0 (and associated specifications) in the
jakarta.*packages. -
Jetty Core — Supports web applications written against the Jetty
HandlerAPIs, without any Servlet dependencies.
This means that you can simultaneously deploy an old Java EE 8 web application, say old-ee8.war, alongside a new Jakarta EE 10 web application, say new-ee10.war, alongside a web application that only uses the Jetty Handler APIs, say app-jetty.xml.
The customization of the deployment (for example, web application context path, etc.) is performed by processing Jetty context XML files.
The deploy module contains the DeploymentManager component that scans the $JETTY_BASE/webapps directory for changes, following the deployment rules described in this section.
For each specific environment there is a specific deploy module that you must enable:
-
For Java EE 8,
ee8-deploy -
For Java EE 9,
ee9-deploy -
For Java EE 10,
ee10-deploy -
For Jetty Core,
core-deploy
Each of these modules provide the environment specific features, and depend on the deploy module that provides the scanning features.
Hot vs Static Deployment
The DeploymentManager scans the $JETTY_BASE/webapps directory for changes every N seconds, where N is configured via the jetty.deploy.scanInterval property.
By default, the scan interval is 0 seconds, which means static deployment, and the DeploymentManager will not scan the $JETTY_BASE/webapps directory for changes.
This means that to deploy/redeploy/undeploy a web application you will need to stop and restart Jetty.
Setting the scan interval to a value of 1 second (or greater) means that hot deployment is enabled: if a file is added/changed/removed from the $JETTY_BASE/webapps directory, the DeploymentManager will notice the change and respectively deploy/redeploy/undeploy the web application.
The following command line enables hot deployment by specifying the jetty.deploy.scanInterval property on the command line, and therefore only for this particular run:
$ java -jar $JETTY_HOME/start.jar jetty.deploy.scanInterval=1
To make hot deployment persistent, you need to edit the appropriate <env>-deploy module configuration file, $JETTY_BASE/start.d/<env>-deploy.ini (eg: ee10-deploy.ini), uncomment the module property jetty.deploy.scanInterval and change the value to 1 second (or greater):
--module=deploy
jetty.deploy.scanInterval=1
...
Deployment Rules
Adding a *.war file, a *.war directory, a Jetty context XML file or a normal directory to $JETTY_BASE/webapps causes the DeploymentManager to deploy the new web application.
Updating a *.war file or a Jetty context XML file causes the DeploymentManager to redeploy the web application, which means that the Jetty context component representing the web application is stopped, then reconfigured, and then restarted.
Removing a *.war file, a *.war directory, a Jetty context XML file or a normal directory from $JETTY_BASE/webapps causes the DeploymentManager to undeploy the web application, which means that the Jetty context component representing the web application is stopped and removed from the Jetty server.
Context Path Resolution
When a file or directory is added to $JETTY_BASE/webapps, the DeploymentManager derives the web application contextPath from the file or directory name, with the following rules:
-
If the directory name is, for example,
mywebapp/, it is deployed as a standard web application if it contains aWEB-INF/subdirectory, otherwise it is deployed as a web application of static content. ThecontextPathwould be/mywebapp(that is, the web application is reachable athttp://localhost:8080/mywebapp/). -
If the directory name is
ROOT, case-insensitive, thecontextPathis/(that is, the web application is reachable athttp://localhost:8080/). -
If the directory name ends with
.d, for exampleconfig.d/, it is ignored, although it may be referenced to configure other web applications (for example to store common files). -
If the
*.warfile name is, for example,mywebapp.war, it is deployed as a standard web application with the context path/mywebapp(that is, the web application is reachable athttp://localhost:8080/mywebapp/). -
If the file name is
ROOT.war, case-insensitive, thecontextPathis/(that is, the web application is reachable athttp://localhost:8080/). -
If both the
mywebapp.warfile and themywebapp/directory exist, only the file is deployed. This allows the directory with the same name to be the*.warfile unpack location and avoid that the web application is deployed twice. -
A Jetty context XML file named
mywebapp.xmlis deployed as a web application by processing the directives contained in the XML file itself, which must set thecontextPath, which could be different from the name of the XML file. -
If both
mywebapp.xmlandmywebapp.warexist, only the XML file is deployed. This allows the XML file to reference the*.warfile and avoid that the web application is deployed twice.
Environment Resolution
A web application is always deployed to a specific environment, which is either configured for the deployed application or set to the default environment.
If only a single specific deployer module is enabled, for example ee10-deploy, then it is the default environment and applications will be deployed to it without any additional configuration.
If multiple deployer modules are enabled, then the default environment is:
-
The most recent Jakarta EE environment of the
ee{8,9,10}-deploymodules that are enabled. -
Otherwise, the
coreenvironment, if thecore-deploymodule is enabled. -
Otherwise, no deployer environment has been enabled, and therefore no application can be deployed.
For example, if core-deploy, ee9-deploy and the ee10-deploy modules are enabled, then ee10 is the default environment, to which applications will be deployed unless otherwise configured (see below).
To configure a specific environment for an application, you add a *.properties file with the same name of the web application.
For example, an application deployed to $JETTY_BASE/webapps/my-ee9-app.war is configured with the file $JETTY_BASE/webapps/my-ee9-app.properties, with the following content:
environment=ee9In case of simultaneous multiple deployer environments, it is good practice to always specify the *.properties file for your web applications.
|
If you do not specify the For example, if you have enabled the deployer Jetty module for all Jakarta EE versions, and you deploy an EE 9 web application without the This unspecified deployment may not work as the EE 9 web application may use APIs that have been removed in EE 10, causing an error at runtime. |
Deploying Jetty Context XML Files
A Jetty context XML file is a Jetty XML file that allows you to customize the deployment of web applications.
Recall that the DeploymentManager component of the Jetty deploy module gives priority to Jetty context XML files over *.war files or directories.
|
To deploy a web application using a Jetty context XML file, simply place the file in the $JETTY_BASE/webapps directory.
A simple Jetty context XML file, for example named wiki.xml is the following:
<?xml version="1.0" encoding="UTF-8"?>
<!DOCTYPE Configure PUBLIC "-//Jetty//Configure//EN" "https://eclipse.dev/jetty/configure_10_0.dtd">

<Configure class="org.eclipse.jetty.ee10.webapp.WebAppContext"> (1)
  <Set name="contextPath">/wiki</Set> (2)
  <Set name="war">/opt/myapps/myapp.war</Set> (3)
</Configure>| 1 | Configures a WebAppContext, which is the Jetty component that represents a standard Servlet web application. |
| 2 | Specifies the web application contextPath, which may be different from the *.war file name. |
| 3 | Specifies the file system path of the *.war file. |
The Jetty content XML file may be accompanied by a *.properties file that specifies the environment to use for the deployment:
environment=ee10Refer to this section for more information about specifying the environment.
The $JETTY_BASE directory would look like this:
$JETTY_BASE
├── resources
│   └── jetty-logging.properties
├── start.d
│   ├── deploy.ini
│   └── http.ini
└── webapps
    ├── wiki.properties
    └── wiki.xml
The *.war file may be placed anywhere in the file system and does not need to be placed in the $JETTY_BASE/webapps directory.
|
If you place both the Jetty context XML file and the *.war file in the $JETTY_BASE/webapps directory, remember that they must have the same file name, for example wiki.xml and wiki.war, so that the DeploymentManager deploys the web application only once using the Jetty context XML file (and not the *.war file).
|
You can use the features of Jetty XML files to avoid to hard-code file system paths or other configurations in your Jetty context XML files, for example by using system properties:
<?xml version="1.0" encoding="UTF-8"?>
<!DOCTYPE Configure PUBLIC "-//Jetty//Configure//EN" "https://eclipse.dev/jetty/configure_10_0.dtd">

<Configure class="org.eclipse.jetty.ee10.webapp.WebAppContext">
  <Set name="contextPath">/wiki</Set>
  <Set name="war"><SystemProperty name="myapps.dir"/>/myapp.war</Set>
</Configure>
Note how the *.war file path is now obtained by resolving the system property myapps.dir that you can specify on the command line when you start Jetty:
$ java -jar $JETTY_HOME/start.jar -Dmyapps.dir=/opt/myapps
Configuring JNDI Entries
A web application may reference a JNDI entry, such as a JDBC DataSource from the web application web.xml file.
The JNDI entry must be defined in a Jetty XML file, for example a context XML like so:
<?xml version="1.0" encoding="UTF-8"?>
<!DOCTYPE Configure PUBLIC "-//Jetty//Configure//EN" "https://eclipse.dev/jetty/configure_10_0.dtd">

<Configure id="wac" class="org.eclipse.jetty.ee10.webapp.WebAppContext">
  <Set name="contextPath">/mywebapp</Set>
  <Set name="war">/opt/webapps/mywebapp.war</Set>
    <New class="org.eclipse.jetty.plus.jndi.Resource">
    <Arg><Ref refid="wac"/></Arg>
    <Arg>jdbc/myds</Arg>
     <Arg>
        <New class="com.mysql.cj.jdbc.MysqlConnectionPoolDataSource">
           <Set name="url">jdbc:mysql://localhost:3306/databasename</Set>
           <Set name="user">user</Set>
           <Set name="password">password</Set>
        </New>
     </Arg>
  </New>
</Configure>
For more information and examples on how to use JNDI in Jetty, refer to the JNDI feature section.
|
Class If the class is instead present within the web application, then the JNDI entry must be declared in a |
Configuring Virtual Hosts
A virtual host is an internet domain name, registered in the Domain Name Server (DNS), for an IP address such that multiple virtual hosts will resolve to the same IP address of a single server instance.
If you have multiple web applications deployed on the same Jetty server, by using virtual hosts you will be able to target a specific web application.
For example, you may have a web application for your business and a web application for your hobbies , both deployed in the same Jetty server.
By using virtual hosts, you will be able to have the first web application available at http://domain.biz/, and the second web application available at http://hobby.net/.
Another typical case is when you want to use different subdomains for different web application, for example a project website is at http://project.org/ and the project documentation is at http://docs.project.org.
Virtual hosts can be used with any context that is a subclass of ContextHandler.
Virtual Host Names
Jetty supports the following variants to be specified as virtual host names:
www.hostname.com-
A fully qualified domain name. It is important to list all variants as a site may receive traffic for both
www.hostname.comandhostname.com. *.hostname.com-
A wildcard domain name which will match only one level of arbitrary subdomains. *.foo.com will match www.foo.com and m.foo.com, but not www.other.foo.com.
10.0.0.2-
An IP address may be set as a virtual host to indicate that a web application should handle requests received on the network interface with that IP address for protocols that do not indicate a host name such as HTTP/0.9 or HTTP/1.0.
@ConnectorName-
A Jetty server
Connectorname to indicate that a web application should handle requests received on the serverConnectorwith that name, and therefore received on a specific socket address (either an IP port forServerConnector, or a Unix-Domain path forUnixDomainServerConnector). A serverConnectorname can be set via https://eclipse.dev/jetty/javadoc/jetty-12/org/eclipse/jetty/server/AbstractConnector.html#setName(java.lang.String). www.√integral.com-
Non-ASCII and IDN domain names can be set as virtual hosts using Puny Code equivalents that may be obtained from a Punycode/IDN converters. For example if the non-ASCII domain name
www.√integral.comis given to a browser, then the browser will make a request that uses the domain namewww.xn—integral-7g7d.com, which is the name that should be added as the virtual host name.
Virtual Hosts Configuration
If you have a web application mywebapp.war you can configure its virtual hosts in this way:
<?xml version="1.0" encoding="UTF-8"?>
<!DOCTYPE Configure PUBLIC "-//Jetty//Configure//EN" "https://eclipse.dev/jetty/configure_10_0.dtd">

<Configure class="org.eclipse.jetty.ee10.webapp.WebAppContext">
  <Set name="contextPath">/mywebapp</Set>
  <Set name="war">/opt/webapps/mywebapp.war</Set>
  <Set name="virtualHosts">
    <Array type="java.lang.String">
      <Item>mywebapp.com</Item>
      <Item>www.mywebapp.com</Item>
      <Item>mywebapp.net</Item>
      <Item>www.mywebapp.net</Item>
    </Array>
  </Set>
</Configure>
Your web application will be available at:
-
http://mywebapp.com/mywebapp -
http://www.mywebapp.com/mywebapp -
http://mywebapp.net/mywebapp -
http://www.mywebapp.net/mywebapp
|
You configured the As such, a request to Likewise, a request to |
Same Context Path, Different Virtual Hosts
If you want to deploy different web applications to the same context path, typically the root context path /, you must use virtual hosts to differentiate among web applications.
You have domain.war that you want to deploy at http://domain.biz/ and hobby.war that you want to deploy at http://hobby.net.
To achieve this, you simply use the same context path of / for each of your webapps, while specifying different virtual hosts for each of your webapps:
<?xml version="1.0" encoding="UTF-8"?>
<!DOCTYPE Configure PUBLIC "-//Jetty//Configure//EN" "https://eclipse.dev/jetty/configure_10_0.dtd">

<Configure class="org.eclipse.jetty.ee10.webapp.WebAppContext">
  <Set name="contextPath">/</Set>
  <Set name="war">/opt/webapps/domain.war</Set>
  <Set name="virtualHosts">
    <Array type="java.lang.String">
      <Item>domain.biz</Item>
    </Array>
  </Set>
</Configure><?xml version="1.0" encoding="UTF-8"?>
<!DOCTYPE Configure PUBLIC "-//Jetty//Configure//EN" "https://eclipse.dev/jetty/configure_10_0.dtd">
<Configure class="org.eclipse.jetty.ee10.webapp.WebAppContext">
<Set name="contextPath">/</Set>
<Set name="war">/opt/webapps/hobby.war</Set>
<Set name="virtualHosts">
<Array type="java.lang.String">
<Item>hobby.net</Item>
</Array>
</Set>
</Configure>Different Port, Different Web Application
Sometimes it is required to serve different web applications from different socket addresses (either different IP ports, or different Unix-Domain paths), and therefore from different server Connectors.
For example, you want requests to http://localhost:8080/ to be served by one web application, but requests to http://localhost:9090/ to be served by another web application.
This configuration may be useful when Jetty sits behind a load balancer.
In this case, you want to configure multiple connectors, each with a different name, and then reference the connector name in the web application virtual host configuration:
<?xml version="1.0" encoding="UTF-8"?>
<!DOCTYPE Configure PUBLIC "-//Jetty//Configure//EN" "https://eclipse.dev/jetty/configure_10_0.dtd">

<Configure class="org.eclipse.jetty.ee10.webapp.WebAppContext">
  <Set name="contextPath">/</Set>
  <Set name="war">/opt/webapps/domain.war</Set>
  <Set name="virtualHosts">
    <Array type="java.lang.String">
      <Item>@port8080</Item>
    </Array>
  </Set>
</Configure><?xml version="1.0" encoding="UTF-8"?>
<!DOCTYPE Configure PUBLIC "-//Jetty//Configure//EN" "https://eclipse.dev/jetty/configure_10_0.dtd">
<Configure class="org.eclipse.jetty.ee10.webapp.WebAppContext">
<Set name="contextPath">/</Set>
<Set name="war">/opt/webapps/hobby.war</Set>
<Set name="virtualHosts">
<Array type="java.lang.String">
<Item>@port9090</Item>
</Array>
</Set>
</Configure>|
Web application Likewise, web application See this section for further information about how to configure connectors. |
Configuring *.war File Extraction
By default, *.war files are uncompressed and its content extracted in a temporary directory.
The web application resources are served by Jetty from the files extracted in the temporary directory, not from the files within the *.war file, for performance reasons.
If you do not want Jetty to extract the *.war files, you can disable this feature, for example:
<?xml version="1.0" encoding="UTF-8"?>
<!DOCTYPE Configure PUBLIC "-//Jetty//Configure//EN" "https://eclipse.dev/jetty/configure_10_0.dtd">

<Configure class="org.eclipse.jetty.ee10.webapp.WebAppContext">
  <Set name="contextPath">/mywebapp</Set>
  <Set name="war">/opt/webapps/mywebapp.war</Set>
  <Set name="extractWAR">false</Set>
</Configure>
Overriding web.xml
You can configure an additional web.xml that complements the web.xml file that is present in the web application *.war file.
This additional web.xml is processed after the *.war file web.xml.
This allows you to add host specific configuration or server specific configuration without having to extract the web application web.xml, modify it, and repackage it in the *.war file.
<?xml version="1.0" encoding="UTF-8"?>
<!DOCTYPE Configure PUBLIC "-//Jetty//Configure//EN" "https://eclipse.dev/jetty/configure_10_0.dtd">

<Configure class="org.eclipse.jetty.ee10.webapp.WebAppContext">
  <Set name="contextPath">/mywebapp</Set>
  <Set name="war">/opt/webapps/mywebapp.war</Set>
  <Set name="overrideDescriptor">/opt/webapps/mywebapp-web.xml</Set>
</Configure>
The format of the additional web.xml is exactly the same as a standard web.xml file, for example:
  1
2
3
4
5
6
7
8
9
10
11
12
13

  <?xml version="1.0" encoding="UTF-8"?>
<web-app xmlns="http://xmlns.jcp.org/xml/ns/javaee"
         xmlns:xsi="http://www.w3.org/2001/XMLSchema-instance"
         xsi:schemaLocation="https://jakarta.ee/xml/ns/jakartaee https://jakarta.ee/xml/ns/jakartaee/web-app_6_0.xsd"
         version="6.0">
  <servlet>
    <servlet-name>my-servlet</servlet-name>
    <init-param>
      <param-name>host</param-name>
      <param-value>192.168.0.13</param-value>
    </init-param>
  </servlet>
</web-app>
In the example above, you configured the my-servlet Servlet (defined in the web application web.xml), adding a host specific init-param with the IP address of the host.
Jetty Server
The Jetty Server object is the central component that links protocol connectors to web applications.
The Server component is defined by the server Jetty module, that in turn depends on other Jetty modules that provide key functionalities, in particular:
Logging
You can configure two types of logging in Jetty: server logging and request logging.
-
Server logging refers to the console output produced by Jetty itself.
-
Request logging refers to the information that Jetty can capture about incoming HTTP requests and responses.
Server Logging
Jetty uses the SLF4J API for its logging. SLF4J is a generic abstraction layer that is supported by many different logging frameworks (or SLF4J bindings).
Jetty provides a default binding via the jetty-slf4j-impl Maven artifact, but you can plug in the SLF4J binding of your choice provided by other logging frameworks.
Jetty’s server logging is enabled by default with the logging Jetty module.
You typically won’t have to enable the logging module directly, since it is a transitive dependency of the server module, and thus pulled in by many of the most commonly used modules.
The logging module is a virtual module and its default implementation is provided by the logging-jetty Jetty module, which uses the Jetty SLF4J binding.
Default Configuration
Jetty’s default SLF4J binding uses an appender (org.eclipse.jetty.logging.StdErrAppender) to format a logging message with metadata (like a timestamp) before sending it to System.err.
The default StdErrAppender format is:
<datetime>:<level>:<logger name>:<thread name>:<message>
where <datetime> is a timestamp with the format yyyy-MM-dd HH:mm:ss.SSS.
You can configure the appender via a file named jetty-logging.properties, which must be found in the server class-path.
When you enable the logging-jetty module — either directly or by transitive dependency, as in the following example — Jetty automatically generates a jetty-logging.properties file in $JETTY_BASE/resources/:
$ java -jar $JETTY_HOME/start.jar --add-modules=http
INFO  : mkdir ${jetty.base}/start.d
INFO  : server          transitively enabled, ini template available with --add-modules=server
INFO  : logging-jetty   transitively enabled
INFO  : http            initialized in ${jetty.base}/start.d/http.ini
INFO  : resources       transitively enabled
INFO  : threadpool      transitively enabled, ini template available with --add-modules=threadpool
INFO  : logging/slf4j   dynamic dependency of logging-jetty
INFO  : bytebufferpool  transitively enabled, ini template available with --add-modules=bytebufferpool
INFO  : mkdir ${jetty.base}/resources
INFO  : copy ${jetty.home}/modules/logging/jetty/resources/jetty-logging.properties to ${jetty.base}/resources/jetty-logging.properties
INFO  : Base directory was modified
You can specify the following configuration options in jetty-logging.properties:
org.eclipse.jetty.LEVEL=<logging level>-
Sets the logging level for the logger tree based at
org.eclipse.jetty. You can specify any of the usual SLF4J logging levels —TRACE,DEBUG,INFO(default),WARNandERROR— plus two additional levels:ALL(an alias forTRACE) andOFF(disables logging entirely). You can also configure a default logging level for specific loggers, or arbitrary logger trees:-
com.example.MyComponent.LEVEL=DEBUG(sets logging level of loggercom.example.MyComponenttoDEBUG) -
com.example.LEVEL=DEBUG(sets logging level of treecom.example.*toDEBUG)
-
com.example.STACKS=<boolean>-
Specifies whether to hide stack traces for some arbitrary logger tree
com.example.*. The exception type and message are logged normally; only stack traces are hidden. Default value isfalse org.eclipse.jetty.logging.appender.NAME_CONDENSE=<boolean>-
Specifies whether to condense logger names, so that for example
org.eclipse.jetty.util.QueuedThreadPoolbecomesoeju.QueuedThreadPool. Default value istrue. org.eclipse.jetty.logging.appender.MESSAGE_ALIGN=<integer>-
Specifies the column at which the logging
<message>should be printed. The value0specifies no alignment. Default value is0. org.eclipse.jetty.logging.appender.MESSAGE_ESCAPE=<boolean>-
Specifies whether to escape ISO control characters such as
\ror\npresent in the message. Character\ris replaced with<and character\nis replaced with|; all other ISO control characters are replaced with?. Default value isfalse. org.eclipse.jetty.logging.appender.ZONE_ID=<timezone id>-
Specifies the timezone ID (such as
PST, orAmerica/Los_AngelesorGMT-8:00) for the<datetime>part of the logging line. The empty string specifies theUTCtimezone. Default value is the local timezone.
When using the Jetty SLF4J binding, the logging levels can be dynamically changed via JMX, see the troubleshooting section for more information.
Capturing Logs to a Rolling File
Logging to System.err may be fine at development time, but you will typically want to capture logs on disk for later inspection, or if you don’t have a terminal access (for example, if you started Jetty as a service).
The console-capture Jetty module allows you to capture what is written to System.out and System.err and write it to a log file.
By default, console-capture logs to a file in the $JETTY_BASE/logs/ directory.
See the console-capture module documentation for details on configuring how logs are written to the log directory.
|
The |
Custom Configuration
You can use a different SLF4J binding if you are more familiar with other logging libraries, or if you need custom logging appenders. There are a number of out-of-the-box Jetty modules that you can use:
Logging with LogBack
To enable the logging-logback module, run:
$ java -jar $JETTY_HOME/start.jar --add-modules=logging-logback,http
Since LogBack is released under a license that is different from Jetty’s, you will be prompted to accept the LogBack license.
Once you accept the LogBack license, your $JETTY_BASE directory will have the following structure.
$JETTY_BASE
├── lib
│   └── logging
│       ├── logback-classic-<version>.jar
│       └── logback-core-<version>.jar
├── resources
│   └── logback.xml
└── start.d
    ├── http.ini
    └── logging-logback.ini
Jetty downloaded the required LogBack *.jar files, and created a $JETTY_BASE/resources/logback.xml file for configuring your LogBack logging.
Please refer to the LogBack configuration manual for more information about how to configure LogBack.
Logging with Log4j2
To enable the logging-log4j2 module, run:
$ java -jar $JETTY_HOME/start.jar --add-modules=logging-log4j2,http
After accepting the Log4j2 license, you will have the following directory structure:
$JETTY_BASE
├── lib
│   └── logging
│       ├── log4j-api-<version>.jar
│       ├── log4j-core-<version>.jar
│       └── log4j-slf4j2-impl-<version>.jar
├── resources
│   └── log4j2.xml
└── start.d
    ├── http.ini
    └── logging-log4j2.ini
Jetty downloaded the required Log4j2 *.jar files, and created a $JETTY_BASE/resources/log4j2.xml file that you can configure to customize your Log4j2 logging.
Please refer to the Log4j2 configuration manual for more information about how to configure Log4j2.
Bridging Logging to SLF4J
When you use libraries that provide the features you need (for example, JDBC drivers), it may be possible that those libraries use a different logging framework than SLF4J.
SLF4J provides bridges for legacy logging APIs that allows you to bridge logging from one of these legacy logging frameworks to SLF4J. Once the logging is bridged to SLF4J, you can use Jetty’s default configuration or a custom configuration so that your logging is centralized in one place.
Jetty provides the logging-jul-capture module for bridging from java.util.logging to SLF4J.
The modules logging-jcl-capture and logging-log4j1-capture similarly provide bridges from Jakarta Commons Logging (JCL) and Apache Log4j, respectively; however, these modules are obsolete and should not be used anymore.
|
Bridging from java.util.logging
For libraries that use java.util.logging as their logging framework, you can enable Jetty’s logging-jul-capture module:
$ java -jar $JETTY_HOME/start.jar --add-modules=logging-jul-capture
The logging-jul-capture module implies --exec and therefore spawns a second JVM because it needs to provide the system property java.util.logging.config.file (so that java.util.logging can read the configuration from the specified file), and because it needs to make available on the System ClassLoader the class org.slf4j.bridge.SLF4JBridgeHandler.
For example, a library that uses java.util.logging as its logging library is the Postgresql JDBC driver.
With the logging-jul-capture Jetty module, the logging follows this diagram:
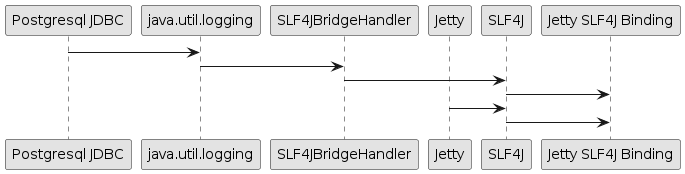
Note how Jetty logs directly to SLF4J, while the Postgresql JDBC driver logs to SLF4J through the SLF4JBridgeHandler.
They both arrive to the SLF4J binding, in this case the Jetty SLF4J binding (but could be any other SLF4J binding such as LogBack).
Request Logging
HTTP requests and responses can be logged to provide data that can be later analyzed with other tools, that can provide information such as the most frequently accessed request URIs, the response status codes, the request/response content lengths, geographical information about the clients, etc.
Request logging is enabled by enabling the requestlog Jetty module.
In the example below, both the http Jetty module and the requestlog module are enabled, so that you can make HTTP requests to the server and have them logged:
$ cd $JETTY_BASE
$ java -jar $JETTY_HOME/start.jar --add-modules=http,requestlog
The $JETTY_BASE directory looks like this:
$JETTY_BASE
├── logs
├── resources
│   └── jetty-logging.properties
└── start.d
    ├── http.ini
    └── requestlog.ini
The $JETTY_BASE/start.d/requestlog.ini file is the Jetty module configuration file that allows you to configure the requestlog module, see this section for more details.
By default the requestlog Jetty module produces the $JETTY_BASE/logs/yyyy_MM_dd.request.log, where the pattern yyyy_MM_dd is replaced with the current date, for example 2020_01_31.
The format of the request log lines is the result of a format string that uses formatting symbols to log relevant request/response data.
The default format is the NCSA Format extended with referrer data and user-agent data. A typical log line looks like this:
192.168.0.100 - - [31/Jan/2020:20:30:40 +0000] "GET / HTTP/1.1" 200 6789 "-" "Mozilla/5.0 (X11; Linux x86_64) AppleWebKit/537.36 (KHTML, like Gecko) Chrome/97.0.4692.71 Safari/537.36"The line above (that uses fake values) shows 192.168.0.100 for the client IP address, a hard-coded - for the identity, - for the authenticated user name, [31/Jan/2020:20:30:40 +0000] for the date and time with timezone, "GET / HTTP/1.1" for the HTTP request line, 200 for the HTTP response status code, 6789 for the HTTP response content length, "-" for the referrer and "Mozilla/5.0 (X11; Linux x86_64) AppleWebKit/537.36 (KHTML, like Gecko) Chrome/97.0.4692.71 Safari/537.36" for the user-agent.
The format string can be customized as described in this section. Request log files are rolled every day, and retained for customizable number of days, by default 90 days.
|
When Jetty is behind a load balancer, you want to log the remote client IP address, not the load balancer IP address. Refer to this section to configure the load balancer and Jetty to retain the remote client IP address information. |
Thread Pooling
Jetty uses thread pooling to efficiently execute tasks that provide Jetty functionalities.
Like any other component, the Jetty thread pool is configured and enabled via the threadpool Jetty module, that is transitively enabled by the server Jetty module which, in turn, is transitively enabled by a protocol module such as the http Jetty module:
$ java -jar $JETTY_HOME/start.jar --add-modules=http
The command above gives you the default configuration for the thread pool.
If you want to explicitly configure the thread pool, it is enough to explicitly specify the threadpool module:
$ java -jar $JETTY_HOME/start.jar --add-modules=threadpool,http
After the command above, the $JETTY_BASE directory looks like this:
$JETTY_BASE
├── resources
│   └── jetty-logging.properties
└── start.d
    ├── http.ini
    └── threadpool.ini
Now you can customize the threadpool.ini file to explicitly configure the thread pool.
Virtual Threads Support
Virtual threads have been introduced as a preview feature in Java 19 and Java 20, and have become an official feature since Java 21.
The threadpool-virtual-preview Jetty module provides support for virtual threads in Java 19 and Java 20, and it is mutually exclusive with the threadpool Jetty module.
The threadpool-virtual Jetty module provides support for virtual threads in Java 21 or later, and it is mutually exclusive with the threadpool Jetty module.
If you have already enabled the threadpool Jetty module, it is sufficient to remove it by removing the $JETTY_BASE/start.d/threadpool.ini file.
When using Java 21 or later, you can enable the threadpool-virtual module:
$ java -jar $JETTY_HOME/start.jar --add-modules=threadpool-virtual,http
After the command above, the $JETTY_BASE directory looks like this:
$JETTY_BASE
├── resources
│   └── jetty-logging.properties
└── start.d
    ├── http.ini
    └── threadpool-virtual.ini
Now you can customize the threadpool-virtual.ini file to explicitly configure the thread pool and the virtual threads and then start Jetty:
**2024-04-18 05:00:47.505:**WARN :oejx.XmlConfiguration:main: Config error java.lang.IllegalStateException: No Method: <Call class="java.lang.Thread" name="ofVirtual"><Call class="java.lang.Thread$Builder" name="name"><Arg>|          <Property name="jetty.threadPool.virtual.namePrefix"><Default><Ref refid="namePrefix"/>-virtual-</Default></Property>|        </Arg><Arg type="long">0</Arg><Call class="java.lang.Thread$Builder" name="inheritInheritableThreadLocals"><Arg type="boolean"><Property name="jetty.threadPool.virtual.inheritInheritableThreadLocals" default="false"/></Arg><Call id="virtualThreadFactory" class="java.lang.Thread$Builder" name="factory"/></Call></Call></Call> on class java.lang.Thread at <Call class="java.lang.Thread" name="ofVirtual"><Call class="java.lang.Thread$Builder" name="name"><Arg>|          <Property name="jetty.threadPool.virtual.namePrefix"><Default><Ref refid="namePrefix"/>-virtual-</Default></Property>|        </Arg><Arg type="long">0</Arg><Call class="java.lang.Thread$Builder" name="inheritInheritableThreadLocals"><Arg type="boolean"><Property name="jetty.threadPool.virtual.inheritInheritableThreadLocals" default="false"/></Arg><Call id="virtualThreadFactory" class="java.lang.Thread$Builder" name="factory"/></Call></Call></Call> in file:///path/to/jetty.home/etc/jetty-threadpool-virtual.xml
**2024-04-18 05:00:47.508:**WARN :oejx.XmlConfiguration:main: Config error java.lang.IllegalStateException: No Method: <Call class="java.lang.Thread" name="ofVirtual"><Call class="java.lang.Thread$Builder" name="name"><Arg>|          <Property name="jetty.threadPool.virtual.namePrefix"><Default><Ref refid="namePrefix"/>-virtual-</Default></Property>|        </Arg><Arg type="long">0</Arg><Call class="java.lang.Thread$Builder" name="inheritInheritableThreadLocals"><Arg type="boolean"><Property name="jetty.threadPool.virtual.inheritInheritableThreadLocals" default="false"/></Arg><Call id="virtualThreadFactory" class="java.lang.Thread$Builder" name="factory"/></Call></Call></Call> on class java.lang.Thread at <New id="threadPool" class="org.eclipse.jetty.util.thread.QueuedThreadPool"><Set name="name" property="jetty.threadPool.namePrefix"/><Set name="minThreads" type="int"><Property name="jetty.threadPool.minThreads" deprecated="threads.min" default="10"/></Set><Set name="maxThreads" type="int"><Property name="jetty.threadPool.maxThreads" deprecated="threads.max" default="200"/></Set><Set name="reservedThreads" type="int"><Property name="jetty.threadPool.reservedThreads" default="-1"/></Set><Set name="idleTimeout" type="int"><Property name="jetty.threadPool.idleTimeout" deprecated="threads.timeout" default="60000"/></Set><Set name="maxEvictCount" type="int"><Property name="jetty.threadPool.maxEvictCount" default="1"/></Set><Set name="detailedDump" type="boolean"><Property name="jetty.threadPool.detailedDump" default="false"/></Set><Get id="namePrefix" name="name"/><Call class="java.lang.Thread" name="ofVirtual"><Call class="java.lang.Thread$Builder" name="name"><Arg>|          <Property name="jetty.threadPool.virtual.namePrefix"><Default><Ref refid="namePrefix"/>-virtual-</Default></Property>|        </Arg><Arg type="long">0</Arg><Call class="java.lang.Thread$Builder" name="inheritInheritableThreadLocals"><Arg type="boolean"><Property name="jetty.threadPool.virtual.inheritInheritableThreadLocals" default="false"/></Arg><Call id="virtualThreadFactory" class="java.lang.Thread$Builder" name="factory"/></Call></Call></Call><Call name="setVirtualThreadsExecutor"><Arg>|        <Call class="java.util.concurrent.Executors" name="newThreadPerTaskExecutor"><Arg><Ref refid="virtualThreadFactory"/></Arg></Call>|      </Arg></Call></New> in file:///path/to/jetty.home/etc/jetty-threadpool-virtual.xml
**2024-04-18 05:00:47.508:**WARN :oejx.XmlConfiguration:main: Unable to execute XmlConfiguration
java.lang.RuntimeException: java.lang.IllegalStateException: No Method: <Call class="java.lang.Thread" name="ofVirtual"><Call class="java.lang.Thread$Builder" name="name"><Arg>|          <Property name="jetty.threadPool.virtual.namePrefix"><Default><Ref refid="namePrefix"/>-virtual-</Default></Property>|        </Arg><Arg type="long">0</Arg><Call class="java.lang.Thread$Builder" name="inheritInheritableThreadLocals"><Arg type="boolean"><Property name="jetty.threadPool.virtual.inheritInheritableThreadLocals" default="false"/></Arg><Call id="virtualThreadFactory" class="java.lang.Thread$Builder" name="factory"/></Call></Call></Call> on class java.lang.Thread
        at org.eclipse.jetty.xml.XmlConfiguration.lambda$main$3(XmlConfiguration.java:2000)
        at org.eclipse.jetty.xml.XmlConfiguration.main(XmlConfiguration.java:2005)
        at java.base/jdk.internal.reflect.NativeMethodAccessorImpl.invoke0(Native Method)
        at java.base/jdk.internal.reflect.NativeMethodAccessorImpl.invoke(NativeMethodAccessorImpl.java:77)
        at java.base/jdk.internal.reflect.DelegatingMethodAccessorImpl.invoke(DelegatingMethodAccessorImpl.java:43)
        at java.base/java.lang.reflect.Method.invoke(Method.java:568)
        at org.eclipse.jetty.start.Main.invokeMain(Main.java:221)
        at org.eclipse.jetty.start.Main.start(Main.java:519)
        at org.eclipse.jetty.start.Main.main(Main.java:76)
Caused by:
java.lang.IllegalStateException: No Method: <Call class="java.lang.Thread" name="ofVirtual"><Call class="java.lang.Thread$Builder" name="name"><Arg>|          <Property name="jetty.threadPool.virtual.namePrefix"><Default><Ref refid="namePrefix"/>-virtual-</Default></Property>|        </Arg><Arg type="long">0</Arg><Call class="java.lang.Thread$Builder" name="inheritInheritableThreadLocals"><Arg type="boolean"><Property name="jetty.threadPool.virtual.inheritInheritableThreadLocals" default="false"/></Arg><Call id="virtualThreadFactory" class="java.lang.Thread$Builder" name="factory"/></Call></Call></Call> on class java.lang.Thread
        at org.eclipse.jetty.xml.XmlConfiguration$JettyXmlConfiguration.call(XmlConfiguration.java:979)
        at org.eclipse.jetty.xml.XmlConfiguration$JettyXmlConfiguration.configure(XmlConfiguration.java:529)
        at org.eclipse.jetty.xml.XmlConfiguration$JettyXmlConfiguration.newObj(XmlConfiguration.java:1049)
        at org.eclipse.jetty.xml.XmlConfiguration$JettyXmlConfiguration.configure(XmlConfiguration.java:535)
        at org.eclipse.jetty.xml.XmlConfiguration$JettyXmlConfiguration.configure(XmlConfiguration.java:482)
        at org.eclipse.jetty.xml.XmlConfiguration.configure(XmlConfiguration.java:384)
        at org.eclipse.jetty.xml.XmlConfiguration.lambda$main$3(XmlConfiguration.java:1993)
        at org.eclipse.jetty.xml.XmlConfiguration.main(XmlConfiguration.java:2005)
        at java.base/jdk.internal.reflect.NativeMethodAccessorImpl.invoke0(Native Method)
        at java.base/jdk.internal.reflect.NativeMethodAccessorImpl.invoke(NativeMethodAccessorImpl.java:77)
        at java.base/jdk.internal.reflect.DelegatingMethodAccessorImpl.invoke(DelegatingMethodAccessorImpl.java:43)
        at java.base/java.lang.reflect.Method.invoke(Method.java:568)
        at org.eclipse.jetty.start.Main.invokeMain(Main.java:221)
        at org.eclipse.jetty.start.Main.start(Main.java:519)
        at org.eclipse.jetty.start.Main.main(Main.java:76)
Caused by:
java.lang.NoSuchMethodException: ofVirtual
        at org.eclipse.jetty.xml.XmlConfiguration$JettyXmlConfiguration.call(XmlConfiguration.java:1014)
        at org.eclipse.jetty.xml.XmlConfiguration$JettyXmlConfiguration.call(XmlConfiguration.java:971)
        at org.eclipse.jetty.xml.XmlConfiguration$JettyXmlConfiguration.configure(XmlConfiguration.java:529)
        at org.eclipse.jetty.xml.XmlConfiguration$JettyXmlConfiguration.newObj(XmlConfiguration.java:1049)
        at org.eclipse.jetty.xml.XmlConfiguration$JettyXmlConfiguration.configure(XmlConfiguration.java:535)
        at org.eclipse.jetty.xml.XmlConfiguration$JettyXmlConfiguration.configure(XmlConfiguration.java:482)
        at org.eclipse.jetty.xml.XmlConfiguration.configure(XmlConfiguration.java:384)
        at org.eclipse.jetty.xml.XmlConfiguration.lambda$main$3(XmlConfiguration.java:1993)
        at org.eclipse.jetty.xml.XmlConfiguration.main(XmlConfiguration.java:2005)
        at java.base/jdk.internal.reflect.NativeMethodAccessorImpl.invoke0(Native Method)
        at java.base/jdk.internal.reflect.NativeMethodAccessorImpl.invoke(NativeMethodAccessorImpl.java:77)
        at java.base/jdk.internal.reflect.DelegatingMethodAccessorImpl.invoke(DelegatingMethodAccessorImpl.java:43)
        at java.base/java.lang.reflect.Method.invoke(Method.java:568)
        at org.eclipse.jetty.start.Main.invokeMain(Main.java:221)
        at org.eclipse.jetty.start.Main.start(Main.java:519)
        at org.eclipse.jetty.start.Main.main(Main.java:76)
java.lang.reflect.InvocationTargetException
        at java.base/jdk.internal.reflect.NativeMethodAccessorImpl.invoke0(Native Method)
        at java.base/jdk.internal.reflect.NativeMethodAccessorImpl.invoke(NativeMethodAccessorImpl.java:77)
        at java.base/jdk.internal.reflect.DelegatingMethodAccessorImpl.invoke(DelegatingMethodAccessorImpl.java:43)
        at java.base/java.lang.reflect.Method.invoke(Method.java:568)
        at org.eclipse.jetty.start.Main.invokeMain(Main.java:221)
        at org.eclipse.jetty.start.Main.start(Main.java:519)
        at org.eclipse.jetty.start.Main.main(Main.java:76)
Caused by: java.lang.RuntimeException: java.lang.IllegalStateException: No Method: <Call class="java.lang.Thread" name="ofVirtual"><Call class="java.lang.Thread$Builder" name="name"><Arg>
          <Property name="jetty.threadPool.virtual.namePrefix"><Default><Ref refid="namePrefix"/>-virtual-</Default></Property>
        </Arg><Arg type="long">0</Arg><Call class="java.lang.Thread$Builder" name="inheritInheritableThreadLocals"><Arg type="boolean"><Property name="jetty.threadPool.virtual.inheritInheritableThreadLocals" default="false"/></Arg><Call id="virtualThreadFactory" class="java.lang.Thread$Builder" name="factory"/></Call></Call></Call> on class java.lang.Thread
        at org.eclipse.jetty.xml.XmlConfiguration.lambda$main$3(XmlConfiguration.java:2000)
        at org.eclipse.jetty.xml.XmlConfiguration.main(XmlConfiguration.java:2005)
        ... 7 more
Caused by: java.lang.IllegalStateException: No Method: <Call class="java.lang.Thread" name="ofVirtual"><Call class="java.lang.Thread$Builder" name="name"><Arg>
          <Property name="jetty.threadPool.virtual.namePrefix"><Default><Ref refid="namePrefix"/>-virtual-</Default></Property>
        </Arg><Arg type="long">0</Arg><Call class="java.lang.Thread$Builder" name="inheritInheritableThreadLocals"><Arg type="boolean"><Property name="jetty.threadPool.virtual.inheritInheritableThreadLocals" default="false"/></Arg><Call id="virtualThreadFactory" class="java.lang.Thread$Builder" name="factory"/></Call></Call></Call> on class java.lang.Thread
        at org.eclipse.jetty.xml.XmlConfiguration$JettyXmlConfiguration.call(XmlConfiguration.java:979)
        at org.eclipse.jetty.xml.XmlConfiguration$JettyXmlConfiguration.configure(XmlConfiguration.java:529)
        at org.eclipse.jetty.xml.XmlConfiguration$JettyXmlConfiguration.newObj(XmlConfiguration.java:1049)
        at org.eclipse.jetty.xml.XmlConfiguration$JettyXmlConfiguration.configure(XmlConfiguration.java:535)
        at org.eclipse.jetty.xml.XmlConfiguration$JettyXmlConfiguration.configure(XmlConfiguration.java:482)
        at org.eclipse.jetty.xml.XmlConfiguration.configure(XmlConfiguration.java:384)
        at org.eclipse.jetty.xml.XmlConfiguration.lambda$main$3(XmlConfiguration.java:1993)
        ... 8 more
Caused by: java.lang.NoSuchMethodException: ofVirtual
        at org.eclipse.jetty.xml.XmlConfiguration$JettyXmlConfiguration.call(XmlConfiguration.java:1014)
        at org.eclipse.jetty.xml.XmlConfiguration$JettyXmlConfiguration.call(XmlConfiguration.java:971)
        ... 14 more

Usage: java -jar $JETTY_HOME/start.jar [options] [properties] [configs]
       java -jar $JETTY_HOME/start.jar --help  # for more information
Jetty Connectors and Protocols
Connectors are the network components through which Jetty accepts incoming network connections.
Each connector listens on a network port and can be configured with ConnectionFactory components that understand one or more network protocols.
Understanding a protocol means that the connector is able to interpret incoming network bytes (for example, the bytes that represent an HTTP/1.1 request) and convert them into more abstract objects (for example an HttpServletRequest object) that are then processed by applications.
Conversely, an abstract object (for example an HttpServletResponse) is converted into the correspondent outgoing network bytes (the bytes that represent an HTTP/1.1 response).
Like other Jetty components, connectors are enabled and configured by enabling and configuring the correspondent Jetty module.
Recall that you must always issue the commands to enable Jetty modules from within the $JETTY_BASE directory, and that the Jetty module configuration files are in the $JETTY_BASE/start.d/ directory.
|
You can obtain the list of connector-related modules in this way:
$ java -jar $JETTY_HOME/start.jar --list-modules=connector
Clear-Text HTTP/1.1
Clear text HTTP/1.1 is enabled with the http Jetty module with the following command (issued from within the $JETTY_BASE directory):
$ java -jar $JETTY_HOME/start.jar --add-modules=http
**2024-04-18 05:00:48.723:**INFO :oejs.Server:main: jetty-12.0.9-SNAPSHOT; built: 2024-04-18T04:55:28.954Z; git: 0f04d4ef429f34935b1f9f1119e460225a3eb774; jvm 17.0.10+7
**2024-04-18 05:00:48.744:**INFO :oejs.AbstractConnector:main: Started ServerConnector@c8c12ac{HTTP/1.1, (http/1.1)}{0.0.0.0:8080}
**2024-04-18 05:00:48.754:**INFO :oejs.Server:main: Started oejs.Server@c267ef4{STARTING}[12.0.9-SNAPSHOT,sto=5000] @805ms
After having enabled the http module, the $JETTY_BASE directory looks like this:
JETTY_BASE
├── resources
│   └── jetty-logging.properties
└── start.d
    └── http.ini
The http.ini file is the file that you want to edit to configure network and protocol parameters — for more details see this section.
Note that the http Jetty module depends on the server Jetty module.
Some parameters that you may want to configure are in fact common HTTP parameters that are applied not only for clear-text HTTP/1.1, but also for secure HTTP/1.1 or for clear-text HTTP/2 or for encrypted HTTP/2, or for HTTP/3, and these configuration parameters may be present in the server module configuration file.
You can force the creation of the server.ini file via:
$ java -jar $JETTY_HOME/start.jar --add-modules=server
Now the $JETTY_BASE directory looks like this:
JETTY_BASE
├── resources
│   └── jetty-logging.properties
└── start.d
    ├── http.ini
    └── server.ini
Now you can edit the server.ini file — for more details see this section.
Secure HTTP/1.1
Secure HTTP/1.1 is enabled with both the ssl and https Jetty modules with the following command (issued from within the $JETTY_BASE directory):
$ java -jar $JETTY_HOME/start.jar --add-modules=ssl,https
INFO  : mkdir ${jetty.base}/start.d
INFO  : server          transitively enabled, ini template available with --add-modules=server
INFO  : logging-jetty   transitively enabled
INFO  : resources       transitively enabled
INFO  : https           initialized in ${jetty.base}/start.d/https.ini
INFO  : ssl             initialized in ${jetty.base}/start.d/ssl.ini
INFO  : threadpool      transitively enabled, ini template available with --add-modules=threadpool
INFO  : logging/slf4j   transitive provider of logging/slf4j for logging-jetty
INFO  : logging/slf4j   dynamic dependency of logging-jetty
INFO  : bytebufferpool  transitively enabled, ini template available with --add-modules=bytebufferpool
INFO  : mkdir ${jetty.base}/resources
INFO  : copy ${jetty.home}/modules/logging/jetty/resources/jetty-logging.properties to ${jetty.base}/resources/jetty-logging.properties
INFO  : Base directory was modified
The command above enables the ssl module, that provides the secure network connector, the KeyStore configuration and TLS configuration — for more details see this section.
Then, the https module adds HTTP/1.1 as the protocol secured by TLS.
The $JETTY_BASE directory looks like this:
$JETTY_BASE
├── resources
│   └── jetty-logging.properties
└── start.d
    ├── https.ini
    └── ssl.ini
Note that the KeyStore file is missing, because you have to provide one with the cryptographic material you want (read this section to create your own KeyStore).
You need to configure these two properties by editing ssl.ini:
-
jetty.sslContext.keyStorePath -
jetty.sslContext.keyStorePassword
As a quick example, you can enable the test-keystore module, that creates on-the-fly a KeyStore containing a self-signed certificate:
$ java -jar $JETTY_HOME/start.jar --add-modules=test-keystore
INFO  : test-keystore   initialized in ${jetty.base}/start.d/test-keystore.ini
INFO  : mkdir ${jetty.base}/lib/bouncycastle
INFO  : copy /path/to/maven.repository/org/bouncycastle/bcpkix-jdk15to18/1.77/bcpkix-jdk15to18-1.77.jar to ${jetty.base}/lib/bouncycastle/bcpkix-jdk15to18-1.77.jar
INFO  : copy /path/to/maven.repository/org/bouncycastle/bcprov-jdk15to18/1.77/bcprov-jdk15to18-1.77.jar to ${jetty.base}/lib/bouncycastle/bcprov-jdk15to18-1.77.jar
INFO  : copy /path/to/maven.repository/org/bouncycastle/bcutil-jdk15to18/1.77/bcutil-jdk15to18-1.77.jar to ${jetty.base}/lib/bouncycastle/bcutil-jdk15to18-1.77.jar
INFO  : Base directory was modified
The $JETTY_BASE directory is now:
├── etc
│   └── test-keystore.p12
├── resources
│   └── jetty-logging.properties
└── start.d
    ├── https.ini
    ├── ssl.ini
    └── test-keystore.ini
Starting Jetty yields:
$ java -jar $JETTY_HOME/start.jar
2024-04-18 05:00:51.689:WARN :oejk.KeystoreGenerator:main: Generating Test Keystore: DO NOT USE IN PRODUCTION!
2024-04-18 05:00:52.213:INFO :oejs.Server:main: jetty-12.0.9-SNAPSHOT; built: 2024-04-18T04:55:28.954Z; git: 0f04d4ef429f34935b1f9f1119e460225a3eb774; jvm 17.0.10+7
2024-04-18 05:00:52.255:INFO :oejus.SslContextFactory:main: x509=X509@59e505b2(jetty-test-keystore,h=[localhost],a=[],w=[]) for Server@3af0a9da[provider=null,keyStore=file:///path/to/jetty.base/etc/test-keystore.p12,trustStore=null]
2024-04-18 05:00:52.312:INFO :oejs.AbstractConnector:main: Started ServerConnector@6b7cb625{SSL, (ssl, http/1.1)}{0.0.0.0:8443}
2024-04-18 05:00:52.318:INFO :oejs.Server:main: Started oejs.Server@5170bcf4{STARTING}[12.0.9-SNAPSHOT,sto=5000] @1567ms
Note how Jetty is listening on port 8443 for the secure HTTP/1.1 protocol.
|
If you point your browser at This is normal because the certificate contained in |
Configuring HTTP/2
HTTP/2 is the successor of the HTTP/1.1 protocol, but it is quite different from HTTP/1.1: where HTTP/1.1 is a duplex, text-based protocol, HTTP/2 is a multiplex, binary protocol.
Because of these fundamental differences, a client and a server need to negotiate what version of the HTTP protocol they speak, based on what versions each side supports.
To ensure maximum compatibility, and reduce the possibility that an intermediary that only understands HTTP/1.1 will close the connection when receiving unrecognized HTTP/2 bytes, HTTP/2 is typically deployed over secure connections, using the TLS protocol to wrap HTTP/2.
| Browsers only support secure HTTP/2. |
The protocol negotiation is performed by the ALPN TLS extension: the client advertises the list of protocols it can speak, and the server communicates to the client the protocol chosen by the server.
For example, you can have a client that only supports HTTP/1.1 and a server that supports both HTTP/1.1 and HTTP/2:
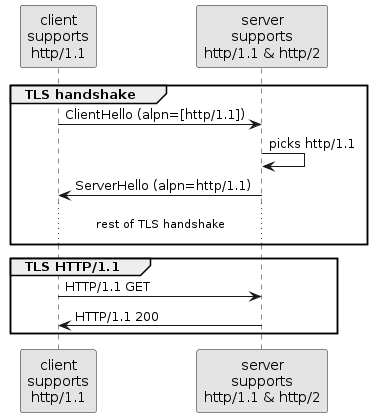
Nowadays, it’s common that both clients and servers support HTTP/2, so servers prefer HTTP/2 as the protocol to speak:
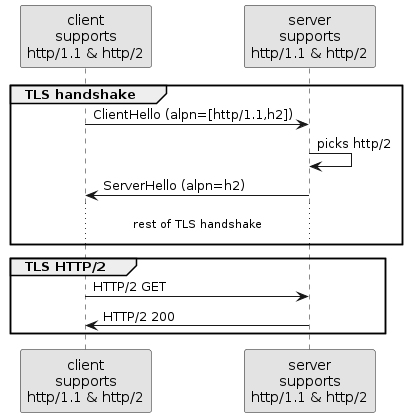
When you configure a connector with the HTTP/2 protocol, you typically want to also configure the HTTP/1.1 protocol. The reason to configure both protocols is that you typically do not control the clients: for example an old browser that does not support HTTP/2, or a monitoring console that performs requests using HTTP/1.1, or a heartbeat service that performs a single HTTP/1.0 request to verify that the server is alive.
Secure vs Clear-Text HTTP/2
Deciding whether you want to configure Jetty with secure HTTP/2 or clear-text HTTP/2 depends on your use case.
You want to configure secure HTTP/2 when Jetty is exposed directly to browsers, because browsers only support secure HTTP/2.

You may configure clear-text HTTP/2 (mostly for performance reasons) if you offload TLS at a load balancer (for example, HAProxy) or at a reverse proxy (for example, nginx).
You may configure clear-text HTTP/2 (mostly for performance reasons) to call microservices deployed to different Jetty servers (although you may want to use secure HTTP/2 for confidentiality reasons).

Secure HTTP/2
When you enable secure HTTP/2 you typically want to enable also secure HTTP/1.1, for backwards compatibility reasons: in this way, old browsers or other clients that do not support HTTP/2 will be able to connect to your server.
You need to enable:
-
the
sslJetty module, which provides the secure connector and the KeyStore and TLS configuration -
the
http2Jetty module, which adds ALPN handling and adds the HTTP/2 protocol to the secured connector -
optionally, the
httpsJetty module, which adds the HTTP/1.1 protocol to the secured connector
Use the following command (issued from within the $JETTY_BASE directory):
$ java -jar $JETTY_HOME/start.jar --add-modules=ssl,http2,https
As when enabling the https Jetty module, you need a valid KeyStore (read this section to create your own KeyStore).
As a quick example, you can enable the test-keystore module, that creates on-the-fly a KeyStore containing a self-signed certificate:
$ java -jar $JETTY_HOME/start.jar --add-modules=test-keystore
Starting Jetty yields:
$ java -jar $JETTY_HOME/start.jar
2024-04-18 05:00:54.430:WARN :oejk.KeystoreGenerator:main: Generating Test Keystore: DO NOT USE IN PRODUCTION!
2024-04-18 05:00:55.066:INFO :oejs.Server:main: jetty-12.0.9-SNAPSHOT; built: 2024-04-18T04:55:28.954Z; git: 0f04d4ef429f34935b1f9f1119e460225a3eb774; jvm 17.0.10+7
2024-04-18 05:00:55.151:INFO :oejus.SslContextFactory:main: x509=X509@2ef14fe(jetty-test-keystore,h=[localhost],a=[],w=[]) for Server@77102b91[provider=null,keyStore=file:///path/to/jetty.base/etc/test-keystore.p12,trustStore=null]
2024-04-18 05:00:55.218:INFO :oejs.AbstractConnector:main: Started ServerConnector@2cc44ad{SSL, (ssl, alpn, h2, http/1.1)}{0.0.0.0:8443}
2024-04-18 05:00:55.224:INFO :oejs.Server:main: Started oejs.Server@58ce9668{STARTING}[12.0.9-SNAPSHOT,sto=5000] @1757ms
Note how Jetty is listening on port 8443 and the protocols supported are the sequence (ssl, alpn, h2, http/1.1).
The (ordered) list of protocols after alpn are the application protocols, in the example above (h2, http/1.1).
When a new connection is accepted by the connector, Jetty first interprets the TLS bytes, then it handles the ALPN negotiation knowing that the application protocols are (in order) h2 and then http/1.1.
You can customize the list of application protocols and the default protocol to use in case the ALPN negotiation fails by editing the alpn module properties.
The HTTP/2 protocol parameters can be configured by editing the http2 module properties.
Clear-Text HTTP/2
When you enable clear-text HTTP/2 you typically want to enable also clear-text HTTP/1.1, for backwards compatibility reasons and to allow clients to upgrade from HTTP/1.1 to HTTP/2.
You need to enable:
-
the
httpJetty module, which provides the clear-text connector and adds the HTTP/1.1 protocol to the clear-text connector -
the
http2cJetty module, which adds the HTTP/2 protocol to the clear-text connector
$ java -jar $JETTY_HOME/start.jar --add-modules=http,http2c
Starting Jetty yields:
$ java -jar $JETTY_HOME/start.jar
2024-04-18 05:00:56.772:INFO :oejs.Server:main: jetty-12.0.9-SNAPSHOT; built: 2024-04-18T04:55:28.954Z; git: 0f04d4ef429f34935b1f9f1119e460225a3eb774; jvm 17.0.10+7
2024-04-18 05:00:56.792:INFO :oejs.AbstractConnector:main: Started ServerConnector@5dda768f{HTTP/1.1, (http/1.1, h2c)}{0.0.0.0:8080}
2024-04-18 05:00:56.800:INFO :oejs.Server:main: Started oejs.Server@55183b20{STARTING}[12.0.9-SNAPSHOT,sto=5000] @834ms
Note how Jetty is listening on port 8080 and the protocols supported are HTTP/1.1 and h2c (i.e. clear-text HTTP/2).
With this configuration, browsers and client applications will be able to connect to port 8080 using:
-
HTTP/1.1 directly (e.g.
curl --http1.1 http://localhost:8080):
GET / HTTP/1.1
Host: localhost:8080
-
HTTP/1.1 with upgrade to HTTP/2 (e.g.
curl --http2 http://localhost:8080):
GET / HTTP/1.1
Host: localhost:8080
Connection: Upgrade, HTTP2-Settings
Upgrade: h2c
HTTP2-Settings:
-
HTTP/2 directly (e.g.
curl --http2-prior-knowledge http://localhost:8080):
50 52 49 20 2a 20 48 54 54 50 2f 32 2e 30 0d 0a
0d 0a 53 4d 0d 0a 0d 0a 00 00 12 04 00 00 00 00
00 00 03 00 00 00 64 00 04 40 00 00 00 00 02 00
00 00 00 00 00 1e 01 05 00 00 00 01 82 84 86 41
8a a0 e4 1d 13 9d 09 b8 f0 1e 07 7a 88 25 b6 50
c3 ab b8 f2 e0 53 03 2a 2f 2a
The HTTP/2 protocol parameters can be configured by editing the http2c module properties.
HTTP/3
When you enable support for the HTTP/3 protocol, by default the secure HTTP/2 protocol is also enabled, so that browsers or clients that do not support HTTP/3 will be able to connect to your server.
You need to enable:
-
the
sslJetty module, which provides the KeyStore and TLS configuration -
the
http3Jetty module, which adds the HTTP/3 protocol on the HTTP/3 connector
Use the following command (issued from within the $JETTY_BASE directory):
$ java -jar $JETTY_HOME/start.jar --add-modules=ssl,http3
Enabling any module Jetty module that supports secure network communication requires a valid KeyStore (read this section to create your own KeyStore), that, as a quick example, you can enable with the test-keystore module, that creates on-the-fly a KeyStore containing a self-signed certificate:
$ java -jar $JETTY_HOME/start.jar --add-modules=test-keystore
Starting Jetty yields:
$ java -jar $JETTY_HOME/start.jar
2024-04-18 05:00:58.593:WARN :oejk.KeystoreGenerator:main: Generating Test Keystore: DO NOT USE IN PRODUCTION!
2024-04-18 05:00:59.193:INFO :oejs.Server:main: jetty-12.0.9-SNAPSHOT; built: 2024-04-18T04:55:28.954Z; git: 0f04d4ef429f34935b1f9f1119e460225a3eb774; jvm 17.0.10+7
2024-04-18 05:00:59.242:INFO :oejus.SslContextFactory:main: x509=X509@74bada02(jetty-test-keystore,h=[localhost],a=[],w=[]) for Server@525575[provider=null,keyStore=file:///path/to/jetty.base/etc/test-keystore.p12,trustStore=null]
2024-04-18 05:00:59.309:INFO :oejs.AbstractConnector:main: Started ServerConnector@fcb4004{SSL, (ssl, alpn, h2)}{0.0.0.0:8443}
2024-04-18 05:00:59.374:INFO :oejqs.QuicServerConnectionFactory:main: HTTP/3+QUIC support is experimental and not suited for production use.
2024-04-18 05:00:59.374:INFO :oejs.AbstractConnector:main: Started QuicServerConnector@2d36e77e{h3, (h3)}{0.0.0.0:8444}
2024-04-18 05:00:59.384:INFO :oejs.Server:main: Started oejs.Server@38aa816f{STARTING}[12.0.9-SNAPSHOT,sto=5000] @1795ms
Note how Jetty is listening on port 8443 for HTTP/2 and on port 8444 for HTTP/3.
The HTTP/3 protocol parameters can be configured by editing the http3 module properties.
WebSocket
WebSocket is a network protocol for bidirectional data communication initiated via the HTTP/1.1 upgrade mechanism. WebSocket provides a simple, low-level, framing protocol layered over TCP. One or more WebSocket frames compose a WebSocket message that is either a UTF-8 text message or binary message.
Jetty provides an implementation of the following standards and specifications.
- RFC-6455 - The WebSocket Protocol
-
Jetty supports version 13 of the released and final specification.
- JSR-356 - The Java WebSocket API (
javax.websocket) -
This is the official Java API for working with WebSockets.
- RFC-7692 - WebSocket Per-Message Deflate Extension
-
This is the replacement for perframe-compression, switching the compression to being based on the entire message, not the individual frames.
- RFC-8441 - Bootstrapping WebSockets with HTTP/2
-
Allows a single stream of an HTTP/2 connection to be upgraded to WebSocket. This allows one TCP connection to be shared by both protocols and extends HTTP/2’s more efficient use of the network to WebSockets.
Configuring WebSocket
Jetty provides two WebSocket implementations: one based on the Java WebSocket APIs defined by JSR 356, provided by module websocket-javax, and one based on Jetty specific WebSocket APIs, provided by module websocket-jetty.
The Jetty websocket module enables both implementations, but each implementation can be enabled independently.
| Remember that a WebSocket connection is always initiated from the HTTP protocol (either an HTTP/1.1 upgrade or an HTTP/2 connect), therefore to enable WebSocket you need to enable HTTP. |
To enable WebSocket support, you also need to decide what version of the HTTP protocol you want WebSocket to be initiated from, and whether you want secure HTTP.
For example, to enable clear-text WebSocket from HTTP/1.1, use the following command (issued from within the $JETTY_BASE directory):
$ java -jar $JETTY_HOME/start.jar --add-modules=http,websocket
To enable secure WebSocket from HTTP/2, use the following command (issued from within the $JETTY_BASE directory):
$ java -jar $JETTY_HOME/start.jar --add-modules=http2,websocket
When enabling secure protocols you need a valid KeyStore (read this section to create your own KeyStore).
As a quick example, you can enable the test-keystore module, that creates on-the-fly a KeyStore containing a self-signed certificate:
$ java -jar $JETTY_HOME/start.jar --add-modules=test-keystore
To enable WebSocket on both HTTP/1.1 and HTTP/2, both clear-text and secure, use the following command (issued from within the $JETTY_BASE directory):
$ java -jar $JETTY_HOME/start.jar --add-modules=http,https,http2c,http2,websocket
Selectively Disabling WebSocket
Enabling the WebSocket Jetty modules comes with a startup cost because Jetty must perform two steps:
-
Scan web applications
*.warfiles (and all the jars and classes inside it) looking for WebSocket EndPoints classes (either annotated with WebSocket API annotations or extending/implementing WebSocket API classes/interfaces). This can be a significant cost if your web application contains a lot of classes and/or jar files. -
Configure and wire WebSocket EndPoints so that WebSocket messages are delivered to the correspondent WebSocket EndPoint.
WebSocket support is by default enabled for all web applications.
For a specific web application, you can disable step 2 for Java WebSocket support (i.e. when the websocket-javax module is enabled) by setting the context attribute org.eclipse.jetty.websocket.javax to false:
<?xml version="1.0" encoding="UTF-8"?>
<web-app xmlns="http://xmlns.jcp.org/xml/ns/javaee"
         xmlns:xsi="http://www.w3.org/2001/XMLSchema-instance"
         xsi:schemaLocation="http://xmlns.jcp.org/xml/ns/javaee http://xmlns.jcp.org/xml/ns/javaee/web-app_4_0.xsd"
         version="4.0">

  <!-- Disable Javax WebSocket -->
  <context-param>
    <param-name>org.eclipse.jetty.websocket.javax</param-name>
    <param-value>false</param-value>
  </context-param>

  ...

</web-app>
Furthermore, for a specific web application, you can disable step 1 (and therefore also step 2) as described in the annotations processing section.
Using WebSocket Client in WebApps
Web applications may need to use a WebSocket client to communicate with third party WebSocket services.
If the web application uses the Java WebSocket APIs, the WebSocket client APIs are provided by the Servlet Container and are available to the web application by enabling the WebSocket server APIs, and therefore you must enable the websocket-javax Jetty module.
However, the Java WebSocket Client APIs are quite limited (for example, they do not support secure WebSocket). For this reason, web applications may want to use the Jetty WebSocket Client APIs.
When using the Jetty WebSocket Client APIs, web applications should include the required jars and their dependencies in the WEB-INF/lib directory of the *.war file.
Alternatively, when deploying your web applications in Jetty, you can enable the websocket-jetty-client Jetty module to allow web applications to use the Jetty WebSocket Client APIs provided by Jetty, without the need to include jars and their dependencies in the *.war file.
FastCGI
FastCGI is a network protocol primarily used by a web server to communicate to a FastCGI server.
FastCGI servers are typically used to serve web content generated by dynamic web languages, primarily PHP, but also Python, Ruby, Perl and others.
Web servers that supports FastCGI are, among others, Apache, Nginx, and Jetty. Web servers typically act as reverse proxies, converting HTTP requests that they receive from clients (browsers) to FastCGI requests that are forwarded to the FastCGI server. The FastCGI server spawns the dynamic web language interpreter, passing it the information contained in the FastCGI request and a dynamic web language script is executed, producing web content, typically HTML. The web content is then formatted into a FastCGI response that is returned to the web server, which converts it to an HTTP response that is then returned to the client.
The most well known FastCGI server is the PHP FastCGI Process Manager, or php-fpm.
In the following we will assume that php-fpm is used as FastCGI server.
This is a diagram of what described above:
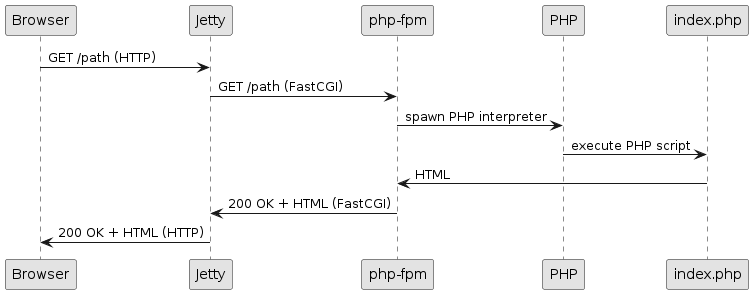
Jetty can be configured to act as a web server that supports FastCGI, replacing the functionality that is normally provided by Apache or Nginx. This allows users to leverage Jetty features such as the support for HTTP/1.1, HTTP/2 and HTTP/3, Jetty’s scalability, and of course Jetty’s native support for Java Web Standards such as Servlets, JSPs, etc.
With such configuration, users can not only deploy their Java Web Applications in Jetty, but also serve their WordPress site or blog or their Drupal site without having to install and manage multiple web servers.
Configuring WordPress
This section explains how to configure Jetty to serve your WordPress site.
The prerequisites are:
-
Have
php-fpminstalled on your server host, and configured to listen either on a Unix-Domain socket (such as/run/php/php-fpm.sock), or on a TCP socket (such aslocalhost:9000). -
Have WordPress installed on your server host, for example under
/var/www/wordpress. For more information about how to install WordPress and the necessary PHP modules, please refer to the WordPress Installation Guide.
Then, the secure HTTP and/or the secure HTTP/2 Jetty modules should be enabled to allow browsers to connect to Jetty.
Lastly, enable the fcgi-proxy module to provide FastCGI support (to convert HTTP requests from browsers to FastCGI for php-fpm and vice versa), and the core-deploy module to deploy your WordPress web application as a Jetty context XML file.
For example:
$ java -jar $JETTY_HOME/start.jar --add-modules=ssl,https,fcgi-proxy,core-deploy
The https Jetty module requires a KeyStore. If you do not already have one configured, you can add the test-keystore Jetty module to the command line above to create a KeyStore on-the-fly.
|
Now you can deploy a Jetty context XML file that represents your WordPress web application.
Use the following file as example, copy it as $JETTY_BASE/webapps/wordpress.xml and customize it as necessary:
<?xml version="1.0"  encoding="UTF-8"?>
<!DOCTYPE Configure PUBLIC "-//Mort Bay Consulting//DTD Configure//EN" "http://www.eclipse.org/jetty/configure_10_0.dtd">
<Configure class="org.eclipse.jetty.server.handler.ContextHandler">

  <New id="root" class="java.lang.String">
    <Arg>/var/www/wordpress</Arg> (1)
  </New>

  <Set name="contextPath">/</Set> (2)
  <Set name="baseResourceAsString"><Ref refid="root" /></Set>

  <Set name="handler">
    <New class="org.eclipse.jetty.server.handler.TryPathsHandler">
      <Set name="originalPathAttribute">wordpress.originalPath</Set>
      <Set name="originalQueryAttribute">wordpress.originalQuery</Set>
      <Set name="paths">
        <Call class="java.util.List" name="of">
          <Arg>$path</Arg>
          <Arg>/index.php</Arg>
        </Call>
      </Set>

      <Set name="handler">
        <New class="org.eclipse.jetty.server.handler.PathMappingsHandler">
          <Call name="addMapping">
            <Arg>
              <New class="org.eclipse.jetty.http.pathmap.ServletPathSpec"><Arg>*.php</Arg></New>
            </Arg>
            <Arg>
              <New class="org.eclipse.jetty.fcgi.proxy.FastCGIProxyHandler"> (3)
                <Arg>(https?)://([^/]+)(.*)</Arg> (4)
                <Arg>http://localhost:9000$3</Arg> (5)
                <Arg><Ref refid="root" /></Arg>

                <Set name="originalPathAttribute">wordpress.originalPath</Set>
                <Set name="originalQueryAttribute">wordpress.originalQuery</Set>
                <Set name="scriptPattern"><Call class="java.util.regex.Pattern" name="compile"><Arg>(.+?\\.php)</Arg></Call></Set>
                <Set name="fastCGISecure">true</Set>
                <Set name="unixDomainPath"><Call class="java.nio.file.Path" name="of"><Arg>/run/php/php-fpm.sock</Arg></Call></Set> (6)
              </New>
            </Arg>
          </Call>
          <Call name="addMapping">
            <Arg>
              <New class="org.eclipse.jetty.http.pathmap.ServletPathSpec"><Arg>/</Arg></New>
            </Arg>
            <Arg>
              <New class="org.eclipse.jetty.server.handler.ResourceHandler"> (7)
                <Set name="welcomeFiles"><Call class="java.util.List" name="of"><Arg>/index.php</Arg></Call></Set>
                <Set name="welcomeMode"><Call class="org.eclipse.jetty.server.ResourceService$WelcomeMode" name="valueOf"><Arg>REHANDLE</Arg></Call></Set>
                <Set name="dirAllowed">false</Set>
              </New>
            </Arg>
          </Call>
        </New>
      </Set>
    </New>
  </Set>

</Configure>| 1 | Specify the WordPress installation path. |
| 2 | Specify the context path of your web application. |
| 3 | The FastCGIProxyHandler forwards requests whose URI path matches *.php to php-fpm. |
| 4 | The client URI regex pattern to match. |
| 5 | The URI used to forward the request to php-fpm, where $3 is the 3rd matching group of the client URI regex pattern (int this example, the client URI path).
If php-fpm is configured to listen on a TCP socket, the host and port must match the listening TCP socket.
If php-fpm is configured to listen on a Unix-Domain socket, the host and port values are ignored but must be present. |
| 6 | If php-fpm is configured to listen on a Unix-Domain socket, specify the Unix-Domain socket path, otherwise omit this line. |
| 7 | The ResourceHandler serves static files from WordPress, such as *.css, *.js and image files. |
Now you can start Jetty and navigate to http://localhost:8080 with your browser to enjoy WordPress:
$ java -jar $JETTY_HOME/start.jar
Configuring Secure Protocols
Secure protocols are normal protocols such as HTTP/1.1, HTTP/2 or WebSocket that are wrapped by the TLS protocol. Any network protocol based on TCP can be wrapped with TLS.
QUIC, the protocol based on UDP that transports HTTP/3, uses TLS messages but not the TLS protocol framing.
The https scheme used in URIs really means tls+http/1.1 (or tls+http/2, or quic+http/3) and similarly the wss scheme used in URIs really means tls+websocket, etc.
Senders wrap the underlying protocol bytes (e.g. HTTP bytes or WebSocket bytes) with the TLS protocol, while receivers first interpret the TLS protocol to obtain the underlying protocol bytes, and then interpret the wrapped bytes.
The ssl Jetty module allows you to configure a secure network connector; if other modules require encryption, they declare a dependency on the ssl module.
It is the job of other Jetty modules to configure the wrapped protocol.
For example, it is the https module that configures the wrapped protocol to be HTTP/1.1.
Similarly, it is the http2 module that configures the wrapped protocol to be HTTP/2.
If you enable both the https and the http2 module, you will have a single secure connector that will be able to interpret both HTTP/1.1 and HTTP/2.
Recall from the section about modules, that only modules that are explicitly enabled get their module configuration file (*.ini) saved in $JETTY_BASE/start.d/, and you want $JETTY_BASE/start.d/ssl.ini to be present so that you can configure the connector properties, the KeyStore properties and the TLS properties.
|
Customizing KeyStore and SSL/TLS Configuration
Secure protocols have a slightly more complicated configuration since they require to configure a KeyStore. Refer to the KeyStore section for more information about how to create and manage a KeyStore.
For simple cases, you only need to configure the KeyStore path and KeyStore password as explained in this section.
For more advanced configuration you may want to configure the TLS protocol versions, or the ciphers to include/exclude, etc.
The correct way of doing this is to create a custom Jetty XML file and reference it in $JETTY_BASE/start.d/ssl.ini:
jetty.sslContext.keyStorePassword=my_passwd! (1)
etc/tls-config.xml (2)| 1 | Configures the jetty.sslContext.keyStorePassword property with the KeyStore password. |
| 2 | References your newly created $JETTY_BASE/etc/tls-config.xml. |
The ssl.ini file above only shows the lines that are not commented out (you can leave the lines that are commented unmodified for future reference).
You want to create the $JETTY_BASE/etc/tls-config.xml with the following template content:
<?xml version="1.0"?>
<!DOCTYPE Configure PUBLIC "-//Jetty//Configure//EN" "http://eclipse.dev/jetty/configure_10_0.dtd">

<Configure>
  <Ref refid="sslContextFactory">
    ... (1)
  </Ref>
</Configure>| 1 | Here goes your advanced configuration. |
The tls-config.xml file references the sslContextFactory component (created by the ssl Jetty module) that configures the KeyStore and TLS parameters, so that you can now call its APIs via XML, and you will have full flexibility for any advanced configuration you want (see below for few examples).
Refer to the SslContextFactory.Server javadocs for the list of methods that you can call through the Jetty XML file.
| Use module properties whenever possible, and only resort to use a Jetty XML file for advanced configuration that you cannot do using module properties. |
Customizing SSL/TLS Protocol Versions
By default, the SSL protocols (SSL, SSLv2, SSLv3, etc.) are already excluded because they are vulnerable. To explicitly add the exclusion of TLSv1.0 and TLSv1.1 (that are also vulnerable — which leaves only TLSv1.2 and TLSv1.3 available), you want to use this XML:
<?xml version="1.0"?>
<!DOCTYPE Configure PUBLIC "-//Jetty//Configure//EN" "http://eclipse.dev/jetty/configure_10_0.dtd">

<Configure>
  <Ref refid="sslContextFactory">
    <Call name="addExcludeProtocols">
      <Arg>
        <Array type="String">
          <Item>TLSv1.0</Item>
          <Item>TLSv1.1</Item>
        </Array>
      </Arg>
    </Call>
  </Ref>
</Configure>
Customizing SSL/TLS Ciphers
You can precisely set the list of excluded ciphers, completely overriding Jetty’s default, with this XML:
<?xml version="1.0"?>
<!DOCTYPE Configure PUBLIC "-//Jetty//Configure//EN" "http://eclipse.dev/jetty/configure_10_0.dtd">

<Configure>
  <Ref refid="sslContextFactory">
    <Set name="ExcludeCipherSuites">
      <Array type="String">
        <Item>^TLS_RSA_.*$</Item>
        <Item>^.*_RSA_.*_(MD5|SHA|SHA1)$</Item>
        <Item>^.*_DHE_RSA_.*$</Item>
        <Item>SSL_RSA_WITH_DES_CBC_SHA</Item>
        <Item>SSL_DHE_RSA_WITH_DES_CBC_SHA</Item>
        <Item>SSL_DHE_DSS_WITH_DES_CBC_SHA</Item>
        <Item>SSL_RSA_EXPORT_WITH_RC4_40_MD5</Item>
        <Item>SSL_RSA_EXPORT_WITH_DES40_CBC_SHA</Item>
        <Item>SSL_DHE_RSA_EXPORT_WITH_DES40_CBC_SHA</Item>
        <Item>SSL_DHE_DSS_EXPORT_WITH_DES40_CBC_SHA</Item>
      </Array>
    </Set>
  </Ref>
</Configure>
Note how each array item specifies a regular expression that matches multiple ciphers, or specifies a precise cipher to exclude.
You can choose to create multiple XML files, and reference them all from $JETTY_BASE/start.d/ssl.ini, or put all your custom configurations in a single XML file.
Renewing the Certificates
When you create a certificate, you must specify for how many days it is valid.
The typical validity is 90 days, and while this period may seem short, it has two advantages:
-
Reduces the risk in case of compromised/stolen keys.
-
Encourages automation, i.e. certificate renewal performed by automated tools (rather than manually) at scheduled times.
To renew a certificate, you must go through the same steps you followed to create the certificate the first time, and then you can reload the KeyStore without the need to stop Jetty.
Watching and Reloading the KeyStore
Jetty can be configured to monitor the directory of the KeyStore file, and reload the SslContextFactory component if the KeyStore file changed.
This feature can be enabled by activating the ssl-reload Jetty module:
$ java -jar $JETTY_HOME/start.jar --add-modules=ssl-reload
For more information about the configuration of the ssl-reload Jetty module, see this section.
Using Conscrypt as SSL/TLS Provider
If not explicitly configured, the TLS implementation is provided by the JDK you are using at runtime.
OpenJDK’s vendors may replace the default TLS provider with their own, but you can also explicitly configure an alternative TLS provider.
The standard TLS provider from OpenJDK is implemented in Java (no native code), and its performance is not optimal, both in CPU usage and memory usage.
A faster alternative, implemented natively, is Google’s Conscrypt, which is built on BoringSSL, which is Google’s fork of OpenSSL.
| As Conscrypt eventually binds to a native library, there is a higher risk that a bug in Conscrypt or in the native library causes a JVM crash, while the Java implementation will not cause a JVM crash. |
To use Conscrypt as the TLS provider just enable the conscrypt Jetty module:
$ java -jar $JETTY_HOME/start.jar --add-modules=conscrypt
Configuring SNI
Server Name Indication (SNI) is a TLS extension that clients send to indicate what domain they want to connect to during the initial TLS handshake.
Modern TLS clients (e.g. browsers) always send the SNI extension; however, older TLS clients may not send the SNI extension.
Being able to handle the SNI is important when you have virtual hosts and a KeyStore with multiple certificates, one for each domain.
For example, you may have deployed over a secure connector two web applications, both at context path /, one at virtual host one.com and one at virtual host two.net.
The KeyStore contains two certificates, one for one.com and one for two.net.
There are three ssl module properties that control the SNI behavior on the server: one that works at the TLS level, and two that works at the HTTP level.
The property that works at the TLS level is:
jetty.sslContext.sniRequired-
Whether SNI is required at the TLS level, defaults to
false. Its behavior is explained by the following table:Table 2. Behavior of the jetty.sslContext.sniRequiredpropertysniRequired=falsesniRequired=trueSNI =
nullclient receives default certificate
client receives TLS failure
SNI =
wrong.orgclient receives default certificate
client receives TLS failure
SNI =
one.comclient receives
one.comcertificateclient receives
one.comcertificateThe default certificate is the certificate returned by the TLS implementation in case there is no SNI match, and you should not rely on this certificate to be the same across Java vendors and versions, or Jetty versions, or TLS provider vendors and versions.
In the example above it could be either the
one.comcertificate or thetwo.netcertificate.
When jetty.sslContext.sniRequired=true, clients that don’t send a valid SNI receive a TLS failure, and their attempt to connect to the server fails.
The details of this failure may not be reported and could be difficult to figure out that the failure is related to an invalid SNI.
For this reason, other two properties are defined at the HTTP level, so that clients can received an HTTP 400 response with more details about what went wrong while trying to connect to the server:
jetty.ssl.sniRequired-
Whether SNI is required at the HTTP level, defaults to
false. Its behavior is similar to thejetty.sslContext.sniRequiredproperty above, and is explained by the following table:Table 3. Behavior of the jetty.ssl.sniRequiredpropertysniRequired=falsesniRequired=trueSNI =
nullAccept
Reject: 400 Bad Request
SNI =
wrong.orgAccept
Reject: 400 Bad Request
SNI =
one.comAccept
Accept
When jetty.ssl.sniRequired=true, the SNI is matched against the certificate sent to the client, and only if there is a match the request is accepted.
When the request is accepted, there could be an additional check controlled by the following property:
jetty.ssl.sniHostCheck-
Whether the certificate sent to the client matches the
Hostheader, defaults totrue. Its behavior is explained by the following table:Table 4. Behavior of the jetty.ssl.sniHostCheckpropertysniHostCheck=falsesniHostCheck=truecertificate =
one.com
Host: wrong.orgAccept
Reject: 400 Bad Request
certificate =
one.com
Host: one.comAccept
Accept
In the normal case with the default server configuration, for a TLS clients that sends SNI, and then sends an HTTP request with the correct Host header, Jetty will pick the correct certificate from the KeyStore based on the SNI received from the client, and accept the request.
Accepting the request does not mean that the request is responded with an HTTP 200 OK, but just that the request passed successfully the SNI checks and will be processed by the server. If the request URI is for a resource that does not exist, the response will likely be a 404 Not Found.
You may modify the default values of the SNI properties if you want stricter control over old/broken TLS clients or bad HTTP requests.
Jetty Behind a Load Balancer or Reverse Proxy
You may need to configure one or more Jetty instances behind an intermediary, typically a load balancer such as HAProxy, or a reverse proxy such as Apache HTTP Server or Nginx.
|
HAProxy can communicate either HTTP/1.1 or HTTP/2 to backend servers such as Jetty. Apache HTTP Server and Nginx can only speak HTTP/1.1 to backend servers such as Jetty, and have no plans to support HTTP/2 towards backend servers. |
In these setups, typically the proxy performs TLS offloading, and the communication with backend servers happens in clear-text. It is possible, however, to configure the proxy so that all the bytes arriving from the client are tunnelled opaquely to the backend Jetty server (that therefore needs to perform the TLS offloading) and vice versa the bytes arriving from the Jetty server are tunnelled opaquely to the client.
Also in these setups, the TCP/IP connection terminating on the Jetty servers does not originate from the client, but from the proxy, so that the remote IP address and port number may be reported incorrectly in backend server logs, or worse applications may not work because they need to be able to differentiate different clients based on the client IP address.
For this reason, intermediaries typically implement at least one of several de facto standards to communicate information about the original client connection to the backend Jetty server.
Jetty supports two methods to process client information sent by intermediaries:
-
The
ForwardedHTTP header, defined in RFC 7239 and replacing the oldX-Forwarded-*headers, defined in this section. -
The Proxy Protocol, defined in this section.
In both methods, web applications that call HttpServletRequest.getRemoteAddr() will receive the remote client IP address as specified by the client information sent by the intermediary, not the physical IP address of TCP connection with the intermediary.
Likewise, HttpServletRequest.getRemotePort() will return the remote client IP port as specified by the client information sent by the intermediary, and HttpServletRequest.isSecure() will return whether the client made a secure request using the https scheme as specified by the client information sent by the intermediary.
Configuring the Forwarded Header
The Forwarded HTTP header is added by the intermediary with information about the client and the client request, for example:
GET / HTTP/1.1
Host: domain.com
Forwarded: for=2.36.72.144:21216;proto=https
In the example above, the intermediary added the Forwarded header specifying that the client remote address is 2.36.72.144:21216 and that the request was made with the https scheme.
Let’s assume you have already configured Jetty with the HTTP/1.1 protocol with the following command (issued from within the $JETTY_BASE directory):
$ java -jar $JETTY_HOME/start.jar --add-modules=http
Support for the Forwarded HTTP header (and its predecessor X-Forwarded-* headers) is enabled with the http-forwarded Jetty module:
$ java -jar $JETTY_HOME/start.jar --add-modules=http-forwarded
INFO  : http-forwarded  initialized in ${jetty.base}/start.d/http-forwarded.ini
INFO  : Base directory was modified
With the http-forwarded Jetty module enabled, Jetty interprets the Forwarded header and makes its information available to web applications via the standard Servlet APIs.
For further information about configuring the http-forwarded Jetty module, see this section.
Configuring the Proxy Protocol
The Proxy Protocol is the de facto standard, introduced by HAProxy, to communicate client information to backend servers via the TCP connection, rather than via HTTP headers.
The information about the client connection is sent as a small data frame on each newly established connection. This mechanism is therefore independent of any protocol, so it can be used for TLS, HTTP/1.1, HTTP/2, etc.
|
There are 2 versions of the proxy protocol: v1 and v2, both supported by Jetty. Proxy protocol v1 is human readable, but it only carries information about the client TCP connection (IP address and IP port). Proxy protocol v2 has a binary format, carries the information about the client TCP connection, and can carry additional arbitrary information encoded in pairs |
Support for the proxy protocol can be enabled for the clear-text connector or for the secure connector (or both).
Let’s assume you have already configured Jetty with the HTTP/1.1 clear-text protocol with the following command (issued from within the $JETTY_BASE directory):
$ java -jar $JETTY_HOME/start.jar --add-modules=http
To enable proxy protocol support for the clear-text connector, enable the proxy-protocol Jetty module:
$ java -jar $JETTY_HOME/start.jar --add-modules=proxy-protocol
INFO  : proxy-protocol  initialized in ${jetty.base}/start.d/proxy-protocol.ini
INFO  : Base directory was modified
Starting Jetty yields:
$ java -jar $JETTY_HOME/start.jar
2024-04-18 05:01:02.373:INFO :oejs.Server:main: jetty-12.0.9-SNAPSHOT; built: 2024-04-18T04:55:28.954Z; git: 0f04d4ef429f34935b1f9f1119e460225a3eb774; jvm 17.0.10+7
2024-04-18 05:01:02.398:INFO :oejs.AbstractConnector:main: Started ServerConnector@59662a0b{[proxy], ([proxy], http/1.1)}{0.0.0.0:8080}
2024-04-18 05:01:02.409:INFO :oejs.Server:main: Started oejs.Server@1817d444{STARTING}[12.0.9-SNAPSHOT,sto=5000] @763ms
Note how in the example above the list of protocols for the clear-text connector is first proxy and then http/1.1.
For every new TCP connection, Jetty first interprets the proxy protocol bytes with the client information; after this initial proxy protocol processing, Jetty interprets the incoming bytes as HTTP/1.1 bytes.
Enabling proxy protocol support for the secure connector is similar.
Let’s assume you have already configured Jetty with the HTTP/1.1 secure protocol and the test KeyStore with the following command (issued from within the $JETTY_BASE directory):
$ java -jar $JETTY_HOME/start.jar --add-modules=https,test-keystore
Enable the proxy-protocol-ssl Jetty module with the following command (issued from within the $JETTY_BASE directory):
$ java -jar $JETTY_HOME/start.jar --add-modules=proxy-protocol-ssl
INFO  : proxy-protocol-ssl initialized in ${jetty.base}/start.d/proxy-protocol-ssl.ini
INFO  : Base directory was modified
Starting Jetty yields:
$ java -jar $JETTY_HOME/start.jar
2024-04-18 05:01:04.925:WARN :oejk.KeystoreGenerator:main: Generating Test Keystore: DO NOT USE IN PRODUCTION!
2024-04-18 05:01:05.429:INFO :oejs.Server:main: jetty-12.0.9-SNAPSHOT; built: 2024-04-18T04:55:28.954Z; git: 0f04d4ef429f34935b1f9f1119e460225a3eb774; jvm 17.0.10+7
2024-04-18 05:01:05.465:INFO :oejus.SslContextFactory:main: x509=X509@38604b81(jetty-test-keystore,h=[localhost],a=[],w=[]) for Server@1e44b638[provider=null,keyStore=file:///path/to/jetty.base/etc/test-keystore.p12,trustStore=null]
2024-04-18 05:01:05.531:INFO :oejs.AbstractConnector:main: Started ServerConnector@2869e989{[proxy], ([proxy], ssl, http/1.1)}{0.0.0.0:8443}
2024-04-18 05:01:05.539:INFO :oejs.Server:main: Started oejs.Server@7357a011{STARTING}[12.0.9-SNAPSHOT,sto=5000] @1558ms
Note how in the example above the list of protocols for the secure connector is first proxy, then ssl and then http/1.1.
HAProxy and Jetty with HTTP/1.1 and HTTP/2
HAProxy is an open source solution that offers load balancing and proxying for TCP and HTTP based application, and can be used as a replacement for Apache or Nginx when these are used as reverse proxies.
The deployment proposed here has HAProxy playing the role that Apache and Nginx usually do: to perform the TLS offloading (that is, decrypt incoming bytes and encrypt outgoing bytes) and then forwarding the now clear-text traffic to a backend Jetty server, speaking either HTTP/1.1 or HTTP/2. Since HAProxy’s TLS offloading is based on OpenSSL, it is much more efficient than the Java implementation shipped with OpenJDK.
After you have installed HAProxy on your system, you want to configure it so that it can perform TLS offloading.
HAProxy will need a single file containing the X509 certificates and the private key, all in PEM format, with the following order:
-
The site certificate; this certificate’s Common Name refers to the site domain (for example: CN=*.webtide.com) and is signed by Certificate Authority #1.
-
The Certificate Authority #1 certificate; this certificate may be signed by Certificate Authority #2.
-
The Certificate Authority #2 certificate; this certificate may be signed by Certificate Authority #3; and so on until the Root Certificate Authority.
-
The Root Certificate Authority certificate.
-
The private key corresponding to the site certificate.
Refer to the section about KeyStores for more information about generating the required certificates and private key.
Now you can create the HAProxy configuration file (in Linux it’s typically /etc/haproxy/haproxy.cfg).
This is a minimal configuration:
global
tune.ssl.default-dh-param 1024

defaults
timeout connect 10000ms
timeout client 60000ms
timeout server 60000ms

frontend fe_http (1)
mode http
bind *:80
# Redirect to https
redirect scheme https code 301

frontend fe_https (2)
mode tcp
bind *:443 ssl no-sslv3 crt /path/to/domain.pem ciphers TLSv1.2 alpn h2,http/1.1
default_backend be_http

backend be_http (3)
mode tcp
server domain 127.0.0.1:8282 send-proxy-v2| 1 | The fe_http front-end accepts connections on port 80 and redirects them to use the https scheme. |
| 2 | The fe_https front-end accepts connections on port 443, and it is where the TLS decryption/encryption happens.
You must specify the path to the PEM file containing the TLS key material (the crt /path/to/domain.pem part), the ciphers that are suitable for HTTP/2 (ciphers TLSv1.2), and the ALPN protocols supported (alpn h2,http/1.1).
This front-end then forwards the now decrypted bytes to the backend in mode tcp.
The mode tcp says that HAProxy will not try to interpret the bytes but instead opaquely forwards them to the backend. |
| 3 | The be_http backend will forward (again in mode tcp) the clear-text bytes to a Jetty connector that talks clear-text HTTP/2 and HTTP/1.1 on port 8282.
The send-proxy-v2 directive sends the proxy protocol v2 bytes to the backend server. |
On the Jetty side, you need to enable the following modules:
$ java -jar $JETTY_HOME/start.jar --add-modules=proxy-protocol,http2c,http,deploy
You need to specify the host (127.0.0.1) and port (8282) you have configured in HAProxy when you start Jetty:
$ java -jar $JETTY_HOME/start.jar jetty.http.host=127.0.0.1 jetty.http.port=8282
|
You want the Jetty connector that listens on port For this reason, you want to specify the If your Jetty instance runs on a different machine and/or on a different (sub)network, you may want to adjust both the back-end section of the HAProxy configuration file and the |
With this configuration for HAProxy and Jetty, browsers supporting HTTP/2 will connect to HAProxy, which will decrypt the traffic and send it to Jetty. Likewise, HTTP/1.1 clients will connect to HAProxy, which will decrypt the traffic and send it to Jetty.
The Jetty connector, configured with the http2c and the http modules is able to distinguish whether the incoming bytes are HTTP/2 or HTTP/1.1 and will handle the request accordingly.
The response is relayed back to HAProxy, which will encrypt it and send it back to the remote client.
This configuration offers you efficient TLS offloading, HTTP/2 support and transparent fallback to HTTP/1.1 for clients that don’t support HTTP/1.1.
Configuring SSL/TLS KeyStores
A KeyStore is a file on the file system that contains a private key and a public certificate, along with the certificate chain of the certificate authorities that issued the certificate. The private key, the public certificate and the certificate chain, but more generally the items present in a KeyStore, are typically referred to as "cryptographic material".
Keystores may encode the cryptographic material with different encodings, the most common being PKCS12, and are typically protected by a password.
Refer to the secure protocols section for more information about how to configure a secure connector using a KeyStore.
Creating a KeyStore
KeyStores are created with the JDK tool $JAVA_HOME/bin/keytool.
The following command creates a KeyStore file containing a private key and a self-signed certificate:
keytool
    -genkeypair (1)
    -alias mykey (2)
    -validity 90 (3)
    -keyalg RSA (4)
    -keysize 2048 (5)
    -keystore /path/to/keystore.p12 (6)
    -storetype pkcs12 (7)
    -dname "CN=domain.com, OU=Unit, O=Company, L=City, S=State, C=Country" (8)
    -ext san=dns:www.domain.com,dns:domain.org (9)
-v (10)| 1 | the command to generate a key and certificate pair |
| 2 | the alias name of the key and certificate pair |
| 3 | specifies the number of days after which the certificate expires |
| 4 | the algorithm must be RSA (the DSA algorithm does not work for web sites) |
| 5 | indicates the strength of the key |
| 6 | the KeyStore file |
| 7 | the KeyStore type, stick with the standard PKCS12 |
| 8 | the distinguished name (more below) — customize it with your values for CN, OU, O, L, S and C |
| 9 | the extension with the subject alternative names (more below) |
| 10 | verbose output |
The command prompts for the KeyStore password that you must choose to protect the access to the KeyStore.
|
The important parts of the command above are the Common Name (CN) part of the distinguished name, and the subject alternative names (SAN). The CN value must be the main domain you own and that you want to use for your web applications.
For example, if you have bought domains Furthermore, to specify additional domains or subdomains within the same certificate, you must specify the SAN extension.
In the example above, In rare cases, you may want to specify IP addresses, rather than domains, in the SAN extension.
The syntax in such case is |
KeyStores with Multiple Entries
A single KeyStore may contain multiple key/certificate pairs. This is useful when you need to support multiple domains on the same Jetty server (typically accomplished using virtual hosts).
You can create multiple key/certificate pairs as detailed in the previous section, provided that you assign each one to a different alias.
Compliant TLS clients will send the TLS SNI extension when creating new connections, and Jetty will automatically choose the right certificate by matching the SNI name sent by the client with the CN or SAN of certificates present in the KeyStore.
Creating a Certificate Signing Request
Self-signed certificates are not trusted by browsers and generic clients: you need to establish a trust chain by having your self-signed certificate signed by a certificate authority (CA).
Browsers and generic clients (e.g. Java clients) have an internal list of trusted certificate authorities root certificates; they use these trusted certificates to verify the certificate they received from the server when they connect to your web applications.
To have your self-signed certificate signed by a certificate authority you first need to produce a certificate signing request (CSR):
keytool
    -certreq (1)
    -file domain.com.csr (2)
-keystore keystore.p12 (3)| 1 | the command to generate a certificate signing request |
| 2 | the file to save the CSR |
| 3 | the keystore that contains the self-signed certificate |
Then, you have to send the CSR file to the certificate authority of your choice, and wait for their reply (they will probably require a proof that you really own the domains indicated in your certificate).
Eventually, the certificate authority will reply to you with one or more files containing the CA certificate chain, and your certificate signed by their certificate chain.
Importing the Signed Certificate
The file you receive from the CA is typically in PEM format, and you must import it back into the same KeyStore file you used to generate the CSR. You must import both the certificate chain and your signed certificate.
First, import the certificate chain:
keytool
    -importcert (1)
    -alias ca (2)
    -file chain_from_ca.pem (3)
    -keystore keystore.p12 (4)
    -trustcacerts (5)
-v (6)| 1 | the command to import certificates |
| 2 | use the ca alias to differentiate from the alias of the server certificate |
| 3 | the file containing the certificate chain received from the CA |
| 4 | your KeyStore file |
| 5 | specify that you trust CA certificates |
| 6 | verbose output |
Then, import the signed certificate:
keytool
    -importcert
    -file signed_certificate.pem
    -keystore keystore.p12
    -trustcacerts
    -v
Now you have a trusted certificate in your KeyStore that you can use for the domains of your web applications.
Refer to the section about configuring secure protocols to configure the secure connector with your newly created KeyStore.
Creating a KeyStore for Client Certificate Authentication
For the majority of secure web sites, it is the client (typically the browser) that validates the certificate sent by the server (by verifying the certificate chain). This is the server domain certificate.
However, the TLS protocol supports a mutual authentication mode where also the client must send a certificate to the server, that the server validates.
You typically want to sign the client certificate(s) with a server certificate that you control, and you must distribute the client certificate(s) to all the clients that need it, and redistribute the client certificates when they expire. The server authentication certificate may be different from the server domain certificate, but it’s typically stored in the same KeyStore for simplicity (although under a different alias).
First, you want to create the private key and server authentication certificate that you will use to sign client certificates:
keytool
    -genkeypair
    -alias server_authn (1)
    -validity 90
    -keyalg RSA
    -keysize 2048
    -keystore keystore.p12 (2)
    -storetype pkcs12
    -dname "CN=server_authn, OU=Unit, O=Company, L=City, S=State, C=Country" (3)
    -ext bc=ca:true (4)
-v| 1 | use the server_authn alias to differentiate from the alias of the server certificate |
| 2 | the KeyStore file |
| 3 | the CN is not that important, since this certificate will not be validated by clients |
| 4 | the extension with the basic constraints (more below) |
The important difference with the creation of a server certificate is the basic constraints extension (bc) that indicates that this certificates acts as a certificate authority (ca:true).
|
Now you want to export both the private key and server authentication certificate.
Unfortunately, the keytool program cannot export private keys, so you need to use a different command line program like openssl, or a graphical program like KeyStore Explorer.
Let’s use openssl to export the server authentication private key:
openssl
    pkcs12
    -in keystore.p12
    -nodes
    -nocerts
    -out server_authn.key
Now let’s export the server authentication certificate:
keytool
    -exportcert
    -keystore keystore.p12
    -rfc
    -file server_authn.crt
    -v
At this point, you want to create a client KeyStore, so that you can sign the client certificate with the server authentication cryptographic material:
keytool
    -genkeypair
    -validity 90
    -keyalg RSA
    -keysize 2048
    -keystore client_keystore.p12 (1)
    -storetype pkcs12
    -dname "CN=client, OU=Unit, O=Company, L=City, S=State, C=Country" (2)
-v| 1 | the client KeyStore file |
| 2 | the CN is not that important, since it will not be validated by the server |
Now produce a certificate signing request (CSR):
keytool
    -certreq
    -file client.csr
    -keystore client_keystore.p12
Now you need to sign the CSR, but again the keytool program does not have this functionality, and you must resort again to use openssl:
openssl
    x509
    -req
    -days 90
    -in client.csr
    -CA server_authn.crt
    -CAkey server_authn.key
    -CAcreateserial
    -sha256
    -out signed.crt
Now you need to import the server authentication certificate and the signed client certificate into the client KeyStore.
First, the server authentication certificate:
keytool
    -importcert
    -alias ca
    -file server_authn.crt
    -keystore client_keystore.p12
    -v
Then, the signed client certificate:
keytool
    -importcert
    -file signed.crt
    -keystore client_keystore.p12
    -v
Now you can distribute client_keystore.p12 to your client(s).
Refer to the section about configuring secure protocols to configure the secure connector to require client authentication.
HTTP Session Management
HTTP sessions are a concept within the Servlet API which allow requests to store and retrieve information across the time a user spends in an application. Jetty offers a number of pluggable alternatives for managing and distributing/persisting sessions. Choosing the best alternative is an important consideration for every application as is the correct configuration to achieve optimum performance.
HTTP Session Overview
Terminology
Before diving into the specifics of how to plug-in and configure various alternative HTTP session management modules, let’s review some useful terminology:
- Session
-
is a means of retaining information across requests for a particular user. The Servlet Specification defines the semantics of sessions. Some of the most important characteristics of sessions is that they have a unique id and that their contents cannot be shared between different contexts (although the id can be): if a session is invalidated in one context, then all other sessions that share the same id in other contexts will also be invalidated. Sessions can expire or they can be explicitly invalidated.
- SessionIdManager
-
is responsible for allocating session ids. A Jetty server can have at most 1 SessionIdManager.
- HouseKeeper
-
is responsible for periodically orchestrating the removal of expired sessions. This process is referred to as "scavenging".
- SessionHandler
-
is responsible for managing the lifecycle of sessions. A context can have at most 1
SessionHandler. - SessionCache
-
is a L1 cache of in-use session objects. The
SessionCacheis used by theSessionHandler. - SessionDataStore
-
is responsible for all clustering/persistence operations on sessions. A
SessionCacheuses aSessionDataStoreas a backing store. - CachingSessionDataStore
-
is an L2 cache of session data. A
SessionCachecan use aCachingSessionDataStoreas its backing store.
More details on these concepts can be found in the Programming Guide.
|
|
Session Modules
There are a number of modules that offer pluggable alternatives for http session management. You can design how you want to cache and store http sessions by selecting alternative combinations of session modules.
For example, Jetty ships with two alternative implementations of the SessionCache:
-
one that caches sessions in memory:
session-cache-hash -
one that does not actually cache:
session-cache-null
There are at least 6 alternative implementations of the SessionDataStore that you can use to persist/distribute your http sessions:
-
file system storage:
session-store-file -
relational database storage:
session-store-jdbc -
NoSQL database storage:
session-store-mongo -
Google Cloud datastore storage:
session-store-gcloud -
Hazelcast:
session-store-hazelcast-remoteorsession-store-hazelcast-embedded -
Infinispan:
session-store-infinispan-remoteorsession-store-infinispan-embedded
| It is worth noting that if you do not configure any session modules, Jetty will still provide HTTP sessions that are cached in memory but are never persisted. |
The Base Session Module
The sessions module is the base module that all other session modules depend upon.
As such it will be transitively enabled if you enable any of the other session modules: you need to explicitly enable it if you wish to change any settings from their defaults.
Enabling the sessions module puts the $JETTY_HOME/etc/sessions/id-manager.xml file onto the execution path and generates a $JETTY_BASE/start.d/sessions.ini file.
The id-manager.xml file instantiates a DefaultSessionIdManager and HouseKeeper.
The former is used to generate and manage session ids whilst the latter is responsible for periodic scavenging of expired sessions.
Configuration
The $JETTY_BASE/start.d/sessions.ini file contains these configuration properties:
- jetty.sessionIdManager.workerName
-
This uniquely identifies the jetty server instance and is applied to the
SessionIdManager. You can either provide a value for this property, or you can allow Jetty to try and synthesize aworkerName- the latter option is only advisable in the case of a single, non-clustered deployment. There are two ways a defaultworkerNamecan be synthesized:-
if running on Google AppEngine, the
workerNamewill be formed by concatenating the values of the environment variablesJETTY_WORKER_INSTANCEandGAE_MODULE_INSTANCE -
otherwise, the
workerNamewill be formed by concatenating the environment variableJETTY_WORKER_INSTANCEand the literal0.
-
So, if you’re not running on Google AppEngine, and you haven’t configured one, the workerName will always be: node0.
If you have more than one Jetty instance, it is crucial that you configure the workerName differently for each instance.
|
- jetty.sessionScavengeInterval.seconds
-
This is the period in seconds between runs of the
HouseKeeper, responsible for orchestrating the removal of expired sessions. By default it will run approximately every 600 secs (ie 10 mins). As a rule of thumb, you should ensure that the scavenge interval is shorter than the<session-timeout>of your sessions to ensure that they are promptly scavenged. On the other hand, if you have a backend store configured for your sessions, scavenging too frequently can increase the load on it.
Don’t forget that the <session-timeout> is specified in web.xml in minutes and the value of the jetty.sessionScavengeInterval.seconds is in seconds.
|
Session Scavenging
The HouseKeeper is responsible for the periodic initiation of session scavenge cycles.
The jetty.sessionScavengeInterval.seconds property in $JETTY_BASE/start.d/sessions.ini controls the periodicity of the cycle.
|
The HouseKeeper semi-randomly adds an additional 10% to the configured |
A session whose expiry time has been exceeded is considered eligible for scavenging.
The session might be present in a SessionCache and/or present in the session persistence/clustering mechanism.
Scavenging occurs for all contexts on a server at every cycle.
The HouseKeeper sequentially asks the SessionHandler in each context to find and remove expired sessions.
The SessionHandler works with the SessionDataStore to evaluate candidates for expiry held in the SessionCache, and also to sweep the persistence mechanism to find expired sessions.
The sweep takes two forms: once per cycle the SessionDataStore searches for sessions for its own context that have expired; infrequently, the SessionDataStore will widen the search to expired sessions in all contexts.
The former finds sessions that are no longer in this context’s SessionCache, and using some heuristics, are unlikely to be in the SessionCache of the same context on another node either.
These sessions will be loaded and fully expired, meaning that HttpSessionListener.destroy() will be called for them.
The latter finds sessions that have not been disposed of by scavenge cycles on any other context/node.
As these will be sessions that expired a long time ago, and may not be appropriate to load by the context doing the scavenging, these are summarily deleted without HttpSessionListener.destroy() being called.
A combination of these sweeps should ensure that the persistence mechanism does not fill over time with expired sessions.
As aforementioned, the sweep period needs to be short enough to find expired sessions in a timely fashion, but not so often that it overloads the persistence mechanism.
Modules for HTTP Session Caching
In this section we will look at the alternatives for the SessionCache, i.e. the L1 cache of in-use session objects.
Jetty ships with 2 alternatives: an in-memory cache, and a null cache.
The latter does not actually do any caching of sessions, and can be useful if you either want to minimize your support for sessions, or you are in a clustered deployment without a sticky loadbalancer.
The scenarios go into more detail on this.
Caching in Memory
If you wish to change any of the default configuration values you should enable the session-cache-hash module.
The name "hash" harks back to historical Jetty session implementations, whereby sessions were kept in memory using a HashMap.
Configuration
The $JETTY_BASE/start.d/session-cache-hash.ini contains the following configurable properties:
- jetty.session.evictionPolicy
-
Integer, default -1. This controls whether session objects that are held in memory are subject to eviction from the cache. Eviction means that the session is removed from the cache. This can reduce the memory footprint of the cache and can be useful if you have a lot of sessions. Eviction is usually used in conjunction with a
SessionDataStorethat persists sessions. The eviction strategies and their corresponding values are:- -1 (NO EVICTION)
-
sessions are never evicted from the cache. The only way they leave are via expiration or invalidation.
- 0 (EVICT AFTER USE)
-
sessions are evicted from the cache as soon as the last active request for it finishes. The session will be passed to the
SessionDataStoreto be written out before eviction. - >= 1 (EVICT ON INACTIVITY)
-
any positive number is the time in seconds after which a session that is in the cache but has not experienced any activity will be evicted. Use the
jetty.session.saveOnInactiveEvictproperty to force a session write before eviction.
If you are not using one of the session store modules, ie one of the session-store-xxxxs, then sessions will be lost when the context is stopped, or the session is evicted.
|
- jetty.session.saveOnInactiveEvict
-
Boolean, default
false. This controls whether a session will be persisted to theSessionDataStoreif it is being evicted due to the EVICT ON INACTIVITY policy. Usually sessions will be written to theSessionDataStorewhenever the last simultaneous request exits the session. However, asSessionDataStorescan be configured to skip some writes (see the documentation for thesession-store-xxxmodule that you are using), this option is provided to ensure that the session will be written out.
| Be careful with this option, as in clustered scenarios it would be possible to "re-animate" a session that has actually been deleted by another node. |
- jetty.session.saveOnCreate
-
Boolean, default
false. Controls whether a session that is newly created will be immediately saved to theSessionDataStoreor lazily saved as the last request for the session exits. This can be useful if the request dispatches to another context and needs to re-use the same session id. - jetty.session.removeUnloadableSessions
-
Boolean, default
false. Controls whether the session cache should ask aSessionDataStoreto delete a session that cannot be restored - for example because it is corrupted. - jetty.session.flushOnResponseCommit
-
Boolean, default
false. If true, if a session is "dirty" - ie its attributes have changed - it will be written to theSessionDataStoreas the response is about to commit. This ensures that all subsequent requests whether to the same or different node will see the updated session data. If false, a dirty session will only be written to the backing store when the last simultaneous request for it leaves the session. - jetty.session.invalidateOnShutdown
-
Boolean, default
false. If true, when a context is shutdown, all sessions in the cache are invalidated and deleted both from the cache and from theSessionDataStore.
No Caching
You may need to use the session-cache-null module if your clustering setup does not have a sticky load balancer, or if you want absolutely minimal support for sessions.
If you enable this module, but you don’t enable a module that provides session persistence (ie one of the session-store-xxx modules), then sessions will neither be retained in memory nor persisted.
Configuration
The $JETTY_BASE/start.d/session-cache-null.ini contains the following configurable properties:
- jetty.session.saveOnCreate
-
Boolean, default
false. Controls whether a session that is newly created will be immediately saved to theSessionDataStoreor lazily saved as the last request for the session exits. This can be useful if the request dispatches to another context and needs to re-use the same session id. - jetty.session.removeUnloadableSessions
-
Boolean, default
false. Controls whether the session cache should ask aSessionDataStoreto delete a session that cannot be restored - for example because it is corrupted. - jetty.session.flushOnResponseCommit
-
Boolean, default
false. If true, if a session is "dirty" - ie its attributes have changed - it will be written to the backing store as the response is about to commit. This ensures that all subsequent requests whether to the same or different node will see the updated session data. If false, a dirty session will only be written to the backing store when the last simultaneous request for it leaves the session.
Modules for Persistent HTTP Sessions: File System
The session-store-file Jetty module supports persistent storage of session data in a filesystem.
| Persisting sessions to the local file system should never be used in a clustered environment. |
Enabling this module creates the $JETTY_BASE/sessions directory.
By default session data will be saved to this directory, one file representing each session.
File names follow this pattern:
[expiry]_[contextpath]_[virtualhost]_[id]
- expiry
-
This is the expiry time in milliseconds since the epoch.
- contextpath
-
This is the context path with any special characters, including
/, replaced by theunderscore character. For example, a context path of/catalogwould become_catalog. A context path of simply/becomes just_. - virtualhost
-
This is the first virtual host associated with the context and has the form of 4 digits separated by
.characters:[digit].[digit].[digit].[digit]. If there are no virtual hosts associated with a context, then0.0.0.0is used. - id
-
This is the unique id of the session.
Putting all of the above together as an example, a session with an id of node0ek3vx7x2y1e7pmi3z00uqj1k0 for the context with path /test with no virtual hosts and an expiry of 1599558193150 would have a file name of:
1599558193150__test_0.0.0.0_node0ek3vx7x2y1e7pmi3z00uqj1k0
Configuration
The $JETTY_BASE/start.d/sessions.ini file contains the following properties which may be modified to customise filesystem session storage:
- jetty.session.storeDir
-
The default is
$JETTY_BASE/sessions. This is a path that defines the location for storage of session files. - jetty.session.file.deleteUnrestorableFiles
-
Boolean, default
false. If set totrue, unreadable files will be deleted. This is useful to prevent repeated logging of the same error when the scavenger periodically (re-)attempts to load the corrupted information for a session in order to expire it. - jetty.session.gracePeriod.seconds
-
Integer, default 3600. Used during session scavenging. Multiples of this period are used to define how long ago a stored session must have expired before it should be scavenged.
- jetty.session.savePeriod.seconds
-
Integer, in seconds, default is
0. Whenever a session is accessed by a request, itslastAccessTimeandexpiryare updated. Even if your sessions are read-mostly, thelastAccessTimeandexpirywill always change. For heavily-used, read-mostly sessions you can save some time by skipping some writes for sessions for which only these fields have changed (ie no session attributes changed). The value of this property is used to skip writes for these kinds of sessions: the session will only be written out if the time since the last write exceeds the value of this property.
|
You should be careful in the use of this property in clustered environments: if you set too large a value for this property, the session may not be written out sufficiently often to update its |
Modules for Persistent HTTP Sessions: JDBC
Enabling the session-store-jdbc module configures Jetty to persist session data in a relational database.
Configuration
After enabling the module, the $JETTY_BASE/start.d/session-store-jdbc.ini file contains the following customizable properties:
- jetty.session.gracePeriod.seconds
-
Integer, default 3600. Used during session scavenging. Multiples of this period are used to define how long ago a stored session must have expired before it should be scavenged.
- jetty.session.savePeriod.seconds
-
Integer, in seconds, default is
0. Whenever a session is accessed by a request, itslastAccessTimeandexpiryare updated. Even if your sessions are read-mostly, thelastAccessTimeandexpirywill always change. For heavily-used, read-mostly sessions you can save some time by skipping some writes for sessions for which only these fields have changed (ie no session attributes changed). The value of this property is used to skip writes for these kinds of sessions: the session will only be written out if the time since the last write exceeds the value of this property.
|
You should be careful in the use of this property in clustered environments: if you set too large a value for this property, the session may not be written out sufficiently often to update its |
- db-connection-type
-
Default
datasource. Set to eitherdatasourceordriverdepending on the type of connection being used. Depending which you select, there are additional properties available:datasource-
- jetty.session.jdbc.datasourceName
-
Name of the remote datasource.
driver-
- jetty.session.jdbc.driverClass
-
Name of the JDBC driver that controls access to the remote database, such as
com.mysql.jdbc.Driver - jetty.session.jdbc.driverUrl
-
URL of the database which includes the driver type, host name and port, service name and any specific attributes unique to the database, such as a username. As an example, here is a mysql connection with the username appended:
jdbc:mysql://127.0.0.1:3306/sessions?user=sessionsadmin.
- jetty.session.jdbc.blobType
-
Optional. Default
bloborbyteafor Postgres. This is the keyword used by the particular database to identify the blob data type. If netiher default is suitable you can set this value explicitly. - jetty.session.jdbc.longType
-
Optional. Default
bigintornumber(20)for Oracle. This is the keyword used by the particular database to identify the long integer data type. Set this explicitly if neither of the default values is appropriate. - jetty.session.jdbc.stringType
-
Optional. Default
varchar. This is the keyword used by the particular database to identify character type. If the default is not suitable, you can set this value explicitly. - jetty.session.jdbc.schema.schemaName
- jetty.session.jdbc.schema.catalogName
-
Optional. The exact meaning of these two properties is dependent on your database vendor, but can broadly be described as further scoping for the session table name. See https://en.wikipedia.org/wiki/Database_schema and https://en.wikipedia.org/wiki/Database_catalog. These extra scoping names can come into play at startup time when Jetty determines if the session table already exists, or otherwise creates it on-the-fly. If you have employed either of these concepts when you pre-created the session table, or you want to ensure that Jetty uses them when it auto-creates the session table, then you have two options: either set them explicitly, or let Jetty infer them from a database connection (obtained using either a Datasource or Driver according to the
db-connection-typeyou have configured). To set them explicitly, uncomment and supply appropriate values for thejetty.session.jdbc.schema.schemaNameand/orjetty.session.jdbc.schema.catalogNameproperties. Alternatively, to allow Jetty to infer them from a database connection, use the special stringINFERREDinstead. If you leave them blank or commented out, then the sessions table will not be scoped by schema or catalog name. - jetty.session.jdbc.schema.table
-
Default
JettySessions. This is the name of the table in which session data is stored. - jetty.session.jdbc.schema.accessTimeColumn
-
Default
accessTime. This is the name of the column that stores the time - in ms since the epoch - at which a session was last accessed - jetty.session.jdbc.schema.contextPathColumn
-
Default
contextPath. This is the name of the column that stores thecontextPathof a session. - jetty.session.jdbc.schema.cookieTimeColumn
-
Default
cookieTime. This is the name of the column that stores the time - in ms since the epoch - that the cookie was last set for a session. - jetty.session.jdbc.schema.createTimeColumn
-
Default
createTime. This is the name of the column that stores the time - in ms since the epoch - at which a session was created. - jetty.session.jdbc.schema.expiryTimeColumn
-
Default
expiryTime. This is name of the column that stores - in ms since the epoch - the time at which a session will expire. - jetty.session.jdbc.schema.lastAccessTimeColumn
-
Default
lastAccessTime. This is the name of the column that stores the time - in ms since the epoch - that a session was previously accessed. - jetty.session.jdbc.schema.lastSavedTimeColumn
-
Default
lastSavedTime. This is the name of the column that stores the time - in ms since the epoch - at which a session was last written. - jetty.session.jdbc.schema.idColumn
-
Default
sessionId. This is the name of the column that stores the id of a session. - jetty.session.jdbc.schema.lastNodeColumn
-
Default
lastNode. This is the name of the column that stores theworkerNameof the last node to write a session. - jetty.session.jdbc.schema.virtualHostColumn
-
Default
virtualHost. This is the name of the column that stores the first virtual host of the context of a session. - jetty.session.jdbc.schema.maxIntervalColumn
-
Default
maxInterval. This is the name of the column that stores the interval - in ms - during which a session can be idle before being considered expired. - jetty.session.jdbc.schema.mapColumn
-
Default
map. This is the name of the column that stores the serialized attributes of a session.
Modules for Persistent HTTP Sessions: MongoDB
Enabling the session-store-mongo module configures Jetty to store session data in MongoDB.
Because MongoDB is not a technology provided by the Eclipse Foundation, you will be prompted to assent to the licenses of the external vendor (Apache in this case) during the install.
Jars needed by MongoDB are downloaded and stored into a directory named $JETTY_BASE/lib/nosql/.
If you want to use updated versions of the jar files automatically downloaded by Jetty, you can place them in the associated $JETTY_BASE/lib/ directory and use the --skip-file-validation=<module name> command line option to prevent errors when starting your server.
|
Configuration
The $JETTY_BASE/start.d/session-store-mongo.ini file contains these configurable properties:
- jetty.session.mongo.dbName
-
Default is "HttpSessions". This is the name of the database in MongoDB used to store the session collection.
- jetty.session.mongo.collectionName
-
Default is "jettySessions". This is the name of the collection in MongoDB used to store all of the sessions.
- The connection type-
-
You can connect to MongoDB either using a host/port combination, or a URI. By default, the host/port method is selected, but you can change this by commenting out the unwanted method, and uncommenting the other one.
- connection-type=address
-
Used when utilizing a direct connection to the MongoDB server.
- jetty.session.mongo.host
-
Host name or address for the remote MongoDB instance.
- jetty.session.mongo.port
-
Port number for the remote MongoDB instance.
- connection-type=uri
-
Used when utilizing MongoURI for secured connections.
- jetty.session.mongo.connectionString
-
The string defining the MongoURI value, such as
mongodb://[username:password@]host1[:port1][,host2[:port2],...[,hostN[:portN]]][/[database][?options]]. More information on how to format the MongoURI string can be found in the official documentation for mongo.
|
You will only use one |
- jetty.session.gracePeriod.seconds
-
Integer, in seconds. Default 3600. Used during session scavenging. Multiples of this period are used to define how long ago a stored session must have expired before it should be scavenged.
- jetty.session.savePeriod.seconds
-
Integer, in seconds, default is
0. Whenever a session is accessed by a request, itslastAccessTimeandexpiryare updated. Even if your sessions are read-mostly, thelastAccessTimeandexpirywill always change. For heavily-used, read-mostly sessions you can save some time by skipping some writes for sessions for which only these fields have changed (ie no session attributes changed). The value of this property is used to skip writes for these kinds of sessions: the session will only be written out if the time since the last write exceeds the value of this property.
|
You should be careful in the use of this property in clustered environments: if you set too large a value for this property, the session may not be written out sufficiently often to update its |
Modules for Persistent HTTP Sessions: Infinispan
In order to persist/cluster sessions using Infinispan, Jetty needs to know how to contact Infinispan.
There are two options: a remote Infinispan instance, or an in-process Infinispan instance.
The former is referred to as "remote" Infinispan and the latter as "embedded" Infinispan.
If you wish Jetty to be able to scavenge expired sessions, you will also need to enable the appropriate infinispan-[remote|embedded]-query module.
Remote Infinispan Session Module
The session-store-infinispan-remote module configures Jetty to talk to an external Infinispan instance to store session data.
Because Infinispan is not a technology provided by the Eclipse Foundation, you will be prompted to assent to the licenses of the external vendor (Apache in this case).
Infinispan-specific jar files are download to the directory named $JETTY_BASE/lib/infinispan/.
In addition to adding these modules to the classpath of the server it also added several ini configuration files to the $JETTY_BASE/start.d directory.
If you have updated versions of the jar files automatically downloaded by Jetty, you can place them in the associated $JETTY_BASE/lib/ directory and use the --skip-file-validation=<module name> command line option to prevent errors when starting your server.
|
Configuration
The $JETTY_BASE/start.d/session-store-infinispan-remote.ini contains the following configurable properties:
- jetty.session.infinispan.remoteCacheName
-
Default
"sessions". This is the name of the cache in Infinispan where sessions will be stored. - jetty.session.infinispan.idleTimeout.seconds
-
Integer, in seconds, default
0. This is the amount of time, in seconds, that a session entry in Infinispan can be idle (ie neither read nor written) before Infinispan will delete its entry. Usually, you do not want to set a value for this, as you want Jetty to manage all session expiration (and call any HttpSessionListeners). You should enable the infinispan-remote-query to allow jetty to scavenge for expired sessions. If you do not, then there is the possibility that sessions can be left in Infinispan but no longer referenced by any Jetty node (so called "zombie" or "orphan" sessions), in which case you can use this feature to ensure their removal.
You should make sure that the number of seconds you specify is larger than the configured maxIdleTime for sessions.
|
- jetty.session.gracePeriod.seconds
-
Integer, default 3600. Used during session scavenging. Multiples of this period are used to define how long ago a stored session must have expired before it should be scavenged.
- jetty.session.savePeriod.seconds
-
Integer, in seconds, default is
0. Whenever a session is accessed by a request, itslastAccessTimeandexpiryare updated. Even if your sessions are read-mostly, thelastAccessTimeandexpirywill always change. For heavily-used, read-mostly sessions you can save some time by skipping some writes for sessions for which only these fields have changed (ie no session attributes changed). The value of this property is used to skip writes for these kinds of sessions: the session will only be written out if the time since the last write exceeds the value of this property.
|
You should be careful in the use of this property in clustered environments: if you set too large a value for this property, the session may not be written out sufficiently often to update its |
Remote Infinispan Query Module
The infinispan-remote-query module allows Jetty to scavenge expired sessions.
Note that this is an additional module, to be used in conjunction with the session-store-infinispan-remote module.
There are no configuration properties associated with this module.
Embedded Infinispan Session Module
Enabling the session-store-infinispan-embedded module runs an in-process instance of Infinispan.
Because Infinispan is not a technology provided by the Eclipse Foundation, you will be prompted to assent to the licenses of the external vendor (Apache in this case).
Infinispan-specific jar files will be downloaded and saved to a directory named $JETTY_BASE/lib/infinispan/.
If you have updated versions of the jar files automatically downloaded by Jetty, you can place them in the associated $JETTY_BASE/lib/ directory and use the --skip-file-validation=<module name> command line option to prevent errors when starting your server.
|
Configuration
The $JETTY_BASE/start.d/session-store-infinispan-embedded.ini contains the following configurable properties:
- jetty.session.infinispan.idleTimeout.seconds
-
Integer, in seconds, default
0. This is the amount of time, in seconds, that a session entry in Infinispan can be idle (ie neither read nor written) before Infinispan will delete its entry. Usually, you do not want to set a value for this, as you want Jetty to manage all session expiration (and call any HttpSessionListeners). You should enable the infinispan-embedded-query to allow Jetty to scavenge for expired sessions. If you do not, then there is the possibility that expired sessions can be left in Infinispan.
You should make sure that the number of seconds you specify is larger than the configured maxIdleTime for sessions.
|
- jetty.session.gracePeriod.seconds
-
Integer, default 3600. Used during session scavenging. Multiples of this period are used to define how long ago a stored session must have expired before it should be scavenged.
- jetty.session.savePeriod.seconds
-
Integer, in seconds, default is
0. Whenever a session is accessed by a request, itslastAccessTimeandexpiryare updated. Even if your sessions are read-mostly, thelastAccessTimeandexpirywill always change. For heavily-used, read-mostly sessions you can save some time by skipping some writes for sessions for which only these fields have changed (ie no session attributes changed). The value of this property is used to skip writes for these kinds of sessions: the session will only be written out if the time since the last write exceeds the value of this property.
|
Thorough consideration of the |
Embedded Infinispan Query Module
The infinispan-embedded-query module allows Jetty to scavenge expired sessions.
There are no configuration properties associated with this module.
Converting Session Format for Jetty-9.4.13
From Jetty-9.4.13 onwards, we have changed the format of the serialized session when using a remote cache (ie using hotrod). Prior to release 9.4.13 we used the default Infinispan serialization, however this was not able to store sufficient information to allow Jetty to properly deserialize session attributes in all circumstances. See issue https://github.com/eclipse/jetty.project/issues/2919 for more background.
We have provided a conversion program which will convert any sessions stored in Infinispan to the new format.
| We recommend that you backup your stored sessions before running the conversion program. |
How to use the converter:
java -cp jetty-jakarta-servlet-api-4.0.2.jar:jetty-util-{VERSION}.jar:jetty-server-{VERSION}.jar:infinispan-remote-9.1.0.Final.jar:jetty-infinispan-{VERSION}.jar:[other classpath]  org.eclipse.jetty.session.infinispan.InfinispanSessionLegacyConverter

Usage:  InfinispanSessionLegacyConverter [-Dhost=127.0.0.1] [-Dverbose=true|false] <cache-name> [check]
- The classpath
-
Must contain the servlet-api, jetty-util, jetty-server, jetty-infinispan and infinispan-remote jars. If your sessions contain attributes that use application classes, you will also need to also put those classes onto the classpath. If your session has been authenticated, you may also need to include the jetty-security and jetty-http jars on the classpath.
- Parameters
-
When used with no arguments the usage message is printed. When used with the
cache-nameparameter the conversion is performed. When used with bothcache-nameandcheckparameters, sessions are checked for whether or not they are converted.- -Dhost
-
you can optionally provide a system property with the address of your remote Infinispan server. Defaults to the localhost.
- -Dverbose
-
defaults to false. If true, prints more comprehensive stacktrace information about failures. Useful to diagnose why a session is not converted.
- cache-name
-
the name of the remote cache containing your sessions. This is mandatory.
- check
-
the optional check command will verify sessions have been converted. Use it after doing the conversion.
To perform the conversion, run the InfinispanSessionLegacyConverter with just the cache-name, and optionally the host system property.
The following command will attempt to convert all sessions in the cached named my-remote-cache on the machine myhost, ensuring that application classes in the /my/custom/classes directory are on the classpath:
java -cp jetty-jakarta-servlet-api-4.0.2.jar:jetty-util-{VERSION}.jar:jetty-server-{VERSION}.jar:infinispan-remote-9.1.0.Final.jar:jetty-infinispan-{VERSION}.jar:/my/custom/classes org.eclipse.jetty.session.infinispan.InfinispanSessionLegacyConverter -Dhost=myhost my-remote-cache
If the converter fails to convert a session, an error message and stacktrace will be printed and the conversion will abort. The failed session should be untouched, however it is prudent to take a backup of your cache before attempting the conversion.
Modules for Persistent HTTP Sessions: Hazelcast
Hazelcast can be used to cluster session information in one of two modes: either remote or embedded. Remote mode means that Hazelcast will create a client to talk to other instances, possibly on other nodes. Embedded mode means that Hazelcast will start a local instance and communicate with that.
Remote Hazelcast Clustering
Enabling the session-store-hazelcast-remote module allows jetty to communicate with a remote Hazelcast instance to cluster session data.
Because Hazelcast is not a technology provided by the Eclipse Foundation, you will be prompted to assent to the licenses of the external vendor (Apache in this case).
Hazelcast-specific jar files will be downloaded and saved to a directory named $JETTY_BASE/lib/hazelcast/.
If you have updated versions of the jar files automatically downloaded by Jetty, you can place them in the associated $JETTY_BASE/lib/ directory and use the --skip-file-validation=<module name> command line option to prevent errors when starting your server.
|
Configuration
The start.d/session-store-hazelcast-remote.ini contains a list of all the configurable options for the Hazelcast module:
- jetty.session.hazelcast.mapName
-
The default is "jetty-distributed-session-map". This is the name of the Map in Hazelcast where sessions will be stored.
- jetty.session.hazelcast.onlyClient
-
Boolean, default
true. The Hazelcast instance will be configured in client mode. - jetty.session.hazelcast.configurationLocation
-
Optional. This is the path to an external Hazelcast xml configuration file.
- jetty.session.hazelcast.useQueries
-
Boolean, default
false. Iftrue, Jetty will use Hazelcast queries to find sessions to scavenge. Iffalsesessions that are not currently in a session cache cannot be scavenged, and will need to be removed by some external process. - jetty.session.hazelcast.addresses
-
Optional. These are the addresses of remote Hazelcast instances with which to communicate.
- jetty.session.gracePeriod.seconds
-
Integer, in seconds. Default 3600. Used during session scavenging. Multiples of this period are used to define how long ago a stored session must have expired before it should be scavenged.
- jetty.session.savePeriod.seconds
-
Integer, in seconds, default is
0. Whenever a session is accessed by a request, itslastAccessTimeandexpiryare updated. Even if your sessions are read-mostly, thelastAccessTimeandexpirywill always change. For heavily-used, read-mostly sessions you can save some time by skipping some writes for sessions for which only these fields have changed (ie no session attributes changed). The value of this property is used to skip writes for these kinds of sessions: the session will only be written out if the time since the last write exceeds the value of this property.
|
You should be careful in the use of this property in clustered environments: if you set too large a value for this property, the session may not be written out sufficiently often to update its |
| Be aware that if your session attributes contain classes from inside your webapp (or Jetty classes) then you will need to put these classes onto the classpath of all of your Hazelcast instances. |
Embedded Hazelcast Clustering
This will run an in-process instance of Hazelcast.
This can be useful for example during testing.
To enable this you enable the session-store-hazelcast-embedded module.
Because Hazelcast is not a technology provided by the Eclipse Foundation, you will be prompted to assent to the licenses of the external vendor (Apache in this case).
Hazelcast-specific jar files will be downloaded to a directory named $JETTY_BASE/lib/hazelcast/.
Configuration
The $JETTY_BASE/start.d/start.d/session-store-hazelcast-embedded.ini contains a list of all the configurable options for the Hazelcast module:
- jetty.session.hazelcast.mapName
-
The default is "jetty-distributed-session-map". This is the name of the Map in Hazelcast where sessions will be stored. jetty.session.hazelcast.hazelcastInstanceName Default is "JETTY_DISTRIBUTED_SESSION_INSTANCE". This is the unique name of the Hazelcast instance that will be created.
- jetty.session.hazelcast.configurationLocation
-
Optional. This is the path to an external Hazelcast xml configuration file.
- jetty.session.hazelcast.useQueries
-
Boolean, default
false'.
If `true
, Jetty will use Hazelcast queries to find expired sessions to scavenge. Iffalsesessions that are not currently in a session cache cannot be scavenged, and will need to be removed by some external process. - jetty.session.gracePeriod.seconds
-
Integer, in seconds. Default 3600. Used during session scavenging. Multiples of this period are used to define how long ago a stored session must have expired before it should be scavenged.
- jetty.session.savePeriod.seconds
-
Integer, in seconds, default is
0. Whenever a session is accessed by a request, itslastAccessTimeandexpiryare updated. Even if your sessions are read-mostly, thelastAccessTimeandexpirywill always change. For heavily-used, read-mostly sessions you can save some time by skipping some writes for sessions for which only these fields have changed (ie no session attributes changed). The value of this property is used to skip writes for these kinds of sessions: the session will only be written out if the time since the last write exceeds the value of this property.
|
You should be careful in the use of this property in clustered environments: if you set too large a value for this property, the session may not be written out sufficiently often to update its |
| If your session attributes contain classes from inside your webapp (or jetty classes) then you will need to put these classes onto the classpath of all of your hazelcast instances. In the case of embedded hazelcast, as it is started before your webapp, it will NOT have access to your webapp’s classes - you will need to extract these classes and put them onto the jetty server’s classpath. |
Modules for Persistent HTTP Sessions: Google Cloud DataStore
Jetty can store http session information into GCloud by enabling the session-store-gcloud module.
Preparation
You will first need to create a project and enable the Google Cloud API: https://cloud.google.com/docs/authentication#preparation. Take note of the project id that you create in this step as you need to supply it in later steps.
Communicating with GCloudDataStore
When Running Jetty Outside of Google Infrastructure
Before running Jetty, you will need to choose one of the following methods to set up the local environment to enable remote GCloud DataStore communications.
-
Using the GCloud SDK:
-
Ensure you have the GCloud SDK installed: https://cloud.google.com/sdk/?hl=en
-
Use the GCloud tool to set up the project you created in the preparation step:
gcloud config set project PROJECT_ID -
Use the GCloud tool to authenticate a Google account associated with the project created in the preparation step:
gcloud auth login ACCOUNT
-
-
Using environment variables
-
Define the environment variable
GCLOUD_PROJECTwith the project id you created in the preparation step. -
Generate a JSON service account key and then define the environment variable
GOOGLE_APPLICATION_CREDENTIALS=/path/to/my/key.json
-
When Running Jetty Inside of Google Infrastructure
The Google deployment tools will automatically configure the project and authentication information for you.
Configuring Indexes for Session Data
Using some special, composite indexes can speed up session search operations, although it may make write operations slower.
By default, indexes will not be used.
In order to use them, you will need to manually upload a file that defines the indexes.
This file is named index.yaml and you can find it in your distribution in $JETTY_BASE/etc/sessions/gcloud/index.yaml.
Follow the instructions here to upload the pre-generated index.yaml file.
Communicating with the GCloudDataStore Emulator
To enable communication using the GCloud Emulator:
-
Ensure you have the GCloud SDK installed: https://cloud.google.com/sdk/?hl=en
-
Follow the instructions here on how to start the GCloud datastore emulator, and how to propagate the environment variables that it creates to the terminal in which you run Jetty.
Enabling the Google Cloud DataStore Module
The session-store-gcloud module provides GCloud support for storing session data.
Because the Google Cloud DataStore is not a technology provided by the Eclipse Foundation, when enabling the module you will be prompted to assent to the licenses of the external vendor.
As GCloud requires certain Java Commons Logging features to work correctly, Jetty routes these through SLF4J. By default, Jetty implements the SLF4J api, but you can choose a different logging implementation by following the instructions here
If you want to use updated versions of the jar files automatically downloaded during the module enablement, you can place them in the associated $JETTY_BASE/lib/ directory and use the --skip-file-validation=<module name> command line option to prevent errors when starting your server.
|
Configuration
The $JETTY_BASE/start.d/session-store-gcloud.ini file contains all of the configurable properties for the session-store-gcloud module:
- jetty.session.gcloud.maxRetries
-
Integer. Default 5. Maximum number of retries to connect to GCloud DataStore to write a session.
- jetty.session.gcloud.backoffMs
-
Integer in milliseconds. Default 1000. Number of milliseconds between successive attempts to connect to the GCloud DataStore to write a session.
- jetty.session.gracePeriod.seconds
-
Integer, in seconds. Default 3600. Used during session scavenging. Multiples of this period are used to define how long ago a stored session must have expired before it should be scavenged.
- jetty.session.savePeriod.seconds
-
Integer, in seconds, default is
0. Whenever a session is accessed by a request, itslastAccessTimeandexpiryare updated. Even if your sessions are read-mostly, thelastAccessTimeandexpirywill always change. For heavily-used, read-mostly sessions you can save some time by skipping some writes for sessions for which only these fields have changed (ie no session attributes changed). The value of this property is used to skip writes for these kinds of sessions: the session will only be written out if the time since the last write exceeds the value of this property.
|
You should be careful in the use of this property in clustered environments: if you set too large a value for this property, the session may not be written out sufficiently often to update its |
- jetty.session.gcloud.namespace
-
Optional. Sets the namespace for GCloud Datastore to use. If set, partitions the visibility of session data between webapps, which is helpful for multi-tenant deployments. More information can be found here.
- Configuration of the stored session object and its fields names-
-
You should very rarely, if ever, need to change these defaults.
- jetty.session.gcloud.model.kind
-
The default is "GCloudSession". This is the type of the object that is stored in GCloud.
- jetty.session.gcloud.model.id
-
The default is "id". This is the session id.
- jetty.session.gcloud.model.contextPath
-
The default is "contextPath". This is the canonicalized context path of the context to which the session belongs.
- jetty.session.gcloud.model.vhost
-
The default is "vhost". This is the canonicalized virtual host of the context to which the session belongs.
- jetty.session.gcloud.model.accessed
-
The default is "accessed". This is the current access time of the session.
- jetty.session.gcloud.model.lastAccessed
-
The default is "lastAccessed". This is the last access time of the session.
- jetty.session.gcloud.model.createTime
-
The default is "createTime". This is the time, in ms since the epoch, at which the session was created.
- jetty.session.gcloud.model.cookieSetTime
-
The default is "cookieSetTime". This is the time at which the session cookie was last set.
- jetty.session.gcloud.model.lastNode
-
The default is "lastNode". This is the
workerNameof the last node to manage the session. - jetty.session.gcloud.model.expiry
-
The default is "expiry". This is the time, in ms since the epoch, at which the session will expire.
- jetty.session.gcloud.model.maxInactive
-
The default is "maxInactive". This is the session timeout in ms.
- jetty.session.gcloud.model.attributes
-
The default is "attributes". This is a map of all the session attributes.
Modules for Persistent HTTP Sessions: The L2 Session Data Cache
If your chosen persistence technology is slow, it can be helpful to locally cache the session data.
The CachingSessionDataStore is a special type of SessionDataStore that locally caches session data, which makes reads faster. It writes-through to your chosen type of SessionDataStore when session data changes.
MemcachedSessionDataMap
The MemcachedSessionDataMap uses memcached to perform caching of SessionData.
To enable it with the Jetty distribution, enable the session-store-cache module, along with your chosen session-store-xxxx module.
Configuration
The $JETTY_BASE/start.d/session-store-cache.ini contains the following configurable properties:
- jetty.session.memcached.host
-
Default value is
localhost. This is the host on which the memcached server resides. - jetty.session.memcached.port
-
Default value is
11211. This is the port on which the memcached server is listening. - jetty.session.memcached.expirySec
-
Default value
0. This is the length of time in seconds that an item can remain in the memcached cache, where 0 indicates indefinitely. - jetty.session.memcached.heartbeats
-
Default value
true. Whether the memcached system should generate heartbeats.
Session Scenarios
Minimizing Support for Sessions
The standard support for webapps in Jetty will use sessions cached in memory, but not persisted/clustered, with a scavenge for expired sessions that occurs every 10 minutes. If you wish to pare back support for sessions because you know your app doesn’t use them (or use JSPs that use them), then you can do the following:
-
enable the base sessions module and configure the scavenge interval to 0 to prevent scavenging
-
enable the null session cache module to prevent sessions being cached in memory
If you wish to do any further minimization, you should consult the Programming Guide.
Clustering with a Sticky Load Balancer
Preferably, your cluster will utilize a sticky load balancer.
This will route requests for the same session to the same Jetty instance.
In this case, the DefaultSessionCache can be used to keep in-use session objects in memory.
You can fine-tune the cache by controlling how long session objects remain in memory with the eviction policy settings.
If you have a large number of sessions or very large session objects, then you may want to manage your memory allocation by controlling the amount of time session objects spend in the cache.
The EVICT_ON_SESSION_EXIT eviction policy will remove a session object from the cache as soon as the last simultaneous request referencing it exits.
Alternatively, the EVICT_ON_INACTIVITY policy will remove a session object from the cache after a configurable amount of time has passed without a request referencing it.
If your sessions are very long lived and infrequently referenced, you might use the EVICT_ON_INACTIVITY_POLICY to control the size of the cache.
If your sessions are small, or relatively few or stable in number or they are read-mostly, then you might select the NEVER_EVICT policy.
With this policy, session objects will remain in the cache until they either expire or are explicitly invalidated.
If you have a high likelihood of simultaneous requests for the same session object, then the EVICT_ON_SESSION_EXIT policy will ensure the session object stays in the cache as long as it is needed.
Clustering Without a Sticky Load Balancer
Without a sticky load balancer requests for the same session may arrive on any node in the cluster.
This means it is likely that the copy of the session object in any SessionCache is likely to be out-of-date, as the session was probably last accessed on a different node.
In this case, your choices are to use either the NullSessionCache or to de-tune the DefaultSessionCache.
If you use the NullSessionCache all session object caching is avoided.
This means that every time a request references a session it must be read in from persistent storage.
It also means that there can be no sharing of session objects for multiple requests for the same session: each will have their own independent session object.
Furthermore, the outcome of session writes are indeterminate because the Servlet Specification does not mandate ACID transactions for sessions.
If you use the DefaultSessionCache, there is a risk that the caches on some nodes will contain out-of-date session information as simultaneous requests for the same session are scattered over the cluster.
To mitigate this somewhat you can use the EVICT_ON_SESSION_EXIT eviction policy: this will ensure that the session is removed from the cache as soon as the last simultaneous request for it exits.
Again, due to the lack of session transactionality, the ordering outcome of write operations cannot be guaranteed.
As the session is cached while at least one request is accessing it, it is possible for multiple simultaneous requests to share the same session object.
Handling Corrupted or Unreadable Session Data
For various reasons it might not be possible for the SessionDataStore to re-read a stored session.
One scenario is that the session stores a serialized object in its attributes, and after a re-deployment there in an incompatible class change.
Setting the $JETTY_BASE/start.d/session-cache-hash.ini or $JETTY_BASE/start.d/session-cache-null.ini property jetty.session.removeUnloadableSessions to true will allow the unreadable session to be removed from persistent storage.
This can be useful for preventing the scavenger from continually generating errors on the same expired, but un-readable session.
Faster Web Application Deployment
The auto discovery features of the Servlet Specification can make deployments slow and uncertain. Auto discovery of web application configuration can be useful during the development as it allows new features and frameworks to be enabled simply by dropping in a jar file. However for production deployment, the need to scan the contents of many jars can have a significant impact at startup time.
The quickstart module allows a webapp to be pre-scanned, making startup predictable and faster.
During scanning all declarative configuration (ie from web.xml, web-fragment.xml and annotations) are encoded into an effective web.xml, called WEB-INF/quickstart-web.xml, which can be inspected to understand what will be deployed.
|
Programmatic configuration is not encoded into the generated |
With quickstart, webapps that took many seconds to scan and deploy can now be deployed in a few hundred milliseconds.
Enabling
Enable the quickstart module for your jetty base:
$ cd $JETTY-BASE
$ java -jar $JETTY_HOME/start.jar --add-modules=quickstart
The $JETTY-BASE/start.d/quickstart.ini file contains these configurable parameters:
- jetty.quickstart.mode
-
The values are:
- AUTO
-
Allows jetty to run either with or without a
quickstart-web.xmlfile. If jetty detects the file, then it will be used, otherwise the app is started normally. - GENERATE
-
In this mode, jetty will generate a
quickstart-web.xmlfile and then terminate. Use this mode first before changing to eitherAUTOorQUICKSTART. - QUICKSTART
-
In this mode, if jetty does not detect a
quickstart-web.xmlfile then jetty will not start.
- jetty.quickstart.origin
-
Use this parameter to set the name of the attribute in the
quickstart-web.xmlfile that contains the origin of each element. Knowing the descriptor or annotation from which each element derives can be useful for debugging. Note that the origin attribute does not conform to the web xml schema, so if you deploy with xml validation, you’ll see errors. It is probably best to do a few trial runs with the attribute set, then turn it off for final generation. - jetty.quickstart.xml
-
Use this parameter to change the name of the generated file. By default this is
quickstart-web.xmlin the webapp’sWEB-INFdirectory. The file named by this parameter will always be interpreted relative toWEB-INF.
If your webapp is a war file, you will need to either first unpack it yourself, or use a context xml file (or code equivalent) that calls WebAppContext.setExtractWAR(true).
If you allow Jetty to do the unpacking, it will use the usual mechanisms to find the location to which to unpack.
Note that by default Jetty unpacks to a temporary location which is not reused between executions.
So either specify the directory to which to unpack, or make a work directory in your base to ensure the unpacked war is preserved and reused across restarts.
Annotations
Enable the ee{8,9,10}-annotations module if your webapp - or any of its third party libraries - uses any of the following:
-
Annotations:
-
@Resource
-
@Resources
-
@PostConstruct
-
@PreDestroy
-
@DeclaredRoles
-
@RunAs
-
@MultipartConfig
-
@WebServlet
-
@WebFilter
-
@WebListener
-
@WebInitParam
-
@ServletSecurity, @HttpConstraint, @HttpMethodConstraint
-
@HandlesTypes
-
-
javax.servlet.ServletContainerInitializers or jakarta.servlet.ServletContainerInitializers
-
JSP
Annotation Scanning
According to more recent versions of the Jakarta Servlet Specification, the web.xml file can contain the attribute metadata-complete.
If this is set to true, then no annotation scanning takes place, and your descriptor must contain the equivalent xml statements of any annotations.
If it is metadata-complete=false, or your web.xml predates the inclusion of this attribute, annotation scanning is required to take place.
To prevent annotation scanning you can use the WebAppContext.setConfigurationDiscovered(false) method.
Here’s an example context XML file that calls this method:
<?xml version="1.0"?>
<!DOCTYPE Configure PUBLIC "-//Jetty//Configure//EN" "https://eclipse.dev/jetty/configure_10_0.dtd">

<Configure class="org.eclipse.jetty.ee10.webapp.WebAppContext"> (1)
  <Set name="configurationDiscovered">false</Set> (2)
</Configure>| 1 | Configures a WebAppContext, which is the Jetty component that represents a standard Servlet web application. |
| 2 | Specifies that scanning should not take place. |
However, despite metadata-complete=true, scanning of classes may still occur because of ServletContainerInitializer.
Classes implementing this interface are found by Jetty using the javax.util.ServiceLoader mechanism, and if one is present and it includes the @HandlesTypes annotation, then Jetty must scan the class hierarchy of the web application.
This may be very time-consuming if you have many jars.
Jetty can reduce the time taken by limiting the jars that are scanned.
The container classpath
By default, Jetty will not scan any classes that are on the container’s classpath.
Sometimes, you may have third party libraries on the container’s classpath that you need to be scanned.
In this case, use the org.eclipse.jetty.server.webapp.ContainerIncludeJarPattern context attribute to define which container jars and class directories to scan.
The value of this attribute is a regular expression.
Here’s an example from a context XML file that includes any jar whose name starts with foo- or bar-, or a directory named classes:
<?xml version="1.0"?>
<!DOCTYPE Configure PUBLIC "-//Jetty//Configure//EN" "https://eclipse.dev/jetty/configure_10_0.dtd">

<Configure class="org.eclipse.jetty.ee10.webapp.WebAppContext"> (1)
    <Call name="setAttribute"> (2)
      <Arg>org.eclipse.jetty.server.webapp.ContainerIncludeJarPattern</Arg> (3)
      <Arg>.*/foo-[^/]*\.jar$|.*/bar-[^/]*\.jar$|.*/classes/.*</Arg> (4)
    </Call>
</Configure>| 1 | Configures a WebAppContext, which is the Jetty component that represents a standard Servlet web application. |
| 2 | Specifies a context attribute. |
| 3 | Specifies the name of the context attribute. |
| 4 | Specifies the value of the context attribute. |
Note that the order of the patterns defines the ordering of the scanning of the jars or class directories.
The webapp classpath
By default, Jetty will scan all classes from WEB-INF/classes and all jars from WEB-INF/lib according to the order, if any, established by absolute or relative ordering clauses in web.xml.
If your webapp contains many jar files that you know do not contain any annotations, you can significantly speed up deployment by omitting them from scanning.
However, be careful if your webapp uses a ServletContainerInitializer with a @HandlesTypes annotation that you don’t exclude jars that contain classes matching the annotation.
Use the org.eclipse.jetty.server.webapp.WebInfIncludeJarPattern context attribute to define a regular expression for jars and class directories to select for scanning.
Here’s an example of a context XML file that sets a pattern that matches any jar on the webapp’s classpath that starts with "spring-":
<?xml version="1.0"?>
<!DOCTYPE Configure PUBLIC "-//Jetty//Configure//EN" "https://eclipse.dev/jetty/configure_10_0.dtd">

<Configure class="org.eclipse.jetty.ee10.webapp.WebAppContext"> (1)
    <Call name="setAttribute">  (2)
      <Arg>org.eclipse.jetty.server.webapp.WebInfIncludeJarPattern</Arg>  (3)
      <Arg>.*/spring-[^/]*\.jar$</Arg>  (4)
    </Call>
</Configure>| 1 | Configures a WebAppContext, which is the Jetty component that represents a standard Servlet web application. |
| 2 | Specifies a context attribute. |
| 3 | Specifies the name of the context attribute. |
| 4 | Specifies the value of the context attribute. |
Multi-threading
By default, Jetty performs annotation scanning in a multi-threaded manner in order to complete it in the minimum amount of time.
If you don’t want multi-threaded scanning, you can configure Jetty to revert to single-threaded scanning. There are several options to configure this:
-
Set the context attribute
org.eclipse.jetty.annotations.multiThreadedtofalse -
Set the
Serverattributeorg.eclipse.jetty.annotations.multiThreadedtofalse -
Set the
Systempropertyorg.eclipse.jetty.annotations.multiThreadedtofalse
Method 1 will only affect the current webapp. Method 2 will affect all webapps deployed to the same Server instance. Method 3 will affect all webapps deployed in the same JVM.
By default, Jetty will wait a maximum of 60 seconds for all of the scanning threads to complete. You can set this to a higher or lower number of seconds by doing one of the following:
-
Set the context attribute
org.eclipse.jetty.annotations.maxWait -
Set the
Serverattributeorg.eclipse.jetty.annotations.maxWait -
Set the
Systempropertyorg.eclipse.jetty.annotations.maxWait
Method 1 will only affect the current webapp. Method 2 will affect all webapps deployed to the same Server instance. Method 3 will affect all webapps deployed in the same JVM.
ServletContainerInitializers
The ServletContainerInitializer class can exist in: the container’s classpath, the webapp’s WEB-INF/classes directory, the webapp’s WEB-INF/lib jars, or any external extraClasspath that you have configured on the webapp.
The Jakarta Servlet Specification does not define any order in which a ServletContainerInitializer must be called when the webapp starts.
By default, Jetty will call them in the following order:
-
ServletContainerInitializers from the container’s classpath
-
ServletContainerInitializers from
WEB-INF/classes -
ServletContainerInitializers from
WEB-INF/libjars in the order established in web.xml, or in the order that the SCI is returned by the javax.util.ServiceLoader if there is no ordering.
Exclusions
By default, as according to the Jakarta Servlet Specification, all ServletContainerInitializer instances that are discovered are invoked.
Sometimes, depending on your requirements, you may need to prevent some being called at all.
In this case, you can define the org.eclipse.jetty.containerInitializerExclusionPattern context attribute.
This is a regular expression that defines patterns of classnames that you want to exclude. Here’s an example of setting the context attribute in a context XML file:
<?xml version="1.0"?>
<!DOCTYPE Configure PUBLIC "-//Jetty//Configure//EN" "https://eclipse.dev/jetty/configure_10_0.dtd">

<Configure class="org.eclipse.jetty.ee10.webapp.WebAppContext"> (1)
    <Call name="setAttribute">  (2)
      <Arg>org.eclipse.jetty.containerInitializerExclusionPattern</Arg>  (3)
      <Arg>com.acme.*|com.corp.SlowContainerInitializer</Arg>  (4)
    </Call>
</Configure>| 1 | Configures a WebAppContext, which is the Jetty component that represents a standard Servlet web application. |
| 2 | Specifies a context attribute. |
| 3 | Specifies the name of the context attribute. |
| 4 | Specifies the value of the context attribute. |
In this example we exclude all ServletContainerInitializer instances in the com.acme package, and the specific class com.corp.SlowContainerInitializer.
It is possible to use exclusion and ordering together to control ServletContainerInitializer invocation - the exclusions will be applied before the ordering.
Ordering
If you need ServletContainerInitializer classes called in a specific order, you can use the context attribute org.eclipse.jetty.containerInitializerOrder.
Set it to a list of comma separated ServletContainerInitializer class names in the order that you want them applied.
You may optionally use the wildcard character * once in the list.
It will match all ServletContainerInitializer classes not explicitly named in the list.
Here is an example context XML file that ensures the com.example.PrioritySCI will be called first, followed by the com.acme.FooSCI, then all other SCIs:
<?xml version="1.0"?>
<!DOCTYPE Configure PUBLIC "-//Jetty//Configure//EN" "https://eclipse.dev/jetty/configure_10_0.dtd">

<Configure class="org.eclipse.jetty.ee10.webapp.WebAppContext"> (1)
    <Call name="setAttribute">  (2)
      <Arg>org.eclipse.jetty.containerInitializerOrder</Arg>  (3)
      <Arg>org.eclipse.jetty.websocket.javax.server.JavaxWebSocketServletContainerInitializer, com.acme.FooSCI, *</Arg>  (4)
    </Call>
</Configure>| 1 | Configures a WebAppContext, which is the Jetty component that represents a standard Servlet web application. |
| 2 | Specifies a context attribute. |
| 3 | Specifies the name of the context attribute. |
| 4 | Specifies the value of the context attribute. |
Java Server Pages
Jetty supports JSP via the ee{8,9,10}-jsp modules, which are based on Apache Jasper:
# DO NOT EDIT THIS FILE - See: https://eclipse.dev/jetty/documentation/

[description]
Enables JSP for all web applications deployed on the server.

[environment]
ee10

[depend]
ee10-servlet
ee10-annotations
ee10-apache-jsp
Logging has been bridged to Jetty logging, so you can enable logging for the org.apache.jasper package, subpackages and classes as usual.
Configuration of the JSP Servlet
The org.eclipse.jetty.jsp.JettyJspServlet is the servlet responsible for serving JSPs.
It is configured as the default jsp servlet in the $JETTY_HOME/etc/webdefault.xml file.
Notice that Jetty identifies the jsp servlet by the presence of the id="jsp" attribute in the <servlet> declaration.
That file maps the org.eclipse.jetty.jsp.JettyJspServlet to the following partial urls:
-
*.jsp -
*.jspf -
*.jspx -
*.xsp -
*.JSP -
*.JSPF -
*.JSPX -
*.XSP
You can change to a different servlet, change or add <init-param>s or add extra <servlet-mapping>s in your web.xml file.
Here’s an example of adding an <init-param> to augment the definitions from the standard webdefault.xml file:
<servlet id="jsp">  (1)
  <servlet-name>jsp</servlet-name> (2)
  <init-param>
    <param-name>keepgenerated</param-name> (3)
    <param-value>true</param-value>  (4)
  </init-param>
</servlet>| 1 | This identifies this servlet as the jsp servlet to Jetty. |
| 2 | This identifies this declaration as augmenting the already-defined servlet called jsp. |
| 3 | This init param controls whether the jsp servlet retains the *.java files generated during jsp compilation. |
| 4 | This sets the value of the init param |
Another element you might consider adding to the default setup is async-supported:
<servlet id="jsp">  (1)
  <servlet-name>jsp</servlet-name>  (2)
  <async-supported>true</async-supported>  (3)
</servlet>| 1 | This identifies this servlet as the jsp servlet to Jetty. |
| 2 | This identifies this declaration as augmenting the already-defined servlet called jsp. |
| 3 | By default, the jsp servlet does not support async. |
There are many configuration parameters for the Apache Jasper JSP Servlet, here are some of them:
| init param | Description | Default | webdefault.xml |
|---|---|---|---|
checkInterval |
If non-zero and |
0 |
– |
classpath |
The classpath is dynamically generated if the context has a URL classloader. The |
- |
– |
classdebuginfo |
Include debugging info in class file. |
true |
– |
compilerClassName |
If not set, defaults to the Eclipse jdt compiler. |
- |
– |
compiler |
Used if the Eclipse jdt compiler cannot be found on the classpath. It is the classname of a compiler that Ant should invoke. |
– |
– |
compilerTargetVM |
Target vm to compile for. |
1.8 |
1.8 |
compilerSourceVM |
Sets source compliance level for the jdt compiler. |
1.8 |
1.8 |
development |
If |
true |
– |
displaySourceFragment |
Should a source fragment be included in exception messages |
true |
– |
dumpSmap |
Dump SMAP JSR45 info to a file. |
false |
– |
enablePooling |
Determines whether tag handler pooling is enabled. |
true |
– |
engineOptionsClass |
Allows specifying the Options class used to configure Jasper. If not present, the default EmbeddedServletOptions will be used. |
- |
– |
errorOnUseBeanInvalidClassAttribute |
Should Jasper issue an error when the value of the class attribute in an useBean action is not a valid bean class |
true |
– |
fork |
Only relevant if you use Ant to compile JSPs: by default Jetty will use the Eclipse jdt compiler. |
true |
- |
genStrAsCharArray |
Option for generating Strings as char arrays. |
false |
– |
ieClassId |
The class-id value to be sent to Internet Explorer when using <jsp:plugin> tags. |
clsid:8AD9C840-044E-11D1-B3E9-00805F499D93 |
– |
javaEncoding |
Pass through the encoding to use for the compilation. |
UTF8 |
– |
jspIdleTimeout |
The amount of time in seconds a JSP can be idle before it is unloaded. A value of zero or less indicates never unload. |
-1 |
– |
keepgenerated |
Do you want to keep the generated Java files around? |
true |
– |
mappedFile |
Support for mapped Files. Generates a servlet that has a print statement per line of the JSP file |
true |
– |
maxLoadedJsps |
The maximum number of JSPs that will be loaded for a web application. If more than this number of JSPs are loaded, the least recently used JSPs will be unloaded so that the number of JSPs loaded at any one time does not exceed this limit. A value of zero or less indicates no limit. |
-1 |
– |
modificationTestInterval |
If |
4 |
– |
quoteAttributeEL |
When EL is used in an attribute value on a JSP page, should the rules for quoting of attributes described in JSP.1.6 be applied to the expression |
true |
- |
recompileOnFail |
If a JSP compilation fails should the modificationTestInterval be ignored and the next access trigger a re-compilation attempt? Used in development mode only and is disabled by default as compilation may be expensive and could lead to excessive resource usage. |
false |
– |
scratchDir |
Directory where servlets are generated. The default is the value of the context attribute |
– |
– |
strictQuoteEscaping |
Should the quote escaping required by section JSP.1.6 of the JSP specification be applied to scriplet expression. |
true |
- |
suppressSmap |
Generation of SMAP info for JSR45 debugging. |
false |
– |
trimSpaces |
Should template text that consists entirely of whitespace be removed from the output (true), replaced with a single space (single) or left unchanged (false)? Note that if a JSP page or tag file specifies a trimDirectiveWhitespaces value of true, that will take precedence over this configuration setting for that page/tag. trimmed? |
false |
– |
xpoweredBy |
Generate an X-Powered-By response header. |
false |
false |
|
If the value you set doesn’t take effect, try using all lower case instead of camel case, or capitalizing only some of the words in the name, as Jasper is inconsistent in its parameter naming strategy. |
JavaServer Pages Standard Tag Libraries
The JavaServer Pages Standard Tag Library (JSTL) is part of the Jetty distribution, and is available via the ee{8,9,10}-jstl modules:
# DO NOT EDIT THIS FILE - See: https://eclipse.dev/jetty/documentation/

[description]
Enables JSTL for all web applications deployed on the server.

[environment]
ee10

[depend]
ee10-jsp
ee10-glassfish-jstl
When enabled, Jetty will make the JSTL tags available for your webapps.
JavaServer Faces TagLibs
If you want to use JSF with your webapp, you should copy the relevant jars from your implementation of choice into your $JETTY_BASE directory, ideally into $JETTY_BASE/lib/ext.
If that directory does not exist, enable the ext module, which will create the directory and ensure all jars within it are put onto the container classpath.
Then you will need to tell Jetty which of those jars contains the *.tld files.
To accomplish that, you need to specify either the name of the file or a pattern that matches the name/s of the file/s as the org.eclipse.jetty.server.webapp.ContainerIncludeJarPattern context attribute.
You will need to preserve the existing value of the attribute, and add in your extra pattern.
Here’s an example of using a context xml file to add in a pattern to match files starting with jsf-, which contain the *.tld files:
<?xml version="1.0"?>
<!DOCTYPE Configure PUBLIC "-//Jetty//Configure//EN" "https://eclipse.dev/jetty/configure_10_0.dtd">

<Configure class="org.eclipse.jetty.ee9.webapp.WebAppContext"> (1)
    <Call name="setAttribute"> (2)
      <Arg>org.eclipse.jetty.server.webapp.ContainerIncludeJarPattern</Arg> (3)
      <Arg>.*/jetty-servlet-api-[^/]*\.jar$|.*/javax.servlet.jsp.jstl-.*\.jar$|.*/org.apache.taglibs.taglibs-standard-impl-.*\.jar$|.*/jsf-[^/]*\.jar$</Arg> (4)
    </Call>
</Configure>| 1 | Configures a WebAppContext, which is the Jetty component that represents a standard Servlet web application. |
| 2 | Specifies a context attribute. |
| 3 | Specifies the name of the context attribute. |
| 4 | Adds the additional pattern .*/jsf-[^/]*\.jar$ to those already existing. |
JNDI
For each specific Jakarta EE environment there is a specific plus module that you must enable in order to use JNDI resources in your webapp:
-
For Java EE 8,
ee8-plus -
For Java EE 9,
ee9-plus -
For Java EE 10,
ee10-plus
If you have already enabled an annotations module suitable for your EE environment, an appropriate plus module will already have been enabled and you do not need to explicitly enable a plus module.
If you have extra jars associated with your JNDI resources, eg database drivers etc, that are not located inside your webapp then you must ensure they are on either the container classpath or a Jakarta EE environment classpath.
You can enable the ext module and place your jars in ${jetty.base}/lib/ext to make them visible on the container classpath.
To make them visible on an EE environment classpath you should create a custom, EE environment-specific module.
You can now declare JNDI resources and reference them within your webapps.
Declaring resources
You must declare the objects you want bound so that you can then hook them into your webapp via env-entry, resource-ref and resource-env-refs in web.xml, web-fragment.xml or override-web.xml.
You make these declarations in Jetty XML files that are either external or internal to your webapp.
A server or context XML file is external to your webapp.
The special WEB-INF/jetty-env.xml file is internal to your webapp.
See the section on Jetty XML files for more information on how to choose in which XML file to place your declarations.
Regardless of its location, the XML file contains declarations of JNDI resources that can be referenced later within your webapp.
The declarations are new instances of the following types:
org.eclipse.jetty.plus.jndi.EnvEntry-
Used for
env-entrytype of entries org.eclipse.jetty.plus.jndi.Resource-
Used for most other type of resources
org.eclipse.jetty.plus.jndi.Transaction-
For a JTA manager
org.eclipse.jetty.plus.jndi.Link-
For the link between a
web.xmlresource name and a naming entry
Declarations of each of these types follow a similar pattern:
<New class="org.eclipse.jetty.plus.jndi.xxxx"> (1)
  <Arg><!-- scope --></Arg> (2)
  <Arg><!-- name --></Arg>  (3)
  <Arg><!-- value --></Arg> (4)
</New>| 1 | Defines a resource to Jetty. |
| 2 | Specifies the scope of the resource. |
| 3 | Specifies the name of the resource which will be looked up by the webapp relative to the java:comp/ or java:comp/env namespace. |
| 4 | Specifies the value of the resource. |
org.eclipse.jetty.plus.jndi.EnvEntry
Sometimes it is useful to pass configuration information to a webapp at runtime that you either cannot or cannot conveniently code into a web.xml <env-entry>.
In such cases, you can use the org.eclipse.jetty.plus.jndi.EnvEntry class, and optionally even override an entry of the same name in web.xml.
Here’s an example that defines the equivalent of an env-entry called mySpecialValue with value 4000 that overrides an <env-entry> declaration of the same name in web.xml:
<New class="org.eclipse.jetty.plus.jndi.EnvEntry"> (1)
  <Arg></Arg> (2)
  <Arg>mySpecialValue</Arg> (3)
  <Arg type="java.lang.Integer">4000</Arg> (4)
  <Arg type="boolean">true</Arg> (5)
</New>| 1 | Define an EnvEntry that corresponds to an <env-entry>. |
| 2 | Scoped at the JVM level. |
| 3 | The name of the entry, corresponding to a lookup by the webapp of java:comp/env/mySpecialValue. |
| 4 | The value of the entry, in this case the integer value 4000. |
| 5 | true means to override the value of an <env-entry> of the same name in web.xml. |
Note that if you don’t want to override the web.xml value, simply omit the last argument, or set it to false.
The Servlet Specification allows binding only the following object types to an env-entry:
-
java.lang.String
-
java.lang.Integer
-
java.lang.Float
-
java.lang.Double
-
java.lang.Long
-
java.lang.Short
-
java.lang.Character
-
java.lang.Byte
-
java.lang.Boolean
Jetty is a little more flexible and allows you to also bind:
-
custom POJOs
Be aware that if you take advantage of this feature, your web application is not portable.
org.eclipse.jetty.plus.jndi.Resource
You can configure any type of resource that you want to refer to in web.xml via a resource-ref or resource-env-ref by using the org.eclipse.jetty.plus.jndi.Resource type of naming entry.
You provide the scope, the name of the object (relative to java:comp/env) and a POJO, javax.naming.Reference or javax.naming.Referenceable instance.
DataSources
This example configures a Derby DataSource named jdbc/myds:
<Configure id='wac' class="org.eclipse.jetty.ee10.webapp.WebAppContext">
  <New class="org.eclipse.jetty.plus.jndi.Resource">
    <Arg><Ref refid="wac"/></Arg>
    <Arg>jdbc/myds</Arg>
    <Arg>
      <New class="org.apache.derby.jdbc.EmbeddedDataSource">
        <Set name="DatabaseName">test</Set>
        <Set name="createDatabase">create</Set>
      </New>
    </Arg>
  </New>
</Configure>
This would be linked into the webapp’s JNDI namespace via an entry in a web.xml like so:
<resource-ref>
  <res-ref-name>jdbc/myds</res-ref-name>
  <res-type>javax.sql.DataSource</res-type>
  <res-auth>Container</res-auth>
</resource-ref>|
When configuring Resources, ensure that the type of object you configure matches the type of object you expect to look up in Also note that the J2EE Specification recommends storing DataSources relative to |
JMS Queues, Topics and ConnectionFactories
Jetty can bind any implementation of the JMS destinations and connection factories.
Here is an example of binding an ActiveMQ in-JVM connection factory:
<Configure id='wac' class="org.eclipse.jetty.ee10.webapp.WebAppContext">
  <New class="org.eclipse.jetty.plus.jndi.Resource">
    <Arg><Ref refid='wac'/></Arg>
    <Arg>jms/connectionFactory</Arg>
    <Arg>
      <New class="org.apache.activemq.ActiveMQConnectionFactory">
        <Arg>vm://localhost?broker.persistent=false</Arg>
      </New>
    </Arg>
  </New>
</Configure>
The corresponding entry in web.xml to bind the ConnectionFactory into the webapp’s JNDI namespace would be:
<resource-ref>
  <res-ref-name>jms/connectionFactory</res-ref-name>
  <res-type>javax.jms.ConnectionFactory</res-type>
  <res-auth>Container</res-auth>
</resource-ref>|
The J2EE Specification recommends storing JMS connection factories under |
To configure access to javax.mail.Session from within a webapp, declare an org.eclipse.jetty.plus.jndi.Resource with an org.eclipse.jetty.ee{8,9,10}.jndi.factories.MailSessionReference that will hold the mail configuration and create the instance of the Session when it is referenced:
<Configure id='wac' class="org.eclipse.jetty.ee10.webapp.WebAppContext">
  <New class="org.eclipse.jetty.ee10.jndi.Resource">
    <Arg><Ref refid="wac"/></Arg>
    <Arg>mail/Session</Arg>
    <Arg>
      <New class="org.eclipse.jetty.ee10.factories.MailSessionReference"> (1)
        <Set name="user">fred</Set> (2)
        <Set name="password">OBF:1xmk1w261z0f1w1c1xmq</Set> (3)
        <Set name="properties"> (4)
          <New class="java.util.Properties">
            <Put name="mail.smtp.host">XXX</Put>
            <Put name="mail.from">me@me</Put>
            <Put name="mail.debug">true</Put>
          </New>
        </Set>
      </New>
    </Arg>
  </New>
</Configure>| 1 | Use the org.eclipse.jetty.ee10.factories.MailSessionReference class to hold the configuration. |
| 2 | Set the username for the mail instance. |
| 3 | Set the password for the mail instance — use the Jetty Password tool to obfuscate the password. |
| 4 | Set all other applicable properties. |
The webapp performs a lookup for java:comp/env/mail/Session at runtime and obtains a javax.mail.Session that has the correct configuration to permit it to send email via SMTP.
|
Jetty does not provide the Note also that the J2EE Specification recommends storing JavaMail connection factories under |
org.eclipse.jetty.plus.jndi.Transaction
To perform distributed transactions with your resources, a transaction manager that supports the JTA interfaces is required.
The transaction manager is looked up by the application as java:comp/UserTransaction.
Jetty does not ship with a JTA manager, but does provide the infrastructure to plug in the JTA manager of your choice.
If your JTA library’s implementation of UserTransaction implements javax.naming.Reference, then you should use the org.eclipse.jetty.plus.jndi.Transaction object in a Jetty XML file to register it in JNDI:
  <New id="tx" class="org.eclipse.jetty.plus.jndi.Transaction">
    <Arg><Property name="environment" default="ee10"/></Arg>
    <Arg>
      <New class="org.example.MyUserTransactionReference" />
    </Arg>
  </New>
If your JTA library’s implementation of UserTransaction does not implement javax.naming.Reference, then you should use the Jakarta EE specific Jetty class to register it in JNDI:
  <New id="tx" class="org.eclipse.jetty.ee10.plus.jndi.Transaction">
    <Arg><Property name="environment" default="ee10"/></Arg>
    <Arg>
      <New class="org.example.MyUserTransaction" />
    </Arg>
  </New>
Jetty will automatically bind this JTA manager to the webapp’s JNDI namespace at java:comp/UserTransaction.
org.eclipse.jetty.plus.jndi.Link
Usually, the name you provide for the org.eclipse.jetty.plus.jndi.Resource is the same name you reference in web.xml.
This ensures that the two are linked together and thus accessible to your webapp.
However, if the names cannot be the same, then it is possible to effectively alias one to another using an org.eclipse.jetty.plus.jndi.Link.
Supposing you have a declaration for a Datasource named jdbc/workforce in a Jetty context XML file, but your web.xml wants to link to a <resource-ref> named jdbc/employees, and you cannot edit the web.xml.
You can create a WEB-INF/jetty-env.xml file with an org.eclipse.jetty.plus.jndi.Link that ties together the names jdbc/workforce and jdbc/employees:
The context XML file declares jdbc/workforce:
<Configure id='wac' class="org.eclipse.jetty.ee10.webapp.WebAppContext">
  <New class="org.eclipse.jetty.plus.jndi.Resource">
    <Arg><Ref refid="wac"/></Arg>
    <Arg>jdbc/workforce</Arg>
    <Arg>
      <New class="org.apache.derby.jdbc.EmbeddedDataSource">
        <Set name="DatabaseName">test</Set>
        <Set name="createDatabase">create</Set>
      </New>
    </Arg>
  </New>
</Configure>
The web.xml refers to it as jdbc/employees:
<resource-ref>
  <res-ref-name>jdbc/employees</res-ref-name>
  <res-type>javax.sql.DataSource</res-type>
  <res-auth>Container</res-auth>
</resource-ref>
Create a WEB-INF/jetty-env.xml file with a org.eclipse.jetty.plus.jndi.Link to link these names together:
<New class="org.eclipse.jetty.plus.jndi.Link">
  <Arg><Ref refid='wac'/></Arg>
  <Arg>jdbc/employees</Arg> (1)
  <Arg>jdbc/workforce</Arg>  (2)
</New>| 1 | The name as referenced in the web.xml file. |
| 2 | The name as referenced in the context XML file. |
Jetty XML files
You can define naming resources in three places:
- Server XML file
-
Naming resources defined in a server XML file are scoped at the JVM,
org.eclipse.jetty.server.Serveror environment level. Note that the classes for the resource must be visible at the point in time that the XML executes. For example, environment level resources should be declared in an XML file that is referenced by a custom module that contains an[environment]clause at the matching environment level to ensure the classpath for that environment is available. - Context XML file
-
Entries in a context XML file should be scoped at the level of the webapp to which they apply (it is possible to use a less strict scoping level of Server or JVM, but not recommended). As a context XML file executes before the webapp’s classes are available, the classes for your resource must be external to the webapp and on either the container or environment classpath.
- WEB-INF/jetty-env.xml
-
Naming resources in a
WEB-INF/jetty-env.xmlfile are scoped to the webapp in which the file resides. The resources defined here may use classes from inside your webapp.
Resource scoping
Naming resources within Jetty belong to different scopes, in increasing order of restrictiveness:
JVM scope:
The name is unique across the JVM instance, and is visible to all application code.
This scope is represented by a null first parameter to the resource declaration.
For example:
<New id="cf" class="org.eclipse.jetty.plus.jndi.Resource">
  <Arg></Arg>  (1)
  <Arg>jms/connectionFactory</Arg>
  <Arg>
    <New class="org.apache.activemq.ActiveMQConnectionFactory">
       <Arg>vm://localhost?broker.persistent=false</Arg>
    </New>
  </Arg>
</New>| 1 | Empty first arg equates to JVM scope for the object bound to name jms/connectionFactory. |
Environment scope: The name is unique within a Jetty environment. It is represented by referencing the name of the Jakarta EE environment as the first parameter to the resource declaration. For example:
<New id="cf" class="org.eclipse.jetty.plus.jndi.Resource">
  <Arg>ee10</Arg>  (1)
  <Arg>jms/connectionFactory</Arg>
  <Arg>
    <New class="org.apache.activemq.ActiveMQConnectionFactory">
      <Arg>vm://localhost?broker.persistent=false</Arg>
    </New>
  </Arg>
</New>
Webapp scope:
The name is unique to the org.eclipse.jetty.ee{8,9,10}.webapp.WebAppContext instance, and is only visible to that application.
This scope is represented by referencing the instance as the first parameter to the resource declaration.
For example:
<New class="org.eclipse.jetty.plus.jndi.Resource">
  <Arg><Ref refid='wac'/></Arg> (1)
  <Arg>jms/connectionFactory</Arg>
  <Arg>
    <New class="org.apache.activemq.ActiveMQConnectionFactory">
      <Arg>vm://localhost?broker.persistent=false</Arg>
    </New>
  </Arg>
</New>
JAAS
JAAS implements a Java version of the standard Pluggable Authentication Module (PAM) framework.
JAAS can be used for two purposes:
-
for authentication of users, to reliably and securely determine who is currently executing Java code, regardless of whether the code is running as an application, an applet, a bean, or a servlet
-
for authorization of users to ensure they have the access control rights (permissions) required to do the actions performed
JAAS authentication is performed in a pluggable fashion. This permits applications to remain independent from underlying authentication technologies. New or updated authentication technologies can be plugged under an application without requiring modifications to the application itself.
See Java Authentication and Authorization Service (JAAS) Reference Guide for more information about JAAS.
The Jetty JAAS support aims to dictate as little as possible whilst providing a sufficiently flexible infrastructure to allow users to drop either one of the JAAS Login Modules that ships with Jetty, or their own custom LoginModules.
Configuration
The jaas module
Enable the ee{8,9,10}-jaas module appropriate for your EE platform:
# DO NOT EDIT THIS FILE - See: https://eclipse.dev/jetty/documentation/

[description]
Enables JAAS for deployed web applications.

[depend]
security

[before]
deploy

[xml]
etc/jetty-jaas.xml

[ini-template]
## The file location (relative to $jetty.base) for the
## JAAS "java.security.auth.login.config" system property
# jetty.jaas.login.conf=etc/login.conf
The configurable items in the resulting $jetty.base/start.d/jaas.ini file are:
- jetty.jaas.login.conf
-
This is the location of the file that will be referenced by the system property
java.security.auth.login.config: Jetty sets this system property for you based on the value of this property. The value of this property is assumed to be relative to$JETTY_BASE. The default value isetc/login.conf, which resolves to$JETTY_BASE/etc/login.conf. If you don’t want to put your login module configuration file here, you can change this property to point to where it is.
See more about the contents of this file in the Configuring JAAS section.
Configure the webapp for JAAS
The <realm-name> in web.xml will be used to identify the org.eclipse.jetty.security.jaas.JAASLoginService declaration that integrates JAAS with Jetty.
For example, this web.xml contains a realm called Test JAAS Realm:
<login-config>
  <auth-method>FORM</auth-method>
  <realm-name>Test JAAS Realm</realm-name> (1)
  <form-login-config>
    <form-login-page>/login/login</form-login-page>
    <form-error-page>/login/error</form-error-page>
  </form-login-config>
</login-config>| 1 | The name of the realm, which must be identical to the name of an org.eclipse.jetty.security.jaas.JAASLoginService declaration. |
We now need to declare an org.eclipse.jetty.security.jaas.JAASLoginService that references the realm name of Test JAAS Realm.
Here’s an example of a suitable XML snippet:
<New class="org.eclipse.jetty.security.jaas.JAASLoginService">
  <Set name="Name">Test JAAS Realm</Set> (1)
  <Set name="LoginModuleName">xyz</Set> (2)
</New>| 1 | The name is the same as that declared in the <realm-name> in web.xml. |
| 2 | The name that identifies a set of javax.security.auth.spi.LoginModule configurations that comprise the JAAS config file identified in the jetty.jaas.login.conf property of the jaas module. |
The org.eclipse.jetty.security.jaas.JAASLoginService can be declared in a couple of different places, pick whichever suits your purposes best:
-
If you have more than one webapp that you would like to use the same security infrastructure, then you can declare your
org.eclipse.jetty.security.jaas.JAASLoginServiceas a bean that is added to theorg.eclipse.jetty.server.Server. The file in which you declare this needs to be on Jetty’s execution path. The recommended procedure is to create a file in your$jetty.base/etcdirectory and then ensure it is on the classpath either by adding it to the Jetty start command line, or more conveniently to a custom module.Here’s an example of this type of XML file:
<?xml version="1.0"?> <!DOCTYPE Configure PUBLIC "-//Jetty//Configure//EN" "https://eclipse.dev/jetty/configure_10_0.dtd"> <Configure id="Server" class="org.eclipse.jetty.server.Server"> <Call name="addBean"> <Arg> <New class="org.eclipse.jetty.security.jaas.JAASLoginService"> <Set name="name">Test JAAS Realm</Set> <Set name="LoginModuleName">xyz</Set> </New> </Arg> </Call> </Configure> -
Alternatively, if you want to use JAAS with a specific webapp only, you declare your
org.eclipse.jetty.security.jaas.JAASLoginServicein a context XLM file specific to that webapp:<?xml version="1.0"?> <!DOCTYPE Configure PUBLIC "-//Jetty//Configure//EN" "https://eclipse.dev/jetty/configure_10_0.dtd"> <Configure class="org.eclipse.jetty.ee9.webapp.WebAppContext"> <Set name="securityHandler"> <New class="org.eclipse.jetty.security.ConstraintSecurityHandler"> <Set name="loginService"> <New class="org.eclipse.jetty.security.jaas.JAASLoginService"> <Set name="name">Test JAAS Realm</Set> <Set name="loginModuleName">xyz</Set> </New> </Set> </New> </Set> </Configure>
Configure JAAS
We now need to setup the contents of the file we specified as the jetty.jaas.login.conf property when we configured the jaas module.
Refer to the syntax rules of this file for a full description.
Remembering the example we set up previously, the contents of the $jetty.base/etc/login.conf file could look as follows:
xyz  { (1)
  com.acme.SomeLoginModule required debug=true; (2)
  com.other.OtherLoginModule optional; (3)
};| 1 | The name of the configuration exactly as specified in your org.eclipse.jetty.security.jaas.JAASLoginService declaration. |
| 2 | The first LoginModule declaration, containing the classname of the LoginModule and its configuration properties. |
| 3 | A second LoginModule declaration.
You can provide as many LoginModule alternatives as you like, with a minimum of one.
Refer to the JAAS documentation for more information on the standard configuration properties, and how JAAS interprets this file. |
Provided LoginModules
|
Passwords can be obfuscated using the Jetty Password tool. |
JDBCLoginModule
The org.eclipse.jetty.security.jaas.spi.JDBCLoginModule stores user passwords and roles in a database accessed via JDBC calls.
You can configure the JDBC connection information, as well as the names of the table and columns storing the username and credential, and the names of the table and columns storing the roles.
Here is an example login module configuration file entry for it using an HSQLDB driver:
jdbc { (1)
  org.eclipse.jetty.security.jaas.spi.JDBCLoginModule required (2) (3)
  dbUrl="jdbc:hsqldb:." (4)
  dbUserName="sa" (5)
  dbDriver="org.hsqldb.jdbcDriver" (6)
  userTable="myusers" (7)
  userField="myuser" (8)
  credentialField="mypassword" (9)
  userRoleTable="myuserroles" (10)
  userRoleUserField="myuser" (11)
  userRoleRoleField="myrole"; (12)
};| 1 | The name of the configuration. |
| 2 | The name of the LoginModule class. |
| 3 | A standard JAAS flag making successful authentication via this LoginModule mandatory. |
| 4 | The JDBC url used to connect to the database. |
| 5 | The name of the JDBC user to use for the connection. |
| 6 | The name of the JDBC Driver class. |
| 7 | The name of the table holding the user authenication information. |
| 8 | The name of the column holding the user name. |
| 9 | The name of the column holding the user credential. |
| 10 | The name of the table holding the user authorization information. |
| 11 | The name of the column holding the user name. |
| 12 | The name of the column holding the user role. |
The properties 7-12 are used to format the following queries:
select <credentialField> from <userTable> where <userField>=?
select <userRoleRoleField> from <userRoleTable> where <userRoleUserField>=?
Credential and role information is lazily read from the database when a previously unauthenticated user requests authentication. Note that this information is only cached for the length of the authenticated session. When the user logs out or the session expires, the information is flushed from memory.
Note that passwords can be stored in the database in plain text or encoded formats — see the note on "Passwords/Credentials" above.
DataSourceLoginModule
Similar to the org.eclipse.jetty.security.jaas.spi.JDBCLoginModule, but using a javax.sql.DataSource to connect to the database instead of a JDBC driver.
The javax.sql.DataSource is obtained at runtime by performing a JNDI lookup on java:comp/env/${dnJNDIName}.
A sample login module configuration for this LoginModule:
ds { (1)
  org.eclipse.jetty.security.jaas.spi.DataSourceLoginModule required (2) (3)
  dbJNDIName="ds" (4)
  userTable="myusers" (5)
  userField="myuser" (6)
  credentialField="mypassword" (7)
  userRoleTable="myuserroles" (8)
  userRoleUserField="myuser" (9)
  userRoleRoleField="myrole"; (10)
};| 1 | The name of the configuration. |
| 2 | The name of the LoginModule class. |
| 3 | A standard JAAS flag making successful authentication via this LoginModule mandatory. |
| 4 | The JNDI name, relative to java:comp/env/ to lookup to obtain the javax.sql.DataSource. |
| 5 | The name of the table holding the user authenication information. |
| 6 | The name of the column holding the user name. |
| 7 | The name of the column holding the user credential. |
| 8 | The name of the table holding the user authorization information. |
| 9 | The name of the column holding the user name. |
| 10 | The name of the column holding the user role. |
PropertyFileLoginModule
With this login module implementation, the authentication and role information is read from a property file.
props { (1)
  org.eclipse.jetty.security.jaas.spi.PropertyFileLoginModule required  (2) (3)
  file="/somewhere/somefile.props"; (4)
};| 1 | The name of the configuration. |
| 2 | The name of the LoginModule class. |
| 3 | A standard JAAS flag making successful authentication via this LoginModule mandatory. |
| 4 | The location of a properties file containing the authentication and authorization information. |
The property file must be of the format:
<username>: <password> [,<rolename> ...]Here’s an example:
fred: OBF:1xmk1w261u9r1w1c1xmq,user,admin
harry: changeme,user,developer
tom: MD5:164c88b302622e17050af52c89945d44,user
dick: CRYPT:adpexzg3FUZAk,admin
The contents of the file are fully read in and cached in memory the first time a user requests authentication.
LdapLoginModule
The org.eclipse.jetty.security.jaas.spi.LdapLoginModule uses LDAP to access authentication and authorization information stored in a directory.
The LDAP connection information and structure of the authentication/authorization data can be configured.
Here’s an example:
example  { (1)
  org.eclipse.jetty.security.jaas.spi.LdapLoginModule required  (2) (3)
  contextFactory="com.sun.jndi.ldap.LdapCtxFactory" (4)
  hostname="ldap.example.com" (5)
  port="389" (6)
  bindDn="cn=Directory Manager" (7)
  bindPassword="directory" (8)
  authenticationMethod="simple" (9)
  useLdaps="true" (10)
  userBaseDn="ou=people,dc=alcatel" (11)
  userRdnAttribute="uid" (12)
  userIdAttribute="cn" (13)
  userPasswordAttribute="userPassword" (14)
  userObjectClass="inetOrgPerson" (15)
  roleBaseDn="ou=groups,dc=example,dc=com" (16)
  roleNameAttribute="cn" (17)
  roleMemberAttribute="uniqueMember" (18)
  roleObjectClass="groupOfUniqueNames"; (19)
  forceBindingLogin="false" (20)
  debug="false" (21)
};| 1 | The name of the configuration. |
| 2 | The name of the LoginModule class. |
| 3 | A standard JAAS flag making successful authentication via this LoginModule mandatory. |
| 4 | The name of the context factory to use for the LDAP connection. |
| 5 | The hostname for the LDAP connection. Optional. |
| 6 | The port for the LDAP connection. Optional. |
| 7 | The caller security Principal. Optional. |
| 8 | The caller security credential. Optional. |
| 9 | The security level for the LDAP connection environment. Optional. |
| 10 | If true, use ldaps instead of ldap for the connection url. |
| 11 | The distinguished name of the directory to search for user information. |
| 12 | The name of the attribute for the user roles. |
| 13 | The name of the attribute for the user id. |
| 14 | The name of the attribute for the user password. |
| 15 | The ObjectClass for users. |
| 16 | The distinguished name of the directory to search for role information. |
| 17 | The name of the attribute for roles. |
| 18 | The name of the attribute storing the user for the roles ObjectClass. |
| 19 | The name of the ObjectClass for roles. |
| 20 | If true, the authentication proceeds on the basis of a successful LDAP binding using the username and credential provided by the user. If false, then authentication proceeds based on username and password information retrieved from LDAP. |
| 21 | If true, failed login attempts are logged on the server. |
JASPI
Enabling this module allows Jetty to utilize authentication modules that implement the Jakarta Authentication (JASPI) specification. JASPI provides an SPI (Service Provider Interface) for pluggable, portable, and standardized authentication modules. Compatible modules are portable between servers that support the JASPI specification. This module provides a bridge from Jakarta Authentication to the Jetty Security framework.
Only modules conforming to the "Servlet Container Profile" with the ServerAuthModule interface within the JakartaAuthentication are supported. These modules must be configured before start-up. Operations for runtime registering or de-registering authentication modules are not supported.
Configuration
The jaspi module
Enable the jaspi module:
# DO NOT EDIT THIS FILE - See: https://eclipse.dev/jetty/documentation/

[description]
Enables JASPI authentication for deployed web applications.

[environment]
ee10

[tags]
security

[depend]
ee10-security
auth-config-factory

[ini]
ee10.jakarta.authentication.api.version?=3.0.0

[lib]
lib/jetty-ee10-jaspi-${jetty.version}.jar
lib/ee10-jaspi/jakarta.authentication-api-${ee10.jakarta.authentication.api.version}.jar

[xml]
etc/jaspi/jetty-ee10-jaspi-authmoduleconfig.xml

[files]
basehome:etc/jaspi/jetty-ee10-jaspi-authmoduleconfig.xml|etc/jaspi/jetty-ee10-jaspi-authmoduleconfig.xml
Configure JASPI
Activate either the ee9-jaspi or ee10-jaspi module, whichever matches your EE platform version.
$ java -jar $JETTY_HOME/start.jar --add-modules=ee10-jaspiYou can then register a AuthConfigProvider onto the static AuthConfigFactory obtained with AuthConfigFactory.getFactory(). This registration can be done in the XML configuration file which will be copied to $JETTY_BASE/etc/jaspi/jaspi-authmoduleconfig.xml when the module is enabled.
JASPI Demo
The ee9-jaspi-demo and ee10-jaspi-demo modules illustrate setting up HTTP Basic Authentication using the EE9 and EE 10 Jakarta Authentication modules that come packaged with Jetty.
The following example uses Jetty’s EE 10 implementation of AuthConfigProvider to register a ServerAuthModule directly.
<?xml version="1.0"?>
<!DOCTYPE Configure PUBLIC "-//Jetty//Configure//EN" "https://www.eclipse.org/jetty/configure_10_0.dtd">

<Configure>
  <Call class="jakarta.security.auth.message.config.AuthConfigFactory" name="getFactory">
    <Call name="registerConfigProvider">

      <!-- The Jetty provided implementation of AuthConfigProvider which will wrap a ServerAuthModule. -->
      <Arg type="String">org.eclipse.jetty.ee10.security.jaspi.provider.JaspiAuthConfigProvider</Arg>

      <!-- A Map of initialization properties. -->
      <Arg>
        <Map>
          <Entry>
            <!-- Provide the fully qualified classname of the ServerAuthModule to be used. -->
            <Item>ServerAuthModule</Item>
            <Item>org.eclipse.jetty.ee10.security.jaspi.modules.BasicAuthenticationAuthModule</Item>
          </Entry>
          <Entry>
            <!-- Realm as utilised by Jetty Security  -->
            <Item>org.eclipse.jetty.ee10.security.jaspi.modules.RealmName</Item>
            <Item>Test Realm</Item>
          </Entry>
        </Map>
      </Arg>

      <!-- Message Layer Identifier as per spec chapter 3.1  -->
      <Arg type="String">HttpServlet</Arg>

      <!-- Application Context Identifier as per spec chapter 3.2

        AppContextID ::= hostname blank context-path
        The algorithm applied here will use the
        _serverName on the configured JaspiAuthenticatorFactory (if set) and try to match it
        against the "server" part (in the "server /test" example below).
        Next it will try to match the ServletContext#getVirtualServerName to the "server" part.
        If neither are set, it will then try to match the first Subject's principal name, and finally fall back to
        the default value "server" if none are available.

        The context-path should match the context path where this applies.
      -->
      <Arg type="String">server /test</Arg>

      <!-- A friendly description of the provided auth-module. -->
      <Arg type="String">A simple provider using HTTP BASIC authentication.</Arg>
    </Call>
  </Call>
</Configure>
Other custom or 3rd party modules that are compatible with the ServerAuthModule interface in JASPI can be registered in the same way.
Integration with Jetty Authentication Mechanisms
To integrate with Jetty authentication mechanisms you must add a LoginService to your context. The LoginService provides a way for you to obtain a UserIdentity from a username and credentials. JASPI can interact with this Jetty LoginService by using the PasswordValidationCallback.
The CallerPrincipalCallback and GroupPrincipalCallback do not require use of a Jetty LoginService. The principal from the CallerPrincipalCallback will be used directly with the IdentityService to produce a UserIdentity.
Replacing the Jetty DefaultAuthConfigFactory
Jetty provides an implementation of the AuthConfigFactory interface which is used to register AuthConfigProviders. This can be replaced by a custom implementation by adding a custom module which provides auth-config-factory.
This custom module must reference an XML file which sets a new instance of the AuthConfigFactory with the static method AuthConfigFactory.setFactory().
For an example of this see the ee10-jaspi-default-auth-config-factory module, which provides the default implementation used by Jetty.
# DO NOT EDIT THIS FILE - See: https://eclipse.dev/jetty/documentation/

[description]
Provides a DefaultAuthConfigFactory for jaspi

[environment]
ee10

[tags]
security

[depend]
ee10-security

[provide]
auth-config-factory

[xml]
etc/jaspi/jetty-ee10-jaspi-default.xml
JMX Monitoring & Management
Monitoring and management of a Jetty server is important because it allows you to monitor the status of the server ("Is the server processing requests?") and to manage — i.e. read and possibly change — its configuration.
The ability to read and change the Jetty configuration is very important for troubleshooting Jetty — please refer to the troubleshooting section for more information.
Jetty relies on the Java Management Extensions (JMX) APIs included in OpenJDK to provide monitoring and management.
The JMX APIs support a JVM-local MBeanServer, accessible only from within the JVM itself (or by tools that can attach to a running JVM), and a way to expose the MBeanServer to remote clients via Java’s RMI (Remote Method Invocation).
Enabling Local JMX Support
As with many other Jetty features, local JMX support is enabled with the jmx Jetty module:
$ java -jar $JETTY_HOME/start.jar --add-modules=jmx
With the jmx Jetty module enabled, Jetty components will be exported as JMX MBeans to the JVM platform MBeanServer, so that they can be accessed by JMX compliant tools.
Each Jetty component will export to its correspondent MBean relevant configuration parameters, so that a JMX tool can read and possibly change the component configuration through the MBean.
Note that the Jetty MBeans are registered into the platform MBeanServer, but are not available to remote clients: they are local to the JVM.
This configuration is useful when you develop and test your Jetty server locally.
JMX compliant tools such as Java Mission Control (JMC) can be started locally on your machine and can attach to other JVMs running on your machine, showing you the registered MBeans among which you will find the Jetty MBeans.
| Enabling only the local JMX support is the most secure option for monitoring and management, but only users that have local access to the JVM will be able to browse the MBeans. If you need to access the MBeans from a remote machine, read this section. |
Enabling Remote JMX Support
There are two ways to configure a Jetty server so that it is possible to access the JVM platform MBeans from remote clients:
-
Use the
com.sun.management.jmxremoteand related system properties when starting Jetty. Unfortunately, this solution does not work well with firewalls, and will not be discussed further. -
Use the
jmx-remoteJetty module.
Both ways use Java’s Remote Method Invocation (RMI) to communicate between the client and the server.
|
Refresher: How RMI Works
A server application that wants to make an object available to remote clients must export the object. Exporting an object creates an RMI stub that contains the host/port of the RMI server that accepts incoming invocations from clients and forwards them to the object.
During the creation of the RMI stub, the host stored in the RMI stub is retrieved from the local name resolution system (for example, in Linux, from The RMI stub is then sent, along with a name that uniquely identifies the object, to the RMI registry. The RMI registry is a service that maps names to RMI stubs; it may be external to both clients and server, although often it is part of the server JVM. When a client application wants to connect to the server object using RMI, it first connects to the RMI registry to download the RMI stub for the RMI server; recall that the RMI stub contains the host/port to connect to the RMI server. Then, the client uses the RMI stub to connect to the RMI server, typically to a host/port that may be different from the RMI registry host/port (in particular, by default the RMI server port will be different from the RMI registry port). |
Remote access to the platform MBeans, and therefore the Jetty MBeans, is enabled by the jmx-remote Jetty module:
$ java -jar $JETTY_HOME/start.jar --add-modules=jmx-remote
This command creates the jmx-remote.ini file:
JETTY_BASE
└── start.d
    └── jmx-remote.ini
Enabling the jmx-remote module transitively enables the jmx module as well.
The configuration for the RMI registry and the RMI server is specified by a JMXServiceURL.
The string format of an RMI JMXServiceURL is the following:
service:jmx:rmi://<rmi_server_host>:<rmi_server_port>/jndi/rmi://<rmi_registry_host>:<rmi_registry_port>/jmxrmi
Below you can find examples of JMXServiceURLs:
service:jmx:rmi:///jndi/rmi:///jmxrmi
where:
  rmi_server_host = local host address
  rmi_server_port = randomly chosen
  rmi_registry_host = local host address
  rmi_registry_port = 1099

service:jmx:rmi://0.0.0.0:1099/jndi/rmi://0.0.0.0:1099/jmxrmi
where:
  rmi_server_host = any address
  rmi_server_port = 1099
  rmi_registry_host = any address
  rmi_registry_port = 1099

service:jmx:rmi://localhost:1100/jndi/rmi://localhost:1099/jmxrmi
where:
  rmi_server_host = loopback address
  rmi_server_port = 1100
  rmi_registry_host = loopback address
  rmi_registry_port = 1099
The default JMXServiceURL configured by the jmx-remote module is the following:
service:jmx:rmi://localhost:1099/jndi/rmi://localhost:1099/jmxrmi
With the default configuration, only clients that are local to the server machine can connect to the RMI registry and RMI server - this is done for security reasons. However, even with this local-only configuration, it would still be possible to access the MBeans from remote using an SSH tunnel, as explained in this section.
By specifying an appropriate JMXServiceURL, you can fine tune the network address the RMI registry and the RMI server bind to, and the ports that the RMI registry and the RMI server listen to.
The RMI server and RMI registry hosts and ports can be the same (as in the default configuration) because RMI is able to multiplex traffic arriving to one port to multiple RMI objects.
If you need to allow JMX remote access through a firewall, you must open both the RMI registry and the RMI server ports.
The default configuration simplifies the firewall configuration because you only need to open port 1099.
|
When Jetty is started with the The RMI stub contains the host/port to connect to the RMI server, but the host is typically the machine host name, not the host specified in the To control the host stored in the RMI stub you need to set the system property |
If your client cannot connect to the server, the most common cause is a mismatch between the RMI server host of the JMXServiceURL and the RMI server host of the RMI stub.
|
You can customize the RMI server host/port, the RMI registry host/port and the system property java.rmi.server.hostname by editing the jmx-remote.ini configuration file.
Further information about the jmx-remote module configuration can be found here.
Remote JMX Access with Port Forwarding via SSH Tunnel
You can access JMX MBeans on a remote machine when the RMI ports are not open, for example because of firewall policies, but you have SSH access to the machine, using local port forwarding via an SSH tunnel.
In this case you want to configure the JMXServiceURL that binds the RMI server and the RMI registry to the loopback interface only and to the same port:
service:jmx:rmi://localhost:1099/jndi/rmi://localhost:1099/jmxrmi
You must set the system property -Djava.rmi.server.hostname=localhost so that the RMI stub contains localhost as the host name to connect to.
This is, incidentally, the default configuration of the jmx-remote module.
Then you set up the local port forwarding with the SSH tunnel:
$ ssh -L 1099:localhost:1099 <user>@<machine_host>
Thanks to the local port forwarding of the SSH tunnel, when the client connects to localhost:1099 on your local computer, the traffic will be forwarded to machine_host and when there, the SSH daemon will forward the traffic to localhost:1099 on machine_host, which is exactly where the RMI server and the RMI registry listens to.
The client first contacts the RMI registry, so it connects to localhost:1099 on your local computer; the traffic is forwarded to machine_host through the SSH tunnel, connects to the RMI registry and the RMI stub is downloaded to the client.
Then the client uses the RMI stub to connect to the RMI server. The RMI stub contains localhost as the RMI server host because that is what you have configured with the system property java.rmi.server.hostname.
The client will connect again to localhost:1099 on your local computer, this time to contact the RMI server; the traffic is forwarded to machine_host through the SSH tunnel, arrives to machine_host and connects to the RMI server.
Remote JMX Access Authentication & Authorization
The standard javax.management.remote.JMXConnectorServer class, used by the jmx-remote module to provide remote JMX access to Jetty MBeans, provides several options to authenticate and authorize users.
For a complete guide to controlling authentication and authorization in JMX, see the official JMX documentation.
The simplest way to control JMX authentication and authorization is to specify two files: one contains username and password pairs, and the other contains username and permission pairs.
This is achieved by enabling the jmx-remote-auth Jetty module:
$ java -jar $JETTY_HOME/start.jar --add-modules=jmx-remote-auth
Enabling the jmx-remote-auth Jetty module creates the following files:
$JETTY_BASE
├── etc
│   ├── jmxremote.access
│   ├── jmxremote.password
│   └── jmx-remote-auth.xml
└── start.d
    ├── jmx-remote-auth.ini
    └── jmx-remote.ini
Then you edit the $JETTY_BASE/etc/jmxremote.password file, adding the username/password pairs that you need:
# The file format is: <username> <password>
alice wonderland
bob marley
You must also edit the $JETTY_BASE/etc/jmxremote.access file to give permissions to your users:
# The file format is: <username> <readonly|readwrite>
alice readwrite
bob readonly
The above files define user alice with password wonderland to have readwrite access, and user bob with password marley to have readonly access.
Securing Remote JMX Access with TLS
The JMX communication via RMI happens by default in clear-text, but it is possible to secure the JMX communication via RMI with TLS.
If you want to reuse the configuration that you are using for the https module, you can just enable the jmx-remote-ssl.xml Jetty module:
$ java -jar $JETTY_HOME/start.jar --add-modules=jmx-remote-ssl
|
The |
The KeyStore must contain a valid certificate signed by a Certification Authority. Having certificates signed by a Certification Authority simplifies by a lot the configuration needed to get the RMI communication over TLS working properly.
The RMI mechanic is the usual one: the RMI client (typically a monitoring console) will connect first to the RMI registry (using TLS), download the RMI stub that contains the address and port of the RMI server to connect to, then connect to the RMI server (using TLS).
This also mean that if the RMI registry and the RMI server are on different hosts, the RMI client must have available the cryptographic material to validate the certificates from both hosts. This is where having certificates signed by a Certification Authority simplifies the configuration: if they are signed by a well known Certification Authority, the client does not need any extra configuration — everything will be handled by the Java runtime.
If the certificates are not signed by a Certification Authority (for example the certificate is self-signed), then you need to specify the TLS system properties that allow RMI (especially when acting as an RMI client) to retrieve the cryptographic material necessary to establish the TLS connection.
|
When the RMI server exports the |
You must edit the $JETTY_BASE/start.d/jmx-remote-ssl.ini file and add the TrustStore path and password:
--module=jmx-remote-ssl # System properties necessary for non-trusted certificates. -Djavax.net.ssl.trustStore=/path/to/trustStore.p12 -Djavax.net.ssl.trustStorePassword=password
|
The TrustStore must contain the certificate you want to trust. If you are using self-signed certificates, the KeyStore already contains the self-signed certificate and therefore the KeyStore can be used as a TrustStore, and the system properties above can refer to the KeyStore path and password. |
JMX compliant tools that offer a graphical user interface also must be started specifying the TrustStore path and password.
For example, to launch Java Mission Control (JMC):
$ jmc -vmargs -Djavax.net.ssl.trustStore=/path/to/trustStore.p12 -Djavax.net.ssl.trustStorePassword=password
Jetty Tools
Password Obfuscation
There are many cases where you might need to provide credentials such as usernames and passwords to authenticate your access to certain services, for example KeyStore and TrustStore passwords, JDBC credentials, Basic or Digest authentication credentials, etc.
Passwords are typically stored in clear-text in configuration files, because a program such as Jetty reading the configuration file must be able to retrieve the original password to authenticate with the service.
You can protect clear-text stored passwords from casual view by obfuscating them using class org.eclipse.jetty.util.security.Password:
$ java -cp jetty-util-12.0.9-SNAPSHOT.jar org.eclipse.jetty.util.security.Password --prompt
Username: (1)
Password: secret (2)
OBF:1yta1t331v8w1v9q1t331ytc (3)
MD5:5eBe2294EcD0E0F08eAb7690D2A6Ee69 (4)| 1 | Hit Enter to specify a blank user. |
| 2 | Enter the password you want to obfuscate. |
| 3 | The obfuscated password. |
| 4 | The MD5 checksum of the password. |
The Password tool produced an obfuscated string for the password secret, namely OBF:1yta1t331v8w1v9q1t331ytc (the prefix OBF: must be retained).
The obfuscated string can be de-obfuscated to obtain the original password.
Now you can use the obfuscated password in Jetty configuration files, for example to specify the KeyStore password in ssl.ini when configuring secure connectors, as explained here.
For example:
jetty.sslContext.keyStorePassword=OBF:1yta1t331v8w1v9q1t331ytc| Remember that password obfuscation only protects from casual view — it can be de-obfuscated to obtain the original password. |
| You can also use the obfuscated password in your Java source code. |
You can also use obfuscated passwords in Jetty XML files where a clear-text password is usually required.
Here is an example, setting an obfuscated password for a JDBC DataSource:
<New id="myDS" class="org.eclipse.jetty.plus.jndi.Resource">
<Arg></Arg>
<Arg>jdbc/myDS</Arg>
<Arg>
<New class="com.zaxxer.hikari.HikariDataSource">
<Arg>
<New class="com.zaxxer.hikari.HikariConfig">
<Set name="dataSourceClassName">org.postgresql.ds.PGSimpleDataSource</Set>
<Set name="username">dbuser</Set>
<Set name="password">
<Call class="org.eclipse.jetty.util.security.Password" name="deobfuscate"> (1)
<Arg>OBF:1yta1t331v8w1v9q1t331ytc</Arg>
</Call>
</Set>
...
</New>
</Arg>
</New>
</Arg>
</New>| 1 | Note the usage of Password.deobfuscate(...) to avoid storing the clear-text password in the XML file. |
Troubleshooting
To troubleshoot Jetty when used as a production server, there are two main tools: the Jetty Server Dump and enabling DEBUG level logging.
Jetty is based on components organized as a tree, with the Server instance at the root of the tree.
As explained in the JMX section, these components can be exported as JMX MBeans and therefore be accessible from JMX Consoles such as Java Missions Control (JMC).
Being able to take a snapshot of the state of Jetty while it is running is the most useful information that can be attached when reporting an issue. Such state includes:
-
The thread pool configuration and its current state, including how many threads are in use, and their stack trace.
-
The TLS configuration.
-
The I/O configuration and its current state, including the ports Jetty listens to, how many connections are currently open, and he state of each connection, and the state of the request/response handling for each connection.
-
The
Handlerstructure and its configuration. -
The web applications deployed and their configurations, including the class loader information.
The prerequisite for troubleshooting is to enable JMX, so that Jetty — possibly a production server — can be accessed from a remote location to obtain the information exported via JMX, and possibly be able to reconfigure Jetty to solve the issue.
| Make sure you read about how to secure the access to Jetty when using remote JMX. |
Server Dump
The Jetty Server Dump is obtained by invoking, via JMX, the Server.dump() operation, as shown below.
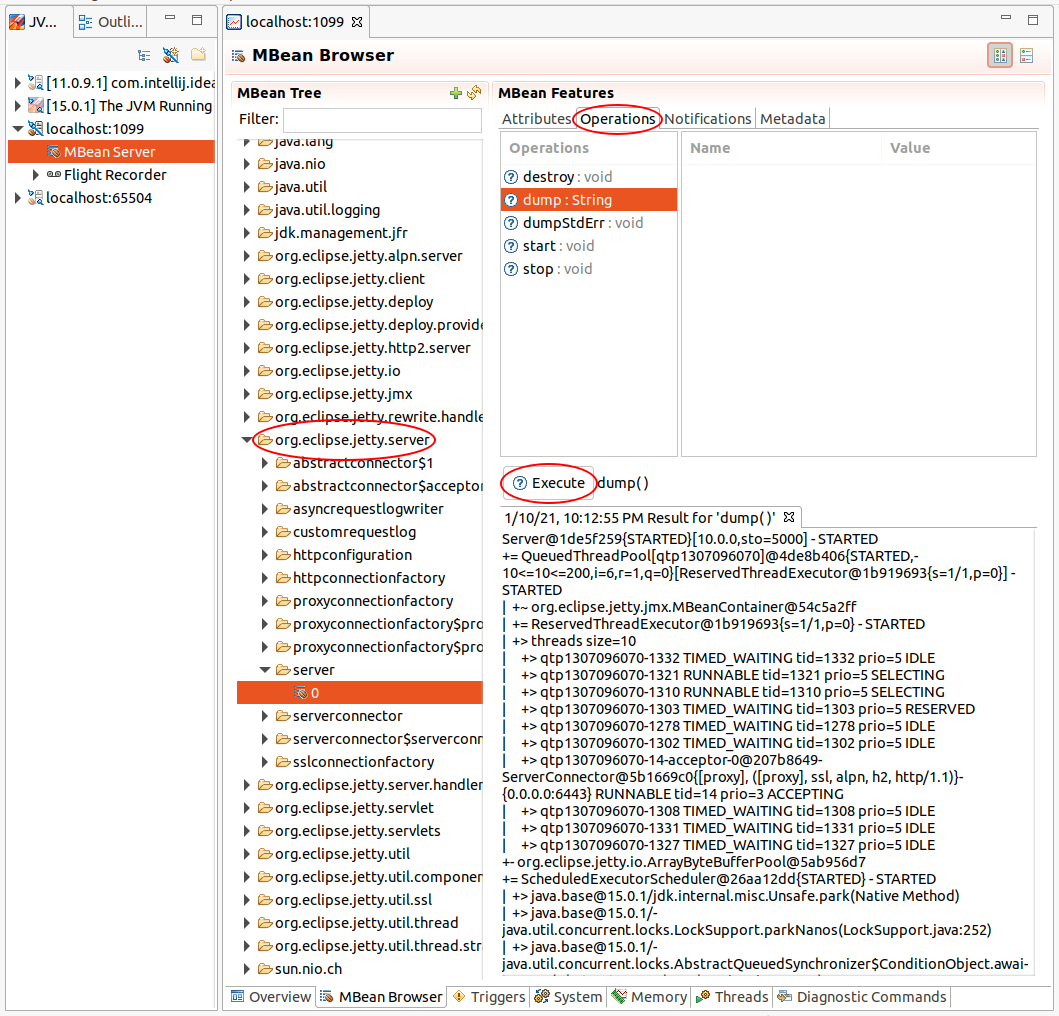
Find the Server MBean in the MBean Tree, under org.eclipse.jetty.server:type=server,id=0.
Then click on the "Operations" tab, select the dump() operation, and then click the Execute button.
In the bottom panel you will see the result of the invocation, that you can copy into a text editor and save to your file system.
|
Taking a Jetty Server Dump is a relatively expensive operation, as it dumps the state of all connections (which can be thousands), and the state of all threads. The result of the invocation may produce a large string, possibly few MiB, that may impact the server memory usage. Furthermore, dumping the state of the I/O Jetty components takes a little CPU time off the handling of the actual I/O, possibly slowing it down temporarily. While the slow-down caused by taking the Jetty Server Dump may be noticeable on highly loaded systems, it is typically a very small price to pay to obtain the information about the Jetty state that may be critical to the resolution of an issue. |
|
The format of the Jetty Server Dump output is subject to change at any time, as Jetty developers modify the Jetty code and decide to include more state, or remove state that is no longer relevant. The Jetty Server Dump is organized in a tree whose structure is similar to the runtime Jetty component tree. At the end of the dump output there is a legend that explains the type of tree node: whether it is a node that represent a managed component, or an array node (or a map node) that represent some component state, etc. |
Dump at Server Start/Stop
The Server.dump() operation may also be invoked just after the Server starts (to log the state of the freshly started server), and just before the Server stops (which may be useful to log the state of server that is not working properly).
You can temporarily enable the Jetty Server Dump at start time by overriding the jetty.server.dumpAfterStart property on the command line:
$ java -jar $JETTY_HOME/start.jar jetty.server.dumpAfterStart=trueTo make this change persistent across server restarts, see the server module configuration for more information about how to configure the server to dump at start/stop time.
Detailed ThreadPool Information
By default, the dump of the thread pool will only dump the topmost stack frame of each thread. It is possible to configure the thread pool to dump the whole stack trace for each thread; while this may be a little more expensive, it provides complete information about the state of each thread, which may be important to diagnose the issue.
See the threadpool module configuration for more information about how to configure the thread pool to dump detailed thread information.
Detailed thread pool information can also be turned on/off on-the-fly via JMX, by finding the ThreadPool MBean under org.eclipse.jetty.util.thread:type=queuedthreadpool,id=0, then selecting the detailedDump attribute and setting it to true. You can now perform the Server.dump() operation as explained above, and then set detailedDump back to false.
Dump Example
Below you can find a simple example of a Jetty Server Dump, with annotations for the principal components:
oejs.Server@c267ef4{STARTING}[12.0.9-SNAPSHOT,sto=5000] - STARTING (1)
+= QueuedThreadPool[qtp22429093]@1563da5{STARTED,4<=4<=200,i=2,r=-1,t=59981ms,q=0}[ReservedThreadExecutor@5656be13{capacity=4,threads=ThreadIdPool@4218d6a3{capacity=4}}] - STARTED (2)
| +- org.eclipse.jetty.util.thread.ThreadPoolBudget@76505305
| += ReservedThreadExecutor@5656be13{capacity=4,threads=ThreadIdPool@4218d6a3{capacity=4}} - STARTED
| | +~ QueuedThreadPool[qtp22429093]@1563da5{STARTED,4<=4<=200,i=2,r=-1,t=59981ms,q=0}[ReservedThreadExecutor@5656be13{capacity=4,threads=ThreadIdPool@4218d6a3{capacity=4}}] - STARTED
| | +- ThreadIdPool@4218d6a3{capacity=4}
| | +> items size=4
| | +> null
| | +> null
| | +> null
| | +> null
| +> threads size=4
| +> qtp22429093-14 RUNNABLE tid=14 prio=5 SELECTING
| +> qtp22429093-17 TIMED_WAITING tid=17 prio=5 IDLE
| +> qtp22429093-16 TIMED_WAITING tid=16 prio=5 IDLE
| +> qtp22429093-15-acceptor-0@f930b60-ServerConnector@57a3af25{HTTP/1.1, (http/1.1)}{0.0.0.0:8080} RUNNABLE tid=15 prio=3 ACCEPTING
+= oejut.ScheduledExecutorScheduler@10d59286{STARTED} - STARTED
+- org.eclipse.jetty.io.ArrayByteBufferPool@59474f18{min=0,max=65536,buckets=16,heap=0/523763712,direct=0/523763712}
| +> direct size=16
| | +> org.eclipse.jetty.io.ArrayByteBufferPool$RetainedBucket@78691363{capacity=4096,in-use=0/0,pooled/acquires=0/0(NaN%),non-pooled/evicts/removes/releases=0/0/0/0}
| | +> org.eclipse.jetty.io.ArrayByteBufferPool$RetainedBucket@41d477ed{capacity=8192,in-use=0/0,pooled/acquires=0/0(NaN%),non-pooled/evicts/removes/releases=0/0/0/0}
| | +> org.eclipse.jetty.io.ArrayByteBufferPool$RetainedBucket@3590fc5b{capacity=12288,in-use=0/0,pooled/acquires=0/0(NaN%),non-pooled/evicts/removes/releases=0/0/0/0}
| | +> org.eclipse.jetty.io.ArrayByteBufferPool$RetainedBucket@397fbdb{capacity=16384,in-use=0/0,pooled/acquires=0/0(NaN%),non-pooled/evicts/removes/releases=0/0/0/0}
| | +> org.eclipse.jetty.io.ArrayByteBufferPool$RetainedBucket@33d512c1{capacity=20480,in-use=0/0,pooled/acquires=0/0(NaN%),non-pooled/evicts/removes/releases=0/0/0/0}
| | +> org.eclipse.jetty.io.ArrayByteBufferPool$RetainedBucket@515c6049{capacity=24576,in-use=0/0,pooled/acquires=0/0(NaN%),non-pooled/evicts/removes/releases=0/0/0/0}
| | +> org.eclipse.jetty.io.ArrayByteBufferPool$RetainedBucket@639c2c1d{capacity=28672,in-use=0/0,pooled/acquires=0/0(NaN%),non-pooled/evicts/removes/releases=0/0/0/0}
| | +> org.eclipse.jetty.io.ArrayByteBufferPool$RetainedBucket@5fe94a96{capacity=32768,in-use=0/0,pooled/acquires=0/0(NaN%),non-pooled/evicts/removes/releases=0/0/0/0}
| | +> org.eclipse.jetty.io.ArrayByteBufferPool$RetainedBucket@443118b0{capacity=36864,in-use=0/0,pooled/acquires=0/0(NaN%),non-pooled/evicts/removes/releases=0/0/0/0}
| | +> org.eclipse.jetty.io.ArrayByteBufferPool$RetainedBucket@765d7657{capacity=40960,in-use=0/0,pooled/acquires=0/0(NaN%),non-pooled/evicts/removes/releases=0/0/0/0}
| | +> org.eclipse.jetty.io.ArrayByteBufferPool$RetainedBucket@74235045{capacity=45056,in-use=0/0,pooled/acquires=0/0(NaN%),non-pooled/evicts/removes/releases=0/0/0/0}
| | +> org.eclipse.jetty.io.ArrayByteBufferPool$RetainedBucket@618b19ad{capacity=49152,in-use=0/0,pooled/acquires=0/0(NaN%),non-pooled/evicts/removes/releases=0/0/0/0}
| | +> org.eclipse.jetty.io.ArrayByteBufferPool$RetainedBucket@2d3379b4{capacity=53248,in-use=0/0,pooled/acquires=0/0(NaN%),non-pooled/evicts/removes/releases=0/0/0/0}
| | +> org.eclipse.jetty.io.ArrayByteBufferPool$RetainedBucket@30c15d8b{capacity=57344,in-use=0/0,pooled/acquires=0/0(NaN%),non-pooled/evicts/removes/releases=0/0/0/0}
| | +> org.eclipse.jetty.io.ArrayByteBufferPool$RetainedBucket@5e0e82ae{capacity=61440,in-use=0/0,pooled/acquires=0/0(NaN%),non-pooled/evicts/removes/releases=0/0/0/0}
| | +> org.eclipse.jetty.io.ArrayByteBufferPool$RetainedBucket@6771beb3{capacity=65536,in-use=0/0,pooled/acquires=0/0(NaN%),non-pooled/evicts/removes/releases=0/0/0/0}
| +> indirect size=16
| +> org.eclipse.jetty.io.ArrayByteBufferPool$RetainedBucket@51399530{capacity=4096,in-use=0/0,pooled/acquires=0/0(NaN%),non-pooled/evicts/removes/releases=0/0/0/0}
| +> org.eclipse.jetty.io.ArrayByteBufferPool$RetainedBucket@6b2ea799{capacity=8192,in-use=0/0,pooled/acquires=0/0(NaN%),non-pooled/evicts/removes/releases=0/0/0/0}
| +> org.eclipse.jetty.io.ArrayByteBufferPool$RetainedBucket@411f53a0{capacity=12288,in-use=0/0,pooled/acquires=0/0(NaN%),non-pooled/evicts/removes/releases=0/0/0/0}
| +> org.eclipse.jetty.io.ArrayByteBufferPool$RetainedBucket@2b71e916{capacity=16384,in-use=0/0,pooled/acquires=0/0(NaN%),non-pooled/evicts/removes/releases=0/0/0/0}
| +> org.eclipse.jetty.io.ArrayByteBufferPool$RetainedBucket@36fc695d{capacity=20480,in-use=0/0,pooled/acquires=0/0(NaN%),non-pooled/evicts/removes/releases=0/0/0/0}
| +> org.eclipse.jetty.io.ArrayByteBufferPool$RetainedBucket@28701274{capacity=24576,in-use=0/0,pooled/acquires=0/0(NaN%),non-pooled/evicts/removes/releases=0/0/0/0}
| +> org.eclipse.jetty.io.ArrayByteBufferPool$RetainedBucket@13c9d689{capacity=28672,in-use=0/0,pooled/acquires=0/0(NaN%),non-pooled/evicts/removes/releases=0/0/0/0}
| +> org.eclipse.jetty.io.ArrayByteBufferPool$RetainedBucket@3754a4bf{capacity=32768,in-use=0/0,pooled/acquires=0/0(NaN%),non-pooled/evicts/removes/releases=0/0/0/0}
| +> org.eclipse.jetty.io.ArrayByteBufferPool$RetainedBucket@62379589{capacity=36864,in-use=0/0,pooled/acquires=0/0(NaN%),non-pooled/evicts/removes/releases=0/0/0/0}
| +> org.eclipse.jetty.io.ArrayByteBufferPool$RetainedBucket@4afcd809{capacity=40960,in-use=0/0,pooled/acquires=0/0(NaN%),non-pooled/evicts/removes/releases=0/0/0/0}
| +> org.eclipse.jetty.io.ArrayByteBufferPool$RetainedBucket@175c2241{capacity=45056,in-use=0/0,pooled/acquires=0/0(NaN%),non-pooled/evicts/removes/releases=0/0/0/0}
| +> org.eclipse.jetty.io.ArrayByteBufferPool$RetainedBucket@5bf0d49{capacity=49152,in-use=0/0,pooled/acquires=0/0(NaN%),non-pooled/evicts/removes/releases=0/0/0/0}
| +> org.eclipse.jetty.io.ArrayByteBufferPool$RetainedBucket@5b7a5baa{capacity=53248,in-use=0/0,pooled/acquires=0/0(NaN%),non-pooled/evicts/removes/releases=0/0/0/0}
| +> org.eclipse.jetty.io.ArrayByteBufferPool$RetainedBucket@776aec5c{capacity=57344,in-use=0/0,pooled/acquires=0/0(NaN%),non-pooled/evicts/removes/releases=0/0/0/0}
| +> org.eclipse.jetty.io.ArrayByteBufferPool$RetainedBucket@1d296da{capacity=61440,in-use=0/0,pooled/acquires=0/0(NaN%),non-pooled/evicts/removes/releases=0/0/0/0}
| +> org.eclipse.jetty.io.ArrayByteBufferPool$RetainedBucket@7c7a06ec{capacity=65536,in-use=0/0,pooled/acquires=0/0(NaN%),non-pooled/evicts/removes/releases=0/0/0/0}
+~ org.eclipse.jetty.util.resource.FileSystemPool@75d4a5c2
+= oejsh.DefaultHandler@557caf28{showContext=true,favIcon=true,STARTED} - STARTED
+= oejsh.ContextHandlerCollection@408d971b{STARTED} - STARTED
+= ServerConnector@57a3af25{HTTP/1.1, (http/1.1)}{0.0.0.0:8080} - STARTED
| +~ QueuedThreadPool[qtp22429093]@1563da5{STARTED,4<=4<=200,i=2,r=-1,t=59965ms,q=0}[ReservedThreadExecutor@5656be13{capacity=4,threads=ThreadIdPool@4218d6a3{capacity=4}}] - STARTED
| +~ oejut.ScheduledExecutorScheduler@10d59286{STARTED} - STARTED
| +~ org.eclipse.jetty.io.ArrayByteBufferPool@59474f18{min=0,max=65536,buckets=16,heap=0/523763712,direct=0/523763712}
| += HttpConnectionFactory@3967e60c[HTTP/1.1] - STARTED
| | +- HttpConfiguration@22555ebf{32768/8192,8192/8192,https://:0,[]}
| | +> customizers size=0
| | +> formEncodedMethods size=2
| | | +> POST
| | | +> PUT
| | +> outputBufferSize=32768
| | +> outputAggregationSize=8192
| | +> requestHeaderSize=8192
| | +> responseHeaderSize=8192
| | +> headerCacheSize=1024
| | +> secureScheme=https
| | +> securePort=0
| | +> idleTimeout=-1
| | +> sendDateHeader=false
| | +> sendServerVersion=true
| | +> sendXPoweredBy=false
| | +> delayDispatchUntilContent=true
| | +> persistentConnectionsEnabled=true
| | +> maxErrorDispatches=10
| | +> minRequestDataRate=0
| | +> minResponseDataRate=0
| | +> requestCookieCompliance=RFC6265@292b08d6[INVALID_COOKIES, OPTIONAL_WHITE_SPACE, SPACE_IN_VALUES]
| | +> responseCookieCompliance=RFC6265@292b08d6[INVALID_COOKIES, OPTIONAL_WHITE_SPACE, SPACE_IN_VALUES]
| | +> notifyRemoteAsyncErrors=true
| | +> relativeRedirectAllowed=false
| += ServerConnectorManager@36ebc363[keys=0] - STARTED
| | += oeji.ManagedSelector@54d9d12d{STARTED}[id=0 keys=0 selected=0 updates=0 selection:tot=0/avg=0.00/max=0] - STARTED
| | += AdaptiveExecutionStrategy@40a4337a/SelectorProducer@6025e1b6/PRODUCING/p=0/QueuedThreadPool[qtp22429093]@1563da5{STARTED,4<=4<=200,i=2,r=-1,t=59958ms,q=0}[ReservedThreadExecutor@5656be13{capacity=4,threads=ThreadIdPool@4218d6a3{capacity=4}}][pc=0,pic=0,pec=0,epc=0]@2024-04-18T05:01:07.365541752Z - STARTED
| | | +- SelectorProducer@6025e1b6
| | | +~ QueuedThreadPool[qtp22429093]@1563da5{STARTED,4<=4<=200,i=2,r=-1,t=59957ms,q=0}[ReservedThreadExecutor@5656be13{capacity=4,threads=ThreadIdPool@4218d6a3{capacity=4}}] - STARTED
| | +> updates @ 2024-04-18T05:01:07.363595842Z size=0
| | +> keys @ 2024-04-18T05:01:07.364173948Z size=0
| +- sun.nio.ch.ServerSocketChannelImpl[/[0:0:0:0:0:0:0:0]:8080]
| +- qtp22429093-15-acceptor-0@f930b60-ServerConnector@57a3af25{HTTP/1.1, (http/1.1)}{0.0.0.0:8080}
+- org.eclipse.jetty.util.component.HaltLifeCycleListener@22ff4249
+- org.eclipse.jetty.server.Server$DynamicErrorHandler@2d1ef81a
+> startJarLoader@61e4705b
| +> URLs size=8
| | +> file:/path/to/jetty.base/resources/
| | +> file:/path/to/jetty.home/lib/logging/slf4j-api-2.0.12.jar
| | +> file:/path/to/jetty.home/lib/logging/jetty-slf4j-impl-12.0.9-SNAPSHOT.jar
| | +> file:/path/to/jetty.home/lib/jetty-http-12.0.9-SNAPSHOT.jar
| | +> file:/path/to/jetty.home/lib/jetty-server-12.0.9-SNAPSHOT.jar
| | +> file:/path/to/jetty.home/lib/jetty-xml-12.0.9-SNAPSHOT.jar
| | +> file:/path/to/jetty.home/lib/jetty-util-12.0.9-SNAPSHOT.jar
| | +> file:/path/to/jetty.home/lib/jetty-io-12.0.9-SNAPSHOT.jar
| +> parent: jdk.internal.loader.ClassLoaders$AppClassLoader@2cdf8d8a
| +> packages size=4
| | +> package org.eclipse.jetty.start.config
| | +> package org.eclipse.jetty.start.builders
| | +> package org.eclipse.jetty.start.shaded.util
| | +> package org.eclipse.jetty.start
| +> parent: jdk.internal.loader.ClassLoaders$PlatformClassLoader@2820671b
| +> packages size=2
| +> package sun.util.resources.provider
| +> package sun.util.resources.cldr.provider
+> environments size=1
| +> oejuc.Environment$Named@0{core}
| +> startJarLoader@61e4705b
| | +> URLs size=8
| | | +> file:/path/to/jetty.base/resources/
| | | +> file:/path/to/jetty.home/lib/logging/slf4j-api-2.0.12.jar
| | | +> file:/path/to/jetty.home/lib/logging/jetty-slf4j-impl-12.0.9-SNAPSHOT.jar
| | | +> file:/path/to/jetty.home/lib/jetty-http-12.0.9-SNAPSHOT.jar
| | | +> file:/path/to/jetty.home/lib/jetty-server-12.0.9-SNAPSHOT.jar
| | | +> file:/path/to/jetty.home/lib/jetty-xml-12.0.9-SNAPSHOT.jar
| | | +> file:/path/to/jetty.home/lib/jetty-util-12.0.9-SNAPSHOT.jar
| | | +> file:/path/to/jetty.home/lib/jetty-io-12.0.9-SNAPSHOT.jar
| | +> parent: jdk.internal.loader.ClassLoaders$AppClassLoader@2cdf8d8a
| | +> packages size=4
| | | +> package org.eclipse.jetty.start.config
| | | +> package org.eclipse.jetty.start.builders
| | | +> package org.eclipse.jetty.start.shaded.util
| | | +> package org.eclipse.jetty.start
| | +> parent: jdk.internal.loader.ClassLoaders$PlatformClassLoader@2820671b
| | +> packages size=2
| | +> package sun.util.resources.provider
| | +> package sun.util.resources.cldr.provider
| +> Attributes core size=0
+> attributes size=0
+> org.eclipse.jetty.util.resource.FileSystemPool@75d4a5c2
+> buckets size=0
key: +- bean, += managed, +~ unmanaged, +? auto, +: iterable, +] array, +@ map, +> undefined| 1 | The Server instance at the root of the tree |
| 2 | The thread pool component |
| 3 | The root of the Handler structure |
| 4 | The connector listening on port 8080 for the HTTP/1.1 protocol |
| 5 | A selector component that manages connections |
| 6 | The connections currently managed by the selector component |
| 7 | The server ClassLoader and its classpath |
| 8 | The legend for the dump nodes |
Enabling DEBUG Logging
Enabling DEBUG level logging for the org.eclipse.jetty logger name provides the maximum amount of information to troubleshoot Jetty issues.
Refer to the logging section for more information about how to configure logging in Jetty.
|
Enabling DEBUG level logging for Your server could be slowed down to almost a halt, especially if it is under heavy load. Furthermore, the log file could quickly fill up the entire filesystem (unless configured to roll over), so you want to be really careful using DEBUG logging. For production servers, consider using the Jetty Server Dump first, and enable DEBUG logging only as a last resort. |
However, sometimes issues are such that only DEBUG logging can really tell what’s going on in the system, and enabling DEBUG logging is your best chance to figure the issue out. Below you can find few suggestions that can help you reduce the impact when you have to enable DEBUG logging.
Jetty Behind a Load Balancer
If Jetty instances are behind a load balancer, you may configure the load balancer to send less load to a particular Jetty instance, and enable DEBUG logging in that instance only.
Enabling DEBUG Logging for a Short Time
In certain cases the issue can be reproduced reliably, but only in the production environment.
You can use JMX to temporarily enable DEBUG logging, reproduce the issue, and then disable DEBUG logging.
Alternatively, if you cannot reliably reproduce the issue, but you know it is happening, you can temporarily enable DEBUG logging for a small period of time, let’s say 10-60 seconds, and then disable DEBUG logging.
Changing the log level at runtime is a feature of the logging implementation that you are using.
The Jetty SLF4J implementation, used by default, exposes via JMX method boolean JettyLoggerFactoryMBean.setLoggerLevel(String loggerName, String levelName) that you can invoke via a JMX console to change the level for the specified logger name.
The method returns true if the logger level was successfully changed.
For example, you can pass the string org.eclipse.jetty as the first parameter, and the string DEBUG (upper case) as the second parameter.
You can then use the string INFO or WARN (upper case) to restore the logging level to its previous value.
Enabling DEBUG Logging for SubPackages
Enabling DEBUG logging for the org.eclipse.jetty logger name implies that all children logger names, recursively, inherit the DEBUG level.
Processing a single HTTP request involves many Jetty components: the I/O subsystem (under org.eclipse.jetty.io), the thread pool (under org.eclipse.jetty.util), the HTTP/1.1 parsing (under org.eclipse.jetty.http), etc.
If you can cut the amount of DEBUG logging to just what you need to troubleshoot the issue, the impact of enabling DEBUG logging will be much less than enabling it for all Jetty components.
For example, if you need to troubleshoot a client that sends bad HTTP/1.1 requests, it may be enough to enable only the org.eclipse.jetty.http logger name, therefore saving the large amount of DEBUG logging produced by the I/O subsystem and by the thread pool.
In another case, you may need to troubleshoot only HTTP/2 requests, and therefore enabling only the org.eclipse.jetty.http2 logger name could be enough.
Remote Debugging
The Java Virtual Machines allows remote processes on different hosts to connect for debugging purposes, by using specific command line options.
|
While it is possible to enable remote debugging on a Jetty server, it is typically not recommended for security and performance reasons. Only enable remote debugging on a Jetty server as a last resort to troubleshoot issues that could not be troubleshot otherwise. |
You can easily create a custom Jetty module (see this section) with the following content:
[description] Enables remote debugging [exec] -agentlib:jdwp=transport=dt_socket,server=y,suspend=n,address=*:5005
The [exec] directive (documented here) is necessary to pass the -agentlib:jdwp JVM option to the forked JVM that runs Jetty, so that you can attach with a debugger.
|
The Please refer to the Java Debug Wire Protocol documentation for additional information about the |
You can now enable the remote-debug Jetty module with the following command issued from the $JETTY_BASE directory:
$ java -jar $JETTY_HOME/start.jar --add-modules=server,remote-debug
The command above minimally adds a Jetty server without connectors (via the server Jetty module) and the remote-debug Jetty module, and produces the following $JETTY_BASE directory structure:
$JETTY_BASE
├── modules
│ └── remote-debug.mod
├── resources
│ └── jetty-logging.properties
└── start.d
├── remote-debug.ini
└── server.iniYou can easily disable the remote-debug Jetty module as explained in this section.
Alternatively, you can enable the remote-debug module on the command line, as explained in this section.
Starting the Jetty server with the remote-debug module enabled yields:
WARN : Forking second JVM due to forking module(s): [remote-debug]. Use --dry-run to generate the command line to avoid forking.
Listening for transport dt_socket at address: 5005
2024-04-18 05:01:08.985:INFO :oejs.Server:main: jetty-12.0.9-SNAPSHOT; built: 2024-04-18T04:55:28.954Z; git: 0f04d4ef429f34935b1f9f1119e460225a3eb774; jvm 17.0.10+7
2024-04-18 05:01:09.010:INFO :oejs.Server:main: Started oejs.Server@2f490758{STARTING}[12.0.9-SNAPSHOT,sto=5000] @417msNote how the JVM is listening on port 5005 to allow remote debuggers to connect.
If you want to avoid to fork a second JVM to pass the -agentlib:jdwp JVM option, please read this section.
Jetty XML
The Jetty XML format is a straightforward mapping of XML elements to Java APIs so that any object can be instantiated and getters, setters, and methods can be called.
The Jetty XML format is very similar to that of frameworks like Spring or Plexus, although it predates all of them and it’s typically more powerful as it can invoke any Java API.
The Jetty XML format is used in Jetty modules to create the Jetty server components, as well as in Jetty XML context files to configure web applications, but it can be used to call any Java API.
Jetty XML Syntax
The Jetty XML syntax defines XML element that allow you to call any Java API and that allow you to interact in a simpler way with the Jetty module system and the Jetty deploy system.
The Jetty XML elements define attributes such as id, name, class, etc. that may be replaced by correspondent elements, so that these XML documents are equivalent:
<?xml version="1.0" encoding="UTF-8"?>
<!DOCTYPE Configure PUBLIC "-//Jetty//Configure//EN" "https://eclipse.dev/jetty/configure_10_0.dtd">
<Configure>
<Get id="stderr" class="java.lang.System" name="err">
<Call name="println" arg="HELLO" />
</Get>
</Configure><?xml version="1.0" encoding="UTF-8"?>
<!DOCTYPE Configure PUBLIC "-//Jetty//Configure//EN" "https://eclipse.dev/jetty/configure_10_0.dtd">
<Configure>
<Get>
<Id>stderr</Id>
<Name>err</Name>
<Class>java.lang.System</Class>
<Call>
<Name>println</Name>
<Arg>HELLO</Arg>
</Call>
</Get>
</Configure>The version using attributes is typically shorter and nicer to read, but sometimes the attribute value cannot be a literal string (for example, it could be the value of a system property) and that’s where elements gives you the required flexibility.
<Configure>
Element Configure must be the root element of the XML document.
The following Jetty XML creates an empty String and assigns it the id mystring:
<?xml version="1.0" encoding="UTF-8"?>
<!DOCTYPE Configure PUBLIC "-//Jetty//Configure//EN" "https://eclipse.dev/jetty/configure_10_0.dtd">
<Configure id="mystring" class="java.lang.String" />This is equivalent to the following Java code:
var mystring = new String();If an object with the id mystring already exists, then it is not created again but rather just referenced.
Within element <Configure>, the created object (if any) is in scope and may be the implicit target of other, nested, elements.
Typically the <Configure> element is used to configure a Server instance or ContextHandler subclasses such as WebAppContext that represent web applications.
<Arg>
Element Arg is used to pass arguments to constructors and method calls.
The following example creates a minimal Jetty Server:
<?xml version="1.0" encoding="UTF-8"?>
<!DOCTYPE Configure PUBLIC "-//Jetty//Configure//EN" "https://eclipse.dev/jetty/configure_10_0.dtd">
<Configure class="org.eclipse.jetty.server.Server">
<Arg type="int">8080</Arg>
</Configure>Arguments may have a type attribute that explicitly performs type coercion.
Arguments may also have a name attribute, which is matched with the corresponding Java annotation in the source class, that helps to identify arguments:
<?xml version="1.0" encoding="UTF-8"?>
<!DOCTYPE Configure PUBLIC "-//Jetty//Configure//EN" "https://eclipse.dev/jetty/configure_10_0.dtd">
<Configure class="org.eclipse.jetty.server.Server">
<Arg name="port" type="int">8080</Arg>
</Configure><New>
Element <New> creates a new object of the type specified by the mandatory class attribute.
A sequence of Arg elements, that must be contiguous and before other elements, may be present to specify the constructor arguments.
Within element <New> the newly created object is in scope and may be the implicit target of other, nested, elements.
The following example creates an ArrayList:
<?xml version="1.0" encoding="UTF-8"?>
<!DOCTYPE Configure PUBLIC "-//Jetty//Configure//EN" "https://eclipse.dev/jetty/configure_10_0.dtd">
<Configure>
<New id="mylist" class="java.util.ArrayList">
<Arg type="int">16</Arg>
</New>
</Configure>This is equivalent to the following Java code:
var mylist = new ArrayList(16);<Call>
Element <Call> invokes a method specified by the mandatory name attribute.
A sequence of Arg elements, that must be contiguous and before other elements, may be present to specify the method arguments.
Within element <Call> the return value, if the return type is not void, is in scope and may be the implicit target of other, nested, elements.
<?xml version="1.0" encoding="UTF-8"?>
<!DOCTYPE Configure PUBLIC "-//Jetty//Configure//EN" "https://eclipse.dev/jetty/configure_10_0.dtd">
<Configure>
<New class="java.util.ArrayList">
<Call name="listIterator">
<Arg type="int">0</Arg>
</Call>
<Call name="next" />
</New>
</Configure>This is equivalent to the following Java code:
new ArrayList().listIterator(0).next();It is possible to call static methods by specifying the class attribute:
<?xml version="1.0" encoding="UTF-8"?>
<!DOCTYPE Configure PUBLIC "-//Jetty//Configure//EN" "https://eclipse.dev/jetty/configure_10_0.dtd">
<Configure>
<Call id="myhost" name="getByName" class="java.net.InetAddress">
<Arg>jdk.java.net</Arg>
</Call>
</Configure>This is equivalent to the following Java code:
var myhost = InetAddress.getByName("jdk.java.net");The class attribute (or <Class> element) can also be used to specify the Java class or interface to use to lookup the non-static method name.
This is necessary when the object in scope, onto which the <Call> would be applied, is an instance of a class that is not visible to Jetty classes, or not accessible because it is not public.
For example:
<?xml version="1.0" encoding="UTF-8"?>
<!DOCTYPE Configure PUBLIC "-//Jetty//Configure//EN" "https://eclipse.dev/jetty/configure_10_0.dtd">
<Configure>
<Call class="java.util.concurrent.Executors" name="newSingleThreadScheduledExecutor">
<Call class="java.util.concurrent.ExecutorService" name="shutdown" />
</Call>
</Configure>In the example above, Executors.newSingleThreadScheduledExecutor() returns an object whose class is a private JDK implementation class.
Without an explicit class attribute (or <Class> element), it is not possible to invoke the method shutdown() when it is obtained via reflection from the private JDK implementation class, because while the method is public, the private JDK implementation class is not, therefore this exception is thrown:
java.lang.IllegalAccessException: class org.eclipse.jetty.xml.XmlConfiguration$JettyXmlConfiguration (in module org.eclipse.jetty.xml) cannot access a member of class java.util.concurrent.Executors$DelegatedExecutorService (in module java.base) with modifiers "public"The solution is to explicitly use the class attribute (or <Class> element) of the <Call> element that is invoking the shutdown() method, specifying a publicly accessible class or interface that the object in scope extends or implements (in the example above java.util.concurrent.ExecutorService).
<Get>
Element <Get> retrieves the value of a JavaBean property specified by the mandatory name attribute.
If the JavaBean property is foo (or Foo), <Get> first attempts to invoke method getFoo() or method isFoo(); failing that, attempts to retrieve the value from field foo (or Foo).
<?xml version="1.0" encoding="UTF-8"?>
<!DOCTYPE Configure PUBLIC "-//Jetty//Configure//EN" "https://eclipse.dev/jetty/configure_10_0.dtd">
<Configure id="server" class="org.eclipse.jetty.server.Server">
<!-- Invokes getter method server.getVersion() -->
<Get id="version" name="version" />
<!-- Gets the System.err field -->
<Get class="java.lang.System" name="err">
<Call name="println">
<Arg>Jetty</Arg>
</Call>
</Get>
</Configure>The class attribute (or <Class> element) allows to perform static calls, or to lookup the getter method from the specified class, as described in the <Call> section.
<Set>
Element <Set> stores the value of a JavaBean property specified by the mandatory name attribute.
If the JavaBean property is foo (or Foo), <Set> first attempts to invoke method setFoo(…) with the value in the scope as argument; failing that, attempts to store the value in the scope to field foo (or Foo).
<?xml version="1.0" encoding="UTF-8"?>
<!DOCTYPE Configure PUBLIC "-//Jetty//Configure//EN" "https://eclipse.dev/jetty/configure_10_0.dtd">
<Configure id="server" class="org.eclipse.jetty.server.Server">
<!-- The value in the <Set> scope is the string "true" -->
<Set name="dryRun">true</Set>
<!-- The value in the <Set> scope is the instance created by <New> -->
<Set name="requestLog">
<New class="org.eclipse.jetty.server.CustomRequestLog" />
</Set>
</Configure>The class attribute (or <Class> element) allows to perform static calls, or to lookup the setter method from the specified class, as described in the <Call> section.
<Map> and <Entry>
Element <Map> allows the creation of a new java.util.Map implementation, specified by the class attribute — by default a HashMap.
The map entries are specified with a sequence of <Entry> elements, each with exactly 2 <Item> elements, for example:
<?xml version="1.0" encoding="UTF-8"?>
<!DOCTYPE Configure PUBLIC "-//Jetty//Configure//EN" "https://eclipse.dev/jetty/configure_10_0.dtd">
<Configure>
<Map class="java.util.concurrent.ConcurrentHashMap">
<Entry>
<Item>host</Item>
<Item>
<Call class="java.net.InetAddress" name="getByName">
<Arg>localhost</Arg>
</Call>
</Item>
</Entry>
</Map>
</Configure><Put>
Element <Put> is a convenience element that puts a key/value pair into objects that implement java.util.Map.
You can only specify the key value via the name attribute, so the key can only be a literal string (for keys that are not literal strings, use the <Call> element).
<?xml version="1.0" encoding="UTF-8"?>
<!DOCTYPE Configure PUBLIC "-//Jetty//Configure//EN" "https://eclipse.dev/jetty/configure_10_0.dtd">
<Configure>
<New class="java.util.Properties">
<Put name="host">
<Call class="java.net.InetAddress" name="getByName">
<Arg>localhost</Arg>
</Call>
</Put>
</New>
</Configure><Array> and <Item>
Element <Array> creates a new array, whose component type may be specified by the type attribute, or by a Type child element.
<?xml version="1.0" encoding="UTF-8"?>
<!DOCTYPE Configure PUBLIC "-//Jetty//Configure//EN" "https://eclipse.dev/jetty/configure_10_0.dtd">
<Configure>
<Array type="java.lang.Object">
<Item /> <!-- null -->
<Item>literalString</Item>
<Item type="String"></Item> <!-- empty string -->
<Item type="Double">1.0D</Item>
<Item>
<New class="java.lang.Exception" />
</Item>
</Array>
</Configure><Ref>
Element <Ref> allows you to reference an object via the refid attribute`, putting it into scope so that nested elements can operate on it.
You must give a unique id attribute to the objects you want to reference.
<?xml version="1.0" encoding="UTF-8"?>
<!DOCTYPE Configure PUBLIC "-//Jetty//Configure//EN" "https://eclipse.dev/jetty/configure_10_0.dtd">
<!-- The Jetty Server has id="server" -->
<Configure id="server" class="org.eclipse.jetty.server.Server">
<Get class="java.lang.System" name="err">
<!-- Here the System.err field is in scope, but you
want to operate on the server to get its version -->
<Ref refid="server">
<!-- Store the server version under id="myversion" -->
<Get id="myversion" name="version" />
</Ref>
<Call name="println">
<!-- Reference the server version stored above -->
<Arg>Server version is: <Ref refid="myversion" /></Arg>
</Call>
</Get>
</Configure><Property>
Element <Property> retrieves the value of the Jetty module property specified by the name attribute, and it is mostly used when creating custom Jetty modules or when using Jetty context XML files.
The deprecated attribute allows you to specify a comma separated list of old, deprecated, property names for backward compatibility.
The default attribute allows you to specify a default value for the property, if it has not been explicitly defined.
For example, you may want to configure the context path of your web application in this way:
<?xml version="1.0" encoding="UTF-8"?>
<!DOCTYPE Configure PUBLIC "-//Jetty//Configure//EN" "https://eclipse.dev/jetty/configure_10_0.dtd">
<Configure class="org.eclipse.jetty.ee9.webapp.WebAppContext">
<Set name="contextPath">
<Property name="com.myapps.mywiki.context.path" default="/wiki" />
</Set>
<Set name="war">/opt/myapps/mywiki.war</Set>
</Configure>The contextPath value is resolved by looking for the Jetty module property com.myapps.mywiki.context.path; if this property is not set, then the default value of /wiki is used.
<SystemProperty>
Element <SystemProperty> retrieves the value of the JVM system property specified by the name attribute, via System.getProperty(…).
The deprecated attribute allows you to specify a comma separated list of old, deprecated, system property names for backward compatibility.
The default attribute allows you to specify a default value for the system property value, if it has not been explicitly defined.
The following example creates a minimal Jetty Server that listens on a port specified by the com.acme.http.port system property:
<?xml version="1.0" encoding="UTF-8"?>
<!DOCTYPE Configure PUBLIC "-//Jetty//Configure//EN" "https://eclipse.dev/jetty/configure_10_0.dtd">
<Configure id="server" class="org.eclipse.jetty.server.Server">
<Arg type="int">
<SystemProperty name="com.acme.http.port" default="8080" />
</Arg>
</Configure><Env>
Element <Env> retrieves the value of the environment variable specified by the name attribute, via System.getenv(…).
The deprecated attribute allows you to specify a comma separated list of old, deprecated, environment variable names for backward compatibility.
The default attribute allows you to specify a default value for the environment variable value, if it has not been explicitly defined.
The following example creates a minimal Jetty Server that listens on a port specified by the COM_ACME_HTTP_PORT environment variable:
<?xml version="1.0" encoding="UTF-8"?>
<!DOCTYPE Configure PUBLIC "-//Jetty//Configure//EN" "https://eclipse.dev/jetty/configure_10_0.dtd">
<Configure id="server" class="org.eclipse.jetty.server.Server">
<Arg type="int">
<Env name="COM_ACME_HTTP_PORT" default="8080" />
</Arg>
</Configure>Type Coercion
Elements that have the type attribute explicitly perform the type coercion of the string value present in the XML document to the Java type specified by the type attribute.
Supported types are the following:
-
all primitive types and their boxed equivalents, for example
type="int"but alsotype="Integer"(short form) andtype="java.lang.Integer"(fully qualified form) -
java.lang.String, in both short form and fully qualified form -
java.net.URL, in both short form and fully qualified form -
java.net.InetAddress, in both short form and fully qualified form
Scopes
Elements that create new objects or that return a value create a scope. Within these elements there may be nested elements that will operate on that scope, i.e. on the new object or returned value.
The following example illustrates how scopes work:
<?xml version="1.0" encoding="UTF-8"?>
<!DOCTYPE Configure PUBLIC "-//Jetty//Configure//EN" "https://eclipse.dev/jetty/configure_10_0.dtd">
<Configure id="server" class="org.eclipse.jetty.server.Server">
<Arg type="int">8080</Arg>
<!-- Here the Server object has been created and is in scope -->
<!-- Calls the setter on the Server object that is in scope -->
<Set name="stopTimeout">5000</Set>
<!-- Creates a new object -->
<New id="httpConfig" class="org.eclipse.jetty.server.HttpConfiguration">
<!-- Here the HttpConfiguration just created is in a nested scope -->
<!-- Calls the setter on the HttpConfiguration object that is in scope -->
<Set name="secureScheme">https</Set>
</New>
<!-- Calls the getter on the Server object that is in scope -->
<Get name="ThreadPool">
<!-- Here the ThreadPool object returned by the getter is in a nested scope -->
<!-- Calls the setter on the ThreadPool object that is in scope -->
<Set name="maxThreads" type="int">256</Set>
</Get>
<!-- Gets the System.err field -->
<Get class="java.lang.System" name="err">
<!-- Here the System.err object is in scope -->
<!-- Equivalent to: var myversion = server.getVersion() -->
<Ref refid="server">
<!-- Here the "server" object is in scope -->
<Get id="myversion" name="version" />
</Ref>
<!-- Calls println() on the System.err object -->
<Call name="println">
<Arg>Server version is: <Ref refid="myversion" /></Arg>
</Call>
</Get>
</Configure>