Eclipse Jetty Programming Guide
The Eclipse Jetty Programming Guide targets developers who want to use the Jetty libraries in their applications.
The Jetty libraries provide the client-side and server-side APIs to work with various web protocols such as HTTP/1.1, HTTP/2, HTTP/3, WebSocket and FastCGI.
You may use the Jetty client-side library in your application to make calls to third party REST services, or to other REST microservices in your system.
Likewise, you may use the Jetty server-side library to quickly create an HTTP or REST service without having to create a web application archive file (a *.war file) and without having to deploy it to a Jetty standalone server that you would have to download and install.
This guide will walk you through the design of the Jetty libraries and how to use its classes to write your applications.
Client Libraries
The Eclipse Jetty Project provides client-side libraries that allow you to embed an HTTP or WebSocket client in your applications. A typical example is a client application that needs to contact a third party service via HTTP (for example a REST service). Another example is a proxy application that receives HTTP requests and forwards them as FCGI requests to a PHP application such as WordPress, or receives HTTP/1.1 requests and converts them to HTTP/2 or HTTP/3. Yet another example is a client application that needs to receive events from a WebSocket server.
The client libraries are designed to be non-blocking and offer both synchronous and asynchronous APIs and come with many configuration options.
These are the available client libraries:
-
The High-Level HTTP Client Library for HTTP/1.1, HTTP/2, HTTP/3 and FastCGI
-
The Low-Level HTTP/2 Client Library for low-level HTTP/2
-
The Low-Level HTTP/3 Client Library for low-level HTTP/3
If you are interested in the low-level details of how the Jetty client libraries work, or are interested in writing a custom protocol, look at the Client I/O Architecture.
I/O Architecture
The Jetty client libraries provide the basic components and APIs to implement a client application.
They build on the common Jetty I/O Architecture and provide client specific concepts (such as establishing a connection to a server).
There are conceptually two layers that compose the Jetty client libraries:
-
The transport layer, that handles the low-level communication with the server, and deals with buffers, threads, etc.
-
The protocol layer, that handles the high-level protocol by parsing the bytes read from the transport layer and by generating the bytes to write to the transport layer.
Transport Layer
The transport layer is the low-level layer that communicates with the server.
Protocols such as HTTP/1.1 and HTTP/2 are typically transported over TCP, while the newer HTTP/3 is transported over QUIC, which is itself transported over UDP.
However, there are other means of communication supported by the Jetty client libraries, in particular over Unix-Domain sockets (for inter-process communication), and over memory (for intra-process communication).
The same high-level protocol can be carried by different low-level transports. For example, the high-level HTTP/1.1 protocol can be transported over either TCP (the default), or QUIC, or Unix-Domain sockets, or memory, because all these low-level transport provide reliable and ordered communication between client and server.
Similarly, the high-level HTTP/3 protocol can be transported over either QUIC (the default) or memory.
It would be possible to transport HTTP/3 also over Unix-Domain sockets, but the current version of Java only supports Unix-Domain sockets for SocketChannels and not for DatagramChannels.
The Jetty client libraries use the common I/O design described in this section.
The common I/O components and concepts are used for all low-level transports.
The only partial exception is the memory transport, which is not based on network components; as such it does not need a SelectorManager, but it exposes EndPoint so that high-level protocols have a common interface to interact with the low-level transport.
The client-side abstraction for the low-level transport is org.eclipse.jetty.io.Transport.
Transport represents how high-level protocols can be transported; there is Transport.TCP_IP that represents communication over TCP, but also Transport.TCPUnix for Unix-Domain sockets, QuicTransport for QUIC and MemoryTransport for memory.
Applications can specify the Transport to use for each request as described in this section.
When the Transport implementation uses the network, it delegates to org.eclipse.jetty.io.ClientConnector.
ClientConnector primarily wraps org.eclipse.jetty.io.SelectorManager to provide network functionalities, and aggregates other four components:
-
a thread pool (in form of an
java.util.concurrent.Executor) -
a scheduler (in form of
org.eclipse.jetty.util.thread.Scheduler) -
a byte buffer pool (in form of
org.eclipse.jetty.io.ByteBufferPool) -
a TLS factory (in form of
org.eclipse.jetty.util.ssl.SslContextFactory.Client)
The ClientConnector is where you want to set those components after you have configured them.
If you don’t explicitly set those components on the ClientConnector, then appropriate defaults will be chosen when the ClientConnector starts.
ClientConnector manages all network-related components, and therefore it is used for TCP, UDP, QUIC and Unix-Domain sockets.
The simplest example that creates and starts a ClientConnector is the following:
ClientConnector clientConnector = new ClientConnector();
clientConnector.start();
A more typical example:
// Create and configure the SslContextFactory.
SslContextFactory.Client sslContextFactory = new SslContextFactory.Client();
sslContextFactory.addExcludeProtocols("TLSv1", "TLSv1.1");

// Create and configure the thread pool.
QueuedThreadPool threadPool = new QueuedThreadPool();
threadPool.setName("client");

// Create and configure the ClientConnector.
ClientConnector clientConnector = new ClientConnector();
clientConnector.setSslContextFactory(sslContextFactory);
clientConnector.setExecutor(threadPool);
clientConnector.start();
A more advanced example that customizes the ClientConnector by overriding some of its methods:
class CustomClientConnector extends ClientConnector
{
    @Override
    protected SelectorManager newSelectorManager()
    {
        return new ClientSelectorManager(getExecutor(), getScheduler(), getSelectors())
        {
            @Override
            protected void endPointOpened(EndPoint endpoint)
            {
                System.getLogger("endpoint").log(INFO, "opened %s", endpoint);
            }

            @Override
            protected void endPointClosed(EndPoint endpoint)
            {
                System.getLogger("endpoint").log(INFO, "closed %s", endpoint);
            }
        };
    }
}

// Create and configure the thread pool.
QueuedThreadPool threadPool = new QueuedThreadPool();
threadPool.setName("client");

// Create and configure the scheduler.
Scheduler scheduler = new ScheduledExecutorScheduler("scheduler-client", false);

// Create and configure the custom ClientConnector.
CustomClientConnector clientConnector = new CustomClientConnector();
clientConnector.setExecutor(threadPool);
clientConnector.setScheduler(scheduler);
clientConnector.start();
Since ClientConnector is the component that handles the low-level network transport, it is also the component where you want to configure the low-level network configuration.
The most common parameters are:
-
ClientConnector.selectors: the number ofjava.nio.Selectors components (defaults to1) that are present to handle theSocketChannels andDatagramChannels opened by theClientConnector. You typically want to increase the number of selectors only for those use cases where each selector should handle more than few hundreds concurrent socket events. For example, one selector typically runs well for250concurrent socket events; as a rule of thumb, you can multiply that number by10to obtain the number of opened sockets a selector can handle (2500), based on the assumption that not all the2500sockets will be active at the same time. -
ClientConnector.idleTimeout: the duration of time after whichClientConnectorcloses a socket due to inactivity (defaults to30seconds). This is an important parameter to configure, and you typically want the client idle timeout to be shorter than the server idle timeout, to avoid race conditions where the client attempts to use a socket just before the client-side idle timeout expires, but the server-side idle timeout has already expired and the is already closing the socket. -
ClientConnector.connectBlocking: whether the operation of connecting a socket to the server (i.e.SocketChannel.connect(SocketAddress)) must be a blocking or a non-blocking operation (defaults tofalse). Forlocalhostor same datacenter hosts you want to set this parameter totruebecause DNS resolution will be immediate (and likely never fail). For generic Internet hosts (e.g. when you are implementing a web spider) you want to set this parameter tofalse. -
ClientConnector.connectTimeout: the duration of time after whichClientConnectoraborts a connection attempt to the server (defaults to5seconds). This time includes the DNS lookup time and the TCP connect time.
Please refer to the ClientConnector javadocs for the complete list of configurable parameters.
Unix-Domain Support
JEP 380 introduced Unix-Domain sockets support in Java 16, on all operative systems, but only for SocketChannels (not for DatagramChannels).
ClientConnector handles Unix-Domain sockets exactly like it handles regular TCP sockets, so there is no additional configuration necessary — Unix-Domain sockets are supported out-of-the-box.
Applications can specify the Transport to use for each request as described in this section.
Memory Support
In addition to support communication between client and server via network or Unix-Domain, the Jetty client libraries also support communication between client and server via memory for intra-process communication. This means that the client and server must be in the same JVM process.
This functionality is provided by org.eclipse.jetty.server.MemoryTransport, which does not delegate to ClientConnector, but instead delegates to the server-side MemoryConnector and its related classes.
Applications can specify the Transport to use for each request as described in this section.
Protocol Layer
The protocol layer builds on top of the transport layer to generate the bytes to be written to the low-level transport and to parse the bytes read from the low-level transport.
Recall from this section that Jetty uses the Connection abstraction to produce and interpret the low-level transport bytes.
On the client side, a ClientConnectionFactory implementation is the component that creates Connection instances based on the protocol that the client wants to "speak" with the server.
Applications may use ClientConnector.connect(SocketAddress, Map<String, Object>) to establish a TCP connection to the server, and must provide ClientConnector with the following information in the context map:
-
A
Transportinstance that specifies the low-level transport to use. -
A
ClientConnectionFactorythat createsConnectioninstances for the high-level protocol. -
A
Promisethat is notified when the connection creation succeeds or fails.
For example:
class CustomConnection extends AbstractConnection
{
    public CustomConnection(EndPoint endPoint, Executor executor)
    {
        super(endPoint, executor);
    }

    @Override
    public void onOpen()
    {
        super.onOpen();
        System.getLogger("connection").log(INFO, "Opened connection {0}", this);
    }

    @Override
    public void onFillable()
    {
    }
}

ClientConnector clientConnector = new ClientConnector();
clientConnector.start();

String host = "serverHost";
int port = 8080;
SocketAddress address = new InetSocketAddress(host, port);

// The Transport instance.
Transport transport = Transport.TCP_IP;

// The ClientConnectionFactory that creates CustomConnection instances.
ClientConnectionFactory connectionFactory = (endPoint, context) ->
{
    System.getLogger("connection").log(INFO, "Creating connection for {0}", endPoint);
    return new CustomConnection(endPoint, clientConnector.getExecutor());
};

// The Promise to notify of connection creation success or failure.
CompletableFuture<CustomConnection> connectionPromise = new Promise.Completable<>();

// Populate the context with the mandatory keys to create and obtain connections.
Map<String, Object> context = new ConcurrentHashMap<>();
context.put(Transport.class.getName(), transport);
context.put(ClientConnector.CLIENT_CONNECTION_FACTORY_CONTEXT_KEY, connectionFactory);
context.put(ClientConnector.CONNECTION_PROMISE_CONTEXT_KEY, connectionPromise);
clientConnector.connect(address, context);

// Use the Connection when it's available.

// Use it in a non-blocking way via CompletableFuture APIs.
connectionPromise.whenComplete((connection, failure) ->
{
    System.getLogger("connection").log(INFO, "Created connection for {0}", connection);
});

// Alternatively, you can block waiting for the connection (or a failure).
// CustomConnection connection = connectionPromise.get();
When a Connection is created successfully, its onOpen() method is invoked, and then the promise is completed successfully.
It is now possible to write a super-simple telnet client that reads and writes string lines:
class TelnetConnection extends AbstractConnection
{
    private final ByteArrayOutputStream bytes = new ByteArrayOutputStream();
    private Consumer<String> consumer;

    public TelnetConnection(EndPoint endPoint, Executor executor)
    {
        super(endPoint, executor);
    }

    @Override
    public void onOpen()
    {
        super.onOpen();

        // Declare interest for fill events.
        fillInterested();
    }

    @Override
    public void onFillable()
    {
        try
        {
            ByteBuffer buffer = BufferUtil.allocate(1024);
            while (true)
            {
                int filled = getEndPoint().fill(buffer);
                if (filled > 0)
                {
                    while (buffer.hasRemaining())
                    {
                        // Search for newline.
                        byte read = buffer.get();
                        if (read == '\n')
                        {
                            // Notify the consumer of the line.
                            consumer.accept(bytes.toString(StandardCharsets.UTF_8));
                            bytes.reset();
                        }
                        else
                        {
                            bytes.write(read);
                        }
                    }
                }
                else if (filled == 0)
                {
                    // No more bytes to fill, declare
                    // again interest for fill events.
                    fillInterested();
                    return;
                }
                else
                {
                    // The other peer closed the
                    // connection, close it back.
                    getEndPoint().close();
                    return;
                }
            }
        }
        catch (Exception x)
        {
            getEndPoint().close(x);
        }
    }

    public void onLine(Consumer<String> consumer)
    {
        this.consumer = consumer;
    }

    public void writeLine(String line, Callback callback)
    {
        line = line + "\r\n";
        getEndPoint().write(callback, ByteBuffer.wrap(line.getBytes(StandardCharsets.UTF_8)));
    }
}

ClientConnector clientConnector = new ClientConnector();
clientConnector.start();

String host = "example.org";
int port = 80;
SocketAddress address = new InetSocketAddress(host, port);

ClientConnectionFactory connectionFactory = (endPoint, context) ->
    new TelnetConnection(endPoint, clientConnector.getExecutor());

CompletableFuture<TelnetConnection> connectionPromise = new Promise.Completable<>();

Map<String, Object> context = new HashMap<>();
context.put(Transport.class.getName(), Transport.TCP_IP);
context.put(ClientConnector.CLIENT_CONNECTION_FACTORY_CONTEXT_KEY, connectionFactory);
context.put(ClientConnector.CONNECTION_PROMISE_CONTEXT_KEY, connectionPromise);
clientConnector.connect(address, context);

connectionPromise.whenComplete((connection, failure) ->
{
    if (failure == null)
    {
        // Register a listener that receives string lines.
        connection.onLine(line -> System.getLogger("app").log(INFO, "line: {0}", line));

        // Write a line.
        connection.writeLine("GET / HTTP/1.0\r\n", Callback.NOOP);
    }
    else
    {
        failure.printStackTrace();
    }
});
Note how a very basic "telnet" API that applications could use is implemented in the form of the onLine(Consumer<String>) for the non-blocking receiving side and writeLine(String, Callback) for the non-blocking sending side.
Note also how the onFillable() method implements some basic "parsing" by looking up the \n character in the buffer.
| The "telnet" client above looks like a super-simple HTTP client because HTTP/1.0 can be seen as a line-based protocol. HTTP/1.0 was used just as an example, but we could have used any other line-based protocol such as SMTP, provided that the server was able to understand it. |
This is very similar to what the Jetty client implementation does for real network protocols. Real network protocols are of course more complicated and so is the implementation code that handles them, but the general ideas are similar.
The Jetty client implementation provides a number of ClientConnectionFactory implementations that can be composed to produce and interpret the network bytes.
For example, it is simple to modify the above example to use the TLS protocol so that you will be able to connect to the server on port 443, typically reserved for the secure HTTP protocol.
The differences between the clear-text version and the TLS encrypted version are minimal:
class TelnetConnection extends AbstractConnection
{
    private final ByteArrayOutputStream bytes = new ByteArrayOutputStream();
    private Consumer<String> consumer;

    public TelnetConnection(EndPoint endPoint, Executor executor)
    {
        super(endPoint, executor);
    }

    @Override
    public void onOpen()
    {
        super.onOpen();

        // Declare interest for fill events.
        fillInterested();
    }

    @Override
    public void onFillable()
    {
        try
        {
            ByteBuffer buffer = BufferUtil.allocate(1024);
            while (true)
            {
                int filled = getEndPoint().fill(buffer);
                if (filled > 0)
                {
                    while (buffer.hasRemaining())
                    {
                        // Search for newline.
                        byte read = buffer.get();
                        if (read == '\n')
                        {
                            // Notify the consumer of the line.
                            consumer.accept(bytes.toString(StandardCharsets.UTF_8));
                            bytes.reset();
                        }
                        else
                        {
                            bytes.write(read);
                        }
                    }
                }
                else if (filled == 0)
                {
                    // No more bytes to fill, declare
                    // again interest for fill events.
                    fillInterested();
                    return;
                }
                else
                {
                    // The other peer closed the
                    // connection, close it back.
                    getEndPoint().close();
                    return;
                }
            }
        }
        catch (Exception x)
        {
            getEndPoint().close(x);
        }
    }

    public void onLine(Consumer<String> consumer)
    {
        this.consumer = consumer;
    }

    public void writeLine(String line, Callback callback)
    {
        line = line + "\r\n";
        getEndPoint().write(callback, ByteBuffer.wrap(line.getBytes(StandardCharsets.UTF_8)));
    }
}

ClientConnector clientConnector = new ClientConnector();
clientConnector.start();

// Use port 443 to contact the server using encrypted HTTP.
String host = "example.org";
int port = 443;
SocketAddress address = new InetSocketAddress(host, port);

ClientConnectionFactory connectionFactory = (endPoint, context) ->
    new TelnetConnection(endPoint, clientConnector.getExecutor());

// Wrap the "telnet" ClientConnectionFactory with the SslClientConnectionFactory.
connectionFactory = new SslClientConnectionFactory(clientConnector.getSslContextFactory(),
    clientConnector.getByteBufferPool(), clientConnector.getExecutor(), connectionFactory);

// We will obtain a SslConnection now.
CompletableFuture<SslConnection> connectionPromise = new Promise.Completable<>();

Map<String, Object> context = new ConcurrentHashMap<>();
context.put(Transport.class.getName(), Transport.TCP_IP);
context.put(ClientConnector.CLIENT_CONNECTION_FACTORY_CONTEXT_KEY, connectionFactory);
context.put(ClientConnector.CONNECTION_PROMISE_CONTEXT_KEY, connectionPromise);
clientConnector.connect(address, context);

connectionPromise.whenComplete((sslConnection, failure) ->
{
    if (failure == null)
    {
        // Unwrap the SslConnection to access the "line" APIs in TelnetConnection.
        TelnetConnection connection = (TelnetConnection)sslConnection.getSslEndPoint().getConnection();
        // Register a listener that receives string lines.
        connection.onLine(line -> System.getLogger("app").log(INFO, "line: {0}", line));

        // Write a line.
        connection.writeLine("GET / HTTP/1.0\r\n", Callback.NOOP);
    }
    else
    {
        failure.printStackTrace();
    }
});
The differences with the clear-text version are only:
-
Change the port from
80to443. -
Wrap the
ClientConnectionFactorywithSslClientConnectionFactory. -
Unwrap the
SslConnectionto accessTelnetConnection.
HTTP Client
HttpClient Introduction
The Jetty HTTP client module provides easy-to-use APIs and utility classes to perform HTTP (or HTTPS) requests.
Jetty’s HTTP client is non-blocking and asynchronous. It offers an asynchronous API that never blocks for I/O, making it very efficient in thread utilization and well suited for high performance scenarios such as load testing or parallel computation.
However, when all you need to do is to perform a GET request to a resource, Jetty’s HTTP client offers also a synchronous API; a programming interface where the thread that issued the request blocks until the request/response conversation is complete.
Jetty’s HTTP client supports different HTTP formats: HTTP/1.1, HTTP/2, HTTP/3 and FastCGI.
Each format has a different HttpClientTransport implementation, that in turn use a low-level transport to communicate with the server.
This means that the semantic of an HTTP request such as: " GET the resource /index.html " can be carried over the low-level transport in different formats.
The most common and default format is HTTP/1.1.
That said, Jetty’s HTTP client can carry the same request using the HTTP/2 format, the HTTP/3 format, or the FastCGI format.
Furthermore, every format can be transported over different low-level transport, such as TCP, Unix-Domain sockets, QUIC or memory. Supports for Unix-Domain sockets requires Java 16 or later, since Unix-Domain sockets support has been introduced in OpenJDK with JEP 380.
The FastCGI format is used in Jetty’s FastCGI support that allows Jetty to work as a reverse proxy to PHP (exactly like Apache or Nginx do) and therefore be able to serve, for example, WordPress websites, often in conjunction with Unix-Domain sockets (although it is possible to use FastCGI via network too).
The HTTP/2 format allows Jetty’s HTTP client to perform requests using HTTP/2 to HTTP/2 enabled websites, see also Jetty’s HTTP/2 support.
The HTTP/3 format allows Jetty’s HTTP client to perform requests using HTTP/3 to HTTP/3 enabled websites, see also Jetty’s HTTP/3 support.
Out of the box features that you get with the Jetty HTTP client include:
-
Redirect support — redirect codes such as 302 or 303 are automatically followed.
-
Cookies support — cookies sent by servers are stored and sent back to servers in matching requests.
-
Authentication support — HTTP "Basic", "Digest" and "SPNEGO" authentications are supported, others are pluggable.
-
Forward proxy support — HTTP proxying, SOCKS4 and SOCKS5 proxying.
Starting HttpClient
The Jetty artifact that provides the main HTTP client implementation is jetty-client.
The Maven artifact coordinates are the following:
<dependency>
  <groupId>org.eclipse.jetty</groupId>
  <artifactId>jetty-client</artifactId>
  <version>12.0.9-SNAPSHOT</version>
</dependency>
The main class is named org.eclipse.jetty.client.HttpClient.
You can think of a HttpClient instance as a browser instance.
Like a browser it can make requests to different domains, it manages redirects, cookies and authentication, you can configure it with a forward proxy, and it provides you with the responses to the requests you make.
In order to use HttpClient, you must instantiate it, configure it, and then start it:
// Instantiate HttpClient.
HttpClient httpClient = new HttpClient();

// Configure HttpClient, for example:
httpClient.setFollowRedirects(false);

// Start HttpClient.
httpClient.start();
You may create multiple instances of HttpClient, but typically one instance is enough for an application.
There are several reasons for having multiple HttpClient instances including, but not limited to:
-
You want to specify different configuration parameters (for example, one instance is configured with a forward proxy while another is not).
-
You want the two instances to behave like two different browsers and hence have different cookies, different authentication credentials, etc.
-
You want to use different
HttpClientTransports.
Like browsers, HTTPS requests are supported out-of-the-box (see this section for the TLS configuration), as long as the server provides a valid certificate.
In case the server does not provide a valid certificate (or in case it is self-signed) you want to customize HttpClient's TLS configuration as described in this section.
Stopping HttpClient
It is recommended that when your application stops, you also stop the HttpClient instance (or instances) that you are using.
// Stop HttpClient.
httpClient.stop();
Stopping HttpClient makes sure that the memory it holds (for example, ByteBuffer pools, authentication credentials, cookies, etc.) is released, and that the thread pool and scheduler are properly stopped allowing all threads used by HttpClient to exit.
|
You cannot call |
HttpClient Architecture
A HttpClient instance can be thought as a browser instance, and it manages the following components:
-
A
CookieStore(see this section). -
A
AuthenticationStore(see this section). -
A
ProxyConfiguration(see this section). -
A set of
Destinations
A Destination is the client-side component that represents an origin server, and manages a queue of requests for that origin, and a pool of connections to that origin.
An origin may be simply thought as the tuple (scheme, host, port) and it is where the client connects to in order to communicate with the server.
However, this is not enough.
If you use HttpClient to write a proxy you may have different clients that want to contact the same server.
In this case, you may not want to use the same proxy-to-server connection to proxy requests for both clients, for example for authentication reasons: the server may associate the connection with authentication credentials, and you do not want to use the same connection for two different users that have different credentials.
Instead, you want to use different connections for different clients and this can be achieved by "tagging" a destination with a tag object that represents the remote client (for example, it could be the remote client IP address).
Two origins with the same (scheme, host, port) but different tag create two different destinations and therefore two different connection pools.
However, also this is not enough.
It is possible for a server to speak different protocols on the same port.
A connection may start by speaking one protocol, for example HTTP/1.1, but then be upgraded to speak a different protocol, for example HTTP/2. After a connection has been upgraded to a second protocol, it cannot speak the first protocol anymore, so it can only be used to communicate using the second protocol.
Two origins with the same (scheme, host, port, tag) but different protocol create two different destinations and therefore two different connection pools.
Finally, it is possible for a server to speak the same protocol over different low-level transports (represented by Transport), for example TCP and Unix-Domain.
Two origins with the same (scheme, host, port, tag, protocol) but different low-level transports create two different destinations and therefore two different connection pools.
Therefore, an origin is identified by the tuple (scheme, host, port, tag, protocol, transport).
HttpClient Connection Pooling
A Destination manages a org.eclipse.jetty.client.ConnectionPool, where connections to a particular origin are pooled for performance reasons: opening a connection is a costly operation, and it’s better to reuse them for multiple requests.
Remember that to select a specific Destination you must select a specific origin, and that an origin is identified by the tuple (scheme, host, port, tag, protocol, transport), so you can have multiple Destinations for the same host and port, and therefore multiple ConnectionPools
|
You can access the ConnectionPool in this way:
HttpClient httpClient = new HttpClient();
httpClient.start();

ConnectionPool connectionPool = httpClient.getDestinations().stream()
    // Find the destination by filtering on the Origin.
    .filter(destination -> destination.getOrigin().getAddress().getHost().equals("domain.com"))
    .findAny()
    // Get the ConnectionPool.
    .map(Destination::getConnectionPool)
    .orElse(null);
Jetty’s client library provides the following ConnectionPool implementations:
-
DuplexConnectionPool, historically the first implementation, only used by the HTTP/1.1 transport. -
MultiplexConnectionPool, the generic implementation valid for any transport where connections are reused with a most recently used algorithm (that is, the connections most recently returned to the connection pool are the more likely to be used again). -
RoundRobinConnectionPool, similar toMultiplexConnectionPoolbut where connections are reused with a round-robin algorithm. -
RandomRobinConnectionPool, similar toMultiplexConnectionPoolbut where connections are reused with an algorithm that chooses them randomly.
The ConnectionPool implementation can be customized for each destination in by setting a ConnectionPool.Factory on the HttpClientTransport:
HttpClient httpClient = new HttpClient();
httpClient.start();

// The max number of connections in the pool.
int maxConnectionsPerDestination = httpClient.getMaxConnectionsPerDestination();

// The max number of requests per connection (multiplexing).
// Start with 1, since this value is dynamically set to larger values if
// the transport supports multiplexing requests on the same connection.
int maxRequestsPerConnection = 1;

HttpClientTransport transport = httpClient.getTransport();

// Set the ConnectionPool.Factory using a lambda.
transport.setConnectionPoolFactory(destination ->
    new RoundRobinConnectionPool(destination,
        maxConnectionsPerDestination,
        maxRequestsPerConnection));
HttpClient Request Processing
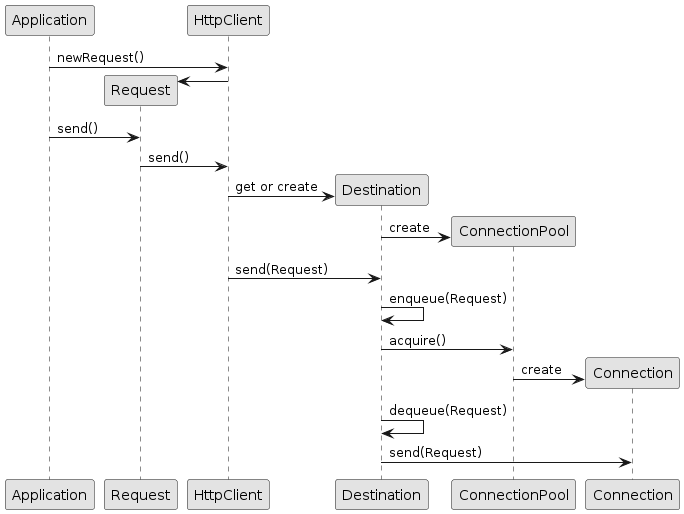
When a request is sent, an origin is computed from the request; HttpClient uses that origin to find (or create if it does not exist) the correspondent destination.
The request is then queued onto the destination, and this causes the destination to ask its connection pool for a free connection.
If a connection is available, it is returned, otherwise a new connection is created.
Once the destination has obtained the connection, it dequeues the request and sends it over the connection.
The first request to a destination triggers the opening of the first connection.
A second request with the same origin sent after the first request/response cycle is completed may reuse the same connection, depending on the connection pool implementation.
A second request with the same origin sent concurrently with the first request will likely cause the opening of a second connection, depending on the connection pool implementation.
The configuration parameter HttpClient.maxConnectionsPerDestination (see also the configuration section) controls the max number of connections that can be opened for a destination.
| If opening connections to a given origin takes a long time, then requests for that origin will queue up in the corresponding destination until the connections are established. |
Each connection can handle a limited number of concurrent requests.
For HTTP/1.1, this number is always 1: there can only be one outstanding request for each connection.
For HTTP/2 this number is determined by the server max_concurrent_stream setting (typically around 100, i.e. there can be up to 100 outstanding requests for every connection).
When a destination has maxed out its number of connections, and all connections have maxed out their number of outstanding requests, more requests sent to that destination will be queued.
When the request queue is full, the request will be failed.
The configuration parameter HttpClient.maxRequestsQueuedPerDestination (see also the configuration section) controls the max number of requests that can be queued for a destination.
HttpClient API Usage
HttpClient provides two types of APIs: a blocking API and a non-blocking API.
HttpClient Blocking APIs
The simpler way to perform a HTTP request is the following:
HttpClient httpClient = new HttpClient();
httpClient.start();

// Perform a simple GET and wait for the response.
ContentResponse response = httpClient.GET("http://domain.com/path?query");
The method HttpClient.GET(...) performs a HTTP GET request to the given URI and returns a ContentResponse when the request/response conversation completes successfully.
The ContentResponse object contains the HTTP response information: status code, headers and possibly content.
The content length is limited by default to 2 MiB; for larger content see the section on response content handling.
If you want to customize the request, for example by issuing a HEAD request instead of a GET, and simulating a browser user agent, you can do it in this way:
ContentResponse response = httpClient.newRequest("http://domain.com/path?query")
    .method(HttpMethod.HEAD)
    .agent("Mozilla/5.0 (X11; Ubuntu; Linux x86_64; rv:17.0) Gecko/20100101 Firefox/17.0")
    .send();
This is a shorthand for:
Request request = httpClient.newRequest("http://domain.com/path?query");
request.method(HttpMethod.HEAD);
request.agent("Mozilla/5.0 (X11; Ubuntu; Linux x86_64; rv:17.0) Gecko/20100101 Firefox/17.0");
ContentResponse response = request.send();
You first create a request object using httpClient.newRequest(...), and then you customize it using the fluent API style (that is, a chained invocation of methods on the request object).
When the request object is customized, you call request.send() that produces the ContentResponse when the request/response conversation is complete.
The Request object, despite being mutable, cannot be reused for other requests.
This is true also when trying to send two or more identical requests: you have to create two or more Request objects.
|
Simple POST requests also have a shortcut method:
ContentResponse response = httpClient.POST("http://domain.com/entity/1")
    .param("p", "value")
    .send();
The POST parameter values added via the param() method are automatically URL-encoded.
Jetty’s HttpClient automatically follows redirects, so it handles the typical web pattern POST/Redirect/GET, and the response object contains the content of the response of the GET request.
Following redirects is a feature that you can enable/disable on a per-request basis or globally.
File uploads also require one line, and make use of java.nio.file classes:
ContentResponse response = httpClient.POST("http://domain.com/upload")
    .file(Paths.get("file_to_upload.txt"), "text/plain")
    .send();
It is possible to impose a total timeout for the request/response conversation using the Request.timeout(...) method as follows:
ContentResponse response = httpClient.newRequest("http://domain.com/path?query")
    .timeout(5, TimeUnit.SECONDS)
    .send();
In the example above, when the 5 seconds expire, the request/response cycle is aborted and a java.util.concurrent.TimeoutException is thrown.
HttpClient Non-Blocking APIs
So far we have shown how to use Jetty HTTP client in a blocking style — that is, the thread that issues the request blocks until the request/response conversation is complete.
This section will look at Jetty’s HttpClient non-blocking, asynchronous APIs that are perfectly suited for large content downloads, for parallel processing of requests/responses and in cases where performance and efficient thread and resource utilization is a key factor.
The asynchronous APIs rely heavily on listeners that are invoked at various stages of request and response processing. These listeners are implemented by applications and may perform any kind of logic. The implementation invokes these listeners in the same thread that is used to process the request or response. Therefore, if the application code in these listeners takes a long time to execute, the request or response processing is delayed until the listener returns.
If you need to execute application code that takes long time inside a listener, it is typically better to spawn your own thread to execute the code that takes long time. In this way you return from the listener as soon as possible and allow the implementation to resume the processing of the request or response (or of other requests/responses).
Request and response processing are executed by two different threads and therefore may happen concurrently. A typical example of this concurrent processing is an echo server, where a large upload may be concurrent with the large download echoed back.
| Remember that responses may be processed and completed before requests; a typical example is a large upload that triggers a quick response, for example an error, by the server: the response may arrive and be completed while the request content is still being uploaded. |
The application thread that calls Request.send(Response.CompleteListener) performs the processing of the request until either the request is fully sent over the network or until it would block on I/O, then it returns (and therefore never blocks).
If it would block on I/O, the thread asks the I/O system to emit an event when the I/O will be ready to continue, then returns.
When such an event is fired, a thread taken from the HttpClient thread pool will resume the processing of the request.
Response are processed from the I/O thread taken from the HttpClient thread pool that processes the event that bytes are ready to be read.
Response processing continues until either the response is fully processed or until it would block for I/O.
If it would block for I/O, the thread asks the I/O system to emit an event when the I/O will be ready to continue, then returns.
When such an event is fired, a (possibly different) thread taken from the HttpClient thread pool will resume the processing of the response.
When the request and the response are both fully processed, the thread that finished the last processing (usually the thread that processes the response, but may also be the thread that processes the request — if the request takes more time than the response to be processed) is used to dequeue the next request for the same destination and to process it.
A simple non-blocking GET request that discards the response content can be written in this way:
httpClient.newRequest("http://domain.com/path")
    .send(result ->
    {
        // Your logic here
    });
Method Request.send(Response.CompleteListener) returns void and does not block; the Response.CompleteListener lambda provided as a parameter is notified when the request/response conversation is complete, and the Result parameter allows you to access the request and response objects as well as failures, if any.
You can impose a total timeout for the request/response conversation in the same way used by the synchronous API:
httpClient.newRequest("http://domain.com/path")
    .timeout(3, TimeUnit.SECONDS)
    .send(result ->
    {
        /* Your logic here */
    });
The example above will impose a total timeout of 3 seconds on the request/response conversation.
The HTTP client APIs use listeners extensively to provide hooks for all possible request and response events:
httpClient.newRequest("http://domain.com/path")
    // Add request hooks.
    .onRequestQueued(request -> { /* ... */ })
    .onRequestBegin(request -> { /* ... */ })
    .onRequestHeaders(request -> { /* ... */ })
    .onRequestCommit(request -> { /* ... */ })
    .onRequestContent((request, content) -> { /* ... */ })
    .onRequestFailure((request, failure) -> { /* ... */ })
    .onRequestSuccess(request -> { /* ... */ })
    // Add response hooks.
    .onResponseBegin(response -> { /* ... */ })
    .onResponseHeader((response, field) -> true)
    .onResponseHeaders(response -> { /* ... */ })
    .onResponseContentAsync((response, chunk, demander) -> demander.run())
    .onResponseFailure((response, failure) -> { /* ... */ })
    .onResponseSuccess(response -> { /* ... */ })
    // Result hook.
    .send(result -> { /* ... */ });
This makes Jetty HTTP client suitable for HTTP load testing because, for example, you can accurately time every step of the request/response conversation (thus knowing where the request/response time is really spent).
|
The code in request and response listeners should not block. It is allowed to call other blocking APIs, such as the Java file-system APIs. You should not call blocking APIs that:
If the listener code blocks, the implementation also will be blocked and will not be able to advance the processing of the request or response that the listener code is likely waiting for, causing a deadlock. |
Have a look at the Request.Listener class to know about request events, and to the Response.Listener class to know about response events.
Request Content Handling
Jetty’s HttpClient provides a number of utility classes off the shelf to handle request content.
You can provide request content as String, byte[], ByteBuffer, java.nio.file.Path, InputStream, and provide your own implementation of org.eclipse.jetty.client.Request.Content.
Here’s an example that provides the request content using java.nio.file.Paths:
ContentResponse response = httpClient.POST("http://domain.com/upload")
    .body(new PathRequestContent("text/plain", Paths.get("file_to_upload.txt")))
    .send();
Alternatively, you can use FileInputStream via the InputStreamRequestContent utility class:
ContentResponse response = httpClient.POST("http://domain.com/upload")
    .body(new InputStreamRequestContent("text/plain", new FileInputStream("file_to_upload.txt")))
    .send();
Since InputStream is blocking, then also the send of the request will block if the input stream blocks, even in case of usage of the non-blocking HttpClient APIs.
If you have already read the content in memory, you can pass it as a byte[] (or a String) using the BytesRequestContent (or StringRequestContent) utility class:
ContentResponse bytesResponse = httpClient.POST("http://domain.com/upload")
    .body(new BytesRequestContent("text/plain", bytes))
    .send();

ContentResponse stringResponse = httpClient.POST("http://domain.com/upload")
    .body(new StringRequestContent("text/plain", string))
    .send();
If the request content is not immediately available, but your application will be notified of the content to send, you can use AsyncRequestContent in this way:
AsyncRequestContent content = new AsyncRequestContent();
httpClient.POST("http://domain.com/upload")
    .body(content)
    .send(result ->
    {
        // Your logic here
    });

// Content not available yet here.

// An event happens in some other class, in some other thread.
class ContentPublisher
{
    void publish(byte[] bytes, boolean lastContent)
    {
        // Wrap the bytes into a new ByteBuffer.
        ByteBuffer buffer = ByteBuffer.wrap(bytes);

        // Write the content.
        content.write(buffer, Callback.NOOP);

        // Close AsyncRequestContent when all the content is arrived.
        if (lastContent)
            content.close();
    }
}
While the request content is awaited and consequently uploaded by the client application, the server may be able to respond (at least with the response headers) completely asynchronously.
In this case, Response.Listener callbacks will be invoked before the request is fully sent.
This allows fine-grained control of the request/response conversation: for example the server may reject contents that are too big, send a response to the client, which in turn may stop the content upload.
Another way to provide request content is by using an OutputStreamRequestContent, which allows applications to write request content when it is available to the OutputStream provided by OutputStreamRequestContent:
OutputStreamRequestContent content = new OutputStreamRequestContent();

// Use try-with-resources to close the OutputStream when all content is written.
try (OutputStream output = content.getOutputStream())
{
    httpClient.POST("http://localhost:8080/")
        .body(content)
        .send(result ->
        {
            // Your logic here
        });

    // Content not available yet here.

    // Content is now available.
    byte[] bytes = new byte[]{'h', 'e', 'l', 'l', 'o'};
    output.write(bytes);
}
// End of try-with-resource, output.close() called automatically to signal end of content.
Response Content Handling
Jetty’s HttpClient allows applications to handle response content in different ways.
You can buffer the response content in memory; this is done when using the blocking APIs and the content is buffered within a ContentResponse up to 2 MiB.
If you want to control the length of the response content (for example limiting to values smaller than the default of 2 MiB), then you can use a org.eclipse.jetty.client.CompletableResponseListener in this way:
Request request = httpClient.newRequest("http://domain.com/path");

// Limit response content buffer to 512 KiB.
CompletableFuture<ContentResponse> completable = new CompletableResponseListener(request, 512 * 1024)
    .send();

// You can attach actions to the CompletableFuture,
// to be performed when the request+response completes.

// Wait at most 5 seconds for request+response to complete.
ContentResponse response = completable.get(5, TimeUnit.SECONDS);
If the response content length is exceeded, the response will be aborted, and an exception will be thrown by method get(...).
You can buffer the response content in memory also using the non-blocking APIs, via the BufferingResponseListener utility class:
httpClient.newRequest("http://domain.com/path")
    // Buffer response content up to 8 MiB
    .send(new BufferingResponseListener(8 * 1024 * 1024)
    {
        @Override
        public void onComplete(Result result)
        {
            if (!result.isFailed())
            {
                byte[] responseContent = getContent();
                // Your logic here
            }
        }
    });
If you want to avoid buffering, you can wait for the response and then stream the content using the InputStreamResponseListener utility class:
InputStreamResponseListener listener = new InputStreamResponseListener();
httpClient.newRequest("http://domain.com/path")
    .send(listener);

// Wait for the response headers to arrive.
Response response = listener.get(5, TimeUnit.SECONDS);

// Look at the response before streaming the content.
if (response.getStatus() == HttpStatus.OK_200)
{
    // Use try-with-resources to close input stream.
    try (InputStream responseContent = listener.getInputStream())
    {
        // Your logic here
    }
}
else
{
    response.abort(new IOException("Unexpected HTTP response"));
}
Finally, let’s look at the advanced usage of the response content handling.
The response content is provided by the HttpClient implementation to application listeners following the read/demand model of org.eclipse.jetty.io.Content.Source.
The listener that follows this model is Response.ContentSourceListener.
After the response headers have been processed by the HttpClient implementation, Response.ContentSourceListener.onContentSource(response, contentSource) is invoked once and only once.
This allows the application to control precisely the read/demand loop: when to read a chunk, how to process it and when to demand the next one.
You must provide a ContentSourceListener whose implementation reads a Content.Chunk from the provided Content.Source, as explained in this section.
The invocation of onContentSource(Request, Content.Source) and of the demand callback passed to contentSource.demand(Runnable) are serialized with respect to asynchronous events such as timeouts or an asynchronous call to Request.abort(Throwable).
This means that these asynchronous events are not processed until the invocation of onContentSource(Request, Content.Source) returns, or until the invocation of the demand callback returns.
With this model, applications should not worry too much about concurrent asynchronous events happening during response content handling, because they will eventually see the events as failures while reading the response content.
Demanding for content and consuming the content are orthogonal activities.
An application can read, store aside the Content.Chunk objects without releasing them (to consume them later), and demand for more chunks, but it must call Chunk.retain() on the stored chunks, and arrange to release them after they have been consumed later.
If not done carefully, this may lead to excessive memory consumption, since the ByteBuffer bytes are not consumed.
Releasing the Content.Chunks will result in the ByteBuffers to be disposed/recycled and may be performed at any time.
An application can also read one chunk of content, consume it, release it, and then not demand for more content until a later time.
Subclass Response.AsyncContentListener overrides the behavior of Response.ContentSourceListener; when an application implements AsyncContentListener.onContent(response, chunk, demander), it can control the disposing/recycling of the ByteBuffer by releasing the chunk and it can control when to demand one more chunk by calling demander.run().
Subclass Response.ContentListener overrides the behavior of Response.AsyncContentListener; when an application implementing its onContent(response, buffer) returns from the method itself, it will both the effect of disposing/recycling the buffer and the effect of demanding one more chunk of content.
An application that implements a forwarder between two servers can be implemented efficiently by handling the response content without copying the ByteBuffer bytes as in the following example:
// Prepare a request to server1, the source.
Request request1 = httpClient.newRequest(host1, port1)
    .path("/source");

// Prepare a request to server2, the sink.
AsyncRequestContent content2 = new AsyncRequestContent();
Request request2 = httpClient.newRequest(host2, port2)
    .path("/sink")
    .body(content2);

request1.onResponseContentSource(new Response.ContentSourceListener()
{
    @Override
    public void onContentSource(Response response, Content.Source contentSource)
    {
        // Only execute this method the very first time
        // to initialize the request to server2.

        request2.onRequestCommit(request ->
        {
            // Only when the request to server2 has been sent,
            // then demand response content from server1.
            contentSource.demand(() -> forwardContent(response, contentSource));
        });

        // Send the request to server2.
        request2.send(result -> System.getLogger("forwarder").log(INFO, "Forwarding to server2 complete"));
    }

    private void forwardContent(Response response, Content.Source contentSource)
    {
        // Read one chunk of content.
        Content.Chunk chunk = contentSource.read();
        if (chunk == null)
        {
            // The read chunk is null, demand to be called back
            // when the next one is ready to be read.
            contentSource.demand(() -> forwardContent(response, contentSource));
            // Once a demand is in progress, the content source must not be read
            // nor demanded again until the demand callback is invoked.
            return;
        }
        // Check if the chunk is last and empty, in which case the
        // read/demand loop is done. Demanding again when the terminal
        // chunk has been read will invoke the demand callback with
        // the same terminal chunk, so this check must be present to
        // avoid infinitely demanding and reading the terminal chunk.
        if (chunk.isLast() && !chunk.hasRemaining())
        {
            chunk.release();
            return;
        }

        // When a response chunk is received from server1, forward it to server2.
        content2.write(chunk.getByteBuffer(), Callback.from(() ->
        {
            // When the request chunk is successfully sent to server2,
            // release the chunk to recycle the buffer.
            chunk.release();
            // Then demand more response content from server1.
            contentSource.demand(() -> forwardContent(response, contentSource));
        }, x ->
        {
            chunk.release();
            response.abort(x);
        }));
    }
});

// When the response content from server1 is complete,
// complete also the request content to server2.
request1.onResponseSuccess(response -> content2.close());

// Send the request to server1.
request1.send(result -> System.getLogger("forwarder").log(INFO, "Sourcing from server1 complete"));
Request Transport
The communication between client and server happens over a low-level transport, and applications can specify the low-level transport to use for each request.
This gives client applications great flexibility, because they can use the same HttpClient instance to communicate, for example, with an external third party web application via TCP, to a different process via Unix-Domain sockets, and efficiently to the same process via memory.
Client application can also choose more esoteric configurations such as using QUIC, typically used to transport HTTP/3, to transport HTTP/1.1 or HTTP/2, because QUIC provides reliable and ordered communication like TCP does.
Provided you have configured a UnixDomainServerConnector on the server, this is how you can configure a request to use Unix-Domain sockets:
// This is the path where the server "listens" on.
Path unixDomainPath = Path.of("/path/to/server.sock");

// Creates a ClientConnector.
ClientConnector clientConnector = new ClientConnector();

// You can use Unix-Domain for HTTP/1.1.
HttpClientTransportOverHTTP http1Transport = new HttpClientTransportOverHTTP(clientConnector);

// You can use Unix-Domain also for HTTP/2.
HTTP2Client http2Client = new HTTP2Client(clientConnector);
HttpClientTransportOverHTTP2 http2Transport = new HttpClientTransportOverHTTP2(http2Client);

// You can use Unix-Domain also for the dynamic transport.
ClientConnectionFactory.Info http1 = HttpClientConnectionFactory.HTTP11;
ClientConnectionFactoryOverHTTP2.HTTP2 http2 = new ClientConnectionFactoryOverHTTP2.HTTP2(http2Client);
HttpClientTransportDynamic dynamicTransport = new HttpClientTransportDynamic(clientConnector, http1, http2);

// Choose the transport you prefer for HttpClient, for example the dynamic transport.
HttpClient httpClient = new HttpClient(dynamicTransport);
httpClient.start();

ContentResponse response = httpClient.newRequest("jetty.org", 80)
    // Specify that the request must be sent over Unix-Domain.
    .transport(new Transport.TCPUnix(unixDomainPath))
    .send();
In the same way, if you have configured a MemoryConnector on the server, this is how you can configure a request to use memory for communication:
// The server-side MemoryConnector speaking HTTP/1.1.
Server server = new Server();
MemoryConnector memoryConnector = new MemoryConnector(server, new HttpConnectionFactory());
server.addConnector(memoryConnector);
// ...

// The code above is the server-side.
// ----
// The code below is the client-side.

HttpClient httpClient = new HttpClient();
httpClient.start();

// Use the MemoryTransport to communicate with the server-side.
Transport transport = new MemoryTransport(memoryConnector);

httpClient.newRequest("http://localhost/")
    // Specify the Transport to use.
    .transport(transport)
    .send();
This is a fancy example of how to mix HTTP versions and low-level transports:
HttpClient httpClient = new HttpClient(new HttpClientTransportDynamic(clientConnector, http2, http1, http3));
httpClient.start();

// Make a TCP request to a 3rd party web application.
ContentResponse thirdPartyResponse = httpClient.newRequest("https://third-party.com/api")
    // No need to specify the Transport, TCP will be used by default.
    .send();

// Upload the third party response content to a validation process.
ContentResponse validatedResponse = httpClient.newRequest("http://localhost/validate")
    // The validation process is available via Unix-Domain.
    .transport(new Transport.TCPUnix(unixDomainPath))
    .method(HttpMethod.POST)
    .body(new BytesRequestContent(thirdPartyResponse.getContent()))
    .send();

// Process the validated response intra-process by sending
// it to another web application in the same Jetty server.
ContentResponse response = httpClient.newRequest("http://localhost/process")
    // The processing is in-memory.
    .transport(new MemoryTransport(memoryConnector))
    .method(HttpMethod.POST)
    .body(new BytesRequestContent(validatedResponse.getContent()))
    .send();
HttpClient Configuration
HttpClient has a quite large number of configuration parameters.
Please refer to the HttpClient javadocs for the complete list of configurable parameters.
The most common parameters are:
-
HttpClient.idleTimeout: same asClientConnector.idleTimeoutdescribed in this section. -
HttpClient.connectBlocking: same asClientConnector.connectBlockingdescribed in this section. -
HttpClient.connectTimeout: same asClientConnector.connectTimeoutdescribed in this section. -
HttpClient.maxConnectionsPerDestination: the max number of TCP connections that are opened for a particular destination (defaults to 64). -
HttpClient.maxRequestsQueuedPerDestination: the max number of requests queued (defaults to 1024).
HttpClient TLS Configuration
HttpClient supports HTTPS requests out-of-the-box like a browser does.
The support for HTTPS request is provided by a SslContextFactory.Client instance, typically configured in the ClientConnector.
If not explicitly configured, the ClientConnector will allocate a default one when started.
SslContextFactory.Client sslContextFactory = new SslContextFactory.Client();

ClientConnector clientConnector = new ClientConnector();
clientConnector.setSslContextFactory(sslContextFactory);

HttpClient httpClient = new HttpClient(new HttpClientTransportDynamic(clientConnector));
httpClient.start();
The default SslContextFactory.Client verifies the certificate sent by the server by verifying the validity of the certificate with respect to the certificate chain, the expiration date, the server host name, etc.
This means that requests to public websites that have a valid certificate (such as https://google.com) will work out-of-the-box, without the need to specify a KeyStore or a TrustStore.
However, requests made to sites that return an invalid or a self-signed certificate will fail (like they will in a browser). An invalid certificate may be expired or have the wrong server host name; a self-signed certificate has a certificate chain that cannot be verified.
The validation of the server host name present in the certificate is important, to guarantee that the client is connected indeed with the intended server.
The validation of the server host name is performed at two levels: at the TLS level (in the JDK) and, optionally, at the application level.
By default, the validation of the server host name at the TLS level is enabled, while it is disabled at the application level.
You can configure the SslContextFactory.Client to skip the validation of the server host name at the TLS level:
SslContextFactory.Client sslContextFactory = new SslContextFactory.Client();
// Disable the validation of the server host name at the TLS level.
sslContextFactory.setEndpointIdentificationAlgorithm(null);
When you disable the validation of the server host name at the TLS level, you are strongly recommended to enable it at the application level. Failing to do so puts you at risk of connecting to a server different from the one you intend to connect to:
SslContextFactory.Client sslContextFactory = new SslContextFactory.Client();
// Only allow to connect to subdomains of domain.com.
sslContextFactory.setHostnameVerifier((hostName, session) -> hostName.endsWith(".domain.com"));
Enabling server host name validation at both the TLS level and application level allow you to further restrict the set of server hosts the client can connect to, among those allowed in the certificate sent by the server.
Entirely disabling server host name validation is not recommended, but may be done in controlled environments.
Even with server host name validation disabled, the validation of the certificate chain, by validating cryptographic signatures and validity dates is still performed.
Please refer to the SslContextFactory.Client javadocs for the complete list of configurable parameters.
HttpClient SslHandshakeListener
Applications may register a org.eclipse.jetty.io.ssl.SslHandshakeListener to be notified of TLS handshakes success or failure, by adding the SslHandshakeListener as a bean to HttpClient:
// Create a SslHandshakeListener.
SslHandshakeListener listener = new SslHandshakeListener()
{
    @Override
    public void handshakeSucceeded(Event event) throws SSLException
    {
        SSLEngine sslEngine = event.getSSLEngine();
        System.getLogger("tls").log(INFO, "TLS handshake successful to %s", sslEngine.getPeerHost());
    }

    @Override
    public void handshakeFailed(Event event, Throwable failure)
    {
        SSLEngine sslEngine = event.getSSLEngine();
        System.getLogger("tls").log(ERROR, "TLS handshake failure to %s", sslEngine.getPeerHost(), failure);
    }
};

HttpClient httpClient = new HttpClient();

// Add the SslHandshakeListener as bean to HttpClient.
// The listener will be notified of TLS handshakes success and failure.
httpClient.addBean(listener);
HttpClient Cookie Support
Jetty’s HttpClient supports cookies out of the box.
The HttpClient instance receives cookies from HTTP responses and stores them in a java.net.CookieStore, a class that is part of the JDK.
When new requests are made, the cookie store is consulted and if there are matching cookies (that is, cookies that are not expired and that match domain and path of the request) then they are added to the requests.
Applications can programmatically access the cookie store to find the cookies that have been set:
HttpCookieStore cookieStore = httpClient.getHttpCookieStore();
List<HttpCookie> cookies = cookieStore.match(URI.create("http://domain.com/path"));
Applications can also programmatically set cookies as if they were returned from a HTTP response:
HttpCookieStore cookieStore = httpClient.getHttpCookieStore();
HttpCookie cookie = HttpCookie.build("foo", "bar")
    .domain("domain.com")
    .path("/")
    .maxAge(TimeUnit.DAYS.toSeconds(1))
    .build();
cookieStore.add(URI.create("http://domain.com"), cookie);
Cookies may be added explicitly only for a particular request:
ContentResponse response = httpClient.newRequest("http://domain.com/path")
    .cookie(HttpCookie.from("foo", "bar"))
    .send();
You can remove cookies that you do not want to be sent in future HTTP requests:
HttpCookieStore cookieStore = httpClient.getHttpCookieStore();
URI uri = URI.create("http://domain.com");
List<HttpCookie> cookies = cookieStore.match(uri);
for (HttpCookie cookie : cookies)
{
    cookieStore.remove(uri, cookie);
}
If you want to totally disable cookie handling, you can install a HttpCookieStore.Empty.
This must be done when HttpClient is used in a proxy application, in this way:
httpClient.setHttpCookieStore(new HttpCookieStore.Empty());You can enable cookie filtering by installing a cookie store that performs the filtering logic in this way:
class GoogleOnlyCookieStore extends HttpCookieStore.Default
{
    @Override
    public boolean add(URI uri, HttpCookie cookie)
    {
        if (uri.getHost().endsWith("google.com"))
            return super.add(uri, cookie);
        return false;
    }
}

httpClient.setHttpCookieStore(new GoogleOnlyCookieStore());
The example above will retain only cookies that come from the google.com domain or sub-domains.
Special Characters in Cookies
Jetty is compliant with RFC6265, and as such care must be taken when setting a cookie value that includes special characters such as ;.
Previously, Version=1 cookies defined in RFC2109 (and continued in RFC2965) allowed for special/reserved characters to be enclosed within double quotes when declared in a Set-Cookie response header:
Set-Cookie: foo="bar;baz";Version=1;Path="/secure"This was added to the HTTP Response as follows:
protected void service(HttpServletRequest request, HttpServletResponse response)
{
    jakarta.servlet.http.Cookie cookie = new Cookie("foo", "bar;baz");
    cookie.setPath("/secure");
    response.addCookie(cookie);
}
The introduction of RFC6265 has rendered this approach no longer possible; users are now required to encode cookie values that use these special characters.
This can be done utilizing jakarta.servlet.http.Cookie as follows:
jakarta.servlet.http.Cookie cookie = new Cookie("foo", URLEncoder.encode("bar;baz", "UTF-8"));Jetty validates all cookie names and values being added to the HttpServletResponse via the addCookie(Cookie) method.
If an illegal value is discovered Jetty will throw an IllegalArgumentException with the details.
HttpClient Authentication Support
Jetty’s HttpClient supports the BASIC and DIGEST authentication mechanisms defined by RFC 7235, as well as the SPNEGO authentication mechanism defined in RFC 4559.
The HTTP conversation, the sequence of related HTTP requests, for a request that needs authentication is the following:
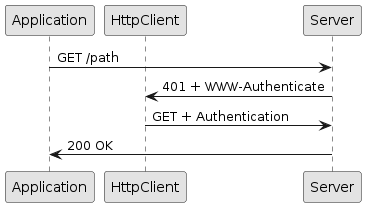
Upon receiving a HTTP 401 response code, HttpClient looks at the WWW-Authenticate response header (the server challenge) and then tries to match configured authentication credentials to produce an Authentication header that contains the authentication credentials to access the resource.
You can configure authentication credentials in the HttpClient instance as follows:
// Add authentication credentials.
AuthenticationStore auth = httpClient.getAuthenticationStore();

URI uri1 = new URI("http://mydomain.com/secure");
auth.addAuthentication(new BasicAuthentication(uri1, "MyRealm", "userName1", "password1"));

URI uri2 = new URI("http://otherdomain.com/admin");
auth.addAuthentication(new BasicAuthentication(uri1, "AdminRealm", "admin", "password"));Authentications are matched against the server challenge first by mechanism (e.g. BASIC or DIGEST), then by realm and then by URI.
If an Authentication match is found, the application does not receive events related to the HTTP 401 response.
These events are handled internally by HttpClient which produces another (internal) request similar to the original request but with an additional Authorization header.
If the authentication is successful, the server responds with a HTTP 200 and HttpClient caches the Authentication.Result so that subsequent requests for a matching URI will not incur in the additional rountrip caused by the HTTP 401 response.
It is possible to clear Authentication.Results in order to force authentication again:
httpClient.getAuthenticationStore().clearAuthenticationResults();Authentication results may be preempted to avoid the additional roundtrip due to the server challenge in this way:
AuthenticationStore auth = httpClient.getAuthenticationStore();
URI uri = URI.create("http://domain.com/secure");
auth.addAuthenticationResult(new BasicAuthentication.BasicResult(uri, "username", "password"));
In this way, requests for the given URI are enriched immediately with the Authorization header, and the server should respond with HTTP 200 (and the resource content) rather than with the 401 and the challenge.
It is also possible to preempt the authentication for a single request only, in this way:
URI uri = URI.create("http://domain.com/secure");
Authentication.Result authn = new BasicAuthentication.BasicResult(uri, "username", "password");
Request request = httpClient.newRequest(uri);
authn.apply(request);
request.send();
See also the proxy authentication section for further information about how authentication works with HTTP proxies.
HttpClient Proxy Support
Jetty’s HttpClient can be configured to use proxies to connect to destinations.
These types of proxies are available out of the box:
-
HTTP proxy (provided by class
org.eclipse.jetty.client.HttpProxy) -
SOCKS 4 proxy (provided by class
org.eclipse.jetty.client.Socks4Proxy) -
SOCKS 5 proxy (provided by class
org.eclipse.jetty.client.Socks5Proxy)
Other implementations may be written by subclassing ProxyConfiguration.Proxy.
The following is a typical configuration:
HttpProxy proxy = new HttpProxy("proxyHost", 8888);

// Do not proxy requests for localhost:8080.
proxy.getExcludedAddresses().add("localhost:8080");

// Add the new proxy to the list of proxies already registered.
ProxyConfiguration proxyConfig = httpClient.getProxyConfiguration();
proxyConfig.addProxy(proxy);

ContentResponse response = httpClient.GET("http://domain.com/path");
You specify the proxy host and proxy port, and optionally also the addresses that you do not want to be proxied, and then add the proxy configuration on the ProxyConfiguration instance.
Configured in this way, HttpClient makes requests to the HTTP proxy (for plain-text HTTP requests) or establishes a tunnel via HTTP CONNECT (for encrypted HTTPS requests).
Proxying is supported for any version of the HTTP protocol.
The communication between the client and the proxy may be encrypted, so that it would not be possible for another party on the same network as the client to know what servers the client connects to.
SOCKS5 Proxy Support
SOCKS 5 (defined in RFC 1928) offers choices for authentication methods and supports IPv6 (things that SOCKS 4 does not support).
A typical SOCKS 5 proxy configuration with the username/password authentication method is the following:
Socks5Proxy proxy = new Socks5Proxy("proxyHost", 8888);
String socks5User = "jetty";
String socks5Pass = "secret";
var socks5AuthenticationFactory = new Socks5.UsernamePasswordAuthenticationFactory(socks5User, socks5Pass);
// Add the authentication method to the proxy.
proxy.putAuthenticationFactory(socks5AuthenticationFactory);

// Do not proxy requests for localhost:8080.
proxy.getExcludedAddresses().add("localhost:8080");

// Add the new proxy to the list of proxies already registered.
ProxyConfiguration proxyConfig = httpClient.getProxyConfiguration();
proxyConfig.addProxy(proxy);

ContentResponse response = httpClient.GET("http://domain.com/path");
HTTP Proxy Authentication Support
Jetty’s HttpClient supports HTTP proxy authentication in the same way it supports server authentication.
In the example below, the HTTP proxy requires BASIC authentication, but the server requires DIGEST authentication, and therefore:
AuthenticationStore auth = httpClient.getAuthenticationStore();

// Proxy credentials.
URI proxyURI = new URI("http://proxy.net:8080");
auth.addAuthentication(new BasicAuthentication(proxyURI, "ProxyRealm", "proxyUser", "proxyPass"));

// Server credentials.
URI serverURI = new URI("http://domain.com/secure");
auth.addAuthentication(new DigestAuthentication(serverURI, "ServerRealm", "serverUser", "serverPass"));

// Proxy configuration.
ProxyConfiguration proxyConfig = httpClient.getProxyConfiguration();
HttpProxy proxy = new HttpProxy("proxy.net", 8080);
proxyConfig.addProxy(proxy);

ContentResponse response = httpClient.newRequest(serverURI).send();
The HTTP conversation for successful authentications on both the proxy and the server is the following:
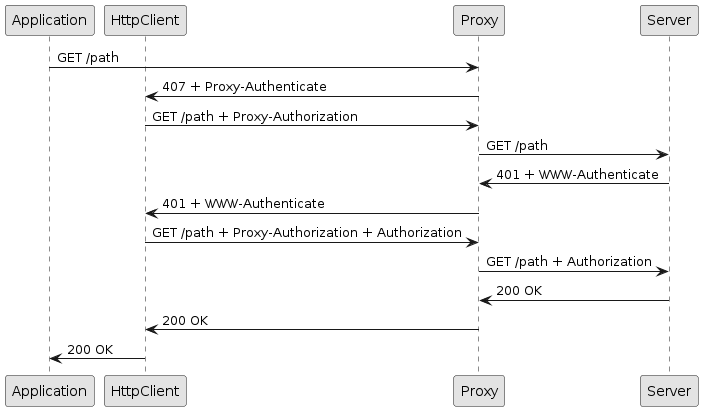
The application does not receive events related to the responses with code 407 and 401 since they are handled internally by HttpClient.
Similarly to the authentication section, the proxy authentication result and the server authentication result can be preempted to avoid, respectively, the 407 and 401 roundtrips.
HttpClient Pluggable Transports
Jetty’s HttpClient can be configured to use different HTTP formats to carry the semantic of HTTP requests and responses, by specifying different HttpClientTransport implementations.
This means that the intention of a client to request resource /index.html using the GET method can be carried over a low-level transport in different formats.
An HttpClientTransport is the component that is in charge of converting a high-level, semantic, HTTP requests such as " GET resource /index.html " into the specific format understood by the server (for example, HTTP/2 or HTTP/3), and to convert the server response from the specific format (HTTP/2 or HTTP/3) into high-level, semantic objects that can be used by applications.
The most common protocol format is HTTP/1.1, a textual protocol with lines separated by \r\n:
GET /index.html HTTP/1.1\r\n
Host: domain.com\r\n
...
\r\n
However, the same request can be made using FastCGI, a binary protocol:
x01 x01 x00 x01 x00 x08 x00 x00
x00 x01 x01 x00 x00 x00 x00 x00
x01 x04 x00 x01 xLL xLL x00 x00
x0C x0B  D   O   C   U   M   E
 N   T   _   U   R   I   /   i
 n   d   e   x   .   h   t   m
 l
...
Similarly, HTTP/2 is a binary protocol that transports the same information in a yet different format via TCP, while HTTP/3 is a binary protocol that transports the same information in yet another format via QUIC.
The HTTP protocol version may be negotiated between client and server. A request for a resource may be sent using one protocol (for example, HTTP/1.1), but the response may arrive in a different protocol (for example, HTTP/2).
HttpClient supports these HttpClientTransport implementations, each speaking only one protocol:
HttpClient also supports HttpClientTransportDynamic, a dynamic transport that can speak different HTTP formats and can select the right protocol by negotiating it with the server or by explicit indication from applications.
Furthermore, every HTTP format can be sent over different low-level transports such as TCP, Unix-Domain, QUIC or memory. Supports for Unix-Domain sockets requires Java 16 or later, since Unix-Domain sockets support has been introduced in OpenJDK with JEP 380.
Applications are typically not aware of the actual HTTP format or low-level transport being used. This allows them to write their logic against a high-level API that hides the details of the specific HTTP format and low-level transport being used.
HTTP/1.1 Transport
HTTP/1.1 is the default transport.
// No transport specified, using default.
HttpClient httpClient = new HttpClient();
httpClient.start();
If you want to customize the HTTP/1.1 transport, you can explicitly configure it in this way:
// Configure HTTP/1.1 transport.
HttpClientTransportOverHTTP transport = new HttpClientTransportOverHTTP();
transport.setHeaderCacheSize(16384);

HttpClient client = new HttpClient(transport);
client.start();
HTTP/2 Transport
The HTTP/2 transport can be configured in this way:
// The HTTP2Client powers the HTTP/2 transport.
HTTP2Client http2Client = new HTTP2Client();
http2Client.setInitialSessionRecvWindow(64 * 1024 * 1024);

// Create and configure the HTTP/2 transport.
HttpClientTransportOverHTTP2 transport = new HttpClientTransportOverHTTP2(http2Client);
transport.setUseALPN(true);

HttpClient client = new HttpClient(transport);
client.start();
HTTP2Client is the lower-level client that provides an API based on HTTP/2 concepts such as sessions, streams and frames that are specific to HTTP/2. See the HTTP/2 client section for more information.
HttpClientTransportOverHTTP2 uses HTTP2Client to format high-level semantic HTTP requests into the HTTP/2 specific format.
HTTP/3 Transport
The HTTP/3 transport can be configured in this way:
// HTTP/3 requires secure communication.
SslContextFactory.Client sslContextFactory = new SslContextFactory.Client();
// The HTTP3Client powers the HTTP/3 transport.
ClientQuicConfiguration clientQuicConfig = new ClientQuicConfiguration(sslContextFactory, null);
HTTP3Client http3Client = new HTTP3Client(clientQuicConfig);
http3Client.getQuicConfiguration().setSessionRecvWindow(64 * 1024 * 1024);

// Create and configure the HTTP/3 transport.
HttpClientTransportOverHTTP3 transport = new HttpClientTransportOverHTTP3(http3Client);

HttpClient client = new HttpClient(transport);
client.start();
HTTP3Client is the lower-level client that provides an API based on HTTP/3 concepts such as sessions, streams and frames that are specific to HTTP/3. See the HTTP/3 client section for more information.
HttpClientTransportOverHTTP3 uses HTTP3Client to format high-level semantic HTTP requests into the HTTP/3 specific format.
FastCGI Transport
The FastCGI transport can be configured in this way:
String scriptRoot = "/var/www/wordpress";
HttpClientTransportOverFCGI transport = new HttpClientTransportOverFCGI(scriptRoot);

HttpClient client = new HttpClient(transport);
client.start();
In order to make requests using the FastCGI transport, you need to have a FastCGI server such as PHP-FPM (see also link:http://php.net/manual/en/install.fpm.php).
The FastCGI transport is primarily used by Jetty’s FastCGI support to serve PHP pages (WordPress for example).
Dynamic Transport
The static HttpClientTransport implementations work well if you know in advance the protocol you want to speak with the server, or if the server only supports one protocol (such as FastCGI).
With the advent of HTTP/2 and HTTP/3, however, servers are now able to support multiple protocols.
The HTTP/2 protocol is typically negotiated between client and server.
This negotiation can happen via ALPN, a TLS extension that allows the client to tell the server the list of protocol that the client supports, so that the server can pick one of the client supported protocols that also the server supports; or via HTTP/1.1 upgrade by means of the Upgrade header.
Applications can configure the dynamic transport with one or more HTTP versions such as HTTP/1.1, HTTP/2 or HTTP/3. The implementation will take care of using TLS for HTTPS URIs, using ALPN if necessary, negotiating protocols, upgrading from one protocol to another, etc.
By default, the dynamic transport only speaks HTTP/1.1:
// Dynamic transport speaks HTTP/1.1 by default.
HttpClientTransportDynamic transport = new HttpClientTransportDynamic();

HttpClient client = new HttpClient(transport);
client.start();
The dynamic transport can be configured with just one protocol, making it equivalent to the corresponding static transport:
ClientConnector connector = new ClientConnector();

// Equivalent to HttpClientTransportOverHTTP.
HttpClientTransportDynamic http11Transport = new HttpClientTransportDynamic(connector, HttpClientConnectionFactory.HTTP11);

// Equivalent to HttpClientTransportOverHTTP2.
HTTP2Client http2Client = new HTTP2Client(connector);
HttpClientTransportDynamic http2Transport = new HttpClientTransportDynamic(connector, new ClientConnectionFactoryOverHTTP2.HTTP2(http2Client));
The dynamic transport, however, has been implemented to support multiple transports, in particular HTTP/1.1, HTTP/2 and HTTP/3:
SslContextFactory.Client sslContextFactory = new SslContextFactory.Client();

ClientConnector connector = new ClientConnector();
connector.setSslContextFactory(sslContextFactory);

ClientConnectionFactory.Info http1 = HttpClientConnectionFactory.HTTP11;

HTTP2Client http2Client = new HTTP2Client(connector);
ClientConnectionFactoryOverHTTP2.HTTP2 http2 = new ClientConnectionFactoryOverHTTP2.HTTP2(http2Client);

ClientQuicConfiguration quicConfiguration = new ClientQuicConfiguration(sslContextFactory, null);
HTTP3Client http3Client = new HTTP3Client(quicConfiguration, connector);
ClientConnectionFactoryOverHTTP3.HTTP3 http3 = new ClientConnectionFactoryOverHTTP3.HTTP3(http3Client);

// The order of the protocols indicates the client's preference.
// The first is the most preferred, the last is the least preferred, but
// the protocol version to use can be explicitly specified in the request.
HttpClientTransportDynamic transport = new HttpClientTransportDynamic(connector, http1, http2, http3);

HttpClient client = new HttpClient(transport);
client.start();
The order in which the protocols are specified to HttpClientTransportDynamic indicates what is the client preference (first the most preferred).
When clear-text communication is used (i.e. URIs with the http scheme) there is no HTTP protocol version negotiation, and therefore the application must know a priori whether the server supports the HTTP version or not.
For example, if the server only supports clear-text HTTP/2, and HttpClientTransportDynamic is configured as in the example above, where HTTP/1.1 has precedence over HTTP/2, the client will send, by default, a clear-text HTTP/1.1 request to a clear-text HTTP/2 only server, which will result in a communication failure.
When using TLS (i.e. URIs with the https scheme), the HTTP protocol version is negotiated between client and server via ALPN, and it is the server that decides what is the application protocol to use for the communication, regardless of the client preference.
|
HTTP/1.1 and HTTP/2 are compatible because they both use TCP, while HTTP/3 is incompatible with previous HTTP versions because it uses QUIC. Only compatible HTTP versions can negotiate the HTTP protocol version to use via ALPN, and only compatible HTTP versions can be upgraded from an older version to a newer version. |
Provided that the server supports HTTP/1.1, HTTP/2 and HTTP/3, client applications can explicitly hint the version they want to use:
HttpClientTransportDynamic transport = new HttpClientTransportDynamic(connector, http1, http2, http3);
HttpClient client = new HttpClient(transport);
client.start();

// The server supports HTTP/1.1, HTTP/2 and HTTP/3.

ContentResponse http1Response = client.newRequest("https://host/")
    // Specify the version explicitly.
    .version(HttpVersion.HTTP_1_1)
    .send();

ContentResponse http2Response = client.newRequest("https://host/")
    // Specify the version explicitly.
    .version(HttpVersion.HTTP_2)
    .send();

ContentResponse http3Response = client.newRequest("https://host/")
    // Specify the version explicitly.
    .version(HttpVersion.HTTP_3)
    .send();

// Make a clear-text upgrade request from HTTP/1.1 to HTTP/2.
// The request will start as HTTP/1.1, but the response will be HTTP/2.
ContentResponse upgradedResponse = client.newRequest("https://host/")
    .headers(headers -> headers
        .put(HttpHeader.UPGRADE, "h2c")
        .put(HttpHeader.HTTP2_SETTINGS, "")
        .put(HttpHeader.CONNECTION, "Upgrade, HTTP2-Settings"))
    .send();
If the client application explicitly specifies the HTTP version, then ALPN is not used by the client. By specifying the HTTP version explicitly, the client application has prior-knowledge of what HTTP version the server supports, and therefore ALPN is not needed. If the server does not support the HTTP version chosen by the client, then the communication will fail.
If the client application does not explicitly specify the HTTP version, then ALPN will be used by the client, but only for compatible protocols.
If the server also supports ALPN, then the protocol will be negotiated via ALPN and the server will choose the protocol to use.
If the server does not support ALPN, the client will try to use the first protocol configured in HttpClientTransportDynamic, and the communication may succeed or fail depending on whether the server supports the protocol chosen by the client.
For example, HTTP/3 is not compatible with previous HTTP version; if HttpClientTransportDynamic is configured to prefer HTTP/3, it will be the only protocol attempted by the client:
// Client prefers HTTP/3.
HttpClientTransportDynamic transport = new HttpClientTransportDynamic(connector, http3, http2, http1);
HttpClient client = new HttpClient(transport);
client.start();

// No explicit HTTP version specified.
// Either HTTP/3 succeeds, or communication failure.
ContentResponse httpResponse = client.newRequest("https://host/")
    .send();
When the client application configures HttpClientTransportDynamic to prefer HTTP/2, there could be ALPN negotiation between HTTP/2 and HTTP/1.1 (but not HTTP/3 because it is incompatible); HTTP/3 will only be possible by specifying the HTTP version explicitly:
// Client prefers HTTP/2.
HttpClientTransportDynamic transport = new HttpClientTransportDynamic(connector, http2, http1, http3);
HttpClient client = new HttpClient(transport);
client.start();

// No explicit HTTP version specified.
// Either HTTP/1.1 or HTTP/2 will be negotiated via ALPN.
// HTTP/3 only possible by specifying the version explicitly.
ContentResponse httpResponse = client.newRequest("https://host/")
    .send();
HTTP/2 Client Library
In the vast majority of cases, client applications should use the generic, high-level, HTTP client library that also provides HTTP/2 support via the pluggable HTTP/2 transport or the dynamic transport.
The high-level HTTP library supports cookies, authentication, redirection, connection pooling and a number of other features that are absent in the low-level HTTP/2 library.
The HTTP/2 client library has been designed for those applications that need low-level access to HTTP/2 features such as sessions, streams and frames, and this is quite a rare use case.
See also the correspondent HTTP/2 server library.
Introducing HTTP2Client
The Maven artifact coordinates for the HTTP/2 client library are the following:
<dependency>
  <groupId>org.eclipse.jetty.http2</groupId>
  <artifactId>jetty-http2-client</artifactId>
  <version>12.0.9-SNAPSHOT</version>
</dependency>
The main class is named org.eclipse.jetty.http2.client.HTTP2Client, and must be created, configured and started before use:
// Instantiate HTTP2Client.
HTTP2Client http2Client = new HTTP2Client();

// Configure HTTP2Client, for example:
http2Client.setStreamIdleTimeout(15000);

// Start HTTP2Client.
http2Client.start();
When your application stops, or otherwise does not need HTTP2Client anymore, it should stop the HTTP2Client instance (or instances) that were started:
// Stop HTTP2Client.
http2Client.stop();
HTTP2Client allows client applications to connect to an HTTP/2 server.
A session represents a single TCP connection to an HTTP/2 server and is defined by class org.eclipse.jetty.http2.api.Session.
A session typically has a long life — once the TCP connection is established, it remains open until it is not used anymore (and therefore it is closed by the idle timeout mechanism), until a fatal error occurs (for example, a network failure), or if one of the peers decides unilaterally to close the TCP connection.
HTTP/2 is a multiplexed protocol: it allows multiple HTTP/2 requests to be sent on the same TCP connection, or session. Each request/response cycle is represented by a stream. Therefore, a single session manages multiple concurrent streams. A stream has typically a very short life compared to the session: a stream only exists for the duration of the request/response cycle and then disappears.
HTTP/2 Flow Control
The HTTP/2 protocol is flow controlled (see the specification). This means that a sender and a receiver maintain a flow control window that tracks the number of data bytes sent and received, respectively. When a sender sends data bytes, it reduces its flow control window. When a receiver receives data bytes, it also reduces its flow control window, and then passes the received data bytes to the application. The application consumes the data bytes and tells back the receiver that it has consumed the data bytes. The receiver then enlarges the flow control window, and the implementation arranges to send a message to the sender with the number of bytes consumed, so that the sender can enlarge its flow control window.
A sender can send data bytes up to its whole flow control window, then it must stop sending. The sender may resume sending data bytes when it receives a message from the receiver that the data bytes sent previously have been consumed. This message enlarges the sender flow control window, which allows the sender to send more data bytes.
HTTP/2 defines two flow control windows: one for each session, and one for each stream. Let’s see with an example how they interact, assuming that in this example the session flow control window is 120 bytes and the stream flow control window is 100 bytes.
The sender opens a session, and then opens stream_1 on that session, and sends 80 data bytes.
At this point the session flow control window is 40 bytes (120 - 80), and stream_1's flow control window is 20 bytes (100 - 80).
The sender now opens stream_2 on the same session and sends 40 data bytes.
At this point, the session flow control window is 0 bytes (40 - 40), while stream_2's flow control window is 60 (100 - 40).
Since now the session flow control window is 0, the sender cannot send more data bytes, neither on stream_1 nor on stream_2, nor on other streams, despite all the streams having their stream flow control windows greater than 0.
The receiver consumes stream_2's 40 data bytes and sends a message to the sender with this information.
At this point, the session flow control window is 40 (0 + 40), stream_1's flow control window is still 20 and stream_2's flow control window is 100 (60 + 40).
If the sender opens stream_3 and would like to send 50 data bytes, it would only be able to send 40 because that is the maximum allowed by the session flow control window at this point.
It is therefore very important that applications notify the fact that they have consumed data bytes as soon as possible, so that the implementation (the receiver) can send a message to the sender (in the form of a WINDOW_UPDATE frame) with the information to enlarge the flow control window, therefore reducing the possibility that sender stalls due to the flow control windows being reduced to 0.
How a client application should handle HTTP/2 flow control is discussed in details in this section.
Connecting to the Server
The first thing an application should do is to connect to the server and obtain a Session.
The following example connects to the server on a clear-text port:
// Address of the server's clear-text port.
SocketAddress serverAddress = new InetSocketAddress("localhost", 8080);

// Connect to the server, the CompletableFuture will be
// notified when the connection is succeeded (or failed).
CompletableFuture<Session> sessionCF = http2Client.connect(serverAddress, new Session.Listener() {});

// Block to obtain the Session.
// Alternatively you can use the CompletableFuture APIs to avoid blocking.
Session session = sessionCF.get();
The following example connects to the server on an encrypted port:
HTTP2Client http2Client = new HTTP2Client();
http2Client.start();

ClientConnector connector = http2Client.getClientConnector();

// Address of the server's encrypted port.
SocketAddress serverAddress = new InetSocketAddress("localhost", 8443);

// Connect to the server, the CompletableFuture will be
// notified when the connection is succeeded (or failed).
CompletableFuture<Session> sessionCF = http2Client.connect(connector.getSslContextFactory(), serverAddress, new Session.Listener() {});

// Block to obtain the Session.
// Alternatively you can use the CompletableFuture APIs to avoid blocking.
Session session = sessionCF.get();
Applications must know in advance whether they want to connect to a clear-text or encrypted port, and pass the SslContextFactory parameter accordingly to the connect(...) method.
|
Configuring the Session
The connect(...) method takes a Session.Listener parameter.
This listener’s onPreface(...) method is invoked just before establishing the connection to the server to gather the client configuration to send to the server.
Client applications can override this method to change the default configuration:
SocketAddress serverAddress = new InetSocketAddress("localhost", 8080);
http2Client.connect(serverAddress, new Session.Listener()
{
    @Override
    public Map<Integer, Integer> onPreface(Session session)
    {
        Map<Integer, Integer> configuration = new HashMap<>();

        // Disable push from the server.
        configuration.put(SettingsFrame.ENABLE_PUSH, 0);

        // Override HTTP2Client.initialStreamRecvWindow for this session.
        configuration.put(SettingsFrame.INITIAL_WINDOW_SIZE, 1024 * 1024);

        return configuration;
    }
});
The Session.Listener is notified of session events originated by the server such as receiving a SETTINGS frame from the server, or the server closing the connection, or the client timing out the connection due to idleness.
Please refer to the Session.Listener javadocs for the complete list of events.
Once a Session has been established, the communication with the server happens by exchanging frames, as specified in the HTTP/2 specification.
Sending a Request
Sending an HTTP request to the server, and receiving a response, creates a stream that encapsulates the exchange of HTTP/2 frames that compose the request and the response.
In order to send an HTTP request to the server, the client must send a HEADERS frame.
HEADERS frames carry the request method, the request URI and the request headers.
Sending the HEADERS frame opens the Stream:
SocketAddress serverAddress = new InetSocketAddress("localhost", 8080);
CompletableFuture<Session> sessionCF = http2Client.connect(serverAddress, new Session.Listener() {});
Session session = sessionCF.get();

// Configure the request headers.
HttpFields requestHeaders = HttpFields.build()
    .put(HttpHeader.USER_AGENT, "Jetty HTTP2Client 12.0.9-SNAPSHOT");

// The request metadata with method, URI and headers.
MetaData.Request request = new MetaData.Request("GET", HttpURI.from("http://localhost:8080/path"), HttpVersion.HTTP_2, requestHeaders);

// The HTTP/2 HEADERS frame, with endStream=true
// to signal that this request has no content.
HeadersFrame headersFrame = new HeadersFrame(request, null, true);

// Open a Stream by sending the HEADERS frame.
session.newStream(headersFrame, null);
Note how Session.newStream(...) takes a Stream.Listener parameter.
This listener is notified of stream events originated by the server such as receiving HEADERS or DATA frames that are part of the response, discussed in more details in the section below.
Please refer to the Stream.Listener javadocs for the complete list of events.
HTTP requests may have content, which is sent using the Stream APIs:
SocketAddress serverAddress = new InetSocketAddress("localhost", 8080);
CompletableFuture<Session> sessionCF = http2Client.connect(serverAddress, new Session.Listener() {});
Session session = sessionCF.get();

// Configure the request headers.
HttpFields requestHeaders = HttpFields.build()
    .put(HttpHeader.CONTENT_TYPE, "application/json");

// The request metadata with method, URI and headers.
MetaData.Request request = new MetaData.Request("POST", HttpURI.from("http://localhost:8080/path"), HttpVersion.HTTP_2, requestHeaders);

// The HTTP/2 HEADERS frame, with endStream=false to
// signal that there will be more frames in this stream.
HeadersFrame headersFrame = new HeadersFrame(request, null, false);

// Open a Stream by sending the HEADERS frame.
CompletableFuture<Stream> streamCF = session.newStream(headersFrame, null);

// Block to obtain the Stream.
// Alternatively you can use the CompletableFuture APIs to avoid blocking.
Stream stream = streamCF.get();

// The request content, in two chunks.
String content1 = "{\"greet\": \"hello world\"}";
ByteBuffer buffer1 = StandardCharsets.UTF_8.encode(content1);
String content2 = "{\"user\": \"jetty\"}";
ByteBuffer buffer2 = StandardCharsets.UTF_8.encode(content2);

// Send the first DATA frame on the stream, with endStream=false
// to signal that there are more frames in this stream.
CompletableFuture<Stream> dataCF1 = stream.data(new DataFrame(stream.getId(), buffer1, false));

// Only when the first chunk has been sent we can send the second,
// with endStream=true to signal that there are no more frames.
dataCF1.thenCompose(s -> s.data(new DataFrame(s.getId(), buffer2, true)));
When sending two DATA frames consecutively, the second call to Stream.data(...) must be done only when the first is completed, or a WritePendingException will be thrown.
Use the Callback APIs or CompletableFuture APIs to ensure that the second Stream.data(...) call is performed when the first completed successfully.
|
Receiving a Response
Response events are delivered to the Stream.Listener passed to Session.newStream(...).
An HTTP response is typically composed of a HEADERS frame containing the HTTP status code and the response headers, and optionally one or more DATA frames containing the response content bytes.
The HTTP/2 protocol also supports response trailers (that is, headers that are sent after the response content) that also are sent using a HEADERS frame.
A client application can therefore receive the HTTP/2 frames sent by the server by implementing the relevant methods in Stream.Listener:
// Open a Stream by sending the HEADERS frame.
session.newStream(headersFrame, new Stream.Listener()
{
    @Override
    public void onHeaders(Stream stream, HeadersFrame frame)
    {
        MetaData metaData = frame.getMetaData();

        // Is this HEADERS frame the response or the trailers?
        if (metaData.isResponse())
        {
            MetaData.Response response = (MetaData.Response)metaData;
            System.getLogger("http2").log(INFO, "Received response {0}", response);
            if (!frame.isEndStream())
            {
                // Demand for DATA frames, so that onDataAvailable()
                // below will be called when they are available.
                stream.demand();
            }
        }
        else
        {
            System.getLogger("http2").log(INFO, "Received trailers {0}", metaData.getHttpFields());
        }
    }

    @Override
    public void onDataAvailable(Stream stream)
    {
        // Read a Data object.
        Stream.Data data = stream.readData();

        if (data == null)
        {
            // Demand more DATA frames.
            stream.demand();
            return;
        }

        // Get the content buffer.
        ByteBuffer buffer = data.frame().getByteBuffer();

        // Consume the buffer, here - as an example - just log it.
        System.getLogger("http2").log(INFO, "Consuming buffer {0}", buffer);

        // Tell the implementation that the buffer has been consumed.
        data.release();

        if (!data.frame().isEndStream())
        {
            // Demand more DATA frames when they are available.
            stream.demand();
        }
    }
});|
When Just returning from the Applications must call |
Applications that consume the content buffer within onDataAvailable(Stream stream) (for example, writing it to a file, or copying the bytes to another storage) should call Data.release() as soon as they have consumed the content buffer.
This allows the implementation to reuse the buffer, reducing the memory requirements needed to handle the content buffers.
Alternatively, an application may store away the Data object to consume the buffer bytes later, or pass the Data object to another asynchronous API (this is typical in proxy applications).
|
The call to |
Applications can unwrap the Data object into some other object that may be used later, provided that the release semantic is maintained:
record Chunk(ByteBuffer byteBuffer, Callback callback)
{
}

// A queue that consumers poll to consume content asynchronously.
Queue<Chunk> dataQueue = new ConcurrentLinkedQueue<>();

// Implementation of Stream.Listener.onDataAvailable(Stream stream)
// in case of unwrapping of the Data object for asynchronous content
// consumption and demand.
Stream.Listener listener = new Stream.Listener()
{
    @Override
    public void onDataAvailable(Stream stream)
    {
        Stream.Data data = stream.readData();

        if (data == null)
        {
            stream.demand();
            return;
        }

        // Get the content buffer.
        ByteBuffer byteBuffer = data.frame().getByteBuffer();

        // Unwrap the Data object, converting it to a Chunk.
        // The Data.release() semantic is maintained in the completion of the Callback.
        dataQueue.offer(new Chunk(byteBuffer, Callback.from(() ->
        {
            // When the buffer has been consumed, then:
            // A) release the Data object.
            data.release();
            // B) possibly demand more DATA frames.
            if (!data.frame().isEndStream())
                stream.demand();
        })));

        // Do not demand more data here, to avoid to overflow the queue.
    }
};|
Applications that implement If they do not call |
Resetting a Request or Response
In HTTP/2, clients and servers have the ability to tell to the other peer that they are not interested anymore in either the request or the response, using a RST_STREAM frame.
The HTTP2Client APIs allow client applications to send and receive this "reset" frame:
// Open a Stream by sending the HEADERS frame.
CompletableFuture<Stream> streamCF = session.newStream(headersFrame, new Stream.Listener()
{
    @Override
    public void onReset(Stream stream, ResetFrame frame, Callback callback)
    {
        // The server reset this stream.

        // Succeed the callback to signal that the reset event has been handled.
        callback.succeeded();
    }
});
Stream stream = streamCF.get();

// Reset this stream (for example, the user closed the application).
stream.reset(new ResetFrame(stream.getId(), ErrorCode.CANCEL_STREAM_ERROR.code), Callback.NOOP);
Receiving HTTP/2 Pushes
HTTP/2 servers have the ability to push resources related to a primary resource.
When an HTTP/2 server pushes a resource, it sends to the client a PUSH_PROMISE frame that contains the request URI and headers that a client would use to request explicitly that resource.
Client applications can be configured to tell the server to never push resources, see this section.
Client applications can listen to the push events, and act accordingly:
// Open a Stream by sending the HEADERS frame.
CompletableFuture<Stream> streamCF = session.newStream(headersFrame, new Stream.Listener()
{
    @Override
    public Stream.Listener onPush(Stream pushedStream, PushPromiseFrame frame)
    {
        // The "request" the client would make for the pushed resource.
        MetaData.Request pushedRequest = frame.getMetaData();
        // The pushed "request" URI.
        HttpURI pushedURI = pushedRequest.getHttpURI();
        // The pushed "request" headers.
        HttpFields pushedRequestHeaders = pushedRequest.getHttpFields();

        // If needed, retrieve the primary stream that triggered the push.
        Stream primaryStream = pushedStream.getSession().getStream(frame.getStreamId());

        // Return a Stream.Listener to listen for the pushed "response" events.
        return new Stream.Listener()
        {
            @Override
            public void onHeaders(Stream stream, HeadersFrame frame)
            {
                // Handle the pushed stream "response".

                MetaData metaData = frame.getMetaData();
                if (metaData.isResponse())
                {
                    // The pushed "response" headers.
                    HttpFields pushedResponseHeaders = metaData.getHttpFields();

                    // Typically a pushed stream has data, so demand for data.
                    stream.demand();
                }
            }

            @Override
            public void onDataAvailable(Stream stream)
            {
                // Handle the pushed stream "response" content.

                Stream.Data data = stream.readData();

                if (data == null)
                {
                    stream.demand();
                    return;
                }

                // The pushed stream "response" content bytes.
                ByteBuffer buffer = data.frame().getByteBuffer();
                // Consume the buffer and release the Data object.
                data.release();

                if (!data.frame().isEndStream())
                {
                    // Demand more DATA frames when they are available.
                    stream.demand();
                }
            }
        };
    }
});
If a client application does not want to handle a particular HTTP/2 push, it can just reset the pushed stream to tell the server to stop sending bytes for the pushed stream:
// Open a Stream by sending the HEADERS frame.
CompletableFuture<Stream> streamCF = session.newStream(headersFrame, new Stream.Listener()
{
    @Override
    public Stream.Listener onPush(Stream pushedStream, PushPromiseFrame frame)
    {
        // Reset the pushed stream to tell the server you are not interested.
        pushedStream.reset(new ResetFrame(pushedStream.getId(), ErrorCode.CANCEL_STREAM_ERROR.code), Callback.NOOP);

        // Not interested in listening to pushed response events.
        return null;
    }
});
HTTP/3 Client Library
In the vast majority of cases, client applications should use the generic, high-level, HTTP client library that also provides HTTP/3 support via the pluggable HTTP/3 transport or the dynamic transport.
The high-level HTTP library supports cookies, authentication, redirection, connection pooling and a number of other features that are absent in the low-level HTTP/3 library.
The HTTP/3 client library has been designed for those applications that need low-level access to HTTP/3 features such as sessions, streams and frames, and this is quite a rare use case.
See also the correspondent HTTP/3 server library.
Introducing HTTP3Client
The Maven artifact coordinates for the HTTP/3 client library are the following:
<dependency>
  <groupId>org.eclipse.jetty.http3</groupId>
  <artifactId>jetty-http3-client</artifactId>
  <version>12.0.9-SNAPSHOT</version>
</dependency>
The main class is named org.eclipse.jetty.http3.client.HTTP3Client, and must be created, configured and started before use:
// Instantiate HTTP3Client.
SslContextFactory.Client sslContextFactory = new SslContextFactory.Client();
HTTP3Client http3Client = new HTTP3Client(new ClientQuicConfiguration(sslContextFactory, null));

// Configure HTTP3Client, for example:
http3Client.getHTTP3Configuration().setStreamIdleTimeout(15000);

// Start HTTP3Client.
http3Client.start();
When your application stops, or otherwise does not need HTTP3Client anymore, it should stop the HTTP3Client instance (or instances) that were started:
// Stop HTTP3Client.
http3Client.stop();
HTTP3Client allows client applications to connect to an HTTP/3 server.
A session represents a single connection to an HTTP/3 server and is defined by class org.eclipse.jetty.http3.api.Session.
A session typically has a long life — once the connection is established, it remains active until it is not used anymore (and therefore it is closed by the idle timeout mechanism), until a fatal error occurs (for example, a network failure), or if one of the peers decides unilaterally to close the connection.
HTTP/3 is a multiplexed protocol because it relies on the multiplexing capabilities of QUIC, the protocol based on UDP that transports HTTP/3 frames. Thanks to multiplexing, multiple HTTP/3 requests are sent on the same QUIC connection, or session. Each request/response cycle is represented by a stream. Therefore, a single session manages multiple concurrent streams. A stream has typically a very short life compared to the session: a stream only exists for the duration of the request/response cycle and then disappears.
Connecting to the Server
The first thing an application should do is to connect to the server and obtain a Session.
The following example connects to the server:
// Address of the server's port.
SocketAddress serverAddress = new InetSocketAddress("localhost", 8444);

// Connect to the server, the CompletableFuture will be
// notified when the connection is succeeded (or failed).
CompletableFuture<Session.Client> sessionCF = http3Client.connect(serverAddress, new Session.Client.Listener() {});

// Block to obtain the Session.
// Alternatively you can use the CompletableFuture APIs to avoid blocking.
Session session = sessionCF.get();
Configuring the Session
The connect(...) method takes a Session.Client.Listener parameter.
This listener’s onPreface(...) method is invoked just before establishing the connection to the server to gather the client configuration to send to the server.
Client applications can override this method to change the default configuration:
SocketAddress serverAddress = new InetSocketAddress("localhost", 8444);
http3Client.connect(serverAddress, new Session.Client.Listener()
{
    @Override
    public Map<Long, Long> onPreface(Session session)
    {
        Map<Long, Long> configuration = new HashMap<>();

        // Add here configuration settings.

        return configuration;
    }
});
The Session.Client.Listener is notified of session events originated by the server such as receiving a SETTINGS frame from the server, or the server closing the connection, or the client timing out the connection due to idleness.
Please refer to the Session.Client.Listener javadocs for the complete list of events.
Once a Session has been established, the communication with the server happens by exchanging frames.
Sending a Request
Sending an HTTP request to the server, and receiving a response, creates a stream that encapsulates the exchange of HTTP/3 frames that compose the request and the response.
In order to send an HTTP request to the server, the client must send a HEADERS frame.
HEADERS frames carry the request method, the request URI and the request headers.
Sending the HEADERS frame opens the Stream:
SocketAddress serverAddress = new InetSocketAddress("localhost", 8444);
CompletableFuture<Session.Client> sessionCF = http3Client.connect(serverAddress, new Session.Client.Listener() {});
Session.Client session = sessionCF.get();

// Configure the request headers.
HttpFields requestHeaders = HttpFields.build()
    .put(HttpHeader.USER_AGENT, "Jetty HTTP3Client 12.0.9-SNAPSHOT");

// The request metadata with method, URI and headers.
MetaData.Request request = new MetaData.Request("GET", HttpURI.from("http://localhost:8444/path"), HttpVersion.HTTP_3, requestHeaders);

// The HTTP/3 HEADERS frame, with endStream=true
// to signal that this request has no content.
HeadersFrame headersFrame = new HeadersFrame(request, true);

// Open a Stream by sending the HEADERS frame.
session.newRequest(headersFrame, new Stream.Client.Listener() {});
Note how Session.newRequest(...) takes a Stream.Client.Listener parameter.
This listener is notified of stream events originated by the server such as receiving HEADERS or DATA frames that are part of the response, discussed in more details in the section below.
Please refer to the Stream.Client.Listener javadocs for the complete list of events.
HTTP requests may have content, which is sent using the Stream APIs:
SocketAddress serverAddress = new InetSocketAddress("localhost", 8444);
CompletableFuture<Session.Client> sessionCF = http3Client.connect(serverAddress, new Session.Client.Listener() {});
Session.Client session = sessionCF.get();

// Configure the request headers.
HttpFields requestHeaders = HttpFields.build()
    .put(HttpHeader.CONTENT_TYPE, "application/json");

// The request metadata with method, URI and headers.
MetaData.Request request = new MetaData.Request("POST", HttpURI.from("http://localhost:8444/path"), HttpVersion.HTTP_3, requestHeaders);

// The HTTP/3 HEADERS frame, with endStream=false to
// signal that there will be more frames in this stream.
HeadersFrame headersFrame = new HeadersFrame(request, false);

// Open a Stream by sending the HEADERS frame.
CompletableFuture<Stream> streamCF = session.newRequest(headersFrame, new Stream.Client.Listener() {});

// Block to obtain the Stream.
// Alternatively you can use the CompletableFuture APIs to avoid blocking.
Stream stream = streamCF.get();

// The request content, in two chunks.
String content1 = "{\"greet\": \"hello world\"}";
ByteBuffer buffer1 = StandardCharsets.UTF_8.encode(content1);
String content2 = "{\"user\": \"jetty\"}";
ByteBuffer buffer2 = StandardCharsets.UTF_8.encode(content2);

// Send the first DATA frame on the stream, with endStream=false
// to signal that there are more frames in this stream.
CompletableFuture<Stream> dataCF1 = stream.data(new DataFrame(buffer1, false));

// Only when the first chunk has been sent we can send the second,
// with endStream=true to signal that there are no more frames.
dataCF1.thenCompose(s -> s.data(new DataFrame(buffer2, true)));
When sending two DATA frames consecutively, the second call to Stream.data(...) must be done only when the first is completed, or a WritePendingException will be thrown.
Use the CompletableFuture APIs to ensure that the second Stream.data(...) call is performed when the first completed successfully.
|
Receiving a Response
Response events are delivered to the Stream.Client.Listener passed to Session.newRequest(...).
An HTTP response is typically composed of a HEADERS frame containing the HTTP status code and the response headers, and optionally one or more DATA frames containing the response content bytes.
The HTTP/3 protocol also supports response trailers (that is, headers that are sent after the response content) that also are sent using a HEADERS frame.
A client application can therefore receive the HTTP/3 frames sent by the server by implementing the relevant methods in Stream.Client.Listener:
// Open a Stream by sending the HEADERS frame.
session.newRequest(headersFrame, new Stream.Client.Listener()
{
    @Override
    public void onResponse(Stream.Client stream, HeadersFrame frame)
    {
        MetaData metaData = frame.getMetaData();
        MetaData.Response response = (MetaData.Response)metaData;
        System.getLogger("http3").log(INFO, "Received response {0}", response);
    }

    @Override
    public void onDataAvailable(Stream.Client stream)
    {
        // Read a chunk of the content.
        Stream.Data data = stream.readData();
        if (data == null)
        {
            // No data available now, demand to be called back.
            stream.demand();
        }
        else
        {
            // Process the content.
            process(data.getByteBuffer());

            // Notify the implementation that the content has been consumed.
            data.release();

            if (!data.isLast())
            {
                // Demand to be called back.
                stream.demand();
            }
        }
    }
});
Resetting a Request or Response
In HTTP/3, clients and servers have the ability to tell to the other peer that they are not interested anymore in either the request or the response, by resetting the stream.
The HTTP3Client APIs allow client applications to send and receive this "reset" event:
// Open a Stream by sending the HEADERS frame.
CompletableFuture<Stream> streamCF = session.newRequest(headersFrame, new Stream.Client.Listener()
{
    @Override
    public void onFailure(Stream.Client stream, long error, Throwable failure)
    {
        // The server reset this stream.
    }
});
Stream stream = streamCF.get();

// Reset this stream (for example, the user closed the application).
stream.reset(HTTP3ErrorCode.REQUEST_CANCELLED_ERROR.code(), new ClosedChannelException());
WebSocket Client
Jetty’s WebSocketClient is a more powerful alternative to the WebSocket client provided by the standard JSR 356 javax.websocket APIs.
Similarly to Jetty’s HttpClient, the WebSocketClient is non-blocking and asynchronous, making it very efficient in resource utilization.
A synchronous, blocking, API is also offered for simpler cases.
Since the first step of establishing a WebSocket communication is an HTTP request, WebSocketClient makes use of HttpClient and therefore depends on it.
The Maven artifact coordinates are the following:
<dependency>
  <groupId>org.eclipse.jetty.websocket</groupId>
  <artifactId>jetty-websocket-jetty-client</artifactId>
  <version>12.0.9-SNAPSHOT</version>
</dependency>
Starting WebSocketClient
The main class is org.eclipse.jetty.websocket.client.WebSocketClient; you instantiate it, configure it, and then start it like many other Jetty components.
This is a minimal example:
// Instantiate WebSocketClient.
WebSocketClient webSocketClient = new WebSocketClient();

// Configure WebSocketClient, for example:
webSocketClient.setMaxTextMessageSize(8 * 1024);

// Start WebSocketClient.
webSocketClient.start();
However, it is recommended that you explicitly pass an HttpClient instance to WebSocketClient so that you can have control over the HTTP configuration as well:
// Instantiate and configure HttpClient.
HttpClient httpClient = new HttpClient();
// For example, configure a proxy.
httpClient.getProxyConfiguration().addProxy(new HttpProxy("localhost", 8888));

// Instantiate WebSocketClient, passing HttpClient to the constructor.
WebSocketClient webSocketClient = new WebSocketClient(httpClient);
// Configure WebSocketClient, for example:
webSocketClient.setMaxTextMessageSize(8 * 1024);

// Start WebSocketClient; this implicitly starts also HttpClient.
webSocketClient.start();
You may create multiple instances of WebSocketClient, but typically one instance is enough for most applications.
Creating multiple instances may be necessary for example when you need to specify different configuration parameters for different instances.
For example, you may need different instances when you need to configure the HttpClient differently: different transports, different proxies, different cookie stores, different authentications, etc.
The configuration that is not WebSocket specific (such as idle timeout, etc.) should be directly configured on the associated HttpClient instance.
The WebSocket specific configuration can be configured directly on the WebSocketClient instance.
Configuring the WebSocketClient allows to give default values to various parameters, whose values may be overridden more specifically, as described in this section.
Refer to the WebSocketClient javadocs for the setter methods available to customize the WebSocket specific configuration.
Stopping WebSocketClient
It is recommended that when your application stops, you also stop the WebSocketClient instance (or instances) that you are using.
Similarly to stopping HttpClient, you want to stop WebSocketClient from a thread that is not owned by WebSocketClient itself, for example:
// Stop WebSocketClient.
// Use LifeCycle.stop(...) to rethrow checked exceptions as unchecked.
new Thread(() -> LifeCycle.stop(webSocketClient)).start();
Connecting to a Remote Host
A WebSocket client may initiate the communication with the server either using HTTP/1.1 or using HTTP/2. The two mechanism are quite different and detailed in the following sections.
Using HTTP/1.1
Initiating a WebSocket communication with a server using HTTP/1.1 is detailed in RFC 6455.
A WebSocket client first establishes a TCP connection to the server, then sends an HTTP/1.1 upgrade request.
If the server supports upgrading to WebSocket, it responds with HTTP status code 101, and then switches the communication over that connection, either incoming or outgoing, to happen using the WebSocket protocol.
When the client receives the HTTP status code 101, it switches the communication over that connection, either incoming or outgoing, to happen using the WebSocket protocol.
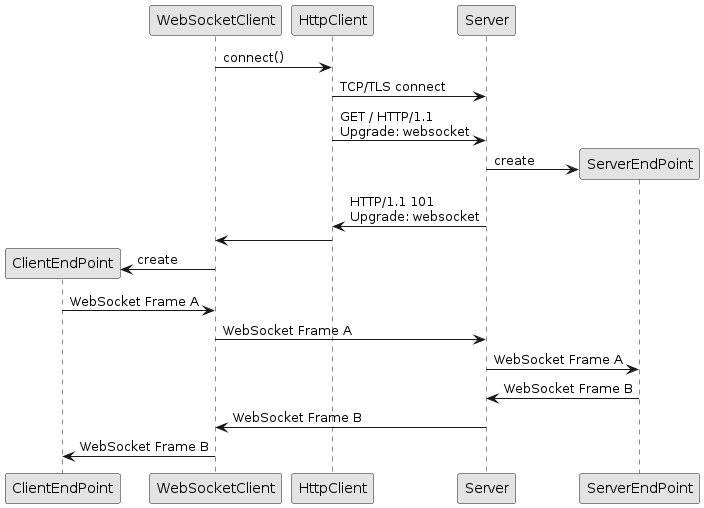
In code:
// Use a standard, HTTP/1.1, HttpClient.
HttpClient httpClient = new HttpClient();

// Create and start WebSocketClient.
WebSocketClient webSocketClient = new WebSocketClient(httpClient);
webSocketClient.start();

// The client-side WebSocket EndPoint that
// receives WebSocket messages from the server.
ClientEndPoint clientEndPoint = new ClientEndPoint();
// The server URI to connect to.
URI serverURI = URI.create("ws://domain.com/path");

// Connect the client EndPoint to the server.
CompletableFuture<Session> clientSessionPromise = webSocketClient.connect(clientEndPoint, serverURI);
WebSocketClient.connect() links the client-side WebSocket endpoint to a specific server URI, and returns a CompletableFuture of an org.eclipse.jetty.websocket.api.Session.
The endpoint offers APIs to receive WebSocket data (or errors) from the server, while the session offers APIs to send WebSocket data to the server.
Using HTTP/2
Initiating a WebSocket communication with a server using HTTP/1.1 is detailed in RFC 8441.
A WebSocket client establishes a TCP connection to the server or reuses an existing one currently used for HTTP/2, then sends an HTTP/2 CONNECT request over an HTTP/2 stream.
If the server supports upgrading to WebSocket, it responds with HTTP status code 200, then switches the communication over that stream, either incoming or outgoing, to happen using HTTP/2 DATA frames wrapping WebSocket frames.
When the client receives the HTTP status code 200, it switches the communication over that stream, either incoming or outgoing, to happen using HTTP/2 DATA frames wrapping WebSocket frames.
From an external point of view, it will look like client is sending chunks of an infinite HTTP/2 request upload, and the server is sending chunks of an infinite HTTP/2 response download, as they will exchange HTTP/2 DATA frames; but the HTTP/2 DATA frames will contain each one or more WebSocket frames that both client and server know how to deliver to the respective WebSocket endpoints.
When either WebSocket endpoint decides to terminate the communication, the HTTP/2 stream will be closed as well.
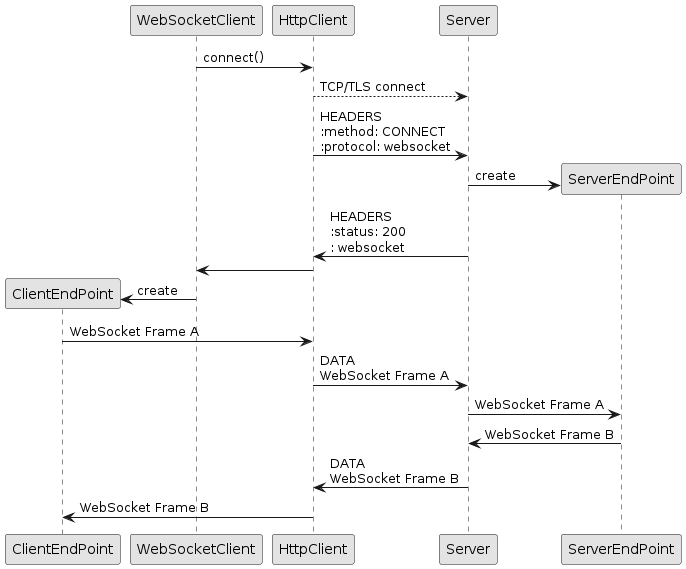
In code:
// Use the HTTP/2 transport for HttpClient.
HTTP2Client http2Client = new HTTP2Client();
HttpClient httpClient = new HttpClient(new HttpClientTransportOverHTTP2(http2Client));

// Create and start WebSocketClient.
WebSocketClient webSocketClient = new WebSocketClient(httpClient);
webSocketClient.start();

// The client-side WebSocket EndPoint that
// receives WebSocket messages from the server.
ClientEndPoint clientEndPoint = new ClientEndPoint();
// The server URI to connect to.
URI serverURI = URI.create("wss://domain.com/path");

// Connect the client EndPoint to the server.
CompletableFuture<Session> clientSessionPromise = webSocketClient.connect(clientEndPoint, serverURI);
Alternatively, you can use the dynamic HttpClient transport:
// Use the dynamic HTTP/2 transport for HttpClient.
ClientConnector clientConnector = new ClientConnector();
HTTP2Client http2Client = new HTTP2Client(clientConnector);
HttpClient httpClient = new HttpClient(new HttpClientTransportDynamic(clientConnector, new ClientConnectionFactoryOverHTTP2.HTTP2(http2Client)));

// Create and start WebSocketClient.
WebSocketClient webSocketClient = new WebSocketClient(httpClient);
webSocketClient.start();

ClientEndPoint clientEndPoint = new ClientEndPoint();
URI serverURI = URI.create("wss://domain.com/path");

// Connect the client EndPoint to the server.
CompletableFuture<Session> clientSessionPromise = webSocketClient.connect(clientEndPoint, serverURI);
Customizing the Initial HTTP Request
Sometimes you need to add custom cookies, or other HTTP headers, or specify a WebSocket sub-protocol to the HTTP request that initiates the WebSocket communication.
You can do this by using overloaded versions of the WebSocketClient.connect(…) method:
ClientEndPoint clientEndPoint = new ClientEndPoint();
URI serverURI = URI.create("ws://domain.com/path");

// Create a custom HTTP request.
ClientUpgradeRequest customRequest = new ClientUpgradeRequest();
// Specify a cookie.
customRequest.getCookies().add(new HttpCookie("name", "value"));
// Specify a custom header.
customRequest.setHeader("X-Token", "0123456789ABCDEF");
// Specify a custom sub-protocol.
customRequest.setSubProtocols("chat");

// Connect the client EndPoint to the server with a custom HTTP request.
CompletableFuture<Session> clientSessionPromise = webSocketClient.connect(clientEndPoint, serverURI, customRequest);
Inspecting the Initial HTTP Response
If you want to inspect the HTTP response returned by the server as a reply to the HTTP request that initiates the WebSocket communication, you may provide a JettyUpgradeListener:
ClientEndPoint clientEndPoint = new ClientEndPoint();
URI serverURI = URI.create("ws://domain.com/path");

// The listener to inspect the HTTP response.
JettyUpgradeListener listener = new JettyUpgradeListener()
{
    @Override
    public void onHandshakeResponse(Request request, Response response)
    {
        // Inspect the HTTP response here.
    }
};

// Connect the client EndPoint to the server with a custom HTTP request.
CompletableFuture<Session> clientSessionPromise = webSocketClient.connect(clientEndPoint, serverURI, null, listener);
Jetty WebSocket Architecture
The Jetty WebSocket architecture is organized around the concept of a logical connection between the client and the server.
The connection may be physical, when connecting to the server using HTTP/1.1, as the WebSocket bytes are carried directly by the TCP connection.
The connection may be virtual, when connecting to the server using HTTP/2, as the WebSocket bytes are wrapped into HTTP/2 DATA frames of an HTTP/2 stream.
In this case, a single TCP connection may carry several WebSocket virtual connections, each wrapped in its own HTTP/2 stream.
Each side of a WebSocket connection, either client or server, is made of two entities:
-
A WebSocket endpoint, the entity that receives WebSocket events.
-
A WebSocket session, the entity that offers an API to send WebSocket data (and to close the WebSocket connection), as well as to configure WebSocket connection parameters.
WebSocket Endpoints
A WebSocket endpoint is the entity that receives WebSocket events.
The WebSocket events are the following:
-
The open event. This event is emitted when the WebSocket communication has been successfully established. Applications interested in the open event receive the WebSocket session so that they can use it to send data to the remote peer.
-
The close event. This event is emitted when the WebSocket communication has been closed. Applications interested in the close event receive a WebSocket status code and an optional close reason message.
-
The error event. This event is emitted when the WebSocket communication encounters a fatal error, such as an I/O error (for example, the network connection has been broken), or a protocol error (for example, the remote peer sends an invalid WebSocket frame). Applications interested in the error event receive a
Throwablethat represent the error. -
The frame events. The frame events are emitted when a WebSocket frame is received, either a control frame such as PING, PONG or CLOSE, or a data frame such as BINARY or TEXT. One or more data frames of the same type define a message.
-
The message events. The message event are emitted when a WebSocket message is received. The message event can be of two types:
-
TEXT. Applications interested in this type of messages receive a
Stringrepresenting the UTF-8 bytes received. -
BINARY. Applications interested in this type of messages receive a
ByteBufferrepresenting the raw bytes received.
-
Listener endpoints are notified of events by invoking the correspondent method defined by the org.eclipse.jetty.websocket.api.Session.Listener interface.
Annotated endpoints are notified of events by invoking the correspondent method annotated with the correspondent annotation from the org.eclipse.jetty.websocket.api.annotations.* package.
Jetty uses MethodHandles to instantiate WebSocket endpoints and invoke WebSocket event methods, so WebSocket endpoint classes and WebSocket event methods must be public.
When using JPMS, your classes must be public and must be exported using the exports directive in your module-info.java.
It is not recommended to use the opens directive in your module-info.java for your classes, as it would expose your classes to deep reflection, which is unnecessary, as the exports directive is sufficient.
This guarantees that WebSocket endpoints can be accessed by the Jetty implementation without additional configuration, no matter whether you are using only the class-path, or the module-path.
For both types of WebSocket endpoints, only one thread at a time will be delivering frame or message events to the corresponding methods; the next frame or message event will not be delivered until the previous call to the corresponding method has exited, and if there is demand for it. Endpoints will always be notified of message events in the same order they were received over the network.
WebSocket Events Demand
In order to receive WebSocket events, you must demand for them; the only exception is the open event, because it is the initial event that applications can interact with.
When a WebSocket event is received by an endpoint, the demand for WebSocket events (for that endpoint) is reset, so that no more WebSocket events will be received by the endpoint. It is responsibility of the endpoint to demand to receive more WebSocket events.
For simple cases, you can just annotate your WebSocket endpoint with @WebSocket(autoDemand = true), or implement Session.Listener.AutoDemanding.
In these two cases, when a method that receives a WebSocket event returns, the Jetty implementation automatically demands for another WebSocket event.
For example:
// Attribute autoDemand is true by default.
@WebSocket(autoDemand = true)
public class AutoDemandAnnotatedEndPoint
{
    @OnWebSocketOpen
    public void onOpen(Session session)
    {
        // No need to demand here, because this endpoint is auto-demanding.
    }

    @OnWebSocketMessage
    public void onText(String message)
    {
        System.getLogger("ws.message").log(INFO, message);
        // No need to demand here, because this endpoint is auto-demanding.
    }
}

public class AutoDemandListenerEndPoint implements Session.Listener.AutoDemanding
{
    private Session session;

    @Override
    public void onWebSocketOpen(Session session)
    {
        this.session = session;
        // No need to demand here, because this endpoint is auto-demanding.
    }

    @Override
    public void onWebSocketText(String message)
    {
        System.getLogger("ws.message").log(INFO, message);
        // No need to demand here, because this endpoint is auto-demanding.
    }
}
While auto-demand works for simple cases, it may not work in all cases, especially those where the method that receives the WebSocket event performs asynchronous operations.
The following example shows the problem:
public class WrongAutoDemandListenerEndPoint implements Session.Listener.AutoDemanding
{
    private Session session;

    @Override
    public void onWebSocketOpen(Session session)
    {
        this.session = session;
        // No need to demand here, because this endpoint is auto-demanding.
    }

    @Override
    public void onWebSocketText(String message)
    {
        // Perform an asynchronous operation, such as invoking
        // a third party service or just echoing the message back.
        session.sendText(message, Callback.NOOP);

        // Returning from this method will automatically demand,
        // so this method may be entered again before sendText()
        // has been completed, causing a WritePendingException.
    }
}
Note how, in the example above, auto-demanding has the problem that receiving WebSocket text messages may happen faster than echoing them back, because the call to sendText(...) may return almost immediately but be slow to complete because it is asynchronous.
In the example above, if another WebSocket text message arrives, and the sendText(...) operation is not complete, a WritePendingException will be thrown.
In other cases, this may lead to infinite buffering of data, eventually causing OutOfMemoryErrors, and in general excessive resource consumption that may be difficult to diagnose and troubleshoot.
For more information, see also the section about sending data.
|
Always be careful when using auto-demand. Analyze the operations that your endpoint performs and make sure they complete synchronously within the method. |
To solve the problem outlined above, you must explicitly demand for the next WebSocket event, only when the processing of the previous events is complete.
For example:
public class ExplicitDemandListenerEndPoint implements Session.Listener
{
    private Session session;

    @Override
    public void onWebSocketOpen(Session session)
    {
        this.session = session;

        // Explicitly demand here, otherwise no other event is received.
        session.demand();
    }

    @Override
    public void onWebSocketText(String message)
    {
        // Perform an asynchronous operation, such as invoking
        // a third party service or just echoing the message back.

        // We want to demand only when sendText() has completed,
        // which is notified to the callback passed to sendText().
        session.sendText(message, Callback.from(session::demand, failure ->
        {
            // Handle the failure, in this case just closing the session.
            session.close(StatusCode.SERVER_ERROR, "failure", Callback.NOOP);
        }));

        // Return from the method without demanding yet,
        // waiting for the completion of sendText() to demand.
    }
}
Note how it is necessary to invoke Session.demand() from the open event, in order to receive message events.
Furthermore, note how every time a text message is received, a possibly slow asynchronous operation is initiated (which returns almost immediately, although it may not be completed yet) and then the method returns.
Because there is no demand when the method returns (because the asynchronous operation is not completed yet), the implementation will not notify any other WebSocket event (not even frame, close or error events).
When the asynchronous operation completes successfully the callback is notified; this, in turn, invokes Session.demand(), and the implementation may notify another WebSocket event (if any) to the WebSocket endpoint.
Listener Endpoints
A WebSocket endpoint may implement the org.eclipse.jetty.websocket.api.Session.Listener interface to receive WebSocket events:
public class ListenerEndPoint implements Session.Listener
{
    private Session session;

    @Override
    public void onWebSocketOpen(Session session)
    {
        // The WebSocket endpoint has been opened.

        // Store the session to be able to send data to the remote peer.
        this.session = session;

        // You may configure the session.
        session.setMaxTextMessageSize(16 * 1024);

        // You may immediately send a message to the remote peer.
        session.sendText("connected", Callback.from(session::demand, Throwable::printStackTrace));
    }

    @Override
    public void onWebSocketText(String message)
    {
        // A WebSocket text message is received.

        // You may echo it back if it matches certain criteria.
        if (message.startsWith("echo:"))
        {
            // Only demand for more events when sendText() is completed successfully.
            session.sendText(message.substring("echo:".length()), Callback.from(session::demand, Throwable::printStackTrace));
        }
        else
        {
            // Discard the message, and demand for more events.
            session.demand();
        }
    }

    @Override
    public void onWebSocketBinary(ByteBuffer payload, Callback callback)
    {
        // A WebSocket binary message is received.

        // Save only PNG images.
        boolean isPNG = true;
        byte[] pngBytes = new byte[]{(byte)0x89, 'P', 'N', 'G'};
        for (int i = 0; i < pngBytes.length; ++i)
        {
            if (pngBytes[i] != payload.get(i))
            {
                // Not a PNG image.
                isPNG = false;
                break;
            }
        }

        if (isPNG)
            savePNGImage(payload);

        // Complete the callback to release the payload ByteBuffer.
        callback.succeed();

        // Demand for more events.
        session.demand();
    }

    @Override
    public void onWebSocketError(Throwable cause)
    {
        // The WebSocket endpoint failed.

        // You may log the error.
        cause.printStackTrace();

        // You may dispose resources.
        disposeResources();
    }

    @Override
    public void onWebSocketClose(int statusCode, String reason)
    {
        // The WebSocket endpoint has been closed.

        // You may dispose resources.
        disposeResources();
    }
}
Message Streaming Reads
If you need to deal with large WebSocket messages, you may reduce the memory usage by streaming the message content. For large WebSocket messages, the memory usage may be large due to the fact that the text or the bytes must be accumulated until the message is complete before delivering the message event.
To stream textual or binary messages, you override either org.eclipse.jetty.websocket.api.Session.Listener.onWebSocketPartialText(...) or org.eclipse.jetty.websocket.api.Session.Listener.onWebSocketPartialBinary(...).
These methods receive chunks of, respectively, text and bytes that form the whole WebSocket message.
You may accumulate the chunks yourself, or process each chunk as it arrives, or stream the chunks elsewhere, for example:
public class StreamingListenerEndpoint implements Session.Listener
{
    private Session session;

    @Override
    public void onWebSocketOpen(Session session)
    {
        this.session = session;
        session.demand();
    }

    @Override
    public void onWebSocketPartialText(String payload, boolean fin)
    {
        // Forward chunks to external REST service, asynchronously.
        // Only demand when the forwarding completed successfully.
        CompletableFuture<Void> result = forwardToREST(payload, fin);
        result.whenComplete((ignored, failure) ->
        {
            if (failure == null)
                session.demand();
            else
                failure.printStackTrace();
        });
    }

    @Override
    public void onWebSocketPartialBinary(ByteBuffer payload, boolean fin, Callback callback)
    {
        // Save chunks to file.
        appendToFile(payload, fin);

        // Complete the callback to release the payload ByteBuffer.
        callback.succeed();

        // Demand for more events.
        session.demand();
    }
}
Annotated Endpoints
A WebSocket endpoint may annotate methods with org.eclipse.jetty.websocket.api.annotations.* annotations to receive WebSocket events.
Each annotated event method may take an optional Session argument as its first parameter:
@WebSocket(autoDemand = false) (1)
public class AnnotatedEndPoint
{
    @OnWebSocketOpen (2)
    public void onOpen(Session session)
    {
        // The WebSocket endpoint has been opened.

        // You may configure the session.
        session.setMaxTextMessageSize(16 * 1024);

        // You may immediately send a message to the remote peer.
        session.sendText("connected", Callback.from(session::demand, Throwable::printStackTrace));
    }

    @OnWebSocketMessage (3)
    public void onTextMessage(Session session, String message)
    {
        // A WebSocket textual message is received.

        // You may echo it back if it matches certain criteria.
        if (message.startsWith("echo:"))
        {
            // Only demand for more events when sendText() is completed successfully.
            session.sendText(message.substring("echo:".length()), Callback.from(session::demand, Throwable::printStackTrace));
        }
        else
        {
            // Discard the message, and demand for more events.
            session.demand();
        }
    }

    @OnWebSocketMessage (3)
    public void onBinaryMessage(Session session, ByteBuffer payload, Callback callback)
    {
        // A WebSocket binary message is received.

        // Save only PNG images.
        boolean isPNG = true;
        byte[] pngBytes = new byte[]{(byte)0x89, 'P', 'N', 'G'};
        for (int i = 0; i < pngBytes.length; ++i)
        {
            if (pngBytes[i] != payload.get(i))
            {
                // Not a PNG image.
                isPNG = false;
                break;
            }
        }

        if (isPNG)
            savePNGImage(payload);

        // Complete the callback to release the payload ByteBuffer.
        callback.succeed();

        // Demand for more events.
        session.demand();
    }

    @OnWebSocketError (4)
    public void onError(Throwable cause)
    {
        // The WebSocket endpoint failed.

        // You may log the error.
        cause.printStackTrace();

        // You may dispose resources.
        disposeResources();
    }

    @OnWebSocketClose (5)
    public void onClose(int statusCode, String reason)
    {
        // The WebSocket endpoint has been closed.

        // You may dispose resources.
        disposeResources();
    }
}| 1 | Use the @WebSocket annotation at the class level to make it a WebSocket endpoint, and disable auto-demand. |
| 2 | Use the @OnWebSocketOpen annotation for the open event.
As this is the first event notified to the endpoint, you can configure the Session object. |
| 3 | Use the @OnWebSocketMessage annotation for the message event, both for textual and binary messages. |
| 4 | Use the @OnWebSocketError annotation for the error event. |
| 5 | Use the @OnWebSocketClose annotation for the close event. |
Message Streaming Reads
If you need to deal with large WebSocket messages, you may reduce the memory usage by streaming the message content.
To stream textual or binary messages, you still use the @OnWebSocketMessage annotation, but you change the signature of the method to take an additional boolean parameter:
@WebSocket(autoDemand = false)
public class PartialAnnotatedEndpoint
{
    @OnWebSocketMessage
    public void onTextMessage(Session session, String partialText, boolean fin)
    {
        // Forward the partial text.
        // Demand only when the forward completed.
        CompletableFuture<Void> result = forwardToREST(partialText, fin);
        result.whenComplete((ignored, failure) ->
        {
            if (failure == null)
                session.demand();
            else
                failure.printStackTrace();
        });
    }

    @OnWebSocketMessage
    public void onBinaryMessage(Session session, ByteBuffer partialPayload, boolean fin, Callback callback)
    {
        // Save partial payloads to file.
        appendToFile(partialPayload, fin);
        // Complete the callback to release the payload ByteBuffer.
        callback.succeed();
        // Demand for more events.
        session.demand();
    }
}
Alternatively, but less efficiently, you can use the @OnWebSocketMessage annotation, but you change the signature of the method to take, respectively, a Reader and an InputStream:
@WebSocket
public class StreamingAnnotatedEndpoint
{
    @OnWebSocketMessage
    public void onTextMessage(Reader reader)
    {
        // Read from the Reader and forward.
        // Caution: blocking APIs.
        forwardToREST(reader);
    }

    @OnWebSocketMessage
    public void onBinaryMessage(InputStream stream)
    {
        // Read from the InputStream and save to file.
        // Caution: blocking APIs.
        appendToFile(stream);
    }
}|
|
Note that when you use blocking APIs, the invocations to Session.demand() are now performed by the Reader or InputStream implementations (as well as the ByteBuffer lifecycle management).
You indirectly control the demand by deciding when to read from Reader or InputStream.
WebSocket Session
A WebSocket session is the entity that offers an API to send data to the remote peer, to close the WebSocket connection, and to configure WebSocket connection parameters.
Configuring the Session
You may configure the WebSocket session behavior using the org.eclipse.jetty.websocket.api.Session APIs.
You want to do this as soon as you have access to the Session object, typically from the open event handler:
public class ConfigureEndpoint implements Session.Listener
{
    @Override
    public void onWebSocketOpen(Session session)
    {
        // Configure the max length of incoming messages.
        session.setMaxTextMessageSize(16 * 1024);

        // Configure the idle timeout.
        session.setIdleTimeout(Duration.ofSeconds(30));

        // Demand for more events.
        session.demand();
    }
}
The settings that can be configured include:
- maxBinaryMessageSize
-
the maximum size in bytes of a binary message (which may be composed of multiple frames) that can be received.
- maxTextMessageSize
-
the maximum size in bytes of a text message (which may be composed of multiple frames) that can be received.
- maxFrameSize
-
the maximum payload size in bytes of any WebSocket frame that can be received.
- inputBufferSize
-
the input (read from network/transport layer) buffer size in bytes; it has no relationship with the WebSocket frame size or message size.
- outputBufferSize
-
the output (write to network/transport layer) buffer size in bytes; it has no relationship to the WebSocket frame size or message size.
- autoFragment
-
whether WebSocket frames are automatically fragmented to respect the maximum frame size.
- idleTimeout
-
the duration that a WebSocket connection may remain idle (that is, there is no network traffic, neither in read nor in write) before being closed by the implementation.
Please refer to the Session javadocs for the complete list of configuration APIs.
Sending Data
To send data to the remote peer, you can use the non-blocking APIs offered by Session.
@WebSocket
public class NonBlockingSendEndpoint
{
    @OnWebSocketMessage
    public void onText(Session session, String text)
    {
        // Send textual data to the remote peer.
        session.sendText("data", new Callback() (1)
        {
            @Override
            public void succeed()
            {
                // Send binary data to the remote peer.
                ByteBuffer bytes = readImageFromFile();
                session.sendBinary(bytes, new Callback() (2)
                {
                    @Override
                    public void succeed()
                    {
                        // Both sends succeeded.
                    }

                    @Override
                    public void fail(Throwable x)
                    {
                        System.getLogger("websocket").log(System.Logger.Level.WARNING, "could not send binary data", x);
                    }
                });
            }

            @Override
            public void fail(Throwable x)
            {
                // No need to rethrow or close the session.
                System.getLogger("websocket").log(System.Logger.Level.WARNING, "could not send textual data", x);
            }
        });

        // remote.sendString("wrong", Callback.NOOP); // May throw WritePendingException! (3)
    }
}| 1 | Non-blocking APIs require a Callback parameter. |
| 2 | Note how the second send must be performed from inside the callback. |
| 3 | Sequential sends may throw WritePendingException. |
|
Non-blocking APIs are more difficult to use since you are required to meet the following condition:
For example, if you have initiated a text send, you cannot initiate another text or binary send, until the previous send has completed. |
This requirement is necessary to avoid unbounded buffering that could lead to OutOfMemoryErrors.
|
We strongly recommend that you follow the condition above. However, there may be cases where you want to explicitly control the number of outgoing buffered messages using Remember that trying to control the number of outgoing frames is very difficult and tricky; you may set |
While non-blocking APIs are more difficult to use, they don’t block the sender thread and therefore use less resources, which in turn typically allows for greater scalability under load: with respect to blocking APIs, non-blocking APIs need less resources to cope with the same load.
Streaming Send APIs
If you need to send large WebSocket messages, you may reduce the memory usage by streaming the message content.
The Jetty WebSocket APIs offer sendPartial*(...) methods that allow you to send a chunk of the whole message at a time, therefore reducing the memory usage since it is not necessary to have the whole message String or ByteBuffer in memory to send it.
The Jetty WebSocket APIs for streaming the message content are non-blocking and therefore you should wait (without blocking!) for the callbacks to complete.
Fortunately, Jetty provides the IteratingCallback utility class (described in more details in this section) which greatly simplify the use of non-blocking APIs:
@WebSocket(autoDemand = false)
public class StreamSendNonBlockingEndpoint
{
    @OnWebSocketMessage
    public void onText(Session session, String text)
    {
        new Sender(session).iterate();
    }

    private class Sender extends IteratingCallback implements Callback (1)
    {
        private final ByteBuffer byteBuffer = ByteBuffer.allocateDirect(1024);
        private final Session session;
        private boolean finished;

        private Sender(Session session)
        {
            this.session = session;
        }

        @Override
        protected Action process() throws Throwable (2)
        {
            if (finished)
                return Action.SUCCEEDED; (4)

            int read = readChunkToSendInto(byteBuffer);
            if (read < 0)
            {
                // No more bytes to send, finish the WebSocket message.
                session.sendPartialBinary(byteBuffer, true, this); (3)
                finished = true;
                return Action.SCHEDULED;
            }
            else
            {
                // Send the chunk.
                session.sendPartialBinary(byteBuffer, false, this); (3)
                return Action.SCHEDULED;
            }
        }

        @Override
        public void succeed()
        {
            // When the send succeeds, succeed this IteratingCallback.
            succeeded();
        }

        @Override
        public void fail(Throwable x)
        {
            // When the send fails, fail this IteratingCallback.
            failed(x);
        }

        @Override
        protected void onCompleteSuccess()
        {
            session.demand(); (5)
        }

        @Override
        protected void onCompleteFailure(Throwable x)
        {
            x.printStackTrace();
        }
    }
}| 1 | Implementing Callback allows to pass this to sendPartialBinary(...). |
| 2 | The process() method is called iteratively when each sendPartialBinary(...) is completed. |
| 3 | Sends the message chunks. |
| 4 | When the last chunk as been sent, complete successfully the IteratingCallback. |
| 5 | Only when the IteratingCallback is completed successfully, demand for more WebSocket events. |
Sending Ping/Pong
The WebSocket protocol defines two special frame, named PING and PONG that may be interesting to applications for these use cases:
-
Calculate the round-trip time with the remote peer.
-
Keep the connection from being closed due to idle timeout — a heartbeat-like mechanism.
To handle PING/PONG events, you may implement methods Session.Listener.onWebSocketPing(ByteBuffer) and/or Session.Listener.onWebSocketPong(ByteBuffer).
|
|
PING frames may contain opaque application bytes, and the WebSocket implementation replies to them with a PONG frame containing the same bytes:
public class RoundTripListenerEndpoint implements Session.Listener
{
    private Session session;

    @Override
    public void onWebSocketOpen(Session session)
    {
        this.session = session;
        // Send to the remote peer the local nanoTime.
        ByteBuffer buffer = ByteBuffer.allocate(8).putLong(NanoTime.now()).flip();
        session.sendPing(buffer, Callback.NOOP);
        // Demand for more events.
        session.demand();
    }

    @Override
    public void onWebSocketPong(ByteBuffer payload)
    {
        // The remote peer echoed back the local nanoTime.
        long start = payload.getLong();

        // Calculate the round-trip time.
        long roundTrip = NanoTime.since(start);

        // Demand for more events.
        session.demand();
    }
}
Closing the Session
When you want to terminate the communication with the remote peer, you close the Session:
@WebSocket
public class CloseEndpoint
{
    @OnWebSocketMessage
    public void onText(Session session, String text)
    {
        if ("close".equalsIgnoreCase(text))
            session.close(StatusCode.NORMAL, "bye", Callback.NOOP);
    }
}
Closing a WebSocket Session carries a status code and a reason message that the remote peer can inspect in the close event handler (see this section).
|
The reason message is optional, and may be truncated to fit into the WebSocket frame sent to the client.
It is best to use short tokens such as |
Server Libraries
The Eclipse Jetty Project provides server-side libraries that allow you to configure and start programmatically an HTTP or WebSocket server from a main class, or embed it in your existing application. A typical example is a HTTP server that needs to expose a REST endpoint. Another example is a proxy application that receives HTTP requests, processes them, and then forwards them to third party services, for example using the Jetty client libraries.
While historically Jetty is an HTTP server, it is possible to use the Jetty server-side libraries to write a generic network server that interprets any network protocol (not only HTTP). If you are interested in the low-level details of how the Eclipse Jetty server libraries work, or are interested in writing a custom protocol, look at the Server I/O Architecture.
The Jetty server-side libraries provide:
-
HTTP high-level support for HTTP/1.0, HTTP/1.1, HTTP/2, clear-text or encrypted, HTTP/3, for applications that want to embed Jetty as a generic HTTP server or proxy (no matter the HTTP version), via the HTTP libraries
-
HTTP/2 low-level support, for applications that want to explicitly handle low-level HTTP/2 sessions, streams and frames, via the HTTP/2 libraries
-
HTTP/3 low-level support, for applications that want to explicitly handle low-level HTTP/3 sessions, streams and frames, via the HTTP/3 libraries
-
WebSocket support, for applications that want to embed a WebSocket server, via the WebSocket libraries
-
FCGI support, to delegate requests to PHP, Python, Ruby or similar scripting languages.
HTTP Server Libraries
Web application development typically involves writing your web applications, packaging them into a web application archive, the *.war file, and then deploy the *.war file into a standalone Servlet Container that you have previously installed.
The Jetty server libraries allow you to write web applications components using either the Jetty APIs (by writing Jetty Handlers) or using the standard Servlet APIs (by writing Servlets and Servlet Filters).
These components can then be programmatically assembled together, without the need of creating a *.war file, added to a Jetty Server instance that is then started.
This result in your web applications to be available to HTTP clients as if you deployed your *.war files in a standalone Jetty server.
Jetty Handler APIs pros:
-
Simple minimalist asynchronous APIs.
-
Very low overhead, only configure the features you use.
-
Faster turnaround to implement new APIs or new standards.
-
Normal classloading behavior (web application classloading isolation also available).
Servlet APIs pros:
-
Standard, well known, APIs.
The Maven artifact coordinates are:
<dependency>
  <groupId>org.eclipse.jetty</groupId>
  <artifactId>jetty-server</artifactId>
  <version>12.0.9-SNAPSHOT</version>
</dependency>
An org.eclipse.jetty.server.Server instance is the central component that links together a collection of Connectors and a collection of Handlers, with threads from a ThreadPool doing the work.

The components that accept connections from clients are org.eclipse.jetty.server.Connector implementations.
When a Jetty server interprets the HTTP protocol (HTTP/1.1, HTTP/2 or HTTP/3), it uses org.eclipse.jetty.server.Handler instances to process incoming requests and eventually produce responses.
A Server must be created, configured and started:
// Create and configure a ThreadPool.
QueuedThreadPool threadPool = new QueuedThreadPool();
threadPool.setName("server");

// Create a Server instance.
Server server = new Server(threadPool);

// Create a ServerConnector to accept connections from clients.
Connector connector = new ServerConnector(server);

// Add the Connector to the Server
server.addConnector(connector);

// Set a simple Handler to handle requests/responses.
server.setHandler(new Handler.Abstract()
{
    @Override
    public boolean handle(Request request, Response response, Callback callback)
    {
        // Succeed the callback to signal that the
        // request/response processing is complete.
        callback.succeeded();
        return true;
    }
});

// Start the Server to start accepting connections from clients.
server.start();
The example above shows the simplest HTTP/1.1 server; it has no support for HTTP sessions, nor for HTTP authentication, nor for any of the features required by the Servlet specification.
These features (HTTP session support, HTTP authentication support, etc.) are provided by the Jetty server libraries, but not all of them may be necessary in your web application. You need to put together the required Jetty components to provide the features required by your web applications. The advantage is that you do not pay the cost for features that you do not use, saving resources and likely increasing performance.
The built-in Handlers provided by the Jetty server libraries allow you to write web applications that have functionalities similar to Apache HTTPD or Nginx (for example: URL redirection, URL rewriting, serving static content, reverse proxying, etc.), as well as generating content dynamically by processing incoming requests.
Read this section for further details about Handlers.
If you are interested in writing your web application based on the Servlet APIs, jump to this section.
Request Processing
The Jetty HTTP request processing is outlined below in the diagram below. You may want to refer to the Jetty I/O architecture for additional information about the classes mentioned below.
Request handing is slightly different for each protocol; in HTTP/2 Jetty takes into account multiplexing, something that is not present in HTTP/1.1.
However, the diagram below captures the essence of request handling that is common among all protocols that carry HTTP requests.
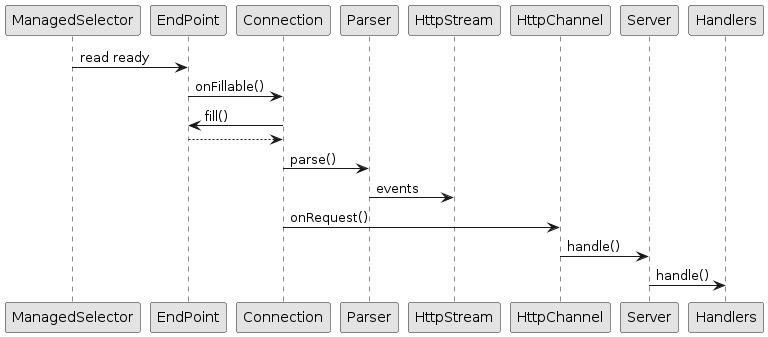
First, the Jetty I/O layer emits an event that a socket has data to read.
This event is converted to a call to AbstractConnection.onFillable(), where the Connection first reads from the EndPoint into a ByteBuffer, and then calls a protocol specific parser to parse the bytes in the ByteBuffer.
The parser emit events that are protocol specific; the HTTP/2 parser, for example, emits events for each HTTP/2 frame that has been parsed, and similarly does the HTTP/3 parser. The parser events are then converted to protocol independent events such as "request start", "request headers", "request content chunk", etc.
When enough of the HTTP request is arrived, the Connection calls HttpChannel.onRequest() that calls the Handler chain starting from the Server instance, that eventually calls your web application code.
Request Processing Events
Advanced web applications may be interested in the progress of the processing of an HTTP request/response. A typical case is to know exactly when the HTTP request/response processing starts and when it is complete, for example to monitor processing times.
This is conveniently implemented by org.eclipse.jetty.server.handler.EventsHandler, described in more details in this section.
Request Logging
HTTP requests and responses can be logged to provide data that can be later analyzed with other tools. These tools can provide information such as the most frequently accessed request URIs, the response status codes, the request/response content lengths, geographical information about the clients, etc.
The default request/response log line format is the NCSA Format extended with referrer data and user-agent data.
|
Typically, the extended NCSA format is the is enough and it’s the standard used and understood by most log parsing tools and monitoring tools. To customize the request/response log line format see the |
Request logging can be enabled at the Server level.
The request logging output can be directed to an SLF4J logger named "org.eclipse.jetty.server.RequestLog" at INFO level, and therefore to any logging library implementation of your choice (see also this section about logging).
Server server = new Server();

// Sets the RequestLog to log to an SLF4J logger named "org.eclipse.jetty.server.RequestLog" at INFO level.
server.setRequestLog(new CustomRequestLog(new Slf4jRequestLogWriter(), CustomRequestLog.EXTENDED_NCSA_FORMAT));
Alternatively, the request logging output can be directed to a daily rolling file of your choice, and the file name must contain yyyy_MM_dd so that rolled over files retain their date:
Server server = new Server();

// Use a file name with the pattern 'yyyy_MM_dd' so rolled over files retain their date.
RequestLogWriter logWriter = new RequestLogWriter("/var/log/yyyy_MM_dd.jetty.request.log");
// Retain rolled over files for 2 weeks.
logWriter.setRetainDays(14);
// Log times are in the current time zone.
logWriter.setTimeZone(TimeZone.getDefault().getID());

// Set the RequestLog to log to the given file, rolling over at midnight.
server.setRequestLog(new CustomRequestLog(logWriter, CustomRequestLog.EXTENDED_NCSA_FORMAT));
For maximum flexibility, you can log to multiple RequestLogs using class RequestLog.Collection, for example by logging with different formats or to different outputs.
You can use CustomRequestLog with a custom RequestLog.Writer to direct the request logging output to your custom targets (for example, an RDBMS).
You can implement your own RequestLog if you want to have functionalities that are not implemented by CustomRequestLog.
Server Connectors
A Connector is the component that handles incoming requests from clients, and works in conjunction with ConnectionFactory instances.
The available implementations are:
-
org.eclipse.jetty.server.ServerConnector, for TCP/IP sockets. -
org.eclipse.jetty.unixdomain.server.UnixDomainServerConnectorfor Unix-Domain sockets (requires Java 16 or later). -
org.eclipse.jetty.quic.server.QuicServerConnector, for the low-level QUIC protocol and HTTP/3. -
org.eclipse.jetty.server.MemoryConnector, for memory communication between client and server.
ServerConnector and UnixDomainServerConnector use a java.nio.channels.ServerSocketChannel to listen to a socket address and to accept socket connections.
QuicServerConnector uses a java.nio.channels.DatagramChannel to listen to incoming UDP packets.
MemoryConnector uses memory for the communication between client and server, avoiding the use of sockets.
Since ServerConnector wraps a ServerSocketChannel, it can be configured in a similar way, for example the TCP port to listen to, the IP address to bind to, etc.:
Server server = new Server();

// The number of acceptor threads.
int acceptors = 1;

// The number of selectors.
int selectors = 1;

// Create a ServerConnector instance.
ServerConnector connector = new ServerConnector(server, acceptors, selectors, new HttpConnectionFactory());

// Configure TCP/IP parameters.

// The port to listen to.
connector.setPort(8080);
// The address to bind to.
connector.setHost("127.0.0.1");

// The TCP accept queue size.
connector.setAcceptQueueSize(128);

server.addConnector(connector);
server.start();
UnixDomainServerConnector also wraps a ServerSocketChannel and can be configured with the Unix-Domain path to listen to:
Server server = new Server();

// The number of acceptor threads.
int acceptors = 1;

// The number of selectors.
int selectors = 1;

// Create a ServerConnector instance.
UnixDomainServerConnector connector = new UnixDomainServerConnector(server, acceptors, selectors, new HttpConnectionFactory());

// Configure Unix-Domain parameters.

// The Unix-Domain path to listen to.
connector.setUnixDomainPath(Path.of("/tmp/jetty.sock"));

// The TCP accept queue size.
connector.setAcceptQueueSize(128);

server.addConnector(connector);
server.start();|
You can use Unix-Domain sockets only when you run your server with Java 16 or later. |
QuicServerConnector wraps a DatagramChannel and can be configured in a similar way, as shown in the example below.
Since the communication via UDP does not require to "accept" connections like TCP does, the number of acceptors is set to 0 and there is no API to configure their number.
Server server = new Server();

// Configure the SslContextFactory with the keyStore information.
SslContextFactory.Server sslContextFactory = new SslContextFactory.Server();
sslContextFactory.setKeyStorePath("/path/to/keystore");
sslContextFactory.setKeyStorePassword("secret");

// Create a QuicServerConnector instance.
Path pemWorkDir = Path.of("/path/to/pem/dir");
ServerQuicConfiguration serverQuicConfig = new ServerQuicConfiguration(sslContextFactory, pemWorkDir);
QuicServerConnector connector = new QuicServerConnector(server, serverQuicConfig, new HTTP3ServerConnectionFactory(serverQuicConfig));

// The port to listen to.
connector.setPort(8080);
// The address to bind to.
connector.setHost("127.0.0.1");

server.addConnector(connector);
server.start();
MemoryConnector uses in-process memory, not sockets, for the communication between client and server, that therefore must be in the same process.
Typical usage of MemoryConnector is the following:
Server server = new Server();

// Create a MemoryConnector instance that speaks HTTP/1.1.
MemoryConnector connector = new MemoryConnector(server, new HttpConnectionFactory());

server.addConnector(connector);
server.start();

// The code above is the server-side.
// ----
// The code below is the client-side.

HttpClient httpClient = new HttpClient();
httpClient.start();

ContentResponse response = httpClient.newRequest("http://localhost/")
    // Use the memory Transport to communicate with the server-side.
    .transport(new MemoryTransport(connector))
    .send();
Acceptors
The acceptors are threads (typically only one) that compete to accept TCP socket connections. The connectors for the QUIC or HTTP/3 protocol, based on UDP, have no acceptors.
When a TCP connection is accepted, ServerConnector wraps the accepted SocketChannel and passes it to the SelectorManager.
Therefore, there is a little moment where the acceptor thread is not accepting new connections because it is busy wrapping the just accepted connection to pass it to the SelectorManager.
Connections that are ready to be accepted but are not accepted yet are queued in a bounded queue (at the OS level) whose capacity can be configured with the acceptQueueSize parameter.
If your application must withstand a very high rate of connection opening, configuring more than one acceptor thread may be beneficial: when one acceptor thread accepts one connection, another acceptor thread can take over accepting connections.
Selectors
The selectors are components that manage a set of accepted TCP sockets, implemented by ManagedSelector.
For QUIC or HTTP/3, there are no accepted TCP sockets, but only one DatagramChannel and therefore there is only one selector.
Each selector requires one thread and uses the Java NIO mechanism to efficiently handle a set of registered channels.
As a rule of thumb, a single selector can easily manage up to 1000-5000 TCP sockets, although the number may vary greatly depending on the application.
For example, web applications for websites tend to use TCP sockets for one or more HTTP requests to retrieve resources and then the TCP socket is idle for most of the time. In this case a single selector may be able to manage many TCP sockets because chances are that they will be idle most of the time. On the contrary, web messaging applications or REST applications tend to send many small messages at a very high frequency so that the TCP sockets are rarely idle. In this case a single selector may be able to manage less TCP sockets because chances are that many of them will be active at the same time, so you may need more than one selector.
Multiple Connectors
It is possible to configure more than one Connector per Server.
Typical cases are a ServerConnector for clear-text HTTP, and another ServerConnector for secure HTTP.
Another case could be a publicly exposed ServerConnector for secure HTTP, and an internally exposed UnixDomainServerConnector or MemoryConnector for clear-text HTTP.
Yet another example could be a ServerConnector for clear-text HTTP, a ServerConnector for secure HTTP/2, and an QuicServerConnector for QUIC+HTTP/3.
For example:
Server server = new Server();

// Create a ServerConnector instance on port 8080.
ServerConnector connector1 = new ServerConnector(server, 1, 1, new HttpConnectionFactory());
connector1.setPort(8080);
server.addConnector(connector1);

// Create another ServerConnector instance on port 9090,
// for example with a different HTTP configuration.
HttpConfiguration httpConfig2 = new HttpConfiguration();
httpConfig2.setHttpCompliance(HttpCompliance.LEGACY);
ServerConnector connector2 = new ServerConnector(server, 1, 1, new HttpConnectionFactory(httpConfig2));
connector2.setPort(9090);
server.addConnector(connector2);

server.start();
If you do not specify the port the connector listens to explicitly, the OS will allocate one randomly when the connector starts.
You may need to use the randomly allocated port to configure other components.
One example is to use the randomly allocated port to configure secure redirects (when redirecting from a URI with the http scheme to the https scheme).
Another example is to bind both the HTTP/2 connector and the HTTP/3 connector to the same randomly allocated port.
It is possible that the HTTP/2 connector and the HTTP/3 connector share the same port, because one uses TCP, while the other uses UDP.
For example:
SslContextFactory.Server sslContextFactory = new SslContextFactory.Server();
sslContextFactory.setKeyStorePath("/path/to/keystore");
sslContextFactory.setKeyStorePassword("secret");

Server server = new Server();

// The plain HTTP configuration.
HttpConfiguration plainConfig = new HttpConfiguration();

// The secure HTTP configuration.
HttpConfiguration secureConfig = new HttpConfiguration(plainConfig);
secureConfig.addCustomizer(new SecureRequestCustomizer());

// First, create the secure connector for HTTPS and HTTP/2.
HttpConnectionFactory https = new HttpConnectionFactory(secureConfig);
HTTP2ServerConnectionFactory http2 = new HTTP2ServerConnectionFactory(secureConfig);
ALPNServerConnectionFactory alpn = new ALPNServerConnectionFactory();
alpn.setDefaultProtocol(https.getProtocol());
ConnectionFactory ssl = new SslConnectionFactory(sslContextFactory, https.getProtocol());
ServerConnector secureConnector = new ServerConnector(server, 1, 1, ssl, alpn, http2, https);
server.addConnector(secureConnector);

// Second, create the plain connector for HTTP.
HttpConnectionFactory http = new HttpConnectionFactory(plainConfig);
ServerConnector plainConnector = new ServerConnector(server, 1, 1, http);
server.addConnector(plainConnector);

// Third, create the connector for HTTP/3.
Path pemWorkDir = Path.of("/path/to/pem/dir");
ServerQuicConfiguration serverQuicConfig = new ServerQuicConfiguration(sslContextFactory, pemWorkDir);
QuicServerConnector http3Connector = new QuicServerConnector(server, serverQuicConfig, new HTTP3ServerConnectionFactory(serverQuicConfig));
server.addConnector(http3Connector);

// Set up a listener so that when the secure connector starts,
// it configures the other connectors that have not started yet.
secureConnector.addEventListener(new NetworkConnector.Listener()
{
    @Override
    public void onOpen(NetworkConnector connector)
    {
        int port = connector.getLocalPort();

        // Configure the plain connector for secure redirects from http to https.
        plainConfig.setSecurePort(port);

        // Configure the HTTP3 connector port to be the same as HTTPS/HTTP2.
        http3Connector.setPort(port);
    }
});

server.start();
Configuring Protocols
A server Connector can be configured with one or more ConnectionFactorys, and this list of ConnectionFactorys represents the protocols that the Connector can understand.
If no ConnectionFactory is specified then HttpConnectionFactory is implicitly configured.
For each accepted connection, the server Connector asks a ConnectionFactory to create a Connection object that handles the traffic on that connection, parsing and generating bytes for a specific protocol (see this section for more details about Connection objects).
You can listen for Connection open and close events as detailed in this section.
|
Secure protocols like secure HTTP/1.1, secure HTTP/2 or HTTP/3 (HTTP/3 is intrinsically secure — there is no clear-text HTTP/3) require an SslContextFactory.Server to be configured with a KeyStore.
For HTTP/1.1 and HTTP/2, SslContextFactory.Server is used in conjunction with SSLEngine, which drives the TLS handshake that establishes the secure communication.
Applications may register a org.eclipse.jetty.io.ssl.SslHandshakeListener to be notified of TLS handshakes success or failure, by adding the SslHandshakeListener as a bean to the Connector:
// Create a SslHandshakeListener.
SslHandshakeListener listener = new SslHandshakeListener()
{
    @Override
    public void handshakeSucceeded(Event event) throws SSLException
    {
        SSLEngine sslEngine = event.getSSLEngine();
        System.getLogger("tls").log(INFO, "TLS handshake successful to %s", sslEngine.getPeerHost());
    }

    @Override
    public void handshakeFailed(Event event, Throwable failure)
    {
        SSLEngine sslEngine = event.getSSLEngine();
        System.getLogger("tls").log(ERROR, "TLS handshake failure to %s", sslEngine.getPeerHost(), failure);
    }
};

Server server = new Server();
ServerConnector connector = new ServerConnector(server);
server.addConnector(connector);

// Add the SslHandshakeListener as bean to ServerConnector.
// The listener will be notified of TLS handshakes success and failure.
connector.addBean(listener);
Clear-Text HTTP/1.1
HttpConnectionFactory creates HttpConnection objects that parse bytes and generate bytes for the HTTP/1.1 protocol.
This is how you configure Jetty to support clear-text HTTP/1.1:
Server server = new Server();

// The HTTP configuration object.
HttpConfiguration httpConfig = new HttpConfiguration();
// Configure the HTTP support, for example:
httpConfig.setSendServerVersion(false);

// The ConnectionFactory for HTTP/1.1.
HttpConnectionFactory http11 = new HttpConnectionFactory(httpConfig);

// Create the ServerConnector.
ServerConnector connector = new ServerConnector(server, http11);
connector.setPort(8080);

server.addConnector(connector);
server.start();
Encrypted HTTP/1.1 (https)
Supporting encrypted HTTP/1.1 (that is, requests with the https scheme) is supported by configuring an SslContextFactory that has access to the KeyStore containing the private server key and public server certificate, in this way:
Server server = new Server();

// The HTTP configuration object.
HttpConfiguration httpConfig = new HttpConfiguration();
// Add the SecureRequestCustomizer because TLS is used.
httpConfig.addCustomizer(new SecureRequestCustomizer());

// The ConnectionFactory for HTTP/1.1.
HttpConnectionFactory http11 = new HttpConnectionFactory(httpConfig);

// Configure the SslContextFactory with the keyStore information.
SslContextFactory.Server sslContextFactory = new SslContextFactory.Server();
sslContextFactory.setKeyStorePath("/path/to/keystore");
sslContextFactory.setKeyStorePassword("secret");

// The ConnectionFactory for TLS.
SslConnectionFactory tls = new SslConnectionFactory(sslContextFactory, http11.getProtocol());

// The ServerConnector instance.
ServerConnector connector = new ServerConnector(server, tls, http11);
connector.setPort(8443);

server.addConnector(connector);
server.start();
You can customize the SSL/TLS provider as explained in this section.
Clear-Text HTTP/2
It is well known that the HTTP ports are 80 (for clear-text HTTP) and 443 for encrypted HTTP.
By using those ports, a client had prior knowledge that the server would speak, respectively, the HTTP/1.x protocol and the TLS protocol (and, after decryption, the HTTP/1.x protocol).
HTTP/2 was designed to be a smooth transition from HTTP/1.1 for users and as such the HTTP ports were not changed.
However the HTTP/2 protocol is, on the wire, a binary protocol, completely different from HTTP/1.1.
Therefore, with HTTP/2, clients that connect to port 80 (or to a specific Unix-Domain path) may speak either HTTP/1.1 or HTTP/2, and the server must figure out which version of the HTTP protocol the client is speaking.
Jetty can support both HTTP/1.1 and HTTP/2 on the same clear-text port by configuring both the HTTP/1.1 and the HTTP/2 ConnectionFactorys:
Server server = new Server();

// The HTTP configuration object.
HttpConfiguration httpConfig = new HttpConfiguration();

// The ConnectionFactory for HTTP/1.1.
HttpConnectionFactory http11 = new HttpConnectionFactory(httpConfig);

// The ConnectionFactory for clear-text HTTP/2.
HTTP2CServerConnectionFactory h2c = new HTTP2CServerConnectionFactory(httpConfig);

// The ServerConnector instance.
ServerConnector connector = new ServerConnector(server, http11, h2c);
connector.setPort(8080);

server.addConnector(connector);
server.start();
Note how the ConnectionFactorys passed to ServerConnector are in order: first HTTP/1.1, then HTTP/2.
This is necessary to support both protocols on the same port: Jetty will start parsing the incoming bytes as HTTP/1.1, but then realize that they are HTTP/2 bytes and will therefore upgrade from HTTP/1.1 to HTTP/2.
This configuration is also typical when Jetty is installed in backend servers behind a load balancer that also takes care of offloading TLS. When Jetty is behind a load balancer, you can always prepend the PROXY protocol as described in this section.
Encrypted HTTP/2
When using encrypted HTTP/2, the unencrypted protocol is negotiated by client and server using an extension to the TLS protocol called ALPN.
Jetty supports ALPN and encrypted HTTP/2 with this configuration:
Server server = new Server();

// The HTTP configuration object.
HttpConfiguration httpConfig = new HttpConfiguration();
// Add the SecureRequestCustomizer because TLS is used.
httpConfig.addCustomizer(new SecureRequestCustomizer());

// The ConnectionFactory for HTTP/1.1.
HttpConnectionFactory http11 = new HttpConnectionFactory(httpConfig);

// The ConnectionFactory for HTTP/2.
HTTP2ServerConnectionFactory h2 = new HTTP2ServerConnectionFactory(httpConfig);

// The ALPN ConnectionFactory.
ALPNServerConnectionFactory alpn = new ALPNServerConnectionFactory();
// The default protocol to use in case there is no negotiation.
alpn.setDefaultProtocol(http11.getProtocol());

// Configure the SslContextFactory with the keyStore information.
SslContextFactory.Server sslContextFactory = new SslContextFactory.Server();
sslContextFactory.setKeyStorePath("/path/to/keystore");
sslContextFactory.setKeyStorePassword("secret");

// The ConnectionFactory for TLS.
SslConnectionFactory tls = new SslConnectionFactory(sslContextFactory, alpn.getProtocol());

// The ServerConnector instance.
ServerConnector connector = new ServerConnector(server, tls, alpn, h2, http11);
connector.setPort(8443);

server.addConnector(connector);
server.start();
Note how the ConnectionFactorys passed to ServerConnector are in order: TLS, ALPN, HTTP/2, HTTP/1.1.
Jetty starts parsing TLS bytes so that it can obtain the ALPN extension.
With the ALPN extension information, Jetty can negotiate a protocol and pick, among the ConnectionFactorys supported by the ServerConnector, the ConnectionFactory correspondent to the negotiated protocol.
The fact that the HTTP/2 protocol comes before the HTTP/1.1 protocol indicates that HTTP/2 is the preferred protocol for the server.
Note also that the default protocol set in the ALPN ConnectionFactory, which is used in case ALPN is not supported by the client, is HTTP/1.1 — if the client does not support ALPN is probably an old client so HTTP/1.1 is the safest choice.
You can customize the SSL/TLS provider as explained in this section.
HTTP/3
The HTTP/3 protocol is layered on top of the QUIC protocol, which is based on UDP. This is rather different with respect to HTTP/1 and HTTP/2, that are based on TCP.
Jetty only implements the HTTP/3 layer in Java; the QUIC implementation is provided by the Quiche native library, that Jetty calls via JNA (and possibly, in the future, via the Foreign APIs).
| Jetty’s HTTP/3 support can only be used on the platforms (OS and CPU) supported by the Quiche native library. |
HTTP/3 clients may not know in advance if the server supports QUIC (over UDP), but the server typically supports either HTTP/1 or HTTP/2 (over TCP) on the default HTTP secure port 443, and advertises the availability HTTP/3 as an HTTP alternate service, possibly on a different port and/or on a different host.
For example, an HTTP/2 response may include the following header:
Alt-Svc: h3=":843"The presence of this header indicates that protocol h3 is available on the same host (since no host is defined before the port), but on port 843 (although it may be the same port 443).
The HTTP/3 client may now initiate a QUIC connection on port 843 and make HTTP/3 requests.
It is nowadays common to use the same port 443 for both HTTP/2 and HTTP/3. This does not cause problems because HTTP/2 listens on the TCP port 443, while QUIC listens on the UDP port 443.
|
It is therefore common for HTTP/3 clients to initiate connections using the HTTP/2 protocol over TCP, and if the server supports HTTP/3 switch to HTTP/3 as indicated by the server.
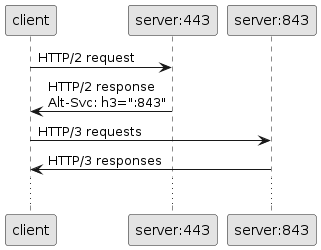
The code necessary to configure HTTP/2 is described in this section.
To setup HTTP/3, for example on port 843, you need the following code (some of which could be shared with other connectors such as HTTP/2’s):
Server server = new Server();

SslContextFactory.Server sslContextFactory = new SslContextFactory.Server();
sslContextFactory.setKeyStorePath("/path/to/keystore");
sslContextFactory.setKeyStorePassword("secret");

HttpConfiguration httpConfig = new HttpConfiguration();
httpConfig.addCustomizer(new SecureRequestCustomizer());

// Create and configure the HTTP/3 connector.
// It is mandatory to configure the PEM directory.
Path pemWorkDir = Path.of("/path/to/pem/dir");
ServerQuicConfiguration serverQuicConfig = new ServerQuicConfiguration(sslContextFactory, pemWorkDir);
QuicServerConnector connector = new QuicServerConnector(server, serverQuicConfig, new HTTP3ServerConnectionFactory(serverQuicConfig));
connector.setPort(843);

server.addConnector(connector);

server.start();|
The use of the Quiche native library requires the private key and public certificate present in the KeyStore to be exported as PEM files for Quiche to use them. It is therefore mandatory to configure the PEM directory as shown above. The PEM directory must also be adequately protected using file system permissions, because it stores the private key PEM file.
You want to grant as few permissions as possible, typically the equivalent of POSIX |
Using Conscrypt as SSL/TLS Provider
If not explicitly configured, the TLS implementation is provided by the JDK you are using at runtime.
OpenJDK’s vendors may replace the default TLS provider with their own, but you can also explicitly configure an alternative TLS provider.
The standard TLS provider from OpenJDK is implemented in Java (no native code), and its performance is not optimal, both in CPU usage and memory usage.
A faster alternative, implemented natively, is Google’s Conscrypt, which is built on BoringSSL, which is Google’s fork of OpenSSL.
| As Conscrypt eventually binds to a native library, there is a higher risk that a bug in Conscrypt or in the native library causes a JVM crash, while the Java implementation will not cause a JVM crash. |
To use Conscrypt as TLS provider, you must have the Conscrypt jar and the Jetty dependency jetty-alpn-conscrypt-server-12.0.9-SNAPSHOT.jar in the class-path or module-path.
Then, you must configure the JDK with the Conscrypt provider, and configure Jetty to use the Conscrypt provider, in this way:
// Configure the JDK with the Conscrypt provider.
Security.addProvider(new OpenSSLProvider());

SslContextFactory.Server sslContextFactory = new SslContextFactory.Server();
sslContextFactory.setKeyStorePath("/path/to/keystore");
sslContextFactory.setKeyStorePassword("secret");
// Configure Jetty's SslContextFactory to use Conscrypt.
sslContextFactory.setProvider("Conscrypt");
Jetty Behind a Load Balancer
It is often the case that Jetty receives connections from a load balancer configured to distribute the load among many Jetty backend servers.
From the Jetty point of view, all the connections arrive from the load balancer, rather than the real clients, but is possible to configure the load balancer to forward the real client IP address and IP port to the backend Jetty server using the PROXY protocol.
The PROXY protocol is widely supported by load balancers such as HAProxy (via its send-proxy directive), Nginx(via its proxy_protocol on directive) and others.
|
To support this case, Jetty can be configured in this way:
Server server = new Server();

// The HTTP configuration object.
HttpConfiguration httpConfig = new HttpConfiguration();
// Configure the HTTP support, for example:
httpConfig.setSendServerVersion(false);

// The ConnectionFactory for HTTP/1.1.
HttpConnectionFactory http11 = new HttpConnectionFactory(httpConfig);

// The ConnectionFactory for the PROXY protocol.
ProxyConnectionFactory proxy = new ProxyConnectionFactory(http11.getProtocol());

// Create the ServerConnector.
ServerConnector connector = new ServerConnector(server, proxy, http11);
connector.setPort(8080);

server.addConnector(connector);
server.start();
Note how the ConnectionFactorys passed to ServerConnector are in order: first PROXY, then HTTP/1.1.
Note also how the PROXY ConnectionFactory needs to know its next protocol (in this example, HTTP/1.1).
Each ConnectionFactory is asked to create a Connection object for each accepted TCP connection; the Connection objects will be chained together to handle the bytes, each for its own protocol.
Therefore the ProxyConnection will handle the PROXY protocol bytes and HttpConnection will handle the HTTP/1.1 bytes producing a request object and response object that will be processed by Handlers.
The load balancer may be configured to communicate with Jetty backend servers via Unix-Domain sockets (requires Java 16 or later). For example:
Server server = new Server();

// The HTTP configuration object.
HttpConfiguration httpConfig = new HttpConfiguration();
// Configure the HTTP support, for example:
httpConfig.setSendServerVersion(false);

// The ConnectionFactory for HTTP/1.1.
HttpConnectionFactory http11 = new HttpConnectionFactory(httpConfig);

// The ConnectionFactory for the PROXY protocol.
ProxyConnectionFactory proxy = new ProxyConnectionFactory(http11.getProtocol());

// Create the ServerConnector.
UnixDomainServerConnector connector = new UnixDomainServerConnector(server, proxy, http11);
connector.setUnixDomainPath(Path.of("/tmp/jetty.sock"));

server.addConnector(connector);
server.start();
Note that the only difference when using Unix-Domain sockets is instantiating UnixDomainServerConnector instead of ServerConnector and configuring the Unix-Domain path instead of the IP port.
Server Handlers
An org.eclipse.jetty.server.Handler is the component that processes incoming HTTP requests and eventually produces HTTP responses.
Handlers can process the HTTP request themselves, or they can be Handler.Containers that delegate HTTP request processing to one or more contained Handlers.
This allows Handlers to be organized as a tree comprised of:
-
Leaf
Handlers that generate a response, complete theCallback, and returntruefrom thehandle(...)method. -
A
Handler.Wrappercan be used to form a chain ofHandlers where request, response or callback objects may be wrapped in thehandle(...)method before being passed down the chain. -
A
Handler.Sequencethat contains a sequence ofHandlers, with eachHandlerbeing called in sequence until one returnstruefrom itshandle(...)method. -
A specialized
Handler.Containerthat may use properties of the request (for example, the URI, or a header, etc.) to select from one or more containedHandlers to delegate the HTTP request processing to, for examplePathMappingsHandler.
A Handler tree is created by composing Handlers together:
Server server = new Server();

GzipHandler gzipHandler = new GzipHandler();
server.setHandler(gzipHandler);

Handler.Sequence sequence = new Handler.Sequence();
gzipHandler.setHandler(sequence);

sequence.addHandler(new App1Handler());
sequence.addHandler(new App2Handler());
The corresponding Handler tree structure looks like the following:
Server
└── GzipHandler
    └── Handler.Sequence
        ├── App1Handler
        └── App2Handler
You should prefer using existing Handlers provided by the Jetty server libraries for managing web application contexts, security, HTTP sessions and Servlet support.
Refer to this section for more information about how to use the Handlers provided by the Jetty server libraries.
You should write your own leaf Handlers to implement your web application logic.
Refer to this section for more information about how to write your own Handlers.
A Handler may be declared as non-blocking (by extending Handler.Abstract.NonBlocking) or as blocking (by extending Handler.Abstract), to allow interaction with the Jetty threading architecture for more efficient thread and CPU utilization during the request/response processing.
Container Handlers typically inherit whether they are blocking or non-blocking from their child or children.
Furthermore, container Handlers may be declared as dynamic: they allow adding/removing child Handlers after they have been started (see Handler.AbstractContainer for more information).
Dynamic container Handlers are therefore always blocking, as it is not possible to know if a child Handler added in the future will be blocking or non-blocking.
If the Handler tree is not dynamic, then it is possible to create a non-blocking Handler tree, for example:
Server
└── RewriteHandler
    └── GzipHandler
        └── ContextHandler
            └── AppHandler extends Handler.Abstract.NonBlocking
When the Handler tree is non-blocking, Jetty may use the Produce-Consume mode to invoke the Handler tree, therefore avoiding a thread hand-off, and saving the cost of being scheduled on a different CPU with cold caches.
The Produce-Consume mode is equivalent to what other servers call "event loop" or "selector thread loop" architectures.
This mode has the benefit of reducing OS context switches and CPU cache misses, using fewer threads, and it is overall very efficient. On the other hand, it requires writing quick, non-blocking code, and partially sequentializes the request/response processing, so that the Nth request in the sequence pays the latency of the processing of the N-1 requests in front of it.
|
If you declare your If the code blocks, you risk a server lock-up. If the code takes a long time to execute, requests from other connections may be delayed. |
Jetty Handlers
Web applications are the unit of deployment in an HTTP server or Servlet container such as Jetty.
Two different web applications are typically deployed on different context paths, where a context path is the initial segment of the URI path.
For example, web application webappA that implements a web user interface for an e-commerce site may be deployed to context path /shop, while web application webappB that implements a REST API for the e-commerce business may be deployed to /api.
A client making a request to URI /shop/cart is directed by Jetty to webappA, while a request to URI /api/products is directed to webappB.
An alternative way to deploy the two web applications of the example above is to use virtual hosts.
A virtual host is a subdomain of the primary domain that shares the same IP address with the primary domain.
If the e-commerce business primary domain is domain.com, then a virtual host for webappA could be shop.domain.com, while a virtual host for webappB could be api.domain.com.
Web application webappA can now be deployed to virtual host shop.domain.com and context path /, while web application webappB can be deployed to virtual host api.domain.com and context path /.
Both applications have the same context path /, but they can be distinguished by the subdomain.
A client making a request to https://shop.domain.com/cart is directed by Jetty to webappA, while a request to https://api.domain.com/products is directed to webappB.
Therefore, in general, a web application is deployed to a context which can be seen as the pair (virtual_host, context_path).
In the first case the contexts were (domain.com, /shop) and (domain.com, /api), while in the second case the contexts were (shop.domain.com, /) and (api.domain.com, /).
Server applications using the Jetty Server Libraries create and configure a context for each web application.
Many contexts can be deployed together to enrich the web application offering — for example a catalog context, a shop context, an API context, an administration context, etc.
Web applications can be written using exclusively the Servlet APIs, since developers know well the Servlet API and because they guarantee better portability across Servlet container implementations, as described in this section.
On the other hand, web applications can be written using the Jetty APIs, for better performance, or to be able to access to Jetty specific APIs, or to use features such as redirection from HTTP to HTTPS, support for gzip content compression, URI rewriting, etc.
The Jetty Server Libraries provides a number of out-of-the-box Handlers that implement the most common functionalities and are described in the next sections.
ContextHandler
ContextHandler is a Handler that represents a context for a web application.
It is a Handler.Wrapper that performs some action before and after delegating to the nested Handler.
The simplest use of ContextHandler is the following:
class ShopHandler extends Handler.Abstract
{
    @Override
    public boolean handle(Request request, Response response, Callback callback)
    {
        // Implement the shop, remembering to complete the callback.
        return true;
    }
}

Server server = new Server();
Connector connector = new ServerConnector(server);
server.addConnector(connector);

// Create a ContextHandler with contextPath.
ContextHandler context = new ContextHandler(new ShopHandler(), "/shop");

// Link the context to the server.
server.setHandler(context);

server.start();
The Handler tree structure looks like the following:
Server
└── ContextHandler /shop
    └── ShopHandler
ContextHandlerCollection
Server applications may need to deploy to Jetty more than one web application.
Recall from the introduction that Jetty offers Handler.Collection that contains a sequence of child Handlers.
However, this has no knowledge of the concept of context and just iterates through the sequence of Handlers.
A better choice for multiple web application is ContextHandlerCollection, that matches a context from either its context path or virtual host, without iterating through the Handlers.
If ContextHandlerCollection does not find a match, it just returns false from its handle(...) method.
What happens next depends on the Handler tree structure: other Handlers may be invoked after ContextHandlerCollection, for example DefaultHandler (see this section).
Eventually, if no Handler returns true from their own handle(...) method, then Jetty returns an HTTP 404 response to the client.
class ShopHandler extends Handler.Abstract
{
    @Override
    public boolean handle(Request request, Response response, Callback callback)
    {
        // Implement the shop, remembering to complete the callback.
        return true;
    }
}

class RESTHandler extends Handler.Abstract
{
    @Override
    public boolean handle(Request request, Response response, Callback callback)
    {
        // Implement the REST APIs, remembering to complete the callback.
        return true;
    }
}

Server server = new Server();
Connector connector = new ServerConnector(server);
server.addConnector(connector);

// Create a ContextHandlerCollection to hold contexts.
ContextHandlerCollection contextCollection = new ContextHandlerCollection();

// Create the context for the shop web application and add it to ContextHandlerCollection.
contextCollection.addHandler(new ContextHandler(new ShopHandler(), "/shop"));

// Link the ContextHandlerCollection to the Server.
server.setHandler(contextCollection);

server.start();

// Create the context for the API web application.
ContextHandler apiContext = new ContextHandler(new RESTHandler(), "/api");
// Web applications can be deployed after the Server is started.
contextCollection.deployHandler(apiContext, Callback.NOOP);
The Handler tree structure looks like the following:
Server
└── ContextHandlerCollection
    ├── ContextHandler /shop
    │   └── ShopHandler
    └── ContextHandler /api
        └── RESTHandler
ResourceHandler — Static Content
Static content such as images or files (HTML, JavaScript, CSS) can be sent by Jetty very efficiently because Jetty can write the content asynchronously, using direct ByteBuffers to minimize data copy, and using a memory cache for faster access to the data to send.
Being able to write content asynchronously means that if the network gets congested (for example, the client reads the content very slowly) and the server stalls the send of the requested data, then Jetty will wait to resume the send without blocking a thread to finish the send.
ResourceHandler supports the following features:
-
Welcome files, for example serving
/index.htmlfor request URI/ -
Precompressed resources, serving a precompressed
/document.txt.gzfor request URI/document.txt -
Range requests, for requests containing the
Rangeheader, which allows clients to pause and resume downloads of large files -
Directory listing, serving a HTML page with the file list of the requested directory
-
Conditional headers, for requests containing the
If-Match,If-None-Match,If-Modified-Since,If-Unmodified-Sinceheaders.
The number of features supported and the efficiency in sending static content are on the same level as those of common front-end servers used to serve static content such as Nginx or Apache. Therefore, the traditional architecture where Nginx/Apache was the front-end server used only to send static content and Jetty was the back-end server used only to send dynamic content is somehow obsolete as Jetty can perform efficiently both tasks. This leads to simpler systems (less components to configure and manage) and more performance (no need to proxy dynamic requests from front-end servers to back-end servers).
| It is common to use Nginx/Apache as load balancers, or as rewrite/redirect servers. We typically recommend HAProxy as load balancer, and Jetty has rewrite/redirect features as well. |
This is how you configure a ResourceHandler to create a simple file server:
Server server = new Server();
Connector connector = new ServerConnector(server);
server.addConnector(connector);

// Create and configure a ResourceHandler.
ResourceHandler handler = new ResourceHandler();
// Configure the directory where static resources are located.
handler.setBaseResource(ResourceFactory.of(handler).newResource("/path/to/static/resources/"));
// Configure directory listing.
handler.setDirAllowed(false);
// Configure welcome files.
handler.setWelcomeFiles(List.of("index.html"));
// Configure whether to accept range requests.
handler.setAcceptRanges(true);

// Link the context to the server.
server.setHandler(handler);

server.start();
If you need to serve static resources from multiple directories:
ResourceHandler handler = new ResourceHandler();

// For multiple directories, use ResourceFactory.combine().
Resource resource = ResourceFactory.combine(
    ResourceFactory.of(handler).newResource("/path/to/static/resources/"),
    ResourceFactory.of(handler).newResource("/another/path/to/static/resources/")
);
handler.setBaseResource(resource);
If the resource is not found, ResourceHandler will not return true from the handle(...) method, so what happens next depends on the Handler tree structure.
See also how to use DefaultHandler.
GzipHandler
GzipHandler provides supports for automatic decompression of compressed request content and automatic compression of response content.
GzipHandler is a Handler.Wrapper that inspects the request and, if the request matches the GzipHandler configuration, just installs the required components to eventually perform decompression of the request content or compression of the response content.
The decompression/compression is not performed until the web application reads request content or writes response content.
GzipHandler can be configured at the server level in this way:
Server server = new Server();
Connector connector = new ServerConnector(server);
server.addConnector(connector);

// Create and configure GzipHandler.
GzipHandler gzipHandler = new GzipHandler();
server.setHandler(gzipHandler);
// Only compress response content larger than this.
gzipHandler.setMinGzipSize(1024);
// Do not compress these URI paths.
gzipHandler.setExcludedPaths("/uncompressed");
// Also compress POST responses.
gzipHandler.addIncludedMethods("POST");
// Do not compress these mime types.
gzipHandler.addExcludedMimeTypes("font/ttf");

// Create a ContextHandlerCollection to manage contexts.
ContextHandlerCollection contexts = new ContextHandlerCollection();
gzipHandler.setHandler(contexts);

server.start();
The Handler tree structure looks like the following:
Server
└── GzipHandler
    └── ContextHandlerCollection
        ├── ContextHandler 1
        :── ...
        └── ContextHandler N
However, in less common cases, you can configure GzipHandler on a per-context basis, for example because you want to configure GzipHandler with different parameters for each context, or because you want only some contexts to have compression support:
Server server = new Server();
ServerConnector connector = new ServerConnector(server);
server.addConnector(connector);

// Create a ContextHandlerCollection to hold contexts.
ContextHandlerCollection contextCollection = new ContextHandlerCollection();
// Link the ContextHandlerCollection to the Server.
server.setHandler(contextCollection);

// Create the context for the shop web application wrapped with GzipHandler so only the shop will do gzip.
GzipHandler shopGzipHandler = new GzipHandler(new ContextHandler(new ShopHandler(), "/shop"));

// Add it to ContextHandlerCollection.
contextCollection.addHandler(shopGzipHandler);

// Create the context for the API web application.
ContextHandler apiContext = new ContextHandler(new RESTHandler(), "/api");

// Add it to ContextHandlerCollection.
contextCollection.addHandler(apiContext);

server.start();
The Handler tree structure looks like the following:
Server
└── ContextHandlerCollection
    └── ContextHandlerCollection
        ├── GzipHandler
        │   └── ContextHandler /shop
        │       └── ShopHandler
        └── ContextHandler /api
            └── RESTHandler
RewriteHandler
RewriteHandler provides support for URL rewriting, very similarly to Apache’s mod_rewrite or Nginx rewrite module.
The Maven artifact coordinates are:
<dependency>
  <groupId>org.eclipse.jetty</groupId>
  <artifactId>jetty-rewrite</artifactId>
  <version>12.0.9-SNAPSHOT</version>
</dependency>
RewriteHandler can be configured with a set of rules; a rule inspects the request and when it matches it performs some change to the request (for example, changes the URI path, adds/removes headers, etc.).
The Jetty Server Libraries provide rules for the most common usages, but you can write your own rules by extending the org.eclipse.jetty.rewrite.handler.Rule class.
Please refer to the jetty-rewrite module javadocs for the complete list of available rules.
You typically want to configure RewriteHandler at the server level, although it is possible to configure it on a per-context basis.
Server server = new Server();
ServerConnector connector = new ServerConnector(server);
server.addConnector(connector);

// Create and link the RewriteHandler to the Server.
RewriteHandler rewriteHandler = new RewriteHandler();
server.setHandler(rewriteHandler);

// Compacts URI paths with double slashes, e.g. /ctx//path/to//resource.
rewriteHandler.addRule(new CompactPathRule());
// Rewrites */products/* to */p/*.
rewriteHandler.addRule(new RewriteRegexRule("/(.*)/product/(.*)", "/$1/p/$2"));
// Redirects permanently to a different URI.
RedirectRegexRule redirectRule = new RedirectRegexRule("/documentation/(.*)", "https://docs.domain.com/$1");
redirectRule.setStatusCode(HttpStatus.MOVED_PERMANENTLY_301);
rewriteHandler.addRule(redirectRule);

// Create a ContextHandlerCollection to hold contexts.
ContextHandlerCollection contextCollection = new ContextHandlerCollection();
rewriteHandler.setHandler(contextCollection);

server.start();
The Handler tree structure looks like the following:
Server
└── RewriteHandler
    └── ContextHandlerCollection
        ├── ContextHandler 1
        :── ...
        └── ContextHandler N
SizeLimitHandler
SizeLimitHandler tracks the sizes of request content and response content, and fails the request processing with an HTTP status code of 413 Content Too Large.
Server applications can set up the SizeLimitHandler before or after handlers that modify the request content or response content such as GzipHandler.
When SizeLimitHandler is before GzipHandler in the Handler tree, it will limit the compressed content; when it is after, it will limit the uncompressed content.
The Handler tree structure look like the following, to limit uncompressed content:
Server
└── GzipHandler
    └── SizeLimitHandler
        └── ContextHandlerCollection
            ├── ContextHandler 1
            :── ...
            └── ContextHandler N
StatisticsHandler
StatisticsHandler gathers and exposes a number of statistic values related to request processing such as:
-
Total number of requests
-
Current number of concurrent requests
-
Minimum, maximum, average and standard deviation of request processing times
-
Number of responses grouped by HTTP code (i.e. how many
2xxresponses, how many3xxresponses, etc.) -
Total response content bytes
Server applications can read these values and use them internally, or expose them via some service, or export them to JMX.
StatisticsHandler can be configured at the server level or at the context level.
Server server = new Server();
ServerConnector connector = new ServerConnector(server);
server.addConnector(connector);

// Create and link the StatisticsHandler to the Server.
StatisticsHandler statsHandler = new StatisticsHandler();
server.setHandler(statsHandler);

// Create a ContextHandlerCollection to hold contexts.
ContextHandlerCollection contextCollection = new ContextHandlerCollection();
statsHandler.setHandler(contextCollection);

server.start();
The Handler tree structure looks like the following:
Server
└── StatisticsHandler
    └── ContextHandlerCollection
        ├── ContextHandler 1
        :── ...
        └── ContextHandler N
It is possible to act on those statistics by subclassing StatisticsHandler.
For instance, StatisticsHandler.MinimumDataRateHandler can be used to enforce a minimum read rate and a minimum write rate based of the figures collected by the StatisticsHandler:
Server server = new Server();
ServerConnector connector = new ServerConnector(server);
server.addConnector(connector);

// Create and link the MinimumDataRateHandler to the Server.
// Create the MinimumDataRateHandler with a minimum read rate of 1KB per second and no minimum write rate.
StatisticsHandler.MinimumDataRateHandler dataRateHandler = new StatisticsHandler.MinimumDataRateHandler(1024L, 0L);
server.setHandler(dataRateHandler);

// Create a ContextHandlerCollection to hold contexts.
ContextHandlerCollection contextCollection = new ContextHandlerCollection();
dataRateHandler.setHandler(contextCollection);

server.start();
EventsHandler
EventsHandler allows applications to be notified of request processing events.
EventsHandler must be subclassed, and the relevant onXYZ() methods overridden to capture the request processing events you are interested in.
The request processing events can be used in conjunction with Request APIs that provide the information you may be interested in.
For example, if you want to use EventsHandler to record processing times, you can use the request processing events with the following Request APIs:
-
Request.getBeginNanoTime(), which returns the earliest possible nanoTime the request was received. -
Request.getHeadersNanoTime(), which returns the nanoTime at which the parsing of the HTTP headers was completed.
|
The |
EventsHandler emits the following events:
beforeHandling-
Emitted just before
EventsHandlerinvokes theHandler.handle(...)method of the nextHandlerin theHandlertree. afterHandling-
Emitted just after the invocation to the
Handler.handle(...)method of the nextHandlerin theHandlertree returns, either normally or by throwing. requestRead-
Emitted every time a chunk of content is read from the
Request. responseBegin-
Emitted when the response first write happens.
responseWrite-
Emitted every time the write of some response content is initiated.
responseWriteComplete-
Emitted every time the write of some response content is completed, either successfully or with a failure.
responseTrailersComplete-
Emitted when the write of the response trailers is completed.
complete-
Emitted when both request and the response have been completely processed.
Your EventsHandler subclass should then be linked in the Handler tree in the relevant position, typically as the outermost Handler after Server:
class MyEventsHandler extends EventsHandler
{
    @Override
    protected void onBeforeHandling(Request request)
    {
        // The nanoTime at which the request is first received.
        long requestBeginNanoTime = request.getBeginNanoTime();

        // The nanoTime just before invoking the next Handler.
        request.setAttribute("beforeHandlingNanoTime", NanoTime.now());
    }

    @Override
    protected void onComplete(Request request, int status, HttpFields headers, Throwable failure)
    {
        // Retrieve the before handling nanoTime.
        long beforeHandlingNanoTime = (long)request.getAttribute("beforeHandlingNanoTime");

        // Record the request processing time and the status that was sent back to the client.
        long processingTime = NanoTime.millisSince(beforeHandlingNanoTime);
        System.getLogger("trackTime").log(INFO, "processing request %s took %d ms and ended with status code %d", request, processingTime, status);
    }
}

Server server = new Server();
ServerConnector connector = new ServerConnector(server);
server.addConnector(connector);

// Link the EventsHandler as the outermost Handler after Server.
MyEventsHandler eventsHandler = new MyEventsHandler();
server.setHandler(eventsHandler);

ContextHandler appHandler = new ContextHandler("/app");
eventsHandler.setHandler(appHandler);

server.start();
The Handler tree structure looks like the following:
Server
└── MyEventsHandler
    └── ContextHandler /app
You can link the EventsHandler at any point in the Handler tree structure, and even have multiple EventsHandlers to be notified of the request processing events at the different stages of the Handler tree, for example:
Server
└── TotalEventsHandler
    └── SlowHandler
        └── AppEventsHandler
            └── ContextHandler /app
In the example above, TotalEventsHandler may record the total times of request processing, from SlowHandler all the way to the ContextHandler.
On the other hand, AppEventsHandler may record both the time it takes for the request to flow from TotalEventsHandler to AppEventsHandler, therefore effectively measuring the processing time due to SlowHandler, and the time it takes to process the request by the ContextHandler.
Refer to the EventsHandler javadocs for further information.
QoSHandler
QoSHandler allows web applications to limit the number of concurrent requests, therefore implementing a quality of service (QoS) mechanism for end users.
Web applications may need to access resources with limited capacity, for example a relational database accessed through a JDBC connection pool.
Consider the case where each HTTP request results in a JDBC query, and the capacity of the database is of 400 queries/s. Allowing more than 400 HTTP requests/s into the system, for example 500 requests/s, results in 100 requests blocking waiting for a JDBC connection for every second. It is evident that even a short load spike of few seconds eventually results in consuming all the server threads: some will be processing requests and queries, the remaining will be blocked waiting for a JDBC connection. When no more threads are available, additional requests will queue up as tasks in the thread pool, consuming more memory and potentially causing a complete server failure. This situation affects the whole server, so one bad behaving web application may affect other well behaving web applications. From the end user perspective the quality of service is terrible, because requests will take a lot of time to be served and eventually time out.
In cases of load spikes, caused for example by popular events (weather or social events), usage bursts (Black Friday sales), or even denial of service attacks, it is desirable to give priority to certain requests rather than others. For example, in an e-commerce site requests that lead to the checkout and to the payments should have higher priorities than requests to browse the products. Another example is to prioritize requests for certain users such as paying users or administrative users.
QoSHandler allows you to configure the maximum number of concurrent requests; by extending QoSHandler you can prioritize suspended requests for faster processing.
A simple example that just limits the number of concurrent requests:
class ShopHandler extends Handler.Abstract
{
    @Override
    public boolean handle(Request request, Response response, Callback callback)
    {
        // Implement the shop, remembering to complete the callback.
        callback.succeeded();
        return true;
    }
}

int maxThreads = 256;
QueuedThreadPool serverThreads = new QueuedThreadPool(maxThreads);
Server server = new Server(serverThreads);
ServerConnector connector = new ServerConnector(server);
server.addConnector(connector);

// Create and configure QoSHandler.
QoSHandler qosHandler = new QoSHandler();
// Set the max number of concurrent requests,
// for example in relation to the thread pool.
qosHandler.setMaxRequestCount(maxThreads / 2);
// A suspended request may stay suspended for at most 15 seconds.
qosHandler.setMaxSuspend(Duration.ofSeconds(15));
server.setHandler(qosHandler);

// Provide quality of service to the shop
// application by wrapping ShopHandler with QoSHandler.
qosHandler.setHandler(new ShopHandler());

server.start();
This is an example of a QoSHandler subclass where you can implement a custom prioritization logic:
class PriorityQoSHandler extends QoSHandler
{
    @Override
    protected int getPriority(Request request)
    {
        String pathInContext = Request.getPathInContext(request);

        // Payment requests have the highest priority.
        if (pathInContext.startsWith("/payment/"))
            return 3;

        // Login, checkout and admin requests.
        if (pathInContext.startsWith("/login/"))
            return 2;
        if (pathInContext.startsWith("/checkout/"))
            return 2;
        if (pathInContext.startsWith("/admin/"))
            return 2;

        // Health-check requests from the load balancer.
        if (pathInContext.equals("/health-check"))
            return 1;

        // Other requests have the lowest priority.
        return 0;
    }
}
SecuredRedirectHandler — Redirect from HTTP to HTTPS
SecuredRedirectHandler allows to redirect requests made with the http scheme (and therefore to the clear-text port) to the https scheme (and therefore to the encrypted port).
For example a request to http://domain.com:8080/path?param=value is redirected to https://domain.com:8443/path?param=value.
Server applications must configure a HttpConfiguration object with the secure scheme and secure port so that SecuredRedirectHandler can build the redirect URI.
SecuredRedirectHandler is typically configured at the server level, although it can be configured on a per-context basis.
Server server = new Server();

// Configure the HttpConfiguration for the clear-text connector.
int securePort = 8443;
HttpConfiguration httpConfig = new HttpConfiguration();
httpConfig.setSecurePort(securePort);

// The clear-text connector.
ServerConnector connector = new ServerConnector(server, new HttpConnectionFactory(httpConfig));
connector.setPort(8080);
server.addConnector(connector);

// Configure the HttpConfiguration for the secure connector.
HttpConfiguration httpsConfig = new HttpConfiguration(httpConfig);
// Add the SecureRequestCustomizer because TLS is used.
httpConfig.addCustomizer(new SecureRequestCustomizer());

// The HttpConnectionFactory for the secure connector.
HttpConnectionFactory http11 = new HttpConnectionFactory(httpsConfig);

// Configure the SslContextFactory with the keyStore information.
SslContextFactory.Server sslContextFactory = new SslContextFactory.Server();
sslContextFactory.setKeyStorePath("/path/to/keystore");
sslContextFactory.setKeyStorePassword("secret");

// The ConnectionFactory for TLS.
SslConnectionFactory tls = new SslConnectionFactory(sslContextFactory, http11.getProtocol());

// The secure connector.
ServerConnector secureConnector = new ServerConnector(server, tls, http11);
secureConnector.setPort(8443);
server.addConnector(secureConnector);

// Create and link the SecuredRedirectHandler to the Server.
SecuredRedirectHandler securedHandler = new SecuredRedirectHandler();
server.setHandler(securedHandler);

// Create a ContextHandlerCollection to hold contexts.
ContextHandlerCollection contextCollection = new ContextHandlerCollection();
securedHandler.setHandler(contextCollection);

server.start();
CrossOriginHandler
CrossOriginHandler supports the server-side requirements of the CORS protocol implemented by browsers when performing cross-origin requests.
An example of a cross-origin request is when a script downloaded from the origin domain http://domain.com uses fetch() or XMLHttpRequest to make a request to a cross domain such as http://cross.domain.com (a subdomain of the origin domain) or to http://example.com (a completely different domain).
This is common, for example, when you embed reusable components such as a chat component into a web page: the web page and the chat component files are downloaded from http://domain.com, but the chat server is at http://chat.domain.com, so the chat component must make cross-origin requests to the chat server.
This kind of setup exposes to cross-site request forgery (CSRF) attacks, and the CORS protocol has been established to protect against this kind of attacks.
For security reasons, browsers by default do not allow cross-origin requests, unless the response from the cross domain contains the right CORS headers.
CrossOriginHandler relieves server-side web applications from handling CORS headers explicitly.
You can set up your Handler tree with the CrossOriginHandler, configure it, and it will take care of the CORS headers separately from your application, where you can concentrate on the business logic.
The Handler tree structure looks like the following:
Server
└── CrossOriginHandler
    └── ContextHandler /app
        └── AppHandler
The most important CrossOriginHandler configuration parameter that must be configured is allowedOrigins, which by default is the empty set, therefore disallowing all origins.
You want to restrict requests to your cross domain to only origins you trust.
From the chat example above, the chat server at http://chat.domain.com knows that the chat component is downloaded from the origin server at http://domain.com, so the CrossOriginHandler is configured in this way:
CrossOriginHandler crossOriginHandler = new CrossOriginHandler();
// The allowed origins are regex patterns.
crossOriginHandler.setAllowedOriginPatterns(Set.of("http://domain\\.com"));
Browsers send cross-origin requests in two ways:
-
Directly, if the cross-origin request meets some simple criteria.
-
By issuing a hidden preflight request before the actual cross-origin request, to verify with the server if it is willing to reply properly to the actual cross-origin request.
Both preflight requests and cross-origin requests will be handled by CrossOriginHandler, which will analyze the request and possibly add appropriate CORS response headers.
By default, preflight requests are not delivered to the CrossOriginHandler child Handler, but it is possible to configure CrossOriginHandler by setting deliverPreflightRequests=true so that the web application can fine-tune the CORS response headers.
Another important CrossOriginHandler configuration parameter is allowCredentials, which controls whether cookies and authentication headers that match the cross-origin request to the cross domain are sent in the cross-origin requests.
By default, allowCredentials=false so that cookies and authentication headers are not sent in cross-origin requests.
If the application deployed in the cross domain requires cookies or authentication, then you must set allowCredentials=true, but you also need to restrict the allowed origins only to the ones your trust, otherwise your cross domain application will be vulnerable to CSRF attacks.
For more CrossOriginHandler configuration options, refer to the CrossOriginHandler javadocs.
DefaultHandler
DefaultHandler is a terminal Handler that always returns true from its handle(...) method and performs the following:
-
Serves the
favicon.icoJetty icon when it is requested -
Sends a HTTP
404response for any other request -
The HTTP
404response content nicely shows a HTML table with all the contexts deployed on theServerinstance
DefaultHandler is set directly on the server, for example:
Server server = new Server();
server.setDefaultHandler(new DefaultHandler(false, true));

Connector connector = new ServerConnector(server);
server.addConnector(connector);

// Add a ContextHandlerCollection to manage contexts.
ContextHandlerCollection contexts = new ContextHandlerCollection();

// Link the contexts to the Server.
server.setHandler(contexts);

server.start();
The Handler tree structure looks like the following:
Server
  ├── ContextHandlerCollection
  │   ├── ContextHandler 1
  │   :── ...
  │   └── ContextHandler N
  └── DefaultHandler
In the example above, ContextHandlerCollection will try to match a request to one of the contexts; if the match fails, Server will call the DefaultHandler that will return a HTTP 404 with an HTML page showing the existing contexts deployed on the Server.
DefaultHandler just sends a nicer HTTP 404 response in case of wrong requests from clients.
Jetty will send an HTTP 404 response anyway if DefaultHandler has not been set.
|
Servlet API Handlers
ServletContextHandler
Handlers are easy to write, but often web applications have already been written using the Servlet APIs, using Servlets and Filters.
ServletContextHandler is a ContextHandler that provides support for the Servlet APIs and implements the behaviors required by the Servlet specification.
However, differently from WebAppContext, it does not require web application to be packaged as a *.war, nor it requires a web.xml for configuration.
With ServletContextHandler you can just put all your Servlet components in a *.jar and configure each component using the ServletContextHandler APIs, in a way equivalent to what you would write in a web.xml.
The Maven artifact coordinates depend on the version of Jakarta EE you want to use, and they are:
<dependency>
  <groupId>org.eclipse.jetty.ee{8,9,10}</groupId>
  <artifactId>jetty-ee{8,9,10}-servlet</artifactId>
  <version>12.0.9-SNAPSHOT</version>
</dependency>
For example, for Jakarta EE 10 the coordinates are: org.eclipse.jetty.ee10:jetty-ee10-servlet:12.0.9-SNAPSHOT.
Below you can find an example of how to set up a Jakarta EE 10 ServletContextHandler:
public class ShopCartServlet extends HttpServlet
{
    @Override
    protected void service(HttpServletRequest request, HttpServletResponse response)
    {
        // Implement the shop cart functionality.
    }
}
Server server = new Server();
Connector connector = new ServerConnector(server);
server.addConnector(connector);
// Add the CrossOriginHandler to protect from CSRF attacks.
CrossOriginHandler crossOriginHandler = new CrossOriginHandler();
crossOriginHandler.setAllowedOriginPatterns(Set.of("http://domain.com"));
crossOriginHandler.setAllowCredentials(true);
server.setHandler(crossOriginHandler);
// Create a ServletContextHandler with contextPath.
ServletContextHandler context = new ServletContextHandler();
context.setContextPath("/shop");
// Link the context to the server.
crossOriginHandler.setHandler(context);
// Add the Servlet implementing the cart functionality to the context.
ServletHolder servletHolder = context.addServlet(ShopCartServlet.class, "/cart/*");
// Configure the Servlet with init-parameters.
servletHolder.setInitParameter("maxItems", "128");
server.start();The Handler and Servlet components tree structure looks like the following:
Server
└── ServletContextHandler /shop
    ├── ShopCartServlet /cart/*
    └── CrossOriginFilter /*
Note how the Servlet components (they are not Handlers) are represented in italic.
Note also how adding a Servlet or a Filter returns a holder object that can be used to specify additional configuration for that particular Servlet or Filter, for example initialization parameters (equivalent to <init-param> in web.xml).
When a request arrives to ServletContextHandler the request URI will be matched against the Filters and Servlet mappings and only those that match will process the request, as dictated by the Servlet specification.
ServletContextHandler is a terminal Handler, that is it always returns true from its handle(...) method when invoked.
Server applications must be careful when creating the Handler tree to put ServletContextHandlers as last Handlers in any Handler.Collection or as children of a ContextHandlerCollection.
|
WebAppContext
WebAppContext is a ServletContextHandler that autoconfigures itself by reading a web.xml Servlet configuration file.
The Maven artifact coordinates depend on the version of Jakarta EE you want to use, and they are:
<dependency>
  <groupId>org.eclipse.jetty.ee{8,9,10}</groupId>
  <artifactId>jetty-ee{8,9,10}-webapp</artifactId>
  <version>12.0.9-SNAPSHOT</version>
</dependency>
Server applications can specify a *.war file or a directory with the structure of a *.war file to WebAppContext to deploy a standard Servlet web application packaged as a war (as defined by the Servlet specification).
Where server applications using ServletContextHandler must manually invoke methods to add Servlets and Filters as described in this section, WebAppContext reads WEB-INF/web.xml to add Servlets and Filters, and also enforces a number of restrictions defined by the Servlet specification, in particular related to class loading.
Server server = new Server();
Connector connector = new ServerConnector(server);
server.addConnector(connector);

// Create a WebAppContext.
WebAppContext context = new WebAppContext();
// Link the context to the server.
server.setHandler(context);

// Configure the path of the packaged web application (file or directory).
context.setWar("/path/to/webapp.war");
// Configure the contextPath.
context.setContextPath("/app");

server.start();The Servlet specification requires that a web application class loader must load the web application classes from WEB-INF/classes and WEB_INF/lib.
The web application class loader is special because it behaves differently from typical class loaders: where typical class loaders first delegate to their parent class loader and then try to find the class locally, the web application class loader first tries to find the class locally and then delegates to the parent class loader.
The typical class loading model, parent-first, is inverted for web application class loaders, as they use a child-first model.
Furthermore, the Servlet specification requires that web applications cannot load or otherwise access the Servlet container implementation classes, also called server classes.
Web applications receive the HTTP request object as an instance of the jakarta.servlet.http.HttpServletRequest interface, and cannot downcast it to the Jetty specific implementation of that interface to access Jetty specific features — this ensures maximum web application portability across Servlet container implementations.
Lastly, the Servlet specification requires that other classes, also called system classes, such as jakarta.servlet.http.HttpServletRequest or JDK classes such as java.lang.String or java.sql.Connection cannot be modified by web applications by putting, for example, modified versions of those classes in WEB-INF/classes so that they are loaded first by the web application class loader (instead of the class-path class loader where they are normally loaded from).
WebAppContext implements this class loader logic using a single class loader, WebAppClassLoader, with filtering capabilities: when it loads a class, it checks whether the class is a system class or a server class and acts according to the Servlet specification.
When WebAppClassLoader is asked to load a class, it first tries to find the class locally (since it must use the inverted child-first model); if the class is found, and it is not a system class, the class is loaded; otherwise the class is not found locally.
If the class is not found locally, the parent class loader is asked to load the class; the parent class loader uses the standard parent-first model, so it delegates the class loading to its parent, and so on.
If the class is found, and it is not a server class, the class is loaded; otherwise the class is not found and a ClassNotFoundException is thrown.
Unfortunately, the Servlet specification does not define exactly which classes are system classes and which classes are server classes.
However, Jetty picks good defaults and allows server applications to customize system classes and server classes in WebAppContext.
DefaultServlet — Static Content for Servlets
If you have a Servlet web application, you may want to use a DefaultServlet instead of ResourceHandler.
The features are similar, but DefaultServlet is more commonly used to serve static files for Servlet web applications.
The Maven artifact coordinates depend on the version of Jakarta EE you want to use, and they are:
<dependency>
  <groupId>org.eclipse.jetty.ee{8,9,10}</groupId>
  <artifactId>jetty-ee{8,9,10}-servlet</artifactId>
  <version>12.0.9-SNAPSHOT</version>
</dependency>
Below you can find an example of how to setup DefaultServlet:
// Create a ServletContextHandler with contextPath.
ServletContextHandler context = new ServletContextHandler();
context.setContextPath("/app");

// Add the DefaultServlet to serve static content.
ServletHolder servletHolder = context.addServlet(DefaultServlet.class, "/");
// Configure the DefaultServlet with init-parameters.
servletHolder.setInitParameter("resourceBase", "/path/to/static/resources/");
servletHolder.setAsyncSupported(true);
Implementing Handler
The Handler API consist fundamentally of just one method:
public boolean handle(Request request, Response response, Callback callback) throws ExceptionThe code that implements the handle(...) method must respect the following contract:
-
It may inspect
Requestimmutable information such as URI and headers, typically to decide whether to returntrueorfalse(see below). -
Returning
falsemeans that the implementation will not handle the request, and it must not complete thecallbackparameter, nor read the request content, nor write response content. -
Returning
truemeans that the implementation will handle the request, and it must eventually complete thecallbackparameter. The completion of thecallbackparameter may happen synchronously within the invocation tohandle(...), or at a later time, asynchronously, possibly from another thread. If the response has not been explicitly written when thecallbackhas been completed, the Jetty implementation will write a200response with no content if thecallbackhas been succeeded, or an error response if thecallbackhas been failed.
|
Violating the contract above may result in undefined or unexpected behavior, and possibly leak resources. For example, returning Similarly, returning |
Applications may wrap the request, the response, or the callback and forward the wrapped request, response and callback to a child Handler.
Hello World Handler
A simple "Hello World" Handler is the following:
class HelloWorldHandler extends Handler.Abstract.NonBlocking
{
    @Override
    public boolean handle(Request request, Response response, Callback callback)
    {
        response.setStatus(200);
        response.getHeaders().put(HttpHeader.CONTENT_TYPE, "text/html; charset=UTF-8");

        // Write a Hello World response.
        Content.Sink.write(response, true, """
            <!DOCTYPE html>
            <html>
            <head>
              <title>Jetty Hello World Handler</title>
            </head>
            <body>
              <p>Hello World</p>
            </body>
            </html>
            """, callback);
        return true;
    }
}

Server server = new Server();
Connector connector = new ServerConnector(server);
server.addConnector(connector);

// Set the Hello World Handler.
server.setHandler(new HelloWorldHandler());

server.start();
Such a simple Handler can access the request and response main features, such as reading request headers and content, or writing response headers and content.
Note how HelloWorldHandler extends from Handler.Abstract.NonBlocking.
This is a declaration that HelloWorldHandler does not use blocking APIs (of any kind) to perform its logic, allowing Jetty to apply optimizations (see here) that are not applied to Handlers that declare themselves as blocking.
If your Handler implementation uses blocking APIs (of any kind), extend from Handler.Abstract.
Note how the callback parameter is passed to Content.Sink.write(...) — a utility method that eventually calls Response.write(...), so that when the write completes, also the callback parameter is completed.
Note also that because the callback parameter will eventually be completed, the value returned from handle(...) is true.
In this way the Handler contract is fully respected: when true is returned, the callback will eventually be completed.
Filtering Handler
A filtering Handler is a handler that perform some modification to the request or response, and then either forwards the request to another Handler or produces an error response:
class FilterHandler extends Handler.Wrapper
{
    public FilterHandler(Handler handler)
    {
        super(handler);
    }

    @Override
    public boolean handle(Request request, Response response, Callback callback) throws Exception
    {
        String path = Request.getPathInContext(request);
        if (path.startsWith("/old_path/"))
        {
            // Rewrite old paths to new paths.
            HttpURI uri = request.getHttpURI();
            String newPath = "/new_path/" + path.substring("/old_path/".length());
            HttpURI newURI = HttpURI.build(uri).path(newPath).asImmutable();

            // Modify the request object by wrapping the HttpURI.
            Request newRequest = Request.serveAs(request, newURI);

            // Forward to the next Handler using the wrapped Request.
            return super.handle(newRequest, response, callback);
        }
        else
        {
            // Forward to the next Handler as-is.
            return super.handle(request, response, callback);
        }
    }
}

Server server = new Server();
Connector connector = new ServerConnector(server);
server.addConnector(connector);

// Link the Handlers in a chain.
server.setHandler(new FilterHandler(new HelloWorldHandler()));

server.start();
Note how a filtering Handler extends from Handler.Wrapper and as such needs another handler to forward the request processing to, and how the two Handlers needs to be linked together to work properly.
Using the Request
The Request object can be accessed by web applications to inspect the HTTP request URI, the HTTP request headers and read the HTTP request content.
Since the Request object may be wrapped by filtering Handlers, the design decision for the Request APIs was to keep the number of virtual methods at a minimum.
This minimizes the effort necessary to write Request wrapper implementations and provides a single source for the data carried by Request objects.
To use the Request APIs, you should look up the relevant methods in the following order:
-
Requestvirtual methods. For example,Request.getMethod()returns the HTTP method used in the request, such asGET,POST, etc. -
Requeststaticmethods. These are utility methods that provide more convenient access to request features. For example, the HTTP URI query is a string and can be directly accessed via the non-staticmethodrequest.getHttpURI().getQuery(); however, the query string typically holds key/value parameters and applications should not have the burden to parse the query string, so thestatic Request.extractQueryParameters(Request)method is provided. -
Super class
staticmethods. SinceRequestis-aContent.Source, look also forstaticmethods inContent.Sourcethat take aContent.Sourceas a parameter, so that you can pass theRequestobject as a parameter.
Below you can find a list of the most common Request features and how to access them.
Refer to the Request javadocs for the complete list.
RequestURI-
The
RequestURI is accessed viaRequest.getHttpURI()and theHttpURIAPIs. RequestHTTP headers-
The
RequestHTTP headers are accessed viaRequest.getHeaders()and theHttpFieldsAPIs. Requestcookies-
The
Requestcookies are accessed viastatic Request.getCookies(Request)and theHttpCookieAPIs. Requestparameters-
The
Requestparameters are accessed viastatic Request.extractQueryParameters(Request)for those present in the HTTP URI query, and viastatic Request.getParametersAsync(Request)for both query parameters and request content parameters received via form upload withContent-Type: application/x-www-url-form-encoded, and theFieldsAPIs. If you are only interested in the request content parameters received via form upload, you can usestatic FormFields.from(Request), see also this section. RequestHTTP session-
The
RequestHTTP session is accessed viaRequest.getSession(boolean)and theSessionAPIs. For more information about how to set up support for HTTP sessions, see this section.
Reading the Request Content
Since Request is-a Content.Source, the section about reading from Content.Source applies to Request as well.
The static Content.Source utility methods will allow you to read the request content as a string, or as an InputStream, for example.
There are two special cases that are specific to HTTP for the request content: form parameters (sent when submitting an HTML form) and multipart form data (sent when submitting an HTML form with file upload).
For form parameters, typical of HTML form submissions, you can use the FormFields APIs as shown here:
class FormHandler extends Handler.Abstract.NonBlocking
{
    @Override
    public boolean handle(Request request, Response response, Callback callback)
    {
        String contentType = request.getHeaders().get(HttpHeader.CONTENT_TYPE);
        if (MimeTypes.Type.FORM_ENCODED.is(contentType))
        {
            // Convert the request content into Fields.
            CompletableFuture<Fields> completableFields = FormFields.from(request); (1)

            // When all the request content has arrived, process the fields.
            completableFields.whenComplete((fields, failure) -> (2)
            {
                if (failure == null)
                {
                    processFields(fields);
                    // Send a simple 200 response, completing the callback.
                    response.setStatus(HttpStatus.OK_200);
                    callback.succeeded();
                }
                else
                {
                    // Reading the request content failed.
                    // Send an error response, completing the callback.
                    Response.writeError(request, response, callback, failure);
                }
            });

            // The callback will be eventually completed in all cases, return true.
            return true;
        }
        else
        {
            // Send an error response, completing the callback, and returning true.
            Response.writeError(request, response, callback, HttpStatus.BAD_REQUEST_400, "invalid request");
            return true;
        }
    }
}| 1 | If the Content-Type is x-www-form-urlencoded, read the request content with FormFields. |
| 2 | When all the request content has arrived, process the Fields. |
|
The It is therefore mandatory to use Failing to do so may result in the |
For multipart form data, typical for HTML form file uploads, you can use the MultiPartFormData.Parser APIs as shown here:
class MultiPartFormDataHandler extends Handler.Abstract.NonBlocking
{
    @Override
    public boolean handle(Request request, Response response, Callback callback)
    {
        String contentType = request.getHeaders().get(HttpHeader.CONTENT_TYPE);
        if (MimeTypes.Type.MULTIPART_FORM_DATA.is(contentType))
        {
            // Extract the multipart boundary.
            String boundary = MultiPart.extractBoundary(contentType);

            // Create and configure the multipart parser.
            MultiPartFormData.Parser parser = new MultiPartFormData.Parser(boundary);
            // By default, uploaded files are stored in this directory, to
            // avoid to read the file content (which can be large) in memory.
            parser.setFilesDirectory(Path.of("/tmp"));
            // Convert the request content into parts.
            CompletableFuture<MultiPartFormData.Parts> completableParts = parser.parse(request); (1)

            // When all the request content has arrived, process the parts.
            completableParts.whenComplete((parts, failure) -> (2)
            {
                if (failure == null)
                {
                    // Use the Parts API to process the parts.
                    processParts(parts);
                    // Send a simple 200 response, completing the callback.
                    response.setStatus(HttpStatus.OK_200);
                    callback.succeeded();
                }
                else
                {
                    // Reading the request content failed.
                    // Send an error response, completing the callback.
                    Response.writeError(request, response, callback, failure);
                }
            });

            // The callback will be eventually completed in all cases, return true.
            return true;
        }
        else
        {
            // Send an error response, completing the callback, and returning true.
            Response.writeError(request, response, callback, HttpStatus.BAD_REQUEST_400, "invalid request");
            return true;
        }
    }
}| 1 | If the Content-Type is multipart/form-data, read the request content with MultiPartFormData.Parser. |
| 2 | When all the request content has arrived, process the MultiPartFormData.Parts. |
|
The It is therefore mandatory to use Failing to do so may result in the |
Request Listeners
Application may add listeners to the Request object to be notified of particular events happening during the request/response processing.
Request.addIdleTimeoutListener(Predicate<TimeoutException>) allows you to add an idle timeout listener, which is invoked when an idle timeout period elapses during the request/response processing, if the idle timeout event is not notified otherwise.
When an idle timeout event happens, it is delivered to the application as follows:
-
If there is pending demand (via
Request.demand(Runnable)), then the demandRunnableis invoked and the application may see the idle timeout failure by reading from theRequest, obtaining a transient failure chunk. -
If there is a pending response write (via
Response.write(boolean, ByteBuffer, Callback)), the response writeCallbackis failed. -
If neither of the above, the idle timeout listeners are invoked, in the same order they have been added. The first idle timeout listener that returns
truestops the Jetty implementation from invoking the idle timeout listeners that follow.
The idle timeout listeners are therefore invoked only when the application is really idle, neither trying to read nor trying to write.
An idle timeout listener may return true to indicate that the idle timeout should be treated as a fatal failure of the request/response processing; otherwise the listener may return false to indicate that no further handling of the idle timeout is needed from the Jetty implementation.
When idle timeout listeners return false, then any subsequent idle timeouts are handled as above.
In the case that the application does not initiate any read or write, then the idle timeout listeners are invoked again after another idle timeout period.
Request.addFailureListener(Consumer<Throwable>) allows you to add a failure listener, which is invoked when a failure happens during the request/response processing.
When a failure happens during the request/response processing, then:
-
The pending demand for request content, if any, is invoked; that is, the
Runnablepassed toRequest.demand(Runnable)is invoked. -
The callback of an outstanding call to
Response.write(boolean, ByteBuffer, Callback), if any, is failed. -
The failure listeners are invoked, in the same order they have been added.
Failure listeners are invoked also in case of idle timeouts, in the following cases:
-
At least one idle timeout listener returned
trueto indicate to the Jetty implementation to treat the idle timeout as a fatal failure. -
There are no idle timeout listeners.
Failures reported to a failure listener are always fatal failures; see also this section about fatal versus transient failures. This means that it is not possible to read or write from a failure listener: the read returns a fatal failure chunk, and the write will immediately fail the write callback.
|
Applications are always required to complete the |
Request.addCompletionListener(Consumer<Throwable>) allows you to add a completion listener, which is invoked at the very end of the request/response processing.
This is equivalent to adding an HttpStream wrapper and overriding both HttpStream.succeeded() and HttpStream.failed(Throwable).
Completion listeners are typically (but not only) used to recycle or dispose resources used during the request/response processing, or get a precise timing for when the request/response processing finishes, to be paired with Request.getBeginNanoTime().
Note that while failure listeners are invoked as soon as the failure happens, completion listeners are invoked only at the very end of the request/response processing: after the Callback passed to Handler.handle(Request, Response, Callback) has been completed, all container dispatched threads have returned, and all the response writes have been completed.
In case of many completion listeners, they are invoked in the reverse order they have been added.
Using the Response
The Response object can be accessed by web applications to set the HTTP response status code, the HTTP response headers and write the HTTP response content.
The design of the Response APIs is similar to that of the Request APIs, described in this section.
To use the Response APIs, you should look up the relevant methods in the following order:
-
Responsevirtual methods. For example,Response.setStatus(int)to set the HTTP response status code. -
Requeststaticmethods. These are utility methods that provide more convenient access to response features. For example, adding an HTTP cookie could be done by adding aSet-Cookieresponse header, but it would be extremely error-prone. The utility methodstatic Response.addCookie(Response, HttpCookie)is provided instead. -
Super class
staticmethods. SinceResponseis-aContent.Sink, look also forstaticmethods inContent.Sinkthat take aContent.Sinkas a parameter, so that you can pass theResponseobject as a parameter.
Below you can find a list of the most common Response features and how to access them.
Refer to the Response javadocs for the complete list.
Responsestatus code-
The
ResponseHTTP status code is accessed viaResponse.getStatus()andResponse.setStatus(int). ResponseHTTP headers-
The
ResponseHTTP headers are accessed viaResponse.getHeaders()and theHttpFields.MutableAPIs. The response headers are mutable until the response is committed, as defined in this section. Responsecookies-
The
Responsecookies are accessed viastatic Response.addCookie(Response, HttpCookie),static Response.replaceCookie(Response, HttpCookie)and theHttpCookieAPIs. Since cookies translate to HTTP headers, they can be added/replaces until the response is committed, as defined in this section.
Writing the Response Content
Since Response is-a Content.Sink, the section about writing to Content.Sink applies to Response as well.
The static Content.Sink utility methods will allow you to write the response content as a string, or as an OutputStream, for example.
The first call to Response.write(boolean, ByteBuffer, Callback) commits the response.
|
Committing the response means that the response status code and response headers are sent to the other peer, and therefore cannot be modified anymore.
Trying to modify them may result in an IllegalStateException to be thrown, as it is an application mistake to commit the response and then try to modify the headers.
You can explicitly commit the response by performing an empty, non-last write:
class FlushingHandler extends Handler.Abstract.NonBlocking
{
    @Override
    public boolean handle(Request request, Response response, Callback callback)
    {
        // Set the response status code.
        response.setStatus(HttpStatus.OK_200);
        // Set the response headers.
        response.getHeaders().put(HttpHeader.CONTENT_TYPE, "text/plain");

        // Commit the response with a "flush" write.
        Callback.Completable.with(flush -> response.write(false, null, flush))
            // When the flush is finished, send the content and complete the callback.
            .whenComplete((ignored, failure) ->
            {
                if (failure == null)
                    response.write(true, UTF_8.encode("HELLO"), callback);
                else
                    callback.failed(failure);
            });

        // Return true because the callback will eventually be completed.
        return true;
    }
}|
The It is therefore mandatory to use Failing to do so may result in the |
Jetty can perform important optimizations for the HTTP/1.1 protocol if the response content length is known before the response is committed:
class ContentLengthHandler extends Handler.Abstract.NonBlocking
{
    @Override
    public boolean handle(Request request, Response response, Callback callback)
    {
        // Set the response status code.
        response.setStatus(HttpStatus.OK_200);

        String content = """
            {
              "result": 0,
              "advice": {
                "message": "Jetty Rocks!"
              }
            }
            """;
        // Must count the bytes, not the characters!
        byte[] bytes = content.getBytes(UTF_8);
        long contentLength = bytes.length;

        // Set the response headers before the response is committed.
        HttpFields.Mutable responseHeaders = response.getHeaders();
        // Set the content type.
        responseHeaders.put(HttpHeader.CONTENT_TYPE, "application/json; charset=UTF-8");
        // Set the response content length.
        responseHeaders.put(HttpHeader.CONTENT_LENGTH, contentLength);

        // Commit the response.
        response.write(true, ByteBuffer.wrap(bytes), callback);

        // Return true because the callback will eventually be completed.
        return true;
    }
}| Setting the response content length is an optimization; Jetty will work well even without it. If you set the response content length, however, remember that it must specify the number of bytes, not the number of characters. |
Sending Interim Responses
The HTTP protocol (any version) allows applications to write interim responses.
An interim response has a status code in the 1xx range (but not 101), and an application may write zero or more interim response before the final response.
This is an example of writing an interim 100 Continue response:
class Continue100Handler extends Handler.Wrapper
{
    public Continue100Handler(Handler handler)
    {
        super(handler);
    }

    @Override
    public boolean handle(Request request, Response response, Callback callback) throws Exception
    {
        HttpFields requestHeaders = request.getHeaders();
        if (requestHeaders.contains(HttpHeader.EXPECT, HttpHeaderValue.CONTINUE.asString()))
        {
            // Analyze the request and decide whether to receive the content.
            long contentLength = request.getLength();
            if (contentLength > 0 && contentLength < 1024)
            {
                // Small request content, ask to send it by
                // sending a 100 Continue interim response.
                CompletableFuture<Void> processing = response.writeInterim(HttpStatus.CONTINUE_100, HttpFields.EMPTY) (1)
                    // Then read the request content into a ByteBuffer.
                    .thenCompose(ignored -> Promise.Completable.<ByteBuffer>with(p -> Content.Source.asByteBuffer(request, p)))
                    // Then store the ByteBuffer somewhere.
                    .thenCompose(byteBuffer -> store(byteBuffer));

                // At the end of the processing, complete
                // the callback with the CompletableFuture,
                // a simple 200 response in case of success,
                // or a 500 response in case of failure.
                callback.completeWith(processing); (2)
                return true;
            }
            else
            {
                // The request content is too large, send an error.
                Response.writeError(request, response, callback, HttpStatus.PAYLOAD_TOO_LARGE_413);
                return true;
            }
        }
        else
        {
            return super.handle(request, response, callback);
        }
    }
}| 1 | Using Response.writeInterim(...) to send the interim response. |
| 2 | The completion of the callback must take into account both success and failure. |
Note how writing an interim response is as asynchronous operation.
As such you must perform subsequent operations using the CompletableFuture APIs, and remember to complete the Handler callback parameter both in case of success or in case of failure.
This is an example of writing an interim 103 Early Hints response:
class EarlyHints103Handler extends Handler.Wrapper
{
    public EarlyHints103Handler(Handler handler)
    {
        super(handler);
    }

    @Override
    public boolean handle(Request request, Response response, Callback callback) throws Exception
    {
        String pathInContext = Request.getPathInContext(request);

        // Simple logic that assumes that every HTML
        // file has associated the same CSS stylesheet.
        if (pathInContext.endsWith(".html"))
        {
            // Tell the client that a Link is coming
            // sending a 103 Early Hints interim response.
            HttpFields.Mutable interimHeaders = HttpFields.build()
                .put(HttpHeader.LINK, "</style.css>; rel=preload; as=style");

            response.writeInterim(HttpStatus.EARLY_HINTS_103, interimHeaders) (1)
                .whenComplete((ignored, failure) -> (2)
                {
                    if (failure == null)
                    {
                        try
                        {
                            // Delegate the handling to the child Handler.
                            boolean handled = super.handle(request, response, callback);
                            if (!handled)
                            {
                                // The child Handler did not produce a final response, do it here.
                                Response.writeError(request, response, callback, HttpStatus.NOT_FOUND_404);
                            }
                        }
                        catch (Throwable x)
                        {
                            callback.failed(x);
                        }
                    }
                    else
                    {
                        callback.failed(failure);
                    }
                });

            // This Handler sent an interim response, so this Handler
            // (or its descendants) must produce a final response, so return true.
            return true;
        }
        else
        {
            // Not a request for an HTML page, delegate
            // the handling to the child Handler.
            return super.handle(request, response, callback);
        }
    }
}| 1 | Using Response.writeInterim(...) to send the interim response. |
| 2 | The completion of the callback must take into account both success and failure. |
An interim response may or may not have its own HTTP headers (this depends on the interim response status code), and they are typically different from the final response HTTP headers.
HTTP Session Support
Some web applications (but not all of them) have the concept of a user, that is a way to identify a specific client that is interacting with the web application.
The HTTP session is a feature offered by servers that allows web applications to maintain a temporary, per-user, storage for user-specific data.
The storage can be accessed by the web application across multiple request/response interactions with the client. This makes the web application stateful, because a computation performed by a previous request may be stored in the HTTP session and used in subsequent requests without the need to perform again the computation.
Since not all web applications need support for the HTTP session, Jetty offers this feature optionally.
The Maven coordinates for the Jetty HTTP session support are:
<dependency>
  <groupId>org.eclipse.jetty</groupId>
  <artifactId>jetty-session</artifactId>
  <version>12.0.9-SNAPSHOT</version>
</dependency>
The HTTP session support is provided by the org.eclipse.jetty.session.SessionHandler, that must be set up in the Handler tree between a ContextHandler and your Handler implementation:
class MyAppHandler extends Handler.Abstract.NonBlocking
{
    @Override
    public boolean handle(Request request, Response response, Callback callback)
    {
        // Your web application implemented here.

        // You can access the HTTP session.
        Session session = request.getSession(false);

        return true;
    }
}

Server server = new Server();
Connector connector = new ServerConnector(server);
server.addConnector(connector);

// Create a ContextHandler with contextPath.
ContextHandler contextHandler = new ContextHandler("/myApp");
server.setHandler(contextHandler);

// Create and link the SessionHandler.
SessionHandler sessionHandler = new SessionHandler();
contextHandler.setHandler(sessionHandler);

// Link your web application Handler.
sessionHandler.setHandler(new MyAppHandler());

server.start();
The corresponding Handler tree structure looks like the following:
Server
└── ContextHandler /myApp
    └── SessionHandler
        └── MyAppHandler
With the Handlers set up in this way, you can access the HTTP session from your MyAppHandler using Request.getSession(boolean), and then use the Session APIs.
The support provided by Jetty for HTTP sessions is advanced and completely pluggable, providing features such as first-level and second-level caching, eviction, etc.
You can configure the HTTP session support from a very simple local in-memory configuration, to a replicated (across nodes in a cluster), persistent (for example over file system, database or memcached) configuration for the most advanced use cases. The advanced configuration of Jetty’s HTTP session support is discussed in more details in this section.
Writing HTTP Server Applications
Writing HTTP applications is typically simple, especially when using blocking APIs. However, there are subtle cases where it is worth clarifying what a server application should do to obtain the desired results when run by Jetty.
Sending 1xx Responses
The HTTP/1.1 RFC allows for 1xx informational responses to be sent before a real content response.
Unfortunately the servlet specification does not provide a way for these to be sent, so Jetty has had to provide non-standard handling of these headers.
100 Continue
The 100 Continue response should be sent by the server when a client sends a request with an Expect: 100-continue header, as the client will not send the body of the request until the 100 Continue response has been sent.
The intent of this feature is to allow a server to inspect the headers and to tell the client to not send a request body that might be too large or insufficiently private or otherwise unable to be handled.
Jetty achieves this by waiting until the input stream or reader is obtained by the filter/servlet, before sending the 100 Continue response.
Thus a filter/servlet may inspect the headers of a request before getting the input stream and send an error response (or redirect etc.) rather than the 100 continues.
class Continue100HttpServlet extends HttpServlet
{
    @Override
    protected void service(HttpServletRequest request, HttpServletResponse response) throws IOException
    {
        // Inspect the method and headers.
        boolean isPost = HttpMethod.POST.is(request.getMethod());
        boolean expects100 = HttpHeaderValue.CONTINUE.is(request.getHeader("Expect"));
        long contentLength = request.getContentLengthLong();

        if (isPost && expects100)
        {
            if (contentLength > 1024 * 1024)
            {
                // Rejects uploads that are too large.
                response.sendError(HttpStatus.PAYLOAD_TOO_LARGE_413);
            }
            else
            {
                // Getting the request InputStream indicates that
                // the application wants to read the request content.
                // Jetty will send the 100 Continue response at this
                // point, and the client will send the request content.
                ServletInputStream input = request.getInputStream();

                // Read and process the request input.
            }
        }
        else
        {
            // Process normal requests.
        }
    }
}
102 Processing
RFC 2518 defined the 102 Processing status code that can be sent:
when the server has a reasonable expectation that the request will take significant time to complete.
As guidance, if a method is taking longer than 20 seconds (a reasonable, but arbitrary value) to process the server SHOULD return a 102 Processing response.
However, a later update of RFC 2518, RFC 4918, removed the 102 Processing status code for "lack of implementation".
Jetty supports the 102 Processing status code.
If a request is received with the Expect: 102-processing header, then a filter/servlet may send a 102 Processing response (without terminating further processing) by calling response.sendError(102).
HTTP/2 Server Library
In the vast majority of cases, server applications should use the generic, high-level, HTTP server library that also provides HTTP/2 support via the HTTP/2 ConnectionFactorys as described in details here.
The low-level HTTP/2 server library has been designed for those applications that need low-level access to HTTP/2 features such as sessions, streams and frames, and this is quite a rare use case.
See also the correspondent HTTP/2 client library.
Introduction
The Maven artifact coordinates for the HTTP/2 client library are the following:
<dependency>
  <groupId>org.eclipse.jetty.http2</groupId>
  <artifactId>jetty-http2-server</artifactId>
  <version>12.0.9-SNAPSHOT</version>
</dependency>
HTTP/2 is a multiplexed protocol: it allows multiple HTTP/2 requests to be sent on the same TCP connection, or session. Each request/response cycle is represented by a stream. Therefore, a single session manages multiple concurrent streams. A stream has typically a very short life compared to the session: a stream only exists for the duration of the request/response cycle and then disappears.
HTTP/2 Flow Control
The HTTP/2 protocol is flow controlled (see the specification). This means that a sender and a receiver maintain a flow control window that tracks the number of data bytes sent and received, respectively. When a sender sends data bytes, it reduces its flow control window. When a receiver receives data bytes, it also reduces its flow control window, and then passes the received data bytes to the application. The application consumes the data bytes and tells back the receiver that it has consumed the data bytes. The receiver then enlarges the flow control window, and the implementation arranges to send a message to the sender with the number of bytes consumed, so that the sender can enlarge its flow control window.
A sender can send data bytes up to its whole flow control window, then it must stop sending. The sender may resume sending data bytes when it receives a message from the receiver that the data bytes sent previously have been consumed. This message enlarges the sender flow control window, which allows the sender to send more data bytes.
HTTP/2 defines two flow control windows: one for each session, and one for each stream. Let’s see with an example how they interact, assuming that in this example the session flow control window is 120 bytes and the stream flow control window is 100 bytes.
The sender opens a session, and then opens stream_1 on that session, and sends 80 data bytes.
At this point the session flow control window is 40 bytes (120 - 80), and stream_1's flow control window is 20 bytes (100 - 80).
The sender now opens stream_2 on the same session and sends 40 data bytes.
At this point, the session flow control window is 0 bytes (40 - 40), while stream_2's flow control window is 60 (100 - 40).
Since now the session flow control window is 0, the sender cannot send more data bytes, neither on stream_1 nor on stream_2, nor on other streams, despite all the streams having their stream flow control windows greater than 0.
The receiver consumes stream_2's 40 data bytes and sends a message to the sender with this information.
At this point, the session flow control window is 40 (0 + 40), stream_1's flow control window is still 20 and stream_2's flow control window is 100 (60 + 40).
If the sender opens stream_3 and would like to send 50 data bytes, it would only be able to send 40 because that is the maximum allowed by the session flow control window at this point.
It is therefore very important that applications notify the fact that they have consumed data bytes as soon as possible, so that the implementation (the receiver) can send a message to the sender (in the form of a WINDOW_UPDATE frame) with the information to enlarge the flow control window, therefore reducing the possibility that sender stalls due to the flow control windows being reduced to 0.
How a server application should handle HTTP/2 flow control is discussed in details in this section.
Server Setup
The low-level HTTP/2 support is provided by org.eclipse.jetty.http2.server.RawHTTP2ServerConnectionFactory and org.eclipse.jetty.http2.api.server.ServerSessionListener:
// Create a Server instance.
Server server = new Server();

ServerSessionListener sessionListener = new ServerSessionListener() {};

// Create a ServerConnector with RawHTTP2ServerConnectionFactory.
RawHTTP2ServerConnectionFactory http2 = new RawHTTP2ServerConnectionFactory(sessionListener);

// Configure RawHTTP2ServerConnectionFactory, for example:

// Configure the max number of concurrent requests.
http2.setMaxConcurrentStreams(128);
// Enable support for CONNECT.
http2.setConnectProtocolEnabled(true);

// Create the ServerConnector.
ServerConnector connector = new ServerConnector(server, http2);

// Add the Connector to the Server
server.addConnector(connector);

// Start the Server so it starts accepting connections from clients.
server.start();
Where server applications using the high-level server library deal with HTTP requests and responses in Handlers, server applications using the low-level HTTP/2 server library deal directly with HTTP/2 sessions, streams and frames in a ServerSessionListener implementation.
The ServerSessionListener interface defines a number of methods that are invoked by the implementation upon the occurrence of HTTP/2 events, and that server applications can override to react to those events.
Please refer to the ServerSessionListener javadocs for the complete list of events.
The first event is the accept event and happens when a client opens a new TCP connection to the server and the server accepts the connection.
This is the first occasion where server applications have access to the HTTP/2 Session object:
ServerSessionListener sessionListener = new ServerSessionListener()
{
    @Override
    public void onAccept(Session session)
    {
        SocketAddress remoteAddress = session.getRemoteSocketAddress();
        System.getLogger("http2").log(INFO, "Connection from {0}", remoteAddress);
    }
};
After connecting to the server, a compliant HTTP/2 client must send the HTTP/2 client preface, and when the server receives it, it generates the preface event on the server. This is where server applications can customize the connection settings by returning a map of settings that the implementation will send to the client:
ServerSessionListener sessionListener = new ServerSessionListener()
{
    @Override
    public Map<Integer, Integer> onPreface(Session session)
    {
        // Customize the settings, for example:
        Map<Integer, Integer> settings = new HashMap<>();

        // Tell the client that HTTP/2 push is disabled.
        settings.put(SettingsFrame.ENABLE_PUSH, 0);

        return settings;
    }
};
Receiving a Request
Receiving an HTTP request from the client, and sending a response, creates a stream that encapsulates the exchange of HTTP/2 frames that compose the request and the response.
An HTTP request is made of a HEADERS frame, that carries the request method, the request URI and the request headers, and optional DATA frames that carry the request content.
Receiving the HEADERS frame opens the Stream:
ServerSessionListener sessionListener = new ServerSessionListener()
{
    @Override
    public Stream.Listener onNewStream(Stream stream, HeadersFrame frame)
    {
        // This is the "new stream" event, so it's guaranteed to be a request.
        MetaData.Request request = (MetaData.Request)frame.getMetaData();

        // Return a Stream.Listener to handle the request events,
        // for example request content events or a request reset.
        return new Stream.Listener()
        {
            // Override callback methods for events you are interested in.
        };
    }
};
Server applications should return a Stream.Listener implementation from onNewStream(...) to be notified of events generated by the client, such as DATA frames carrying request content, or a RST_STREAM frame indicating that the client wants to reset the request, or an idle timeout event indicating that the client was supposed to send more frames but it did not.
The example below shows how to receive request content:
ServerSessionListener sessionListener = new ServerSessionListener()
{
    @Override
    public Stream.Listener onNewStream(Stream stream, HeadersFrame frame)
    {
        MetaData.Request request = (MetaData.Request)frame.getMetaData();

        // Demand for request data content.
        stream.demand();

        // Return a Stream.Listener to handle the request events.
        return new Stream.Listener()
        {
            @Override
            public void onDataAvailable(Stream stream)
            {
                Stream.Data data = stream.readData();

                if (data == null)
                {
                    stream.demand();
                    return;
                }

                // Get the content buffer.
                ByteBuffer buffer = data.frame().getByteBuffer();

                // Consume the buffer, here - as an example - just log it.
                System.getLogger("http2").log(INFO, "Consuming buffer {0}", buffer);

                // Tell the implementation that the buffer has been consumed.
                data.release();

                if (!data.frame().isEndStream())
                {
                    // Demand more DATA frames when they are available.
                    stream.demand();
                }
            }
        };
    }
};|
When Just returning from the Applications must call |
Applications that consume the content buffer within onDataAvailable(Stream stream) (for example, writing it to a file, or copying the bytes to another storage) should call Data.release() as soon as they have consumed the content buffer.
This allows the implementation to reuse the buffer, reducing the memory requirements needed to handle the content buffers.
Alternatively, an application may store away the Data object to consume the buffer bytes later, or pass the Data object to another asynchronous API (this is typical in proxy applications).
|
The call to |
Applications can unwrap the Data object into some other object that may be used later, provided that the release semantic is maintained:
record Chunk(ByteBuffer byteBuffer, Callback callback)
{
}

// A queue that consumers poll to consume content asynchronously.
Queue<Chunk> dataQueue = new ConcurrentLinkedQueue<>();

// Implementation of Stream.Listener.onDataAvailable(Stream stream)
// in case of unwrapping of the Data object for asynchronous content
// consumption and demand.
Stream.Listener listener = new Stream.Listener()
{
    @Override
    public void onDataAvailable(Stream stream)
    {
        Stream.Data data = stream.readData();

        if (data == null)
        {
            stream.demand();
            return;
        }

        // Get the content buffer.
        ByteBuffer byteBuffer = data.frame().getByteBuffer();

        // Unwrap the Data object, converting it to a Chunk.
        // The Data.release() semantic is maintained in the completion of the Callback.
        dataQueue.offer(new Chunk(byteBuffer, Callback.from(() ->
        {
            // When the buffer has been consumed, then:
            // A) release the Data object.
            data.release();
            // B) possibly demand more DATA frames.
            if (!data.frame().isEndStream())
                stream.demand();
        })));

        // Do not demand more data here, to avoid to overflow the queue.
    }
};|
Applications that implement If they do not call |
Sending a Response
After receiving an HTTP request, a server application must send an HTTP response.
An HTTP response is typically composed of a HEADERS frame containing the HTTP status code and the response headers, and optionally one or more DATA frames containing the response content bytes.
The HTTP/2 protocol also supports response trailers (that is, headers that are sent after the response content) that also are sent using a HEADERS frame.
A server application can send a response in this way:
ServerSessionListener sessionListener = new ServerSessionListener()
{
    @Override
    public Stream.Listener onNewStream(Stream stream, HeadersFrame frame)
    {
        // Send a response after reading the request.
        MetaData.Request request = (MetaData.Request)frame.getMetaData();
        if (frame.isEndStream())
        {
            respond(stream, request);
            return null;
        }
        else
        {
            // Demand for request data.
            stream.demand();

            // Return a listener to handle the request events.
            return new Stream.Listener()
            {
                @Override
                public void onDataAvailable(Stream stream)
                {
                    Stream.Data data = stream.readData();

                    if (data == null)
                    {
                        stream.demand();
                        return;
                    }

                    // Consume the request content.
                    data.release();

                    if (data.frame().isEndStream())
                        respond(stream, request);
                    else
                        stream.demand();
                }
            };
        }
    }

    private void respond(Stream stream, MetaData.Request request)
    {
        // Prepare the response HEADERS frame.

        // The response HTTP status and HTTP headers.
        MetaData.Response response = new MetaData.Response(HttpStatus.OK_200, null, HttpVersion.HTTP_2, HttpFields.EMPTY);

        if (HttpMethod.GET.is(request.getMethod()))
        {
            // The response content.
            ByteBuffer resourceBytes = getResourceBytes(request);

            // Send the HEADERS frame with the response status and headers,
            // and a DATA frame with the response content bytes.
            stream.headers(new HeadersFrame(stream.getId(), response, null, false))
                .thenCompose(s -> s.data(new DataFrame(s.getId(), resourceBytes, true)));
        }
        else
        {
            // Send just the HEADERS frame with the response status and headers.
            stream.headers(new HeadersFrame(stream.getId(), response, null, true));
        }
    }
};
Resetting a Request
A server application may decide that it does not want to accept the request. For example, it may throttle the client because it sent too many requests in a time window, or the request is invalid (and does not deserve a proper HTTP response), etc.
A request can be reset in this way:
ServerSessionListener sessionListener = new ServerSessionListener()
{
    @Override
    public Stream.Listener onNewStream(Stream stream, HeadersFrame frame)
    {
        float requestRate = calculateRequestRate();

        if (requestRate > maxRequestRate)
        {
            stream.reset(new ResetFrame(stream.getId(), ErrorCode.REFUSED_STREAM_ERROR.code), Callback.NOOP);
            return null;
        }
        else
        {
            // The request is accepted.
            MetaData.Request request = (MetaData.Request)frame.getMetaData();
            // Return a Stream.Listener to handle the request events.
            return new Stream.Listener()
            {
                // Override callback methods for events you are interested in.
            };
        }
    }
};
HTTP/2 Push of Resources
A server application may push secondary resources related to a primary resource.
A client may inform the server that it does not accept pushed resources(see this section of the specification) via a SETTINGS frame.
Server applications must track SETTINGS frames and verify whether the client supports HTTP/2 push, and only push if the client supports it:
// The favicon bytes.
ByteBuffer faviconBuffer = BufferUtil.toBuffer(ResourceFactory.root().newResource("/path/to/favicon.ico"), true);

ServerSessionListener sessionListener = new ServerSessionListener()
{
    // By default, push is enabled.
    private boolean pushEnabled = true;

    @Override
    public void onSettings(Session session, SettingsFrame frame)
    {
        // Check whether the client sent an ENABLE_PUSH setting.
        Map<Integer, Integer> settings = frame.getSettings();
        Integer enablePush = settings.get(SettingsFrame.ENABLE_PUSH);
        if (enablePush != null)
            pushEnabled = enablePush == 1;
    }

    @Override
    public Stream.Listener onNewStream(Stream stream, HeadersFrame frame)
    {
        MetaData.Request request = (MetaData.Request)frame.getMetaData();
        if (pushEnabled && request.getHttpURI().toString().endsWith("/index.html"))
        {
            // Push the favicon.
            HttpURI pushedURI = HttpURI.build(request.getHttpURI()).path("/favicon.ico");
            MetaData.Request pushedRequest = new MetaData.Request("GET", pushedURI, HttpVersion.HTTP_2, HttpFields.EMPTY);
            PushPromiseFrame promiseFrame = new PushPromiseFrame(stream.getId(), 0, pushedRequest);
            stream.push(promiseFrame, null)
                .thenCompose(pushedStream ->
                {
                    // Send the favicon "response".
                    MetaData.Response pushedResponse = new MetaData.Response(HttpStatus.OK_200, null, HttpVersion.HTTP_2, HttpFields.EMPTY);
                    return pushedStream.headers(new HeadersFrame(pushedStream.getId(), pushedResponse, null, false))
                        .thenCompose(pushed -> pushed.data(new DataFrame(pushed.getId(), faviconBuffer.slice(), true)));
                });
        }
        // Return a Stream.Listener to handle the request events.
        return new Stream.Listener()
        {
            // Override callback methods for events you are interested in.
        };
    }
};
HTTP/3 Server Library
In the vast majority of cases, server applications should use the generic, high-level, HTTP server library that also provides HTTP/3 support via the HTTP/3 connector and ConnectionFactorys as described in details here.
The low-level HTTP/3 server library has been designed for those applications that need low-level access to HTTP/3 features such as sessions, streams and frames, and this is quite a rare use case.
See also the correspondent HTTP/3 client library.
Introduction
The Maven artifact coordinates for the HTTP/3 client library are the following:
<dependency>
  <groupId>org.eclipse.jetty.http3</groupId>
  <artifactId>jetty-http3-server</artifactId>
  <version>12.0.9-SNAPSHOT</version>
</dependency>
HTTP/3 is a multiplexed protocol because it relies on the multiplexing capabilities of QUIC, the protocol based on UDP that transports HTTP/3 frames. Thanks to multiplexing, multiple HTTP/3 requests are sent on the same QUIC connection, or session. Each request/response cycle is represented by a stream. Therefore, a single session manages multiple concurrent streams. A stream has typically a very short life compared to the session: a stream only exists for the duration of the request/response cycle and then disappears.
Server Setup
The low-level HTTP/3 support is provided by org.eclipse.jetty.http3.server.RawHTTP3ServerConnectionFactory and org.eclipse.jetty.http3.api.Session.Server.Listener:
// Create a Server instance.
Server server = new Server();

// HTTP/3 is always secure, so it always need a SslContextFactory.
SslContextFactory.Server sslContextFactory = new SslContextFactory.Server();
sslContextFactory.setKeyStorePath("/path/to/keystore");
sslContextFactory.setKeyStorePassword("secret");

// The listener for session events.
Session.Server.Listener sessionListener = new Session.Server.Listener() {};

ServerQuicConfiguration quicConfiguration = new ServerQuicConfiguration(sslContextFactory, Path.of("/path/to/pem/dir"));
// Configure the max number of requests per QUIC connection.
quicConfiguration.setMaxBidirectionalRemoteStreams(1024);

// Create and configure the RawHTTP3ServerConnectionFactory.
RawHTTP3ServerConnectionFactory http3 = new RawHTTP3ServerConnectionFactory(quicConfiguration, sessionListener);
http3.getHTTP3Configuration().setStreamIdleTimeout(15000);

// Create and configure the QuicServerConnector.
QuicServerConnector connector = new QuicServerConnector(server, quicConfiguration, http3);

// Add the Connector to the Server.
server.addConnector(connector);

// Start the Server so it starts accepting connections from clients.
server.start();
Where server applications using the high-level server library deal with HTTP requests and responses in Handlers, server applications using the low-level HTTP/3 server library deal directly with HTTP/3 sessions, streams and frames in a Session.Server.Listener implementation.
The Session.Server.Listener interface defines a number of methods that are invoked by the implementation upon the occurrence of HTTP/3 events, and that server applications can override to react to those events.
Please refer to the Session.Server.Listener javadocs for the complete list of events.
The first event is the accept event and happens when a client opens a new QUIC connection to the server and the server accepts the connection.
This is the first occasion where server applications have access to the HTTP/3 Session object:
Session.Server.Listener sessionListener = new Session.Server.Listener()
{
    @Override
    public void onAccept(Session session)
    {
        SocketAddress remoteAddress = session.getRemoteSocketAddress();
        System.getLogger("http3").log(INFO, "Connection from {0}", remoteAddress);
    }
};
After the QUIC connection has been established, both client and server send an HTTP/3 SETTINGS frame to exchange their HTTP/3 configuration.
This generates the preface event, where applications can customize the HTTP/3 settings by returning a map of settings that the implementation will send to the other peer:
Session.Server.Listener sessionListener = new Session.Server.Listener()
{
    @Override
    public Map<Long, Long> onPreface(Session session)
    {
        Map<Long, Long> settings = new HashMap<>();

        // Customize the settings

        return settings;
    }
};
Receiving a Request
Receiving an HTTP request from the client, and sending a response, creates a stream that encapsulates the exchange of HTTP/3 frames that compose the request and the response.
An HTTP request is made of a HEADERS frame, that carries the request method, the request URI and the request headers, and optional DATA frames that carry the request content.
Receiving the HEADERS frame opens the Stream:
Session.Server.Listener sessionListener = new Session.Server.Listener()
{
    @Override
    public Stream.Server.Listener onRequest(Stream.Server stream, HeadersFrame frame)
    {
        MetaData.Request request = (MetaData.Request)frame.getMetaData();

        // Return a Stream.Server.Listener to handle the request events,
        // for example request content events or a request reset.
        return new Stream.Server.Listener() {};
    }
};
Server applications should return a Stream.Server.Listener implementation from onRequest(…) to be notified of events generated by the client, such as DATA frames carrying request content, or a reset event indicating that the client wants to reset the request, or an idle timeout event indicating that the client was supposed to send more frames but it did not.
The example below shows how to receive request content:
Session.Server.Listener sessionListener = new Session.Server.Listener()
{
    @Override
    public Stream.Server.Listener onRequest(Stream.Server stream, HeadersFrame frame)
    {
        MetaData.Request request = (MetaData.Request)frame.getMetaData();

        // Demand to be called back when data is available.
        stream.demand();

        // Return a Stream.Server.Listener to handle the request content.
        return new Stream.Server.Listener()
        {
            @Override
            public void onDataAvailable(Stream.Server stream)
            {
                // Read a chunk of the request content.
                Stream.Data data = stream.readData();

                if (data == null)
                {
                    // No data available now, demand to be called back.
                    stream.demand();
                }
                else
                {
                    // Get the content buffer.
                    ByteBuffer buffer = data.getByteBuffer();

                    // Consume the buffer, here - as an example - just log it.
                    System.getLogger("http3").log(INFO, "Consuming buffer {0}", buffer);

                    // Tell the implementation that the buffer has been consumed.
                    data.release();

                    if (!data.isLast())
                    {
                        // Demand to be called back.
                        stream.demand();
                    }
                }
            }
        };
    }
};
Sending a Response
After receiving an HTTP request, a server application must send an HTTP response.
An HTTP response is typically composed of a HEADERS frame containing the HTTP status code and the response headers, and optionally one or more DATA frames containing the response content bytes.
The HTTP/3 protocol also supports response trailers (that is, headers that are sent after the response content) that also are sent using a HEADERS frame.
A server application can send a response in this way:
Session.Server.Listener sessionListener = new Session.Server.Listener()
{
    @Override
    public Stream.Server.Listener onRequest(Stream.Server stream, HeadersFrame frame)
    {
        // Send a response after reading the request.
        MetaData.Request request = (MetaData.Request)frame.getMetaData();
        if (frame.isLast())
        {
            respond(stream, request);
            return null;
        }
        else
        {
            // Demand to be called back when data is available.
            stream.demand();
            return new Stream.Server.Listener()
            {
                @Override
                public void onDataAvailable(Stream.Server stream)
                {
                    Stream.Data data = stream.readData();
                    if (data == null)
                    {
                        stream.demand();
                    }
                    else
                    {
                        // Consume the request content.
                        data.release();

                        if (data.isLast())
                            respond(stream, request);
                        else
                            stream.demand();
                    }
                }
            };
        }
    }

    private void respond(Stream.Server stream, MetaData.Request request)
    {
        // Prepare the response HEADERS frame.

        // The response HTTP status and HTTP headers.
        MetaData.Response response = new MetaData.Response(HttpStatus.OK_200, null, HttpVersion.HTTP_3, HttpFields.EMPTY);

        if (HttpMethod.GET.is(request.getMethod()))
        {
            // The response content.
            ByteBuffer resourceBytes = getResourceBytes(request);

            // Send the HEADERS frame with the response status and headers,
            // and a DATA frame with the response content bytes.
            stream.respond(new HeadersFrame(response, false))
                .thenCompose(s -> s.data(new DataFrame(resourceBytes, true)));
        }
        else
        {
            // Send just the HEADERS frame with the response status and headers.
            stream.respond(new HeadersFrame(response, true));
        }
    }
};
Resetting a Request
A server application may decide that it does not want to accept the request. For example, it may throttle the client because it sent too many requests in a time window, or the request is invalid (and does not deserve a proper HTTP response), etc.
A request can be reset in this way:
Session.Server.Listener sessionListener = new Session.Server.Listener()
{
    @Override
    public Stream.Server.Listener onRequest(Stream.Server stream, HeadersFrame frame)
    {
        float requestRate = calculateRequestRate();

        if (requestRate > maxRequestRate)
        {
            stream.reset(HTTP3ErrorCode.REQUEST_REJECTED_ERROR.code(), new RejectedExecutionException());
            return null;
        }
        else
        {
            // The request is accepted.
            MetaData.Request request = (MetaData.Request)frame.getMetaData();
            // Return a Stream.Listener to handle the request events.
            return new Stream.Server.Listener() {};
        }
    }
};
Server Compliance Modes
The Jetty server strives to keep up with the latest IETF RFCs for compliance with internet specifications, which are periodically updated.
When possible, Jetty will support backwards compatibility by providing compliance modes that can be configured to allow violations of the current specifications that may have been allowed in obsoleted specifications.
There are compliance modes provided for:
Compliance modes can be configured to allow violations from the RFC requirements, or in some cases to allow additional behaviors that Jetty has implemented in excess of the RFC (for example, to allow ambiguous URIs).
For example, the HTTP RFCs require that request HTTP methods are case sensitive, however Jetty can allow case-insensitive HTTP methods by including the HttpCompliance.Violation.CASE_INSENSITIVE_METHOD in the HttpCompliance set of allowed violations.
HTTP Compliance Modes
In 1995, when Jetty was first implemented, there were no RFC specification of HTTP, only a W3C specification for HTTP/0.9, which has since been obsoleted or augmented by:
In addition to these evolving requirements, some earlier version of Jetty did not completely or strictly implement the RFC at the time (for example, case-insensitive HTTP methods). Therefore, upgrading to a newer Jetty version may cause runtime behavior differences that may break your applications.
The HttpCompliance.Violation enumeration defines the RFC requirements that may be optionally enforced by Jetty, to support legacy deployments. These possible violations are grouped into modes by the HttpCompliance class, which also defines several named modes that support common deployed sets of violations (with the default being HttpCompliance.RFC7230).
For example:
HttpConfiguration httpConfiguration = new HttpConfiguration();
httpConfiguration.setHttpCompliance(HttpCompliance.RFC7230);
If you want to customize the violations that you want to allow, you can create your own mode using the HttpCompliance.from(String) method:
HttpConfiguration httpConfiguration = new HttpConfiguration();

// RFC7230 compliance, but allow Violation.MULTIPLE_CONTENT_LENGTHS.
HttpCompliance customHttpCompliance = HttpCompliance.from("RFC7230,MULTIPLE_CONTENT_LENGTHS");

httpConfiguration.setHttpCompliance(customHttpCompliance);
URI Compliance Modes
Universal Resource Locators (URLs) where initially formalized in 1994 in RFC 1738 and then refined in 1995 with relative URLs by RFC 1808.
In 1998, URLs were generalized to Universal Resource Identifiers (URIs) by RFC 2396, which also introduced features such a path parameters.
This was then obsoleted in 2005 by RFC 3986 which removed the definition for path parameters.
Unfortunately by this stage the existence and use of such parameters had already been codified in the Servlet specification.
For example, the relative URI /foo/bar;JSESSIONID=a8b38cd02b1c would define the path parameter JSESSIONID for the path segment bar, but the most recent RFC does not specify a formal definition of what this relative URI actually means.
The current situation is that there may be URIs that are entirely valid for RFC 3986, but are ambiguous when handled by the Servlet APIs:
-
A URI with
..and path parameters such as/some/..;/pathis not resolved by RFC 3986, since the resolution process only applies to the exact segment.., not to..;. However, once the path parameters are removed by the Servlet APIs, the resulting/some/../pathcan easily be resolved to/path, rather than be treated as a path that has..;as a segment. -
A URI such as
/some/%2e%2e/pathis not resolved by RFC 3986, yet when URL-decoded by the Servlet APIs will result in/some/../pathwhich can easily be resolved to/path, rather than be treated as a path that has..as a segment. -
A URI with empty segments like
/some//../pathmay be correctly resolved to/some/path(the..removes the previous empty segment) by the Servlet APIs. However, if the URI raw path is passed to some other APIs (for example, file system APIs) it can be interpreted as/pathbecause the empty segment//is discarded and treated as/, and the..thus removes the/somesegment.
In order to avoid ambiguous URIs, Jetty imposes additional URI requirements in excess of what is required by RFC 3986 compliance.
These additional requirements may optionally be violated and are defined by the UriCompliance.Violation enumeration.
These violations are then grouped into modes by the UriCompliance class, which also defines several named modes that support common deployed sets of violations, with the default being UriCompliance.DEFAULT.
For example:
HttpConfiguration httpConfiguration = new HttpConfiguration();
httpConfiguration.setUriCompliance(UriCompliance.RFC3986);
If you want to customize the violations that you want to allow, you can create your own mode using the UriCompliance.from(String) method:
HttpConfiguration httpConfiguration = new HttpConfiguration();

// RFC3986 compliance, but enforce Violation.AMBIGUOUS_PATH_SEPARATOR.
UriCompliance customUriCompliance = UriCompliance.from("RFC3986,-AMBIGUOUS_PATH_SEPARATOR");

httpConfiguration.setUriCompliance(customUriCompliance);
Cookie Compliance Modes
The standards for Cookies have varied greatly over time from a non-specified but de-facto standard (implemented by the first browsers), through RFC 2965 and currently to RFC 6265.
The CookieCompliance.Violation enumeration defines the RFC requirements that may be optionally enforced by Jetty when parsing the Cookie HTTP header in requests and when generating the Set-Cookie HTTP header in responses.
These violations are then grouped into modes by the CookieCompliance class, which also defines several named modes that support common deployed sets of violations, with the default being CookieCompliance.RFC6265.
For example:
HttpConfiguration httpConfiguration = new HttpConfiguration();
httpConfiguration.setRequestCookieCompliance(CookieCompliance.RFC6265);
httpConfiguration.setResponseCookieCompliance(CookieCompliance.RFC6265);
If you want to customize the violations that you want to allow, you can create your own mode using the CookieCompliance.from(String) method:
HttpConfiguration httpConfiguration = new HttpConfiguration();

// RFC6265 compliance, but enforce Violation.RESERVED_NAMES_NOT_DOLLAR_PREFIXED.
CookieCompliance customUriCompliance = CookieCompliance.from("RFC6265,-RESERVED_NAMES_NOT_DOLLAR_PREFIXED");
httpConfiguration.setRequestCookieCompliance(customUriCompliance);

httpConfiguration.setResponseCookieCompliance(CookieCompliance.RFC6265);
HTTP Session Management
Sessions are a concept within the Servlet API which allow requests to store and retrieve information across the time a user spends in an application.
Session Architecture
Jetty session support has been architected to provide a core implementation that is independent of the Servlet specification.
This allows programmers who use core Jetty - without the Servlet API - to still have classic Servlet session-like support for their Requests and Handlers.
These core classes are adapted to each of the various Servlet specification environments to deliver classic HttpSessions for Servlets,`Filter``s, etc
Full support for the session lifecycle is supported, in addition to L1 and L2 caching, and a number of pluggable options for persisting session data.
Here are some of the most important concepts that will be referred to throughout the documentation:
- SessionIdManager
-
responsible for allocation of unique session ids.
- HouseKeeper
-
responsible for orchestrating the detection and removal of expired sessions.
- SessionManager
-
responsible for managing the lifecycle of sessions.
- SessionHandler
-
an implementation of
SessionManagerthat adapts sessions to either the core or Servlet specification environment. - SessionCache
-
an L1 cache of in-use
ManagedSessionobjects - Session
-
a session consisting of
SessionDatathat can be associated with aRequest - ManagedSession
-
a
Sessionthat supports caching and lifecycle management - SessionData
-
encapsulates the attributes and metadata associated with a
Session - SessionDataStore
-
responsible for creating, persisting and reading
SessionData - CachingSessionDataStore
-
an L2 cache of
SessionData
Diagrammatically, these concepts can be represented as:
The SessionIdManager
There is a maximum of one SessionIdManager per Server instance.
Its purpose is to generate fresh, unique session ids and to coordinate the re-use of session ids amongst co-operating contexts.
The SessionIdManager is agnostic with respect to the type of clustering technology chosen.
Jetty provides a default implementation - the DefaultSessionIdManager - which should meet the needs of most users.
The DefaultSessionIdManager
A single instance of the DefaultSessionIdManager should be created and registered as a bean on the Server instance so that all SessionHandler's share the same instance.
This is done by the Jetty session module, but can be done programmatically instead.
As a fallback, when an individual SessionHandler starts up, if it does not find the SessionIdManager already present for the Server it will create and register a bean for it.
That instance will be shared by the other SessionHandlers.
The most important configuration parameter for the DefaultSessionIdManager is the workerName, which uniquely identifies the server in a cluster.
If a workerName has not been explicitly set, then the value is derived as follows:
node[JETTY_WORKER_NAME]
where JETTY_WORKER_NAME is an environment variable whose value can be an integer or string.
If the environment variable is not set, then it defaults to 0, yielding the default workerName of "node0".
It is essential to change this default if you have more than one Server.
Here is an example of explicitly setting up a DefaultSessionIdManager with a workerName of server3 in code:
Server server = new Server();
DefaultSessionIdManager idMgr = new DefaultSessionIdManager(server);
//you must set the workerName unless you set the env viable JETTY_WORKER_NAME
idMgr.setWorkerName("server3");
server.addBean(idMgr, true);
The HouseKeeper
The DefaultSessionIdManager creates a HouseKeeper, which periodically scans for, and eliminates, expired sessions (referred to as "scavenging").
The period of the scan is controlled by the setIntervalSec(int) method, defaulting to 600secs.
Setting a negative or 0 value prevents scavenging occurring.
|
The |
Here is an example of creating and configuring a HouseKeeper for the DefaultSessionIdManager in code:
Server server = new Server();
DefaultSessionIdManager idMgr = new DefaultSessionIdManager(server);
idMgr.setWorkerName("server7");
server.addBean(idMgr, true);
HouseKeeper houseKeeper = new HouseKeeper();
houseKeeper.setSessionIdManager(idMgr);
//set the frequency of scavenge cycles
houseKeeper.setIntervalSec(600L);
idMgr.setSessionHouseKeeper(houseKeeper);Implementing a Custom SessionIdManager
If the DefaultSessionIdManager does not meet your needs, you can extend it, or implement the SessionIdManager interface directly.
When implementing a SessionIdManager pay particular attention to the following:
-
the
getWorkerName()method must return a name that is unique to theServerinstance. TheworkerNamebecomes important in clustering scenarios because sessions can migrate from node to node: theworkerNameidentifies which node was last managing aSession. -
the contract of the
isIdInUse(String id)method is very specific: a session id may only be reused iff it is already in use by another context. This restriction is important to support cross-context dispatch. -
you should be very careful to ensure that the
newSessionId(HttpServletRequest request, long created)method does not return duplicate or predictable session ids.
The SessionHandler
A SessionHandler is a Handler that implements the SessionManager, and is thus responsible for the creation, maintenance and propagation of sessions.
There are SessionHandlers for both the core and the various Servlet environments.
Note that in the Servlet environments, each ServletContextHandler or WebAppContext has at most a single SessionHandler.
Both core and Servlet environment SessionHandlers can be configured programmatically.
Here are some of the most important methods that you may call to customize your session setup.
Note that in Servlet environments, some of these methods also have analogous Servlet API methods and/or analogous web.xml declarations and also equivalent context init params.
These alternatives are noted below.
- setCheckingRemoteSessionIdEncoding(boolean) [Default:false]
-
This controls whether response urls will be encoded with the session id as a path parameter when the URL is destined for a remote node.
Servlet environment alternatives:-
org.eclipse.jetty.session.CheckingRemoteSessionIdEncodingcontext init parameter
-
- setMaxInactiveInterval(int) [Default:-1]
-
This is the amount of time in seconds after which an unused session may be scavenged.
Servlet environment alternatives:-
<session-config><session-timeout/></session-config>element inweb.xml(NOTE! this element is specified in minutes but this method uses seconds). -
ServletContext.setSessionTimeout(int)where the timeout is configured in minutes.
-
- setHttpOnly(boolean) [Default:false]
-
If
true, the session cookie will not be exposed to client-side scripting code.
Servlet environment alternatives:-
SessionCookieConfig.setHttpOnly(boolean) -
<session-config><cookie-config><http-only/></cookie-config></session-config>element inweb.xml
-
- setMaxAge(int) [Default:-1]
-
This is the maximum number of seconds that the session cookie will be considered to be valid. By default, the cookie has no maximum validity time. See also refreshing the session cookie.
Servlet environment alternatives:-
ServletContext.getSessionCookieConfig().setMaxAge(int) -
org.eclipse.jetty.session.MaxAgecontext init parameter
-
- setSessionDomain(String) [Default:null]
-
This is the domain of the session cookie.
Servlet environment alternatives:-
ServletContext.getSessionCookieConfig().setDomain(String) -
<session-config><cookie-config><domain/></cookie-config></session-config>element inweb.xml -
org.eclipse.jetty.session.SessionDomaincontext init parameter
-
- setSessionPath(String) [Default:null]
-
This is used when creating a new session cookie. If nothing is configured, the context path is used instead, defaulting to
/.
Servlet environment alternatives:-
ServletContext.getSessionCookieConfig().setPath(String) -
<session-config><cookie-config><path/></cookie-config></session-config>element inweb.xml -
org.eclipse.jetty.session.SessionPathcontext init parameter
-
Statistics
Some statistics about the sessions for a context can be obtained from the SessionHandler, either by calling the methods directly or via JMX:
- getSessionsCreated()
-
This is the total number of sessions that have been created for this context since Jetty started.
- getSessionTimeMax()
-
The longest period of time a session was valid in this context before being invalidated.
- getSessionTimeMean()
-
The average period of time a session in this context was valid.
- getSessionTimeStdDev()
-
The standard deviation of the session validity times for this context.
- getSessionTimeTotal()
-
The total time that all sessions in this context have remained valid.
The SessionCache
There is one SessionCache per SessionManager, and thus one per context.
Its purpose is to provide an L1 cache of ManagedSession objects.
Having a working set of ManagedSession objects in memory allows multiple simultaneous requests for the same session (ie the same session id in the same context) to share the same ManagedSession object.
A SessionCache uses a SessionDataStore to create, read, store, and delete the SessionData associated with the ManagedSession.
There are two ways to create a SessionCache for a SessionManager:
-
allow the
SessionManagerto create one lazily at startup. TheSessionManagerlooks for aSessionCacheFactorybean on theServerto produce theSessionCacheinstance. It then looks for aSessionDataStoreFactorybean on theServerto produce aSessionDataStoreinstance to use with theSessionCache. If noSessionCacheFactoryis present, it defaults to creating aDefaultSessionCache. If noSessionDataStoreFactoryis present, it defaults to creating aNullSessionDataStore. -
pass a fully configured
SessionCacheinstance to theSessionManager. You are responsible for configuring both theSessionCacheinstance and itsSessionDataStore
More on SessionDataStores later, this section concentrates on the SessionCache and SessionCacheFactory.
The AbstractSessionCache provides most of the behaviour of SessionCaches.
If you are implementing a custom SessionCache it is strongly recommended that you extend this class because it implements the numerous subtleties of the Servlet specification.
Some of the important behaviours of SessionCaches are:
- eviction
-
By default,
ManagedSessions remain in a cache until they are expired or invalidated. If you have many or large sessions that are infrequently referenced you can use eviction to reduce the memory consumed by the cache. When a session is evicted, it is removed from the cache but it is not invalidated. If you have configured aSessionDataStorethat persists or distributes the session in some way, it will continue to exist, and can be read back in when it needs to be referenced again. The eviction strategies are:- NEVER_EVICT
-
This is the default, sessions remain in the cache until expired or invalidated.
- EVICT_ON_SESSION_EXIT
-
When the last simultaneous request for a session finishes, the session will be evicted from the cache.
- EVICT_ON_INACTIVITY
-
If a session has not been referenced for a configurable number of seconds, then it will be evicted from the cache.
- saveOnInactiveEviction
-
This controls whether a session will be persisted to the
SessionDataStoreif it is being evicted due to the EVICT_ON_INACTIVITY policy. Usually sessions are written to theSessionDataStorewhenever the last simultaneous request exits the session. However, asSessionDataStores` can be configured to skip some writes, this option ensures that the session will be written out. - saveOnCreate
-
Usually a session will be written through to the configured
SessionDataStorewhen the last request for it finishes. In the case of a freshly created session, this means that it will not be persisted until the request is fully finished. If your application uses context forwarding or including, the newly created session id will not be available in the subsequent contexts. You can enable this feature to ensure that a freshly created session is immediately persisted after creation: in this way the session id will be available for use in other contexts accessed during the same request. - removeUnloadableSessions
-
If a session becomes corrupted in the persistent store, it cannot be re-loaded into the
SessionCache. This can cause noisy log output during scavenge cycles, when the same corrupted session fails to load over and over again. To prevent his, enable this feature and theSessionCachewill ensure that if a session fails to be loaded, it will be deleted. - invalidateOnShutdown
-
Some applications want to ensure that all cached sessions are removed when the server shuts down. This option will ensure that all cached sessions are invalidated. The
AbstractSessionCachedoes not implement this behaviour, a subclass must implement the SessionCache.shutdown() method. - flushOnResponseCommit
-
This forces a "dirty" session to be written to the
SessionDataStorejust before a response is returned to the client, rather than waiting until the request is finished. A "dirty" session is one whose attributes have changed, or it has been freshly created. Using this option ensures that all subsequent requests - either to the same or a different node - will see the latest changes to the session.
Jetty provides two SessionCache implementations: the DefaultSessionCache and the NullSessionCache.
The DefaultSessionCache
The DefaultSessionCache retains ManagedSession objects in memory in a ConcurrentHashMap.
It is suitable for non-clustered and clustered deployments.
For clustered deployments, a sticky load balancer is strongly recommended, otherwise you risk indeterminate session state as the session bounces around multiple nodes.
It implements the SessionCache.shutdown() method.
It also provides some statistics on sessions, which are convenient to access either directly in code or remotely via JMX:
- current sessions
-
The DefaultSessionCache.getSessionsCurrent() method reports the number of sessions in the cache at the time of the method call.
- max sessions
-
The DefaultSessionCache.getSessionsMax() method reports the highest number of sessions in the cache at the time of the method call.
- total sessions
-
The DefaultSessionCache.getSessionsTotal() method reports the cumulative total of the number of sessions in the cache at the time of the method call.
If you create a DefaultSessionFactory and register it as a Server bean, a SessionManger will be able to lazily create a DefaultSessionCache.
The DefaultSessionCacheFactory has all of the same configuration setters as a DefaultSessionCache.
Alternatively, if you only have a single SessionManager, or you need to configure a DefaultSessionCache differently for every SessionManager, then you could dispense with the DefaultSessionCacheFactory and simply instantiate, configure, and pass in the DefaultSessionCache yourself.
Server server = new Server();
DefaultSessionCacheFactory cacheFactory = new DefaultSessionCacheFactory();
//EVICT_ON_INACTIVE: evict a session after 60sec inactivity
cacheFactory.setEvictionPolicy(60);
//Only useful with the EVICT_ON_INACTIVE policy
cacheFactory.setSaveOnInactiveEviction(true);
cacheFactory.setFlushOnResponseCommit(true);
cacheFactory.setInvalidateOnShutdown(false);
cacheFactory.setRemoveUnloadableSessions(true);
cacheFactory.setSaveOnCreate(true);
//Add the factory as a bean to the server, now whenever a
//SessionManager starts it will consult the bean to create a new DefaultSessionCache
server.addBean(cacheFactory);
If you don’t configure any SessionCache or SessionCacheFactory, a SessionManager will automatically create its own DefaultSessionCache.
|
The NullSessionCache
The NullSessionCache does not actually cache any objects: each request uses a fresh ManagedSession object.
It is suitable for clustered deployments without a sticky load balancer and non-clustered deployments when purely minimal support for sessions is needed.
As no sessions are actually cached, of course functions like invalidateOnShutdown and all of the eviction strategies have no meaning for the NullSessionCache.
There is a NullSessionCacheFactory which you can instantiate, configure and set as a Server bean to enable a SessionManager to automatically create new NullSessionCaches as needed.
All of the same configuration options are available on the NullSessionCacheFactory as the NullSessionCache itself.
Alternatively, if you only have a single SessionManager, or you need to configure a NullSessionCache differently for every SessionManager, then you could dispense with the NullSessionCacheFactory and simply instantiate, configure, and pass in the NullSessionCache yourself.
Server server = new Server();
NullSessionCacheFactory cacheFactory = new NullSessionCacheFactory();
cacheFactory.setFlushOnResponseCommit(true);
cacheFactory.setRemoveUnloadableSessions(true);
cacheFactory.setSaveOnCreate(true);
//Add the factory as a bean to the server, now whenever a
//SessionManager starts it will consult the bean to create a new NullSessionCache
server.addBean(cacheFactory);Implementing a custom SessionCache
As previously mentioned, it is strongly recommended that you extend the AbstractSessionCache.
Heterogeneous caching
Using one of the SessionCacheFactorys will ensure that every time a SessionManager starts it will create a new instance of the corresponding type of SessionCache.
But, what if you deploy multiple webapps, and for one of them, you don’t want to use sessions?
Or alternatively, you don’t want to use sessions, but you have one webapp that now needs them?
In that case, you can configure the SessionCacheFactory appropriate to the majority, and then specifically create the right type of SessionCache for the others.
Here’s an example where we configure the DefaultSessionCacheFactory to handle most webapps, but then specifically use a NullSessionCache for another:
Server server = new Server();
DefaultSessionCacheFactory cacheFactory = new DefaultSessionCacheFactory();
//NEVER_EVICT
cacheFactory.setEvictionPolicy(SessionCache.NEVER_EVICT);
cacheFactory.setFlushOnResponseCommit(true);
cacheFactory.setInvalidateOnShutdown(false);
cacheFactory.setRemoveUnloadableSessions(true);
cacheFactory.setSaveOnCreate(true);
//Add the factory as a bean to the server, now whenever a
//SessionManager starts it will consult the bean to create a new DefaultSessionCache
server.addBean(cacheFactory);
ContextHandlerCollection contexts = new ContextHandlerCollection();
server.setHandler(contexts);
//Add a webapp that will use a DefaultSessionCache via the DefaultSessionCacheFactory
WebAppContext app1 = new WebAppContext();
app1.setContextPath("/app1");
contexts.addHandler(app1);
//Add a webapp that uses an explicit NullSessionCache instead
WebAppContext app2 = new WebAppContext();
app2.setContextPath("/app2");
NullSessionCache nullSessionCache = new NullSessionCache(app2.getSessionHandler());
nullSessionCache.setFlushOnResponseCommit(true);
nullSessionCache.setRemoveUnloadableSessions(true);
nullSessionCache.setSaveOnCreate(true);
//If we pass an existing SessionCache instance to the SessionHandler, it must be
//fully configured: this means we must also provide SessionDataStore
nullSessionCache.setSessionDataStore(new NullSessionDataStore());
app2.getSessionHandler().setSessionCache(nullSessionCache);The SessionDataStore
A SessionDataStore mediates the storage, retrieval and deletion of SessionData.
There is one SessionDataStore per SessionCache and thus one per context.
Jetty provides a number of alternative SessionDataStore implementations:
- NullSessionDataStore
-
Does not store
SessionData, meaning that sessions will exist in-memory only. See NullSessionDataStore - FileSessionDataStore
-
Uses the file system to persist
SessionData. See FileSessionDataStore for more information. - GCloudSessionDataStore
-
Uses GCloud Datastore for persisting
SessionData. See GCloudSessionDataStore for more information. - HazelcastSessionDataStore
-
Uses Hazelcast for persisting
SessionData. - InfinispanSessionDataStore
-
Uses Infinispan for persisting
SessionData. See InfinispanSessionDataStore for more information. - JDBCSessionDataStore
-
Uses a relational database via JDBC API to persist
SessionData. See JDBCSessionDataStore for more information. - MongoSessionDataStore
-
Uses MongoDB document database to persist
SessionData. See MongoSessionDataStore for more information. - CachingSessionDataStore
-
Uses memcached to provide an L2 cache of
SessionDatawhile delegating to anotherSessionDataStorefor persistence ofSessionData. See CachingSessionDataStore for more information.
Most of the behaviour common to SessionDataStores is provided by the AbstractSessionDataStore class.
You are strongly encouraged to use this as the base class for implementing your custom SessionDataStore.
Some important methods are:
- isPassivating()
-
Boolean. "True" means that session data is serialized. Some persistence mechanisms serialize, such as JDBC, GCloud Datastore etc. Others can store an object in shared memory, e.g. Infinispan and thus don’t serialize session data. In Servlet environments, whether a
SessionDataStorereports that it is capable of passivating controls whetherHttpSessionActivationListeners will be called. When implementing a customSessionDataStoreyou need to decide whether you will support passivation or not.
- setSavePeriodSec(int) [Default:0]
-
This is an interval defined in seconds. It is used to reduce the frequency with which
SessionDatais written. Normally, whenever the last concurrent request leaves aSession, theSessionDatafor thatSessionis always persisted, even if the only thing that changed is thelastAccessTime. If thesavePeriodSecis non-zero, theSessionDatawill not be persisted if no session attributes changed, unless the time since the last save exceeds thesavePeriod. Setting a non-zero value can reduce the load on the persistence mechanism, but in a clustered environment runs the risk that other nodes will see the session as expired because it has not been persisted sufficiently recently. - setGracePeriodSec(int) [Default:3600]
-
The
gracePeriodis an interval defined in seconds. It is an attempt to deal with the non-transactional nature of sessions with regard to finding sessions that have expired. In a clustered configuration - even with a sticky load balancer - it is always possible that a session is "live" on a node but not yet updated in the persistent store. This means that it can be hard to determine at any given moment whether a clustered session has truly expired. Thus, we use thegracePeriodto provide a bit of leeway around the moment of expiry during scavenging:-
on every scavenge cycle an
AbstractSessionDataStoresearches for sessions that belong to the context that expired at least onegracePeriodago -
infrequently the
AbstractSessionDataStoresearches for and summarily deletes sessions - from any context - that expired at least 10gracePeriods ago
-
Custom SessionDataStores
When implementing a SessionDataStore for a particular persistence technology, you should base it off the AbstractSessionDataStore class.
Firstly, it is important to understand the components of a unique key for a session suitable for storing in a persistence mechanism. Consider that although multiple contexts may share the same session id (ie cross-context dispatch), the data in those sessions must be distinct. Therefore, when storing session data in a persistence mechanism that is shared by many nodes in a cluster, the session must be identified by a combination of the id and the context.
The SessionDataStores use the following information to synthesize a unique key for session data that is suitable to the particular persistence mechanism :
- id
-
This is the id as generated by the
SessionIdManager - context
-
The path of the context associated with the session.
- virtual host
-
The first virtual host - if any - associated with the context.
The SessionContext class, of which every AbstractSessionDataStore has an instance, will provide these components to you in a canonicalized form.
Then you will need to implement the following methods:
- public boolean doExists(String id)
-
Check if data for the given session exists in your persistence mechanism. The id is always relative to the context, see above.
- public void doStore(String id, SessionData data, long lastSaveTime)
-
Store the session data into your persistence mechanism. The id is always relative to the context, see above.
- public SessionData doLoad(String id)
-
Load the session from your persistent mechanism. The id is always relative to the context, see above.
- public Set<String> doCheckExpired(Set<String> candidates, long time)
-
Verify which of the suggested session ids have expired since the time given, according to the data stored in your persistence mechanism. This is used during scavenging to ensure that a session that is a candidate for expiry according to this node is not in-use on another node. The sessions matching these ids will be loaded as
ManagedSessions and have their normal expiration lifecycle events invoked. The id is always relative to the context, see above. - public Set<String> doGetExpired(long before)
-
Find the ids of sessions that expired at or before the time given. The sessions matching these ids will be loaded as
ManagedSessions and have their normal expiration lifecycle events invoked. The id is always relative to the context, see above. - public void doCleanOrphans(long time)
-
Find the ids of sessions that expired at or before the given time, independent of the context they are in. The purpose is to find sessions that are no longer being managed by any node. These sessions may even belong to contexts that no longer exist. Thus, any such sessions must be summarily deleted from the persistence mechanism and cannot have their normal expiration lifecycle events invoked.
The SessionDataStoreFactory
Every SessionDataStore has a factory class that creates instances based on common configuration.
All SessionDataStoreFactory implementations support configuring:
- setSavePeriodSec(int)
- setGracePeriodSec(int)
The NullSessionDataStore
The NullSessionDataStore is a trivial implementation of SessionDataStore that does not persist SessionData.
Use it when you want your sessions to remain in memory only.
Be careful of your SessionCache when using the NullSessionDataStore:
-
if using a
NullSessionCachethen your sessions are neither shared nor saved -
if using a
DefaultSessionCachewith eviction settings, your session will cease to exist when it is evicted from the cache
If you have not configured any other SessionDataStore, when a SessionHandler aka AbstractSessionManager starts up, it will instantiate a NullSessionDataStore.
The FileSessionDataStore
The FileSessionDataStore supports persistent storage of session data in a filesystem.
| Persisting sessions to the local file system should never be used in a clustered environment. |
One file represents one session in one context.
File names follow this pattern:
[expiry]_[contextpath]_[virtualhost]_[id]
- expiry
-
This is the expiry time in milliseconds since the epoch.
- contextpath
-
This is the context path with any special characters, including
/, replaced by theunderscore character. For example, a context path of/catalogwould become_catalog. A context path of simply/becomes just_. - virtualhost
-
This is the first virtual host associated with the context and has the form of 4 digits separated by
.characters. If there are no virtual hosts associated with a context, then0.0.0.0is used:[digit].[digit].[digit].[digit]
- id
-
This is the unique id of the session.
Putting all of the above together as an example, a session with an id of node0ek3vx7x2y1e7pmi3z00uqj1k0 for the context with path /test with no virtual hosts and an expiry of 1599558193150 would have a file name of:
1599558193150__test_0.0.0.0_node0ek3vx7x2y1e7pmi3z00uqj1k0
You can configure either a FileSessionDataStore individually, or a FileSessionDataStoreFactory if you want multiple SessionHandlers to use FileSessionDataStores that are identically configured.
The configuration methods are:
- setStoreDir(File) [Default:null]
-
This is the location for storage of session files. If the directory does not exist at startup, it will be created. If you use the same
storeDirfor multipleSessionHandlers, then the sessions for all of those contexts are stored in the same directory. This is not a problem, as the name of the file is unique because it contains the context information. You must supply a value for this, otherwise startup of theFileSessionDataStorewill fail. - deleteUnrestorableFiles(boolean) [Default:false]
-
If set to
true, unreadable files will be deleted. This is useful to prevent repeated logging of the same error when the scavenger periodically (re-)attempts to load the corrupted information for a session in order to expire it. - setSavePeriodSec(int) [Default:0]
-
This is an interval defined in seconds. It is used to reduce the frequency with which
SessionDatais written. Normally, whenever the last concurrent request leaves aSession, theSessionDatafor thatSessionis always persisted, even if the only thing that changed is thelastAccessTime. If thesavePeriodSecis non-zero, theSessionDatawill not be persisted if no session attributes changed, unless the time since the last save exceeds thesavePeriod. Setting a non-zero value can reduce the load on the persistence mechanism, but in a clustered environment runs the risk that other nodes will see the session as expired because it has not been persisted sufficiently recently. - setGracePeriodSec(int) [Default:3600]
-
The
gracePeriodis an interval defined in seconds. It is an attempt to deal with the non-transactional nature of sessions with regard to finding sessions that have expired. In a clustered configuration - even with a sticky load balancer - it is always possible that a session is "live" on a node but not yet updated in the persistent store. This means that it can be hard to determine at any given moment whether a clustered session has truly expired. Thus, we use thegracePeriodto provide a bit of leeway around the moment of expiry during scavenging:-
on every scavenge cycle an
AbstractSessionDataStoresearches for sessions that belong to the context that expired at least onegracePeriodago -
infrequently the
AbstractSessionDataStoresearches for and summarily deletes sessions - from any context - that expired at least 10gracePeriods ago
-
Here’s an example of configuring a FileSessionDataStoreFactory:
Server server = new Server();
//First lets configure a DefaultSessionCacheFactory
DefaultSessionCacheFactory cacheFactory = new DefaultSessionCacheFactory();
//NEVER_EVICT
cacheFactory.setEvictionPolicy(SessionCache.NEVER_EVICT);
cacheFactory.setFlushOnResponseCommit(true);
cacheFactory.setInvalidateOnShutdown(false);
cacheFactory.setRemoveUnloadableSessions(true);
cacheFactory.setSaveOnCreate(true);
//Add the factory as a bean to the server, now whenever a
//SessionManager starts it will consult the bean to create a new DefaultSessionCache
server.addBean(cacheFactory);
//Now, lets configure a FileSessionDataStoreFactory
FileSessionDataStoreFactory storeFactory = new FileSessionDataStoreFactory();
storeFactory.setStoreDir(new File("/tmp/sessions"));
storeFactory.setGracePeriodSec(3600);
storeFactory.setSavePeriodSec(0);
//Add the factory as a bean on the server, now whenever a
//SessionManager starts, it will consult the bean to create a new FileSessionDataStore
//for use by the DefaultSessionCache
server.addBean(storeFactory);Here’s an alternate example, configuring a FileSessionDataStore directly:
//create a context
WebAppContext app1 = new WebAppContext();
app1.setContextPath("/app1");
//First, we create a DefaultSessionCache
DefaultSessionCache cache = new DefaultSessionCache(app1.getSessionHandler());
cache.setEvictionPolicy(SessionCache.NEVER_EVICT);
cache.setFlushOnResponseCommit(true);
cache.setInvalidateOnShutdown(false);
cache.setRemoveUnloadableSessions(true);
cache.setSaveOnCreate(true);
//Now, we configure a FileSessionDataStore
FileSessionDataStore store = new FileSessionDataStore();
store.setStoreDir(new File("/tmp/sessions"));
store.setGracePeriodSec(3600);
store.setSavePeriodSec(0);
//Tell the cache to use the store
cache.setSessionDataStore(store);
//Tell the context to use the cache/store combination
app1.getSessionHandler().setSessionCache(cache);The JDBCSessionDataStore
The JDBCSessionDataStore supports persistent storage of session data in a relational database.
To do that, it requires a DatabaseAdaptor that handles the differences between databases (eg Oracle, Postgres etc), and a SessionTableSchema that allows for the customization of table and column names.
The JDBCSessionDataStore and corresponding JDBCSessionDataStoreFactory support the following configuration:
- setSavePeriodSec(int) [Default:0]
-
This is an interval defined in seconds. It is used to reduce the frequency with which
SessionDatais written. Normally, whenever the last concurrent request leaves aSession, theSessionDatafor thatSessionis always persisted, even if the only thing that changed is thelastAccessTime. If thesavePeriodSecis non-zero, theSessionDatawill not be persisted if no session attributes changed, unless the time since the last save exceeds thesavePeriod. Setting a non-zero value can reduce the load on the persistence mechanism, but in a clustered environment runs the risk that other nodes will see the session as expired because it has not been persisted sufficiently recently. - setGracePeriodSec(int) [Default:3600]
-
The
gracePeriodis an interval defined in seconds. It is an attempt to deal with the non-transactional nature of sessions with regard to finding sessions that have expired. In a clustered configuration - even with a sticky load balancer - it is always possible that a session is "live" on a node but not yet updated in the persistent store. This means that it can be hard to determine at any given moment whether a clustered session has truly expired. Thus, we use thegracePeriodto provide a bit of leeway around the moment of expiry during scavenging:-
on every scavenge cycle an
AbstractSessionDataStoresearches for sessions that belong to the context that expired at least onegracePeriodago -
infrequently the
AbstractSessionDataStoresearches for and summarily deletes sessions - from any context - that expired at least 10gracePeriods ago
-
- setDatabaseAdaptor(DatabaseAdaptor)
-
A
JDBCSessionDataStorerequires aDatabaseAdapter, otherwise anExceptionis thrown at start time. - setSessionTableSchema(SessionTableSchema)
-
If a
SessionTableSchemahas not been explicitly set, one with all values defaulted is created at start time.
The DatabaseAdaptor
Many databases use different keywords for types such as long, blob and varchar.
Jetty will detect the type of the database at runtime by interrogating the metadata associated with a database connection.
Based on that metadata Jetty will try to select that database’s preferred keywords.
However, you may need to instead explicitly configure these as described below.
- setDatasource(String)
- setDatasource(Datasource)
-
Either the JNDI name of a
Datasourceto look up, or theDatasourceitself. Alternatively you can set the driverInfo, see below.
DatabaseAdaptor datasourceAdaptor = new DatabaseAdaptor();
datasourceAdaptor.setDatasourceName("/jdbc/myDS");- setDriverInfo(String, String)
- setDriverInfo(Driver, String)
-
This is the name or instance of a
Driverclass and a connection URL. Alternatively you can set the datasource, see above.
DatabaseAdaptor driverAdaptor = new DatabaseAdaptor();
driverAdaptor.setDriverInfo("com.mysql.jdbc.Driver", "jdbc:mysql://127.0.0.1:3306/sessions?user=sessionsadmin");- setBlobType(String) [Default: "blob" or "bytea" for Postgres]
-
The type name used to represent "blobs" by the database.
- setLongType(String) [Default: "bigint" or "number(20)" for Oracle]
-
The type name used to represent large integers by the database.
- setStringType(String) [Default: "varchar"]
-
The type name used to represent character data by the database.
The SessionTableSchema
SessionData is stored in a table with one row per session.
This is the definition of the table with the table name, column names, and type keywords all at their default settings:
| sessionId | contextPath | virtualHost | lastNode | accessTime | lastAccessTime | createTime | cookieTime | lastSavedTime | expiryTime | maxInterval | map |
|---|---|---|---|---|---|---|---|---|---|---|---|
120 varchar |
60 varchar |
60 varchar |
60 varchar |
long |
long |
long |
long |
long |
long |
long |
blob |
Use the SessionTableSchema class to customize these names.
- setSchemaName(String), setCatalogName(String) [Default: null]
-
The exact meaning of these two are dependent on your database vendor, but can broadly be described as further scoping for the session table name. See https://en.wikipedia.org/wiki/Database_schema and https://en.wikipedia.org/wiki/Database_catalog. These extra scoping names come into play at startup time when Jetty determines if the session table already exists, or creates it on-the-fly. If your database is not using schema or catalog name scoping, leave these unset. If your database is configured with a schema or catalog name, use the special value "INFERRED" and Jetty will extract them from the database metadata. Alternatively, set them explicitly using these methods.
- setTableName(String) [Default:"JettySessions"]
-
This is the name of the table in which session data is stored.
- setAccessTimeColumn(String) [Default: "accessTime"]
-
This is the name of the column that stores the time - in ms since the epoch - at which a session was last accessed
- setContextPathColumn(String) [Default: "contextPath"]
-
This is the name of the column that stores the
contextPathof a session. - setCookieTimeColumn(String) [Default: "cookieTime"]
-
This is the name of the column that stores the time - in ms since the epoch - that the cookie was last set for a session.
- setCreateTimeColumn(String) [Default: "createTime"]
-
This is the name of the column that stores the time - in ms since the epoch - at which a session was created.
- setExpiryTimeColumn(String) [Default: "expiryTime"]
-
This is name of the column that stores - in ms since the epoch - the time at which a session will expire.
- setLastAccessTimeColumn(String) [Default: "lastAccessTime"]
-
This is the name of the column that stores the time - in ms since the epoch - that a session was previously accessed.
- setLastSavedTimeColumn(String) [Default: "lastSavedTime"]
-
This is the name of the column that stores the time - in ms since the epoch - at which a session was last written.
- setIdColumn(String) [Default: "sessionId"]
-
This is the name of the column that stores the id of a session.
- setLastNodeColumn(String) [Default: "lastNode"]
-
This is the name of the column that stores the
workerNameof the last node to write a session. - setVirtualHostColumn(String) [Default: "virtualHost"]
-
This is the name of the column that stores the first virtual host of the context of a session.
- setMaxIntervalColumn(String) [Default: "maxInterval"]
-
This is the name of the column that stores the interval - in ms - during which a session can be idle before being considered expired.
- setMapColumn(String) [Default: "map"]
-
This is the name of the column that stores the serialized attributes of a session.
The MongoSessionDataStore
The MongoSessionDataStore supports persistence of SessionData in a nosql database.
The best description for the document model for session information is found in the javadoc for the MongoSessionDataStore. In overview, it can be represented thus:

The database contains a document collection for the sessions.
Each document represents a session id, and contains one nested document per context in which that session id is used.
For example, the session id abcd12345 might be used by two contexts, one with path /contextA and one with path /contextB.
In that case, the outermost document would refer to abcd12345 and it would have a nested document for /contextA containing the session attributes for that context, and another nested document for /contextB containing the session attributes for that context.
Remember, according to the Servlet Specification, a session id can be shared by many contexts, but the attributes must be unique per context.
The outermost document contains these fields:
- id
-
The session id.
- created
-
The time (in ms since the epoch) at which the session was first created in any context.
- maxIdle
-
The time (in ms) for which an idle session is regarded as valid. As maxIdle times can be different for
Sessions from different contexts, this is the shortest maxIdle time. - expiry
-
The time (in ms since the epoch) at which the session will expire. As the expiry time can be different for
Sessions from different contexts, this is the shortest expiry time.
Each nested context-specific document contains:
- attributes
-
The session attributes as a serialized map.
- lastSaved
-
The time (in ms since the epoch) at which the session in this context was saved.
- lastAccessed
-
The time (in ms since the epoch) at which the session in this context was previously accessed.
- accessed
-
The time (in ms since the epoch) at which this session was most recently accessed.
- lastNode
-
The workerName of the last server that saved the session data.
- version
-
An object that is updated every time a session is written for a context.
You can configure either a MongoSessionDataStore individually, or a MongoSessionDataStoreFactory if you want multiple SessionHandlers to use MongoSessionDataStores that are identically configured.
The configuration methods for the MongoSessionDataStoreFactory are:
- setSavePeriodSec(int) [Default:0]
-
This is an interval defined in seconds. It is used to reduce the frequency with which
SessionDatais written. Normally, whenever the last concurrent request leaves aSession, theSessionDatafor thatSessionis always persisted, even if the only thing that changed is thelastAccessTime. If thesavePeriodSecis non-zero, theSessionDatawill not be persisted if no session attributes changed, unless the time since the last save exceeds thesavePeriod. Setting a non-zero value can reduce the load on the persistence mechanism, but in a clustered environment runs the risk that other nodes will see the session as expired because it has not been persisted sufficiently recently. - setGracePeriodSec(int) [Default:3600]
-
The
gracePeriodis an interval defined in seconds. It is an attempt to deal with the non-transactional nature of sessions with regard to finding sessions that have expired. In a clustered configuration - even with a sticky load balancer - it is always possible that a session is "live" on a node but not yet updated in the persistent store. This means that it can be hard to determine at any given moment whether a clustered session has truly expired. Thus, we use thegracePeriodto provide a bit of leeway around the moment of expiry during scavenging:-
on every scavenge cycle an
AbstractSessionDataStoresearches for sessions that belong to the context that expired at least onegracePeriodago -
infrequently the
AbstractSessionDataStoresearches for and summarily deletes sessions - from any context - that expired at least 10gracePeriods ago
-
- setDbName(String)
-
This is the name of the database.
- setCollectionName(String)
-
The name of the document collection.
- setConnectionString(String)
-
a mongodb url, eg "mongodb://localhost". Alternatively, you can specify the host,port combination instead, see below.
- setHost(String)
- setPort(int)
-
the hostname and port number of the mongodb instance to contact. Alternatively, you can specify the connectionString instead, see above.
This is an example of configuring a MongoSessionDataStoreFactory:
Server server = new Server();
MongoSessionDataStoreFactory mongoSessionDataStoreFactory = new MongoSessionDataStoreFactory();
mongoSessionDataStoreFactory.setGracePeriodSec(3600);
mongoSessionDataStoreFactory.setSavePeriodSec(0);
mongoSessionDataStoreFactory.setDbName("HttpSessions");
mongoSessionDataStoreFactory.setCollectionName("JettySessions");
// Either set the connectionString
mongoSessionDataStoreFactory.setConnectionString("mongodb:://localhost:27017");
// or alternatively set the host and port.
mongoSessionDataStoreFactory.setHost("localhost");
mongoSessionDataStoreFactory.setPort(27017);The InfinispanSessionDataStore
The InfinispanSessionDataStore supports persistent storage of session data via the Infinispan data grid.
You may use Infinispan in either embedded mode, where it runs in the same process as Jetty, or in remote mode mode, where your Infinispan instance is on another node.
For more information on Infinispan, including some code examples, consult the Infinispan documentation.
See below for some code examples of configuring the InfinispanSessionDataStore in Jetty.
Note that the configuration options are the same for both the InfinispanSessionDataStore and the InfinispanSessionDataStoreFactory.
Use the latter to apply the same configuration to multiple InfinispanSessionDataStores.
- setSavePeriodSec(int) [Default:0]
-
This is an interval defined in seconds. It is used to reduce the frequency with which
SessionDatais written. Normally, whenever the last concurrent request leaves aSession, theSessionDatafor thatSessionis always persisted, even if the only thing that changed is thelastAccessTime. If thesavePeriodSecis non-zero, theSessionDatawill not be persisted if no session attributes changed, unless the time since the last save exceeds thesavePeriod. Setting a non-zero value can reduce the load on the persistence mechanism, but in a clustered environment runs the risk that other nodes will see the session as expired because it has not been persisted sufficiently recently. - setGracePeriodSec(int) [Default:3600]
-
The
gracePeriodis an interval defined in seconds. It is an attempt to deal with the non-transactional nature of sessions with regard to finding sessions that have expired. In a clustered configuration - even with a sticky load balancer - it is always possible that a session is "live" on a node but not yet updated in the persistent store. This means that it can be hard to determine at any given moment whether a clustered session has truly expired. Thus, we use thegracePeriodto provide a bit of leeway around the moment of expiry during scavenging:-
on every scavenge cycle an
AbstractSessionDataStoresearches for sessions that belong to the context that expired at least onegracePeriodago -
infrequently the
AbstractSessionDataStoresearches for and summarily deletes sessions - from any context - that expired at least 10gracePeriods ago
-
- setCache(BasicCache<String, InfinispanSessionData> cache)
-
Infinispan uses a cache API as the interface to the data grid and this method configures Jetty with the cache instance. This cache can be either an embedded cache - also called a "local" cache in Infinispan parlance - or a remote cache.
- setSerialization(boolean) [Default: false]
-
When the
InfinispanSessionDataStorestarts, if it detects the Infinispan classes for remote caches on the classpath, it will automatically assumeserializationis true, and thus thatSessionDatawill be serialized over-the-wire to a remote cache. You can use this parameter to override this. If this parameter istrue, theInfinispanSessionDataStorereturns true for theisPassivating()method, but false otherwise. - setInfinispanIdleTimeoutSec(int) [Default: 0]
-
This controls the Infinispan option whereby it can detect and delete entries that have not been referenced for a configurable amount of time. A value of 0 disables it.
| If you use this option, expired sessions will be summarily deleted from Infinispan without the normal session invalidation handling (eg calling of lifecycle listeners). Only use this option if you do not have session lifecycle listeners that must be called when a session is invalidated. |
- setQueryManager(QueryManager)
-
If this parameter is not set, the
InfinispanSessionDataStorewill be unable to scavenge for unused sessions. In that case, you can use theinfinispanIdleTimeoutSecoption instead to prevent the accumulation of expired sessions. When using Infinispan in embedded mode, configure the EmbeddedQueryManager to enable Jetty to query for expired sessions so that they may be property invalidated and lifecycle listeners called. When using Infinispan in remote mode, configure the RemoteQueryManager instead.
Here is an example of configuring an InfinispanSessionDataStore in code using an embedded cache:
/* Create a core SessionHandler
* Alternatively in a Servlet Environment do:
* WebAppContext webapp = new WebAppContext();
* SessionHandler sessionHandler = webapp.getSessionHandler();
*/
SessionHandler sessionHandler = new SessionHandler();
//Use an Infinispan local cache configured via an infinispan xml file
DefaultCacheManager defaultCacheManager = new DefaultCacheManager("path/to/infinispan.xml");
Cache<String, InfinispanSessionData> localCache = defaultCacheManager.getCache();
//Configure the Jetty session datastore with Infinispan
InfinispanSessionDataStore infinispanSessionDataStore = new InfinispanSessionDataStore();
infinispanSessionDataStore.setCache(localCache);
infinispanSessionDataStore.setSerialization(false); //local cache does not serialize session data
infinispanSessionDataStore.setInfinispanIdleTimeoutSec(0); //do not use infinispan auto delete of unused sessions
infinispanSessionDataStore.setQueryManager(new org.eclipse.jetty.session.infinispan.EmbeddedQueryManager(localCache)); //enable Jetty session scavenging
infinispanSessionDataStore.setGracePeriodSec(3600);
infinispanSessionDataStore.setSavePeriodSec(0);
//Configure a SessionHandler to use the local Infinispan cache as a store of SessionData
DefaultSessionCache sessionCache = new DefaultSessionCache(sessionHandler);
sessionCache.setSessionDataStore(infinispanSessionDataStore);
sessionHandler.setSessionCache(sessionCache);Here is an example of configuring an InfinispanSessionDataStore in code using a remote cache:
/* Create a core SessionHandler
* Alternatively in a Servlet Environment do:
* WebAppContext webapp = new WebAppContext();
* SessionHandler sessionHandler = webapp.getSessionHandler();
*/
SessionHandler sessionHandler = new SessionHandler();
//Configure Infinispan to provide a remote cache called "JettySessions"
Properties hotrodProperties = new Properties();
hotrodProperties.load(new FileInputStream("/path/to/hotrod-client.properties"));
org.infinispan.client.hotrod.configuration.ConfigurationBuilder configurationBuilder = new ConfigurationBuilder();
configurationBuilder.withProperties(hotrodProperties);
configurationBuilder.marshaller(new ProtoStreamMarshaller());
configurationBuilder.addContextInitializer(new org.eclipse.jetty.session.infinispan.InfinispanSerializationContextInitializer());
org.infinispan.client.hotrod.RemoteCacheManager remoteCacheManager = new RemoteCacheManager(configurationBuilder.build());
RemoteCache<String, InfinispanSessionData> remoteCache = remoteCacheManager.getCache("JettySessions");
//Configure the Jetty session datastore with Infinispan
InfinispanSessionDataStore infinispanSessionDataStore = new InfinispanSessionDataStore();
infinispanSessionDataStore.setCache(remoteCache);
infinispanSessionDataStore.setSerialization(true); //remote cache serializes session data
infinispanSessionDataStore.setInfinispanIdleTimeoutSec(0); //do not use infinispan auto delete of unused sessions
infinispanSessionDataStore.setQueryManager(new org.eclipse.jetty.session.infinispan.RemoteQueryManager(remoteCache)); //enable Jetty session scavenging
infinispanSessionDataStore.setGracePeriodSec(3600);
infinispanSessionDataStore.setSavePeriodSec(0);
//Configure a SessionHandler to use a remote Infinispan cache as a store of SessionData
DefaultSessionCache sessionCache = new DefaultSessionCache(sessionHandler);
sessionCache.setSessionDataStore(infinispanSessionDataStore);
sessionHandler.setSessionCache(sessionCache);The GCloudSessionDataStore
The GCloudSessionDataStore supports persistent storage of session data into Google Cloud DataStore.
Preparation
You will first need to create a project and enable the Google Cloud API: https://cloud.google.com/docs/authentication#preparation.
Take note of the project id that you create in this step as you need to supply it in later steps.
You can choose to use Jetty either inside or outside of Google infrastructure.
-
Outside of Google infrastructure
Before running Jetty, you will need to choose one of the following methods to set up the local environment to enable remote GCloud DataStore communications:
-
Using the GCloud SDK
-
Ensure you have the GCloud SDK installed: https://cloud.google.com/sdk/?hl=en
-
Use the GCloud tool to set up the project you created in the preparation step:
gcloud config set project PROJECT_ID -
Use the GCloud tool to authenticate a Google account associated with the project created in the preparation step:
gcloud auth login ACCOUNT
-
-
Using environment variables
-
Define the environment variable
GCLOUD_PROJECTwith the project id you created in the preparation step. -
Generate a JSON service account key and then define the environment variable
GOOGLE_APPLICATION_CREDENTIALS=/path/to/my/key.json
-
-
-
Inside of Google infrastructure
The Google deployment tools will automatically configure the project and authentication information for you.
Jetty GCloud session support provides some indexes as optimizations that can speed up session searches.
This will particularly benefit session scavenging, although it may make write operations slower.
By default, indexes will not be used.
You will see a log WARNING message informing you about the absence of indexes:
WARN: Session indexes not uploaded, falling back to less efficient queries
In order to use them, you will need to manually upload the file to GCloud that defines the indexes.
This file is named index.yaml and you can find it in your distribution in $JETTY_BASE/etc/sessions/gcloud/index.yaml.
Follow the instructions here to upload the pre-generated index.yaml file.
Configuration
The following configuration options apply to both the GCloudSessionDataStore and the GCloudSessionDataStoreFactory.
Use the latter if you want multiple SessionHandlers to use GCloudSessionDataStores that are identically configured.
- setSavePeriodSec(int) [Default:0]
-
This is an interval defined in seconds. It is used to reduce the frequency with which
SessionDatais written. Normally, whenever the last concurrent request leaves aSession, theSessionDatafor thatSessionis always persisted, even if the only thing that changed is thelastAccessTime. If thesavePeriodSecis non-zero, theSessionDatawill not be persisted if no session attributes changed, unless the time since the last save exceeds thesavePeriod. Setting a non-zero value can reduce the load on the persistence mechanism, but in a clustered environment runs the risk that other nodes will see the session as expired because it has not been persisted sufficiently recently. - setGracePeriodSec(int) [Default:3600]
-
The
gracePeriodis an interval defined in seconds. It is an attempt to deal with the non-transactional nature of sessions with regard to finding sessions that have expired. In a clustered configuration - even with a sticky load balancer - it is always possible that a session is "live" on a node but not yet updated in the persistent store. This means that it can be hard to determine at any given moment whether a clustered session has truly expired. Thus, we use thegracePeriodto provide a bit of leeway around the moment of expiry during scavenging:-
on every scavenge cycle an
AbstractSessionDataStoresearches for sessions that belong to the context that expired at least onegracePeriodago -
infrequently the
AbstractSessionDataStoresearches for and summarily deletes sessions - from any context - that expired at least 10gracePeriods ago
-
- setProjectId(String) [Default: null]
-
Optional. The
project idof your project. You don’t need to set this if you carried out the instructions in the Preparation section, but you might want to set this - along with thehostand/ornamespaceparameters - if you want more explicit control over connecting to GCloud. - setHost(String) [Default: null]
-
Optional. This is the name of the host for the GCloud DataStore. If you leave it unset, then the GCloud DataStore library will work out the host to contact. You might want to use this - along with
projectIdand/ornamespaceparameters - if you want more explicit control over connecting to GCloud. - setNamespace(String) [Default: null]
-
Optional. If set, partitions the visibility of session data in multi-tenant deployments. More information can be found here.
- setMaxRetries(int) [Default: 5]
-
This is the maximum number of retries to connect to GCloud DataStore in order to write a session. This is used in conjunction with the
backoffMsparameter to control the frequency with which Jetty will retry to contact GCloud to write out a session. - setBackoffMs(int) [Default: 1000]
-
This is the interval that Jetty will wait in between retrying failed writes. Each time a write fails, Jetty doubles the previous backoff. Used in conjunction with the
maxRetriesparameter. - setEntityDataModel(EntityDataModel)
-
The
EntityDataModelencapsulates the type (called "kind" in GCloud DataStore) of stored session objects and the names of its fields. If you do not set this parameter,GCloudSessionDataStoreuses all default values, which should be sufficient for most needs. Should you need to customize this, the methods and their defaults are:-
setKind(String) [Default: "GCloudSession"] this is the type of the session object.
-
setId(String) [Default: "id"] this is the name of the field storing the session id.
-
setContextPath(String) [Default: "contextPath"] this is name of the field storing the canonicalized context path of the context to which the session belongs.
-
setVhost(String) [Default: "vhost"] this the name of the field storing the canonicalized virtual host of the context to which the session belongs.
-
setAccessed(String) [Default: "accessed"] this is the name of the field storing the current access time of the session.
-
setLastAccessed(String) [Default: "lastAccessed"] this is the name of the field storing the last access time of the session.
-
setCreateTime(String) [Default: "createTime"] this is the name of the field storing the time in ms since the epoch, at which the session was created.
-
setCookieSetTime(String) [Default: "cookieSetTime"] this is the name of the field storing time at which the session cookie was last set.
-
setLastNode(String) [Default: "lastNode"] this is the name of the field storing the
workerNameof the last node to manage the session. -
setExpiry(String) [Default: "expiry"] this is the name of the field storing the time, in ms since the epoch, at which the session will expire.
-
setMaxInactive(String) [Default: "maxInactive"] this is the name of the field storing the session timeout in ms.
-
setAttributes(String) [Default: "attributes"] this is the name of the field storing the session attribute map.
-
Here’s an example of configuring a GCloudSessionDataStoreFactory:
Server server = new Server();
//Ensure there is a SessionCacheFactory
DefaultSessionCacheFactory cacheFactory = new DefaultSessionCacheFactory();
//Add the factory as a bean to the server, now whenever a
//SessionManager starts it will consult the bean to create a new DefaultSessionCache
server.addBean(cacheFactory);
//Configure the GCloudSessionDataStoreFactory
GCloudSessionDataStoreFactory storeFactory = new GCloudSessionDataStoreFactory();
storeFactory.setGracePeriodSec(3600);
storeFactory.setSavePeriodSec(0);
storeFactory.setBackoffMs(2000); //increase the time between retries of failed writes
storeFactory.setMaxRetries(10); //increase the number of retries of failed writes
//Add the factory as a bean on the server, now whenever a
//SessionManager starts, it will consult the bean to create a new GCloudSessionDataStore
//for use by the DefaultSessionCache
server.addBean(storeFactory);The CachingSessionDataStore

The CachingSessionDataStore is a special type of SessionDataStore that checks an L2 cache for SessionData before checking a delegate SessionDataStore.
This can improve the performance of slow stores.
The L2 cache is an instance of a SessionDataMap.
Jetty provides one implementation of this L2 cache based on memcached, MemcachedSessionDataMap.
This is an example of how to programmatically configure CachingSessionDataStores, using a FileSessionDataStore as a delegate, and memcached as the L2 cache:
Server server = new Server();
//Make a factory for memcached L2 caches for SessionData
MemcachedSessionDataMapFactory mapFactory = new MemcachedSessionDataMapFactory();
mapFactory.setExpirySec(0); //items in memcached don't expire
mapFactory.setHeartbeats(true); //tell memcached to use heartbeats
mapFactory.setAddresses(new InetSocketAddress("localhost", 11211)); //use a local memcached instance
mapFactory.setWeights(new int[]{100}); //set the weighting
//Make a FileSessionDataStoreFactory for creating FileSessionDataStores
//to persist the session data
FileSessionDataStoreFactory storeFactory = new FileSessionDataStoreFactory();
storeFactory.setStoreDir(new File("/tmp/sessions"));
storeFactory.setGracePeriodSec(3600);
storeFactory.setSavePeriodSec(0);
//Make a factory that plugs the L2 cache into the SessionDataStore
CachingSessionDataStoreFactory cachingSessionDataStoreFactory = new CachingSessionDataStoreFactory();
cachingSessionDataStoreFactory.setSessionDataMapFactory(mapFactory);
cachingSessionDataStoreFactory.setSessionStoreFactory(storeFactory);
//Register it as a bean so that all SessionManagers will use it
//to make FileSessionDataStores that use memcached as an L2 SessionData cache.
server.addBean(cachingSessionDataStoreFactory);WebSocket Server
Jetty provides different implementations of the WebSocket protocol:
-
A Jakarta EE 8 (
javax.websocket) implementation, based on the Jakarta WebSocket 1.1 Specification. -
A Jakarta EE 9 (
jakarta.websocket) implementation, based on the Jakarta WebSocket 2.0 Specification. -
A Jakarta EE 10 (
jakarta.websocket) implementation, based on the Jakarta WebSocket 2.1 Specification. -
A Jetty specific implementation, based on the Jetty WebSocket APIs, that does not depend on any Jakarta EE APIs.
The Jakarta EE implementations and APIs are described in this section.
Using the standard Jakarta EE WebSocket APIs allows your applications to depend only on standard APIs, and your applications may be deployed in any compliant WebSocket Container that supports Jakarta WebSocket. The standard Jakarta EE WebSocket APIs provide these features that are not present in the Jetty WebSocket APIs:
-
Encoders and Decoders for automatic conversion of text or binary messages to objects.
The Jetty specific WebSocket implementation and APIs are described in this section.
Using the Jetty WebSocket APIs allows your applications to be more efficient and offer greater and more fine-grained control, and provide these features that are not present in the Jakarta EE WebSocket APIs:
-
A demand mechanism to control backpressure.
-
Remote socket address (IP address and port) information.
-
Advanced request URI matching with regular expressions, in addition to Servlet patterns and URI template patterns.
-
More configuration options, for example the network buffer capacity.
-
Programmatic WebSocket upgrade, in addition to WebSocket upgrade based on URI matching, for maximum flexibility.
If your application needs specific features that are not provided by the standard APIs, the Jetty WebSocket APIs may provide such features.
| If the feature you are looking for is not present, you may ask for these features by submitting an issue to the Jetty Project without waiting for the standard Jakarta EE process to approve them and release a new version of the Jakarta EE WebSocket specification. |
Standard APIs Implementation
When you write a WebSocket application using the standard jakarta.websocket APIs, your code typically need to depend on just the APIs to compile your application.
However, at runtime you need to have an implementation of the standard APIs in your class-path (or module-path).
The standard jakarta.websocket APIs, for example for Jakarta EE 10, are provided by the following Maven artifact:
<dependency>
<groupId>jakarta.websocket</groupId>
<artifactId>jakarta.websocket-api</artifactId>
<version>2.1.0</version>
</dependency>At runtime, you also need an implementation of the standard Jakarta EE 10 WebSocket APIs, that Jetty provides with the following Maven artifact (and its transitive dependencies):
<dependency>
<groupId>org.eclipse.jetty.ee10.websocket</groupId>
<artifactId>jetty-ee10-websocket-jakarta-server</artifactId>
<version>12.0.9-SNAPSHOT</version>
</dependency>|
The |
To configure correctly your WebSocket application based on the standard Jakarta EE 10 WebSocket APIs, you need two steps:
-
Make sure that Jetty sets up an instance of
jakarta.websocket.server.ServerContainer, described in this section. -
Configure the WebSocket endpoints that implement your application logic, either by annotating their classes with the standard
jakarta.websocketannotations, or by using theServerContainerAPIs to register them in your code, described in this section.
Setting Up ServerContainer
Jetty sets up a ServerContainer instance using JakartaWebSocketServletContainerInitializer.
When you deploy web applications using WebAppContext, then JakartaWebSocketServletContainerInitializer is automatically discovered and initialized by Jetty when the web application starts, so that it sets up the ServerContainer.
In this way, you do not need to write any additional code:
// Create a Server with a ServerConnector listening on port 8080.
Server server = new Server(8080);
// Create a WebAppContext with the given context path.
WebAppContext handler = new WebAppContext("/path/to/webapp", "/ctx");
server.setHandler(handler);
// Starting the Server will start the WebAppContext.
server.start();On the other hand, when you deploy web applications using ServletContextHandler, you have to write the code to ensure that the JakartaWebSocketServletContainerInitializer is initialized, so that it sets up the ServerContainer:
// Create a Server with a ServerConnector listening on port 8080.
Server server = new Server(8080);
// Create a ServletContextHandler with the given context path.
ServletContextHandler handler = new ServletContextHandler("/ctx");
server.setHandler(handler);
// Ensure that JavaxWebSocketServletContainerInitializer is initialized,
// to setup the ServerContainer for this web application context.
JakartaWebSocketServletContainerInitializer.configure(handler, null);
// Starting the Server will start the ServletContextHandler.
server.start();Calling JakartaWebSocketServletContainerInitializer.configure(...) must be done before the ServletContextHandler is started, and configures the Jakarta EE 10 WebSocket implementation for that web application context, making ServerContainer available to web applications.
Configuring Endpoints
Once you have setup the ServerContainer, you can configure your WebSocket endpoints.
The WebSocket endpoints classes may be either annotated with the standard jakarta.websocket annotations, extend the jakarta.websocket.Endpoint abstract class, or implement the jakarta.websocket.server.ServerApplicationConfig interface.
When you deploy web applications using WebAppContext, then annotated WebSocket endpoint classes are automatically discovered and registered.
In this way, you do not need to write any additional code; you just need to ensure that your WebSocket endpoint classes are present in the web application’s /WEB-INF/classes directory, or in a *.jar file in /WEB-INF/lib.
On the other hand, when you deploy web applications using WebAppContext but you need to perform more advanced configuration of the ServerContainer or of the WebSocket endpoints, or when you deploy web applications using ServletContextHandler, you need to access the ServerContainer APIs.
The ServerContainer instance is stored as a ServletContext attribute, so it can be retrieved when the ServletContext is initialized, either from a ServletContextListener, or from a Servlet Filter, or from an HttpServlet:
// Create a Server with a ServerConnector listening on port 8080.
Server server = new Server(8080);
// Create a ServletContextHandler with the given context path.
ServletContextHandler handler = new ServletContextHandler("/ctx");
server.setHandler(handler);
// Ensure that JavaxWebSocketServletContainerInitializer is initialized,
// to setup the ServerContainer for this web application context.
JakartaWebSocketServletContainerInitializer.configure(handler, null);
// Add a WebSocket-initializer Servlet to register WebSocket endpoints.
handler.addServlet(MyJavaxWebSocketInitializerServlet.class, "/*");
// Starting the Server will start the ServletContextHandler.
server.start();public class MyJavaxWebSocketInitializerServlet extends HttpServlet
{
@Override
public void init() throws ServletException
{
try
{
// Retrieve the ServerContainer from the ServletContext attributes.
ServerContainer container = (ServerContainer)getServletContext().getAttribute(ServerContainer.class.getName());
// Configure the ServerContainer.
container.setDefaultMaxTextMessageBufferSize(128 * 1024);
// Simple registration of your WebSocket endpoints.
container.addEndpoint(MyJavaxWebSocketEndPoint.class);
// Advanced registration of your WebSocket endpoints.
container.addEndpoint(
ServerEndpointConfig.Builder.create(MyJavaxWebSocketEndPoint.class, "/ws")
.subprotocols(List.of("my-ws-protocol"))
.build()
);
}
catch (DeploymentException x)
{
throw new ServletException(x);
}
}
}When you deploy web applications using ServletContextHandler, you can alternatively use the code below to set up the ServerContainer and configure the WebSocket endpoints in one step:
// Create a Server with a ServerConnector listening on port 8080.
Server server = new Server(8080);
// Create a ServletContextHandler with the given context path.
ServletContextHandler handler = new ServletContextHandler("/ctx");
server.setHandler(handler);
// Setup the ServerContainer and the WebSocket endpoints for this web application context.
JakartaWebSocketServletContainerInitializer.configure(handler, (servletContext, container) ->
{
// Configure the ServerContainer.
container.setDefaultMaxTextMessageBufferSize(128 * 1024);
// Simple registration of your WebSocket endpoints.
container.addEndpoint(MyJavaxWebSocketEndPoint.class);
// Advanced registration of your WebSocket endpoints.
container.addEndpoint(
ServerEndpointConfig.Builder.create(MyJavaxWebSocketEndPoint.class, "/ws")
.subprotocols(List.of("my-ws-protocol"))
.build()
);
});
// Starting the Server will start the ServletContextHandler.
server.start();When the ServletContextHandler is started, the Configurator lambda (the second parameter passed to JakartaWebSocketServletContainerInitializer.configure(...)) is invoked and allows you to explicitly configure the WebSocket endpoints using the standard APIs provided by ServerContainer.
Upgrade to WebSocket
Under the hood, JakartaWebSocketServletContainerInitializer installs the org.eclipse.jetty.ee10.websocket.servlet.WebSocketUpgradeFilter, which is the component that intercepts HTTP requests to upgrade to WebSocket, and performs the upgrade from the HTTP protocol to the WebSocket protocol.
|
The Refer to the advanced |
With the default configuration, every HTTP request flows first through the WebSocketUpgradeFilter.
If the HTTP request is a valid upgrade to WebSocket, then WebSocketUpgradeFilter tries to find a matching WebSocket endpoint for the request URI path; if the match is found, WebSocketUpgradeFilter performs the upgrade and does not invoke any other Filter or Servlet.
From this point on, the communication happens with the WebSocket protocol, and HTTP components such as Filters and Servlets are not relevant anymore.
If the HTTP request is not an upgrade to WebSocket, or WebSocketUpgradeFilter did not find a matching WebSocket endpoint for the request URI path, then the request is passed to the Filter chain of your web application, and eventually the request arrives to a Servlet to be processed (otherwise a 404 Not Found response is returned to client).
Advanced WebSocketUpgradeFilter Configuration
The WebSocketUpgradeFilter that handles the HTTP requests that upgrade to WebSocket is installed by the JakartaWebSocketServletContainerInitializer, as described in this section.
Typically, the WebSocketUpgradeFilter is not present in the web.xml configuration, and therefore the mechanisms above create a new WebSocketUpgradeFilter and install it before any other Filter declared in web.xml, under the default name of "org.eclipse.jetty.ee10.websocket.servlet.WebSocketUpgradeFilter" and with path mapping /*.
However, if the WebSocketUpgradeFilter is already present in web.xml under the default name, then the ServletContainerInitializers will use that declared in web.xml instead of creating a new one.
This allows you to customize:
-
The filter order; for example, by configuring filters for increased security or authentication before the
WebSocketUpgradeFilter. -
The
WebSocketUpgradeFilterconfiguration viainit-params, that affects allSessioninstances created by this filter. -
The
WebSocketUpgradeFilterpath mapping. Rather than the default mapping of/*, you can map theWebSocketUpgradeFilterto a more specific path such as/ws/*. -
The possibility to have multiple
WebSocketUpgradeFilters, mapped to different paths, each with its own configuration.
For example:
<?xml version="1.0" encoding="UTF-8"?>
<web-app xmlns="https://jakarta.ee/xml/ns/jakartaee"
xmlns:xsi="http://www.w3.org/2001/XMLSchema-instance"
xsi:schemaLocation="https://jakarta.ee/xml/ns/jakartaee https://jakarta.ee/xml/ns/jakartaee/web-app_5_0.xsd"
version="5.0">
<display-name>My WebSocket WebApp</display-name>
<!-- The SecurityFilter *must* be the first --> (1)
<filter>
<filter-name>security</filter-name>
<filter-class>com.acme.SecurityFilter</filter-class>
<async-supported>true</async-supported>
</filter>
<filter-mapping>
<filter-name>security</filter-name>
<url-pattern>/*</url-pattern>
</filter-mapping>
<!-- Configure the default WebSocketUpgradeFilter --> (2)
<filter>
<!-- The filter name must be the default WebSocketUpgradeFilter name -->
<filter-name>org.eclipse.jetty.ee10.websocket.servlet.WebSocketUpgradeFilter</filter-name> (3)
<filter-class>org.eclipse.jetty.ee10.websocket.servlet.WebSocketUpgradeFilter</filter-class>
<!-- Configure at most 1 MiB text messages -->
<init-param> (4)
<param-name>maxTextMessageSize</param-name>
<param-value>1048576</param-value>
</init-param>
<async-supported>true</async-supported>
</filter>
<filter-mapping>
<filter-name>org.eclipse.jetty.ee10.websocket.servlet.WebSocketUpgradeFilter</filter-name>
<!-- Use a more specific path mapping for WebSocket requests -->
<url-pattern>/ws/*</url-pattern> (5)
</filter-mapping>
</web-app>| 1 | The custom SecurityFilter is the first, to apply custom security. |
| 2 | The configuration for the default WebSocketUpgradeFilter. |
| 3 | Note the use of the default WebSocketUpgradeFilter name. |
| 4 | Specific configuration for WebSocketUpgradeFilter parameters. |
| 5 | Use a more specific path mapping for WebSocketUpgradeFilter. |
Note that using a more specific path mapping for WebSocket requests is also beneficial to the performance of normal HTTP requests: they do not go through the WebSocketUpgradeFilter (as they will not match its path mapping), saving the cost of analyzing them to see whether they are WebSocket upgrade requests or not.
Jetty APIs Implementation
When you write a WebSocket application using the Jetty WebSocket APIs, your code typically needs to depend on just the Jetty WebSocket APIs to compile your application. However, at runtime you need to have the implementation of the Jetty WebSocket APIs in your class-path (or module-path).
Jetty’s WebSocket APIs are provided by the following Maven artifact:
<dependency>
<groupId>org.eclipse.jetty.websocket</groupId>
<artifactId>jetty-websocket-jetty-api</artifactId>
<version>12.0.9-SNAPSHOT</version>
</dependency>Jetty’s implementation of the Jetty WebSocket APIs is provided by the following Maven artifact (and its transitive dependencies):
<dependency>
<groupId>org.eclipse.jetty.websocket</groupId>
<artifactId>jetty-websocket-jetty-server</artifactId>
<version>12.0.9-SNAPSHOT</version>
</dependency>|
The |
To configure correctly your WebSocket application based on the Jetty WebSocket APIs, you need two steps:
-
Make sure to set up an instance of
org.eclipse.jetty.websocket.server.ServerWebSocketContainer. -
Use the
ServerWebSocketContainerAPIs in your applications to register the WebSocket endpoints that implement your application logic.
You can read more about the Jetty WebSocket architecture, which is common to both client-side and server-side, to get familiar with the terminology used in the following sections.
Setting up ServerWebSocketContainer
You need Jetty to set up a ServerWebSocketContainer instance to make your WebSocket applications based on the Jetty WebSocket APIs work.
Your WebSocket web application is represented by a ContextHandler.
The WebSocket upgrade is performed in a descendant (typically the only child) of the ContextHandler, either by the org.eclipse.jetty.websocket.server.WebSocketUpgradeHandler, or by a custom Handler that you write and is part of your web application.
In both cases, you need to set up a ServerWebSocketContainer, and this can be done implicitly by using WebSocketUpgradeHandler, or explicitly by creating the ServerWebSocketContainer instance.
Implicit setup using WebSocketUpgradeHandler
Using WebSocketUpgradeHandler is the most common way to set up your WebSocket applications.
You can use the WebSocketUpgradeHandler and the ServerWebSocketContainer APIs to map HTTP request URIs to WebSocket endpoints.
When an HTTP request arrives, WebSocketUpgradeHandler tests whether it is a WebSocket upgrade request, whether it matches a mapped URI, and if so upgrades the protocol to WebSocket.
From this point on, the communication on the upgraded connection happens with the WebSocket protocol.
This is very similar to what WebSocketUpgradeFilter does when using the Jakarta EE WebSocket APIs.
Once you have set up the WebSocketUpgradeHandler, you can use the ServerWebSocketContainer APIs to configure the WebSocket endpoints.
The example below shows how to set up the WebSocketUpgradeHandler and use the ServerWebSocketContainer APIs:
// Create a Server with a ServerConnector listening on port 8080.
Server server = new Server(8080);
// Create a ContextHandler with the given context path.
ContextHandler contextHandler = new ContextHandler("/ctx");
server.setHandler(contextHandler);
// Create a WebSocketUpgradeHandler that implicitly creates a ServerWebSocketContainer.
WebSocketUpgradeHandler webSocketHandler = WebSocketUpgradeHandler.from(server, contextHandler, container ->
{
// Configure the ServerWebSocketContainer.
container.setMaxTextMessageSize(128 * 1024);
// Map a request URI to a WebSocket endpoint, for example using a regexp.
container.addMapping("regex|/ws/v\\d+/echo", (rq, rs, cb) -> new EchoEndPoint());
// Advanced registration of a WebSocket endpoint.
container.addMapping("/ws/adv", (rq, rs, cb) ->
{
List<String> subProtocols = rq.getSubProtocols();
if (subProtocols.contains("my-ws-protocol"))
return new MyJettyWebSocketEndPoint();
return null;
});
});
contextHandler.setHandler(webSocketHandler);
// Starting the Server will start the ContextHandler and the WebSocketUpgradeHandler,
// which would run the configuration of the ServerWebSocketContainer.
server.start();The mapping of request URIs to WebSocket endpoints is further explained in this section.
Explicit setup using ServerWebSocketContainer
A more advanced way to set up your WebSocket applications is to explicitly create the ServerWebSocketContainer instance programmatically.
This gives you more flexibility when deciding whether an HTTP request should be upgraded to WebSocket, because you do not need to match request URIs (although you can), nor you need to use WebSocketUpgradeHandler (although you can).
Once you have created the ServerWebSocketContainer, you can use its APIs to configure the WebSocket endpoints as shown in the example below.
// Create a Server with a ServerConnector listening on port 8080.
Server server = new Server(8080);
// Create a ContextHandler with the given context path.
ContextHandler contextHandler = new ContextHandler("/ctx");
server.setHandler(contextHandler);
// Create a ServerWebSocketContainer, which is also stored as an attribute in the context.
ServerWebSocketContainer container = ServerWebSocketContainer.ensure(server, contextHandler);
// You can use WebSocketUpgradeHandler if you want, but it is not necessary.
// You can ignore the line below, it is shown only for reference.
WebSocketUpgradeHandler webSocketHandler = new WebSocketUpgradeHandler(container);
// You can directly use ServerWebSocketContainer from any Handler.
contextHandler.setHandler(new Handler.Abstract()
{
@Override
public boolean handle(Request request, Response response, Callback callback)
{
// Retrieve the ServerWebSocketContainer.
ServerWebSocketContainer container = ServerWebSocketContainer.get(request.getContext());
// Verify special conditions for which a request should be upgraded to WebSocket.
String pathInContext = Request.getPathInContext(request);
if (pathInContext.startsWith("/ws/echo") && request.getHeaders().contains("X-WS", "true"))
{
try
{
// This is a WebSocket upgrade request, perform a direct upgrade.
boolean upgraded = container.upgrade((rq, rs, cb) -> new EchoEndPoint(), request, response, callback);
if (upgraded)
return true;
// This was supposed to be a WebSocket upgrade request, but something went wrong.
Response.writeError(request, response, callback, HttpStatus.UPGRADE_REQUIRED_426);
return true;
}
catch (Exception x)
{
Response.writeError(request, response, callback, HttpStatus.UPGRADE_REQUIRED_426, "failed to upgrade", x);
return true;
}
}
else
{
// Handle a normal HTTP request.
response.setStatus(HttpStatus.OK_200);
callback.succeeded();
return true;
}
}
});
// Starting the Server will start the ContextHandler.
server.start();Note how the call to ServerWebSocketContainer.upgrade(...) allows you to perform a direct WebSocket upgrade programmatically.
WebSocket Endpoints
When using the Jetty WebSocket APIs, the WebSocket endpoint classes must be either annotated with the Jetty WebSocket annotations from the org.eclipse.jetty.websocket.api.annotations package, or implement the org.eclipse.jetty.websocket.api.Session.Listener interface.
In the case you want to implement the Session.Listener interface, remember that you have to explicitly demand to receive the next WebSocket event.
Use Session.Listener.AutoDemanding to automate the demand for simple use cases.
Refer to the Jetty WebSocket architecture section for more information about Jetty WebSocket endpoints and how to correctly deal with the demand for WebSocket events.
There is no automatic discovery of WebSocket endpoints; all the WebSocket endpoints of your application must be returned by a org.eclipse.jetty.websocket.server.WebSocketCreator that is either mapped to a request URI via ServerWebSocketContainer.addMapping(...), or directly upgraded via ServerWebSocketContainer.upgrade(...).
In the call to ServerWebSocketContainer.addMapping(...), you can specify a path spec (the first parameter) that can specified as discussed in this section.
When the Server is started, the lambda passed to ServerWebSocketContainer.configure(...)) is invoked and allows you to explicitly configure the WebSocket endpoints using the Jetty WebSocket APIs provided by ServerWebSocketContainer.
Custom PathSpec Mappings
The ServerWebSocketContainer.addMapping(...) API maps a path spec to a WebSocketCreator instance (typically a lambda expression).
The path spec is matched against the WebSocket upgrade request URI to select the correspondent WebSocketCreator to invoke.
The path spec can have these forms:
-
Servlet syntax, specified with
servlet|<path spec>, where theservlet|prefix can be omitted if the path spec begins with/or*.(for example,/ws,/ws/chator*.ws). -
Regex syntax, specified with
regex|<path spec>, where theregex|prefix can be omitted if the path spec begins with^(for example,^/ws/[0-9]+). -
URI template syntax, specified with
uri-template|<path spec>(for exampleuri-template|/ws/chat/{room}).
Within the WebSocketCreator, it is possible to access the path spec and, for example in case of URI templates, extract additional information in the following way:
Server server = new Server(8080);
ContextHandler contextHandler = new ContextHandler("/ctx");
server.setHandler(contextHandler);
// Create a WebSocketUpgradeHandler.
WebSocketUpgradeHandler webSocketHandler = WebSocketUpgradeHandler.from(server, contextHandler, container ->
{
container.addMapping("/ws/chat/{room}", (upgradeRequest, upgradeResponse, callback) ->
{
// Retrieve the URI template.
UriTemplatePathSpec pathSpec = (UriTemplatePathSpec)upgradeRequest.getAttribute(PathSpec.class.getName());
// Match the URI template.
String pathInContext = Request.getPathInContext(upgradeRequest);
Map<String, String> params = pathSpec.getPathParams(pathInContext);
String room = params.get("room");
// Create the new WebSocket endpoint with the URI template information.
return new MyWebSocketRoomEndPoint(room);
});
});
contextHandler.setHandler(webSocketHandler);Server I/O Architecture
The Jetty server libraries provide the basic components and APIs to implement a network server.
They build on the common Jetty I/O Architecture and provide server specific concepts.
The Jetty server libraries provide I/O support for TCP/IP sockets (for both IPv4 and IPv6) and, when using Java 16 or later, for Unix-Domain sockets.
Support for Unix-Domain sockets is interesting when Jetty is deployed behind a proxy or a load-balancer: it is possible to configure the proxy or load balancer to communicate with Jetty via Unix-Domain sockets, rather than via the loopback network interface.
The central I/O server-side component are org.eclipse.jetty.server.ServerConnector, that handles the TCP/IP socket traffic, and org.eclipse.jetty.unixdomain.server.UnixDomainServerConnector, that handles the Unix-Domain socket traffic.
ServerConnector and UnixDomainServerConnector are very similar, and while in the following sections ServerConnector is used, the same concepts apply to UnixDomainServerConnector, unless otherwise noted.
A ServerConnector manages a list of ConnectionFactorys, that indicate what protocols the connector is able to speak.
Creating Connections with ConnectionFactory
Recall from the Connection section of the Jetty I/O architecture that Connection instances are responsible for parsing bytes read from a socket and generating bytes to write to that socket.
On the server-side, a ConnectionFactory creates Connection instances that know how to parse and generate bytes for the specific protocol they support — it can be either HTTP/1.1, or TLS, or FastCGI, or the PROXY protocol.
For example, this is how clear-text HTTP/1.1 is configured for TCP/IP sockets:
// Create the HTTP/1.1 ConnectionFactory.
HttpConnectionFactory http = new HttpConnectionFactory();
Server server = new Server();
// Create the connector with the ConnectionFactory.
ServerConnector connector = new ServerConnector(server, http);
connector.setPort(8080);
server.addConnector(connector);
server.start();With this configuration, the ServerConnector will listen on port 8080.
Similarly, this is how clear-text HTTP/1.1 is configured for Unix-Domain sockets:
// Create the HTTP/1.1 ConnectionFactory.
HttpConnectionFactory http = new HttpConnectionFactory();
Server server = new Server();
// Create the connector with the ConnectionFactory.
UnixDomainServerConnector connector = new UnixDomainServerConnector(server, http);
connector.setUnixDomainPath(Path.of("/tmp/jetty.sock"));
server.addConnector(connector);
server.start();With this configuration, the UnixDomainServerConnector will listen on file /tmp/jetty.sock.
|
Both configure |
When a new socket connection is established, ServerConnector delegates to the ConnectionFactory the creation of the Connection instance for that socket connection, that is linked to the corresponding EndPoint:

For every socket connection there will be an EndPoint + Connection pair.
Wrapping a ConnectionFactory
A ConnectionFactory may wrap another ConnectionFactory; for example, the TLS protocol provides encryption for any other protocol.
Therefore, to support encrypted HTTP/1.1 (also known as https), you need to configure the ServerConnector with two ConnectionFactorys — one for the TLS protocol and one for the HTTP/1.1 protocol, like in the example below:
// Create the HTTP/1.1 ConnectionFactory.
HttpConnectionFactory http = new HttpConnectionFactory();
// Create and configure the TLS context factory.
SslContextFactory.Server sslContextFactory = new SslContextFactory.Server();
sslContextFactory.setKeyStorePath("/path/to/keystore.p12");
sslContextFactory.setKeyStorePassword("secret");
// Create the TLS ConnectionFactory,
// setting HTTP/1.1 as the wrapped protocol.
SslConnectionFactory tls = new SslConnectionFactory(sslContextFactory, http.getProtocol());
Server server = new Server();
// Create the connector with both ConnectionFactories.
ServerConnector connector = new ServerConnector(server, tls, http);
connector.setPort(8443);
server.addConnector(connector);
server.start();With this configuration, the ServerConnector will listen on port 8443.
When a new socket connection is established, the first ConnectionFactory configured in ServerConnector is invoked to create a Connection.
In the example above, SslConnectionFactory creates a SslConnection and then asks to its wrapped ConnectionFactory (in the example, HttpConnectionFactory) to create the wrapped Connection (an HttpConnection) and will then link the two Connections together, in this way:
Bytes read by the SocketChannelEndPoint will be interpreted as TLS bytes by the SslConnection, then decrypted and made available to the SslEndPoint (a component part of SslConnection), which will then provide them to HttpConnection.
The application writes bytes through the HttpConnection to the SslEndPoint, which will encrypt them through the SslConnection and write the encrypted bytes to the SocketChannelEndPoint.
Choosing ConnectionFactory via Bytes Detection
Typically, a network port is associated with a specific protocol.
For example, port 80 is associated with clear-text HTTP, while port 443 is associated with encrypted HTTP (that is, the TLS protocol wrapping the HTTP protocol, also known as https).
In certain cases, applications need to listen to the same port for two or more protocols, or for different but incompatible versions of the same protocol, which can only be distinguished by reading the initial bytes and figuring out to what protocol they belong to.
The Jetty server libraries support this case by placing a DetectorConnectionFactory in front of other ConnectionFactorys.
DetectorConnectionFactory accepts a list of ConnectionFactorys that implement ConnectionFactory.Detecting, which will be called to see if one of them recognizes the initial bytes.
In the example below you can see how to support both clear-text and encrypted HTTP/1.1 (i.e. both http and https) on the same network port:
// Create the HTTP/1.1 ConnectionFactory.
HttpConnectionFactory http = new HttpConnectionFactory();
// Create and configure the TLS context factory.
SslContextFactory.Server sslContextFactory = new SslContextFactory.Server();
sslContextFactory.setKeyStorePath("/path/to/keystore.p12");
sslContextFactory.setKeyStorePassword("secret");
// Create the TLS ConnectionFactory,
// setting HTTP/1.1 as the wrapped protocol.
SslConnectionFactory tls = new SslConnectionFactory(sslContextFactory, http.getProtocol());
Server server = new Server();
// Create the detector ConnectionFactory to
// detect whether the initial bytes are TLS.
DetectorConnectionFactory tlsDetector = new DetectorConnectionFactory(tls); (1)
// Create the connector with both ConnectionFactories.
ServerConnector connector = new ServerConnector(server, tlsDetector, http); (2)
connector.setPort(8181);
server.addConnector(connector);
server.start();| 1 | Creates the DetectorConnectionFactory with the SslConnectionFactory as the only detecting ConnectionFactory.
With this configuration, the detector will delegate to SslConnectionFactory to recognize the initial bytes, which will detect whether the bytes are TLS protocol bytes. |
| 2 | Creates the ServerConnector with DetectorConnectionFactory as the first ConnectionFactory, and HttpConnectionFactory as the next ConnectionFactory to invoke if the detection fails. |
In the example above ServerConnector will listen on port 8181.
When a new socket connection is established, DetectorConnectionFactory is invoked to create a Connection, because it is the first ConnectionFactory specified in the ServerConnector list.
DetectorConnectionFactory reads the initial bytes and asks to its detecting ConnectionFactorys if they recognize the bytes.
In the example above, the detecting ConnectionFactory is SslConnectionFactory which will therefore detect whether the initial bytes are TLS bytes.
If one of the detecting ConnectionFactorys recognizes the bytes, it creates a Connection; otherwise DetectorConnectionFactory will try the next ConnectionFactory after itself in the ServerConnector list.
In the example above, the next ConnectionFactory after DetectorConnectionFactory is HttpConnectionFactory.
The final result is that when new socket connection is established, the initial bytes are examined: if they are TLS bytes, a SslConnectionFactory will create a SslConnection that wraps an HttpConnection as explained here, therefore supporting https; otherwise they are not TLS bytes and an HttpConnection is created, therefore supporting http.
Writing a Custom ConnectionFactory
This section explains how to use the Jetty server-side libraries to write a generic network server able to parse and generate any protocol..
Let’s suppose that we want to write a custom protocol that is based on JSON but has the same semantic as HTTP; let’s call this custom protocol JSONHTTP, so that a request would look like this:
{
"type": "request",
"method": "GET",
"version": "HTTP/1.1",
"uri": "http://localhost/path",
"fields": {
"content-type": "text/plain;charset=ASCII"
},
"content": "HELLO"
}In order to implement this custom protocol, we need to:
-
implement a
JSONHTTPConnectionFactory -
implement a
JSONHTTPConnection -
parse bytes and generate bytes in the
JSONHTTPformat -
design an easy to use API that applications use to process requests and respond
First, the JSONHTTPConnectionFactory:
public class JSONHTTPConnectionFactory extends AbstractConnectionFactory
{
public JSONHTTPConnectionFactory()
{
super("JSONHTTP");
}
@Override
public Connection newConnection(Connector connector, EndPoint endPoint)
{
JSONHTTPConnection connection = new JSONHTTPConnection(endPoint, connector.getExecutor());
// Call configure() to apply configurations common to all connections.
return configure(connection, connector, endPoint);
}
}Note how JSONHTTPConnectionFactory extends AbstractConnectionFactory to inherit facilities common to all ConnectionFactory implementations.
Second, the JSONHTTPConnection.
Recall from the echo Connection example that you need to override onOpen() to call fillInterested() so that the Jetty I/O system will notify your Connection implementation when there are bytes to read by calling onFillable().
Furthermore, because the Jetty libraries are non-blocking and asynchronous, you need to use IteratingCallback to implement onFillable():
public class JSONHTTPConnection extends AbstractConnection
{
// The asynchronous JSON parser.
private final AsyncJSON parser = new AsyncJSON.Factory().newAsyncJSON();
private final IteratingCallback callback = new JSONHTTPIteratingCallback();
public JSONHTTPConnection(EndPoint endPoint, Executor executor)
{
super(endPoint, executor);
}
@Override
public void onOpen()
{
super.onOpen();
// Declare interest in being called back when
// there are bytes to read from the network.
fillInterested();
}
@Override
public void onFillable()
{
callback.iterate();
}
private class JSONHTTPIteratingCallback extends IteratingCallback
{
private ByteBuffer buffer;
@Override
protected Action process() throws Throwable
{
if (buffer == null)
buffer = BufferUtil.allocate(getInputBufferSize(), true);
while (true)
{
int filled = getEndPoint().fill(buffer);
if (filled > 0)
{
boolean parsed = parser.parse(buffer);
if (parsed)
{
Map<String, Object> request = parser.complete();
// Allow applications to process the request.
invokeApplication(request, this);
// Signal that the iteration should resume when
// the application completed the request processing.
return Action.SCHEDULED;
}
else
{
// Did not receive enough JSON bytes,
// loop around to try to read more.
}
}
else if (filled == 0)
{
// We don't need the buffer anymore, so
// don't keep it around while we are idle.
buffer = null;
// No more bytes to read, declare
// again interest for fill events.
fillInterested();
// Signal that the iteration is now IDLE.
return Action.IDLE;
}
else
{
// The other peer closed the connection,
// the iteration completed successfully.
return Action.SUCCEEDED;
}
}
}
@Override
protected void onCompleteSuccess()
{
getEndPoint().close();
}
@Override
protected void onCompleteFailure(Throwable cause)
{
getEndPoint().close(cause);
}
}
}Again, note how JSONHTTPConnection extends AbstractConnection to inherit facilities that you would otherwise need to re-implement from scratch.
When JSONHTTPConnection receives a full JSON object it calls invokeApplication(…) to allow the application to process the incoming request and produce a response.
At this point you need to design a non-blocking asynchronous API that takes a Callback parameter so that applications can signal to the implementation when the request processing is complete (either successfully or with a failure).
A simple example of this API design could be the following:
-
Wrap the JSON
Mapinto aJSONHTTPRequestparameter so that applications may use more specific HTTP APIs such asJSONHTTPRequest.getMethod()rather than a genericMap.get("method") -
Provide an equivalent
JSONHTTPResponseparameter so that applications may use more specific APIs such asJSONHTTPResponse.setStatus(int)rather than a genericMap.put("status", 200) -
Provide a
Callback(or aCompletableFuture) parameter so that applications may indicate when the request processing is complete
This results in the following API:
class JSONHTTPRequest
{
// Request APIs
}
class JSONHTTPResponse
{
// Response APIs
}
interface JSONHTTPService
{
void service(JSONHTTPRequest request, JSONHTTPResponse response, Callback callback);
}The important part of this simple API example is the Callback parameter that makes the API non-blocking and asynchronous.
Maven and Jetty
Using Maven
Apache Maven is a software project management and comprehension tool. Based on the concept of a project object model (POM), Maven can manage a project’s build, reporting and documentation from a central piece of information.
It is an ideal tool to build a web application project, and such projects can use the jetty-maven-plugin to easily run the web application and save time in development. You can also use Maven to build, test and run a project which embeds Jetty.
|
Use of Maven and the jetty-maven-plugin is not required. Using Maven for Jetty implementations is a popular choice, but users encouraged to manage their projects in whatever way suits their needs. Other popular tools include Ant and Gradle. |
Using Embedded Jetty with Maven
To understand the basic operations of building and running against Jetty, first review:
Maven uses convention over configuration, so it is best to use the project structure Maven recommends. You can use archetypes to quickly setup Maven projects, but we will set up the structure manually for this simple tutorial example:
> mkdir JettyMavenHelloWorld > cd JettyMavenHelloWorld > mkdir -p src/main/java/org/example
Creating the HelloWorld Class
Use an editor to create the file src/main/java/org/example/HelloWorld.java with the following contents:
package org.example;
import jakarta.servlet.http.HttpServletRequest;
import jakarta.servlet.http.HttpServletResponse;
import jakarta.servlet.ServletException;
import java.io.IOException;
import org.eclipse.jetty.server.Server;
import org.eclipse.jetty.server.Request;
import org.eclipse.jetty.server.handler.AbstractHandler;
public class HelloWorld extends AbstractHandler
{
public void handle(String target,
Request baseRequest,
HttpServletRequest request,
HttpServletResponse response)
throws IOException, ServletException
{
response.setContentType("text/html;charset=utf-8");
response.setStatus(HttpServletResponse.SC_OK);
baseRequest.setHandled(true);
response.getWriter().println("<h1>Hello World</h1>");
}
public static void main(String[] args) throws Exception
{
Server server = new Server(8080);
server.setHandler(new HelloWorld());
server.start();
server.join();
}
}Creating the POM Descriptor
The pom.xml file declares the project name and its dependencies.
Use an editor to create the file pom.xml in the JettyMavenHelloWorld directory with the following contents:
<project xmlns="http://maven.apache.org/POM/4.0.0"
xmlns:xsi="http://www.w3.org/2001/XMLSchema-instance"
xsi:schemaLocation="http://maven.apache.org/POM/4.0.0 http://maven.apache.org/maven-v4_0_0.xsd">
<modelVersion>4.0.0</modelVersion>
<groupId>org.example</groupId>
<artifactId>hello-world</artifactId>
<version>0.1-SNAPSHOT</version>
<packaging>jar</packaging>
<name>Jetty HelloWorld</name>
<properties>
<jettyVersion>12.0.9-SNAPSHOT</jettyVersion>
</properties>
<dependencies>
<dependency>
<groupId>org.eclipse.jetty</groupId>
<artifactId>jetty-server</artifactId>
<version>${jettyVersion}</version>
</dependency>
</dependencies>
<build>
<plugins>
<plugin>
<groupId>org.codehaus.mojo</groupId>
<artifactId>exec-maven-plugin</artifactId>
<version>1.1</version>
<executions>
<execution><goals><goal>java</goal></goals></execution>
</executions>
<configuration>
<mainClass>org.example.HelloWorld</mainClass>
</configuration>
</plugin>
</plugins>
</build>
</project>Building and Running Embedded HelloWorld
You can now compile and execute the HelloWorld class by using these commands:
> mvn clean compile exec:java
Point your browser to http://localhost:8080 to see the Hello World page.
Developing a Standard WebApp with Jetty and Maven
The previous section demonstrated how to use Maven with an application that embeds Jetty. We can instead develop a standard webapp using Maven and Jetty. First create the Maven structure (you can use the maven webapp archetype instead if you prefer):
> mkdir JettyMavenHelloWarApp > cd JettyMavenHelloWebApp > mkdir -p src/main/java/org/example > mkdir -p src/main/webapp/WEB-INF
Creating a Servlet
Use an editor to create the file src/main/java/org/example/HelloServlet.java with the following contents:
package org.example;
import java.io.IOException;
import jakarta.servlet.ServletException;
import jakarta.servlet.http.HttpServlet;
import jakarta.servlet.http.HttpServletRequest;
import jakarta.servlet.http.HttpServletResponse;
public class HelloServlet extends HttpServlet
{
protected void doGet(HttpServletRequest request, HttpServletResponse response) throws ServletException, IOException
{
response.setContentType("text/html");
response.setStatus(HttpServletResponse.SC_OK);
response.getWriter().println("<h1>Hello Servlet</h1>");
response.getWriter().println("session=" + request.getSession(true).getId());
}
}This servlet must be declared in the web deployment descriptor, so create the file src/main/webapp/WEB-INF/web.xml and add the following contents:
<?xml version="1.0" encoding="UTF-8"?>
<web-app
xmlns="https://jakarta.ee/xml/ns/jakartaee"
xmlns:xsi="http://www.w3.org/2001/XMLSchema-instance"
xsi:schemaLocation="https://jakarta.ee/xml/ns/jakartaee https://jakarta.ee/xml/ns/jakartaee/web-app_6_0.xsd"
metadata-complete="false"
version="6.0">
<servlet>
<servlet-name>Hello</servlet-name>
<servlet-class>org.example.HelloServlet</servlet-class>
</servlet>
<servlet-mapping>
<servlet-name>Hello</servlet-name>
<url-pattern>/hello/*</url-pattern>
</servlet-mapping>
</web-app>Creating the POM Descriptor
The pom.xml file declares the project name and its dependencies.
Use an editor to create the file pom.xml with the following contents in the JettyMavenHelloWarApp directory, noting particularly the declaration of the jetty-maven-plugin for the Jakarta EE 10 environment:
<project xmlns="http://maven.apache.org/POM/4.0.0"
xmlns:xsi="http://www.w3.org/2001/XMLSchema-instance"
xsi:schemaLocation="http://maven.apache.org/POM/4.0.0 http://maven.apache.org/maven-v4_0_0.xsd">
<modelVersion>4.0.0</modelVersion>
<groupId>org.example</groupId>
<artifactId>hello-world</artifactId>
<version>0.1-SNAPSHOT</version>
<packaging>war</packaging>
<name>Jetty HelloWorld WebApp</name>
<properties>
<jettyVersion>12.0.9-SNAPSHOT</jettyVersion>
</properties>
<dependencies>
<dependency>
<groupId>jakarta.servlet</groupId>
<artifactId>jakarta.servlet-api</artifactId>
<version>6.0.0</version>
<scope>provided</scope>
</dependency>
</dependencies>
<build>
<plugins>
<plugin>
<groupId>org.eclipse.jetty.ee10</groupId>
<artifactId>jetty-ee10-maven-plugin</artifactId>
<version>${jettyVersion}</version>
</plugin>
</plugins>
</build>
</project>Building and Running the Web Application
The web application can now be built and run without first needing to assemble it into a war by using the jetty-maven-plugin via the command:
> mvn jetty:run
You can see the static and dynamic content at http://localhost:8080/hello
There are a great deal of configuration options available for the jetty-maven-plugin to help you build and run your webapp. The full reference is at Configuring the Jetty Maven Plugin.
Building a WAR file
A Web Application Archive (WAR) file can be produced from the project with the command:
> mvn package
The resulting war file is in the target directory and may be deployed on any standard servlet server, including Jetty.
Using the Jetty Maven Plugin
The Jetty Maven plugin is useful for rapid development and testing. It can optionally periodically scan a project for changes and automatically redeploy the webapp if any are found. This makes the development cycle more productive by eliminating the build and deploy steps: use an IDE to make changes to the project, and the running web container automatically picks them up, allowing them to be tested straight away.
There are only 4 goals to run a webapp in Jetty:
Plus two utility goals:
jetty:run and jetty:start are alike in that they both run an unassembled webapp in Jetty,however jetty:run is designed to be used at the command line, whereas jetty:start is specifically designed to be bound to execution phases in the build lifecycle.
jetty:run will pause Maven while jetty is running, echoing all output to the console, and then stop Maven when jetty exits.
jetty:start will not pause Maven, will write all its output to a file, and will not stop Maven when jetty exits.
jetty:run-war and jetty:start-war are similar in that they both run an assembled war file in Jetty.
However, jetty:run-war is designed to be run at the command line, whereas jetty:start-war is specifically designed to be bound to execution phases in the build lifecycle.
jetty:run-war will pause Maven while Jetty is running, echoing all output to the console, and then stop Maven when Jetty exits.
jetty:start-war will not pause Maven, will write all its output to a file, and will not stop Maven when Jetty exits.
|
While the Jetty Maven Plugin can be very useful for development we do not recommend its use in a production capacity. In order for the plugin to work it needs to leverage many internal Maven APIs and Maven itself it not a production deployment tool. We recommend either the traditional distribution deployment approach or using embedded Jetty. |
Get Up and Running
Since Jetty 12, Jetty Maven plugin is repackaged for the corresponding Jakarta EE version with an eeX classifier in the groupId and artifactId.
First, add jetty-ee{8,9,10}-maven-plugin to your pom.xml definition. Here’s an example of how to do that for Jakarta EE 10:
<plugin>
<groupId>org.eclipse.jetty.ee10</groupId>
<artifactId>jetty-ee10-maven-plugin</artifactId>
<version>12.0.9-SNAPSHOT</version>
</plugin>Then, from the same directory as the project’s root pom.xml, type:
mvn jetty:run
This starts Jetty and serves up the project on http://localhost:8080/.
Jetty will continue to run until you stop it.
By default, it will not automatically restart your webapp.
Set a non-zero <scan> value to have Jetty scan your webapp for changes and automatically redeploy, or set <scan> to 0 to cause manual redeployment by hitting the Enter key.
Terminate the plugin with a Ctrl+c in the terminal window where it is running.
|
The classpath of the running Jetty instance and its deployed webapp are managed by Maven, and may not be exactly what you expect.
For example: a webapp’s dependent jars might be referenced via the local repository, or other projects in the reactor, not the |
Supported Goals
The goals prefixed with "run-" are designed to be used at the command line.
They first run a Maven build on your project to ensure at least the classes are all built.
They then start Jetty and pause the Maven build process until Jetty is manually terminated, at which time the build will also be terminated.
Jetty can scan various files in your project for changes and redeploy the webapp as necessary, or you can choose to manually trigger a redeploy if you prefer.
All output from Jetty is echoed to the console.
The goals prefixed with "start-" are designed to be used with build lifecycle bindings in the pom, and not at the command line.
No part of your project will be rebuilt by invoking these goals - you should ensure that your bind the execution to a build phase where all necessary parts of your project have been built.
Maven will start and terminate Jetty at the appropriate points in the build lifecycle, continuing with the build.
Jetty will not scan any files in your project for changes, and your webapp will not be redeployed either automatically or manually.
Output from Jetty is directed to a file in the target directory.
To see a list of all goals supported by the Jetty Maven plugin, do:
mvn jetty:help
To see the detailed list of parameters that can be configured for a particular goal, in addition to its description, do:
mvn jetty:help -Ddetail=true -Dgoal=<goalName>
Deployment Modes
All of the "run-" and "start-" goals can deploy your webapp either into the running maven process, or forked into a new child process, or forked into a Jetty distribution on disk.
This is controlled by setting the deployMode configuration parameter in the pom, but can also be set by defining the Maven property 'jetty.deployMode'.
Embedded
deployMode of EMBED.
This is the "classic" Jetty Maven plugin deployment mode, running in-process with Maven.
This is the default mode.
These extra configuration parameters are available:
- httpConnector
-
Optional. Note that to configure a https connector, you will need to use xml configuration files instead, setting the
jettyXmlsparameter. This parameter can only be used to configure a standard http connector. If not specified, Jetty will create a ServerConnector instance listening on port 8080. You can change this default port number by using the system propertyjetty.http.porton the command line, for example,mvn -Djetty.http.port=9999 jetty:run. Alternatively, you can use this configuration element to set up the information for the ServerConnector. The following are the valid configuration sub-elements:- port
-
The port number for the connector to listen on. By default it is 8080.
- host
-
The particular interface for the connector to listen on. By default, all interfaces.
- name
-
The name of the connector, which is useful for configuring contexts to respond only on particular connectors.
- idleTimeout
-
Maximum idle time for a connection. You could instead configure the connectors in a standard Jetty xml config file and put its location into the
jettyXmlparameter. Note that since Jetty 9.0 it is no longer possible to configure a https connector directly in the pom.xml: you need to use Jetty xml config files to do it.
- loginServices
-
Optional. A list of
org.eclipse.jetty.security.LoginServiceimplementations. Note that there is no default realm. If you use a realm in yourweb.xmlyou can specify a corresponding realm here. You could instead configure the login services in a jetty xml file and add its location to thejettyXmlparameter. See Configuring Security. - requestLog
-
Optional. An implementation of the
org.eclipse.jetty.server.RequestLogrequest log interface. There are three other ways to configure theRequestLog:-
In a Jetty xml config file, as specified in the
jettyXmlparameter. -
In a context xml config file, as specified in the
contextXmlparameter. -
In the
webAppelement.
See Configuring Request Logs for more information.
-
- server
-
Optional as of Jetty 9.3.1. This would configure an instance of
org.eclipse.jetty.server.Serverfor the plugin to use, however it is usually not necessary to configure this, as the plugin will automatically configure one for you. In particular, if you use thejettyXmlselement, then you generally don’t want to define this element, as you are probably using thejettyXmlsfile/s to configure up a Server with a special constructor argument, such as a custom threadpool. If you define both aserverelement and use ajettyXmlselement which points to a config file that has a line like<Configure id="Server" class="org.eclipse.jetty.server.Server">then the the xml configuration will override what you configure for theserverin thepom.xml. - useProvidedScope
-
Default value is
false. If true, the dependencies with<scope>provided</scope>are placed onto the container classpath. Be aware that this is not the webapp classpath, asprovidedindicates that these dependencies would normally be expected to be provided by the container. You should very rarely ever need to use this. See Container Classpath vs WebApp Classpath.
Forked
deployMode of FORK.
This is similar to the old "jetty:run-forked" goal - a separate process is forked to run your webapp embedded into jetty.
These extra configuration parameters are available:
- env
-
Optional. Map of key/value pairs to pass as environment to the forked JVM.
- jvmArgs
-
Optional. A space separated string representing arbitrary arguments to pass to the forked JVM.
- forkWebXml
-
Optional. Defaults to
target/fork-web.xml. This is the location of a quickstart web xml file that will be generated during the forking of the jetty process. You should not need to set this parameter, but it is available if you wish to control the name and location of that file. - useProvidedScope
-
Default value is
false. If true, the dependencies with<scope>provided</scope>are placed onto the container classpath. Be aware that this is NOT the webapp classpath, as "provided" indicates that these dependencies would normally be expected to be provided by the container. You should very rarely ever need to use this. See Container Classpath vs WebApp Classpath.
In a jetty distribution
deployMode of EXTERNAL.
This is similar to the old "jetty:run-distro" goal - your webapp is deployed into a dynamically downloaded, unpacked and configured Jetty distribution.
A separate process is forked to run it.
These extra configuration parameters are available:
- jettyBase
-
Optional. The location of an existing Jetty base directory to use to deploy the webapp. The existing base will be copied to the
target/directory before the webapp is deployed. If there is no existing jetty base, a fresh one will be made intarget/jetty-base. - jettyHome
-
Optional. The location of an existing unpacked Jetty distribution. If one does not exist, a fresh Jetty distribution will be downloaded from Maven and installed to the
targetdirectory. - jettyOptions
-
Optional. A space separated string representing extra arguments to the synthesized Jetty command line. Values for these arguments can be found in the section titled "Options" in the output of
java -jar $jetty.home/start.jar --help. - jvmArgs
-
Optional. A space separated string representing arguments that should be passed to the jvm of the child process running the distro.
- modules
-
Optional. An array of names of additional Jetty modules that the Jetty child process will activate. Use this to change the container classpath instead of
useProvidedScope. These modules are enabled by default:server,http,webapp,deploy.
Common Configuration
The following configuration parameters are common to all of the "run-" and "start-" goals:
- deployMode
-
One of
EMBED,FORKorEXTERNAL. DefaultEMBED. Can also be configured by setting the Maven propertyjetty.deployMode. This parameter determines whether the webapp will run in Jetty in-process with Maven, forked into a new process, or deployed into a Jetty distribution. See Deployment Modes. - jettyXmls
-
Optional. A comma separated list of locations of Jetty xml files to apply in addition to any plugin configuration parameters. You might use it if you have other webapps, handlers, specific types of connectors etc., to deploy, or if you have other Jetty objects that you cannot configure from the plugin.
- skip
-
Default is false. If true, the execution of the plugin exits. Same as setting the SystemProperty
-Djetty.skipon the command line. This is most useful when configuring Jetty for execution during integration testing and you want to skip the tests. - excludedGoals
-
Optional. A list of Jetty plugin goal names that will cause the plugin to print an informative message and exit. Useful if you want to prevent users from executing goals that you know cannot work with your project.
- supportedPackagings
-
Optional. Defaults to
war. This is a list of maven <packaging> types that can work with the jetty plugin. Usually, onlywarprojects are suitable, however, you may configure other types. The plugin will refuse to start if the <packaging> type in the pom is not in list ofsupportedPackagings. - systemProperties
-
Optional. Allows you to configure System properties for the execution of the plugin. For more information, see Setting System Properties.
- systemPropertiesFile
-
Optional. A file containing System properties to set for the execution of the plugin. By default, settings that you make here do not override any system properties already set on the command line, by the JVM, or in the POM via
systemProperties. Read Setting System Properties for how to force overrides. - jettyProperties
-
Optional. A map of property name, value pairs. Allows you to configure standard jetty properties.
Container Classpath vs WebApp Classpath
The Servlet Specification makes a strong distinction between the classpath for a webapp, and the classpath of the container. When running in Maven, the plugin’s classpath is equivalent to the container classpath. It will make a classpath for the webapp to be deployed comprised of <dependencies> specified in the pom.
If your production environment places specific jars onto the container’s classpath, the equivalent way to do this with Maven is to define these as <dependencies> for the plugin itself, not the project. See configuring maven plugins.
This is suitable if you are using either EMBED or FORK mode.
If you are using EXTERNAL mode, then you should configure the modules parameter with the names of the Jetty modules that place these jars onto the container classpath.
Note that in EMBED or FORK mode, you could also influence the container classpath by setting the useProvidedScope parameter to true: this will place any dependencies with <scope>provided<scope> onto the plugin’s classpath.
Use this very cautiously: as the plugin already automatically places most Jetty jars onto the classpath, you could wind up with duplicate jars.
jetty:run
The run goal deploys a webapp that is not first built into a WAR.
A virtual webapp is constructed from the project’s sources and its dependencies.
It looks for the constituent parts of a webapp in the Maven default project locations, although you can override these in the plugin configuration.
For example, by default it looks for:
-
resources in
${project.basedir}/src/main/webapp -
classes in
${project.build.outputDirectory} -
web.xmlin${project.basedir}/src/main/webapp/WEB-INF/
The plugin first runs a Maven parallel build to ensure that the classes are built and up-to-date before deployment.
If you change the source of a class and your IDE automatically compiles it in the background, the plugin picks up the changed class (note you need to configure a non-zero scan interval for automatic redeployment).
If the plugin is invoked in a multi-module build, any dependencies that are also in the Maven reactor are used from their compiled classes.
Once invoked, you can configure the plugin to run continuously, scanning for changes in the project and automatically performing a hot redeploy when necessary. Any changes you make are immediately reflected in the running instance of Jetty, letting you quickly jump from coding to testing, rather than going through the cycle of: code, compile, reassemble, redeploy, test.
The Maven build will be paused until Jetty exits, at which time Maven will also exit.
Stopping Jetty is accomplished by typing cntrl-c at the command line.
Output from Jetty will be logged to the console.
Here is an example, which turns on scanning for changes every ten seconds, and sets the webapp context path to /test:
<plugin>
<groupId>org.eclipse.jetty.ee10</groupId>
<artifactId>jetty-ee10-maven-plugin</artifactId>
<version>12.0.9-SNAPSHOT</version>
<configuration>
<scan>10</scan>
<webApp>
<contextPath>/test</contextPath>
</webApp>
</configuration>
</plugin>Configuration
- webApp
-
This is an instance of org.eclipse.jetty.ee10.maven.plugin.MavenWebAppContext, which is an extension to the class
org.eclipse.jetty.ee10.webapp.WebAppContext. You can use any of the setter methods on this object to configure your webapp. Here are a few of the most useful ones:- contextPath
-
The context path for your webapp. By default, this is set to
/. If using a custom value for this parameter, you should include the leading/, example/mycontext. - descriptor
-
The path to the
web.xmlfile for your webapp. By default, the plugin will look insrc/main/webapp/WEB-INF/web.xml. - defaultsDescriptor
-
The path to a
webdefault.xmlfile that will be applied to your webapp before theweb.xml. If you don’t supply one, Jetty uses a default file baked into thejetty-ee10-webapp.jar. - overrideDescriptor
-
The path to a
web.xmlfile that Jetty applies after reading yourweb.xml. You can use this to replace or add configuration. - jettyEnvXml
-
Optional. Location of a
jetty-env.xmlfile, which allows you to make JNDI bindings that satisfyenv-entry,resource-env-ref, andresource-reflinkages in theweb.xmlthat are scoped only to the webapp and not shared with other webapps that you might be deploying at the same time (for example, by using ajettyXmlfile). - tempDirectory
-
The path to a dir that Jetty can use to expand or copy jars and jsp compiles when your webapp is running. The default is
${project.build.outputDirectory}/tmp. - baseResource
-
The path from which Jetty serves static resources. Defaults to
src/main/webapp. If this location does not exist (because, for example, your project does not use static content), then the plugin will synthesize a virtual static resource location oftarget/webapp-synth. - resourceBases
-
Use instead of
baseResourceif you have multiple directories from which you want to serve static content. This is an array of directory locations, either as urls or file paths. - baseAppFirst
-
Defaults to "true". Controls whether any overlaid wars are added before or after the original base resource(s) of the webapp. See the section on overlaid wars for more information.
- containerIncludeJarPattern
-
Defaults to
./jetty-jakarta-servlet-api-[/]\.jar$|.jakarta.servlet.jsp.jstl-[/]\.jar|.taglibs-standard-impl-.\.jar. This is a pattern that is applied to the names of the jars on the container’s classpath (ie the classpath of the plugin, not that of the webapp) that should be scanned for fragments, tlds, annotations etc. This is analogous to the context attribute org.eclipse.jetty.server.webapp.ContainerIncludeJarPattern that is documented here. You can define extra patterns of jars that will be included in the scan. - webInfIncludeJarPattern
-
Defaults to matching all of the dependency jars for the webapp (ie the equivalent of WEB-INF/lib). You can make this pattern more restrictive to only match certain jars by using this setter. This is analogous to the context attribute org.eclipse.jetty.server.webapp.WebInfIncludeJarPattern that is documented here.
- contextXml
-
The path to a context xml file that is applied to your webapp AFTER the
webAppelement. - classesDirectory
-
Location of your compiled classes for the webapp. You should rarely need to set this parameter. Instead, you should set
<build><outputDirectory>in yourpom.xml. - testClassesDirectory
-
Location of the compiled test classes for your webapp. By default this is
${project.build.testOutputDirectory}. - useTestScope
-
If true, the classes from
testClassesDirectoryand dependencies of scope "test" are placed first on the classpath. By default this is false. - scan
-
The pause in seconds between sweeps of the webapp to check for changes and automatically hot redeploy if any are detected. By default this is
-1, which disables hot redeployment scanning. A value of0means no hot redeployment is done, and that you must use the Enter key to manually force a redeploy. Any positive integer will enable hot redeployment, using the number as the sweep interval in seconds. - scanTargetPatterns
-
Optional. List of extra directories with glob-style include/excludes patterns (see javadoc for FileSystem.getPathMatcher) to specify other files to periodically scan for changes.
- scanClassesPattern
-
Optional. Include and exclude patterns that can be applied to the classesDirectory for the purposes of scanning, it does not affect the classpath. If a file or directory is excluded by the patterns then a change in that file (or subtree in the case of a directory) is ignored and will not cause the webapp to redeploy. Patterns are specified as a relative path using a glob-like syntax as described in the javadoc for FileSystem.getPathMatcher.
- scanTestClassesPattern
-
Optional. Include and exclude patterns that can be applied to the testClassesDirectory for the purposes of scanning, it does not affect the classpath. If a file or directory is excluded by the patterns then a change in that file (or subtree in the case of a directory) is ignored and will not cause the webapp to redeploy. Patterns are specified as a relative path using a glob-like syntax as described in the javadoc for FileSystem.getPathMatcher.
See Deployment Modes for other configuration parameters available when using the run goal in EMBED, FORK or EXTERNAL modes.
Here is an example of a pom configuration for the plugin with the run goal:
<project>
...
<plugins>
...
<plugin>
<groupId>org.eclipse.jetty.ee10</groupId>
<artifactId>jetty-ee10-maven-plugin</artifactId>
<version>12.0.9-SNAPSHOT</version>
<configuration>
<webApp>
<contextPath>/</contextPath>
<descriptor>${project.basedir}/src/over/here/web.xml</descriptor>
<jettyEnvXml>${project.basedir}/src/over/here/jetty-env.xml</jettyEnvXml>
<baseResource>${project.basedir}/src/staticfiles</baseResource>
</webApp>
<classesDirectory>${project.basedir}/somewhere/else</classesDirectory>
<scanClassesPattern>
<excludes>
<exclude>**/Foo.class</exclude>
</excludes>
</scanClassesPattern>
<scanTargetPatterns>
<scanTargetPattern>
<directory>src/other-resources</directory>
<includes>
<include>**/*.xml</include>
<include>**/*.properties</include>
</includes>
<excludes>
<exclude>**/myspecial.xml</exclude>
<exclude>**/myspecial.properties</exclude>
</excludes>
</scanTargetPattern>
</scanTargetPatterns>
</configuration>
</plugin>
</plugins>
...
</project>If, for whatever reason, you cannot run on an unassembled webapp, the goal run-war works on assembled webapps.
jetty:run-war
When invoked at the command line this goal first executes a maven build of your project to the package phase.
By default it then deploys the resultant war to Jetty, but you can use this goal instead to deploy any war file by simply setting the <webApp><war> configuration parameter to its location.
If you set a non-zero scan, Jetty watches your pom.xml and the WAR file; if either changes, it redeploys the war.
The maven build is held up until Jetty exits, which is achieved by typing cntrl-c at the command line.
All Jetty output is directed to the console.
Configuration
Configuration parameters are:
- webApp
-
- war
-
The location of the built WAR file. This defaults to
${project.build.directory}/${project.build.finalName}.war. You can set it to the location of any pre-built war file. - contextPath
-
The context path for your webapp. By default, this is set to
/. If using a custom value for this parameter, you should include the leading/, example/mycontext. - defaultsDescriptor
-
The path to a
webdefault.xmlfile that will be applied to your webapp before theweb.xml. If you don’t supply one, Jetty uses a default file baked into thejetty-ee10-webapp.jar. - overrideDescriptor
-
The path to a
web.xmlfile that Jetty applies after reading yourweb.xml. You can use this to replace or add configuration. - containerIncludeJarPattern
-
Defaults to
./jetty-jakarta-servlet-api-[/]\.jar$|.jakarta.servlet.jsp.jstl-[/]\.jar|.taglibs-standard-impl-.\.jar. This is a pattern that is applied to the names of the jars on the container’s classpath (ie the classpath of the plugin, not that of the webapp) that should be scanned for fragments, tlds, annotations etc. This is analogous to the context attribute org.eclipse.jetty.server.webapp.ContainerIncludeJarPattern that is documented here. You can define extra patterns of jars that will be included in the scan. - webInfIncludeJarPattern
-
Defaults to matching all of the dependency jars for the webapp (ie the equivalent of WEB-INF/lib). You can make this pattern more restrictive to only match certain jars by using this setter. This is analogous to the context attribute org.eclipse.jetty.server.webapp.WebInfIncludeJarPattern that is documented here.
- tempDirectory
-
The path to a dir that Jetty can use to expand or copy jars and jsp compiles when your webapp is running. The default is
${project.build.outputDirectory}/tmp. - contextXml
-
The path to a context xml file that is applied to your webapp AFTER the
webAppelement.
- scan
-
The pause in seconds between sweeps of the webapp to check for changes and automatically hot redeploy if any are detected. By default this is
-1, which disables hot redeployment scanning. A value of0means no hot redeployment is done, and that you must use the Enter key to manually force a redeploy. Any positive integer will enable hot redeployment, using the number as the sweep interval in seconds. - scanTargetPatterns
-
Optional. List of directories with ant-style include/excludes patterns to specify other files to periodically scan for changes.
See Deployment Modes for other configuration parameters available when using the run-war goal in EMBED, FORK or EXTERNAL modes.
jetty:start
This is similar to the jetty:run goal, however it is not designed to be run from the command line and does not first execute the build up until the test-compile phase to ensure that all necessary classes and files of the webapp have been generated.
It will not scan your project for changes and restart your webapp.
It does not pause maven until Jetty is stopped.
Instead, it is designed to be used with build phase bindings in your pom. For example to you can have Maven start your webapp at the beginning of your tests and stop at the end.
If the plugin is invoked as part of a multi-module build, any dependencies that are also in the maven reactor are used from their compiled classes.
Here’s an example of using the pre-integration-test and post-integration-test Maven build phases to trigger the execution and termination of Jetty:
<plugin>
<groupId>org.eclipse.jetty.ee10</groupId>
<artifactId>jetty-ee10-maven-plugin</artifactId>
<version>12.0.9-SNAPSHOT</version>
<configuration>
<stopKey>foo</stopKey>
<stopPort>9999</stopPort>
</configuration>
<executions>
<execution>
<id>start-jetty</id>
<phase>pre-integration-test</phase>
<goals>
<goal>start</goal>
</goals>
</execution>
<execution>
<id>stop-jetty</id>
<phase>post-integration-test</phase>
<goals>
<goal>stop</goal>
</goals>
</execution>
</executions>
</plugin>This goal will generate output from jetty into the target/jetty-start.out file.
Configuration
These configuration parameters are available:
- webApp
-
This is an instance of org.eclipse.jetty.ee10.maven.plugin.MavenWebAppContext, which is an extension to the class
org.eclipse.jetty.ee9.webapp.WebAppContext. You can use any of the setter methods on this object to configure your webapp. Here are a few of the most useful ones:- contextPath
-
The context path for your webapp. By default, this is set to
/. If using a custom value for this parameter, you should include the leading/, example/mycontext. - descriptor
-
The path to the
web.xmlfile for your webapp. The default issrc/main/webapp/WEB-INF/web.xml. - defaultsDescriptor
-
The path to a
webdefault.xmlfile that will be applied to your webapp before theweb.xml. If you don’t supply one, Jetty uses a default file baked into thejetty-ee10-webapp.jar. - overrideDescriptor
-
The path to a
web.xmlfile that Jetty applies after reading yourweb.xml. You can use this to replace or add configuration. - jettyEnvXml
-
Optional. Location of a
jetty-env.xmlfile, which allows you to make JNDI bindings that satisfyenv-entry,resource-env-ref, andresource-reflinkages in theweb.xmlthat are scoped only to the webapp and not shared with other webapps that you might be deploying at the same time (for example, by using ajettyXmlfile). - tempDirectory
-
The path to a dir that Jetty can use to expand or copy jars and jsp compiles when your webapp is running. The default is
${project.build.outputDirectory}/tmp. - baseResource
-
The path from which Jetty serves static resources. Defaults to
src/main/webapp. - resourceBases
-
Use instead of
baseResourceif you have multiple directories from which you want to serve static content. This is an array of directory names. - baseAppFirst
-
Defaults to "true". Controls whether any overlaid wars are added before or after the original base resource(s) of the webapp. See the section on overlaid wars for more information.
- containerIncludeJarPattern
-
Defaults to
./jetty-jakarta-servlet-api-[/]\.jar$|.jakarta.servlet.jsp.jstl-[/]\.jar|.taglibs-standard-impl-.\.jar. This is a pattern that is applied to the names of the jars on the container’s classpath (ie the classpath of the plugin, not that of the webapp) that should be scanned for fragments, tlds, annotations etc. This is analogous to the context attribute org.eclipse.jetty.server.webapp.ContainerIncludeJarPattern that is documented here. You can define extra patterns of jars that will be included in the scan. - webInfIncludeJarPattern
-
Defaults to matching all of the dependency jars for the webapp (ie the equivalent of WEB-INF/lib). You can make this pattern more restrictive to only match certain jars by using this setter. This is analogous to the context attribute org.eclipse.jetty.server.webapp.WebInfIncludeJarPattern that is documented here.
- contextXml
-
The path to a context xml file that is applied to your webapp AFTER the
webAppelement. - classesDirectory
-
Location of your compiled classes for the webapp. You should rarely need to set this parameter. Instead, you should set
build outputDirectoryin yourpom.xml. - testClassesDirectory
-
Location of the compiled test classes for your webapp. By default this is
${project.build.testOutputDirectory}. - useTestScope
-
If true, the classes from
testClassesDirectoryand dependencies of scope "test" are placed first on the classpath. By default this is false. - stopPort
-
Optional. Port to listen on for stop commands. Useful to use in conjunction with the stop and start goals.
- stopKey
-
Optional. Used in conjunction with stopPort for stopping jetty. Useful to use in conjunction with the stop and start goals.
These additional configuration parameters are available when running in FORK or EXTERNAL mode:
- maxChildStartChecks
-
Default is
10. This is maximum number of times the parent process checks to see if the forked jetty process has started correctly - maxChildStartCheckMs
-
Default is
200. This is the time in milliseconds between checks on the startup of the forked jetty process.
jetty:start-war
Similarly to the jetty:start goal, jetty:start-war is designed to be bound to build lifecycle phases in your pom.
It will not scan your project for changes and restart your webapp. It does not pause maven until Jetty is stopped.
By default, if your pom is for a webapp project, it will deploy the war file for the project to jetty.
However, like the jetty:run-war project, you can nominate any war file to deploy by defining its location in the <webApp><war> parameter.
If the plugin is invoked as part of a multi-module build, any dependencies that are also in the Maven reactor are used from their compiled classes.
This goal will generate output from jetty into the target/jetty-start-war.out file.
Configuration
These configuration parameters are available:
- webApp
-
- war
-
The location of the built WAR file. This defaults to
${project.build.directory}/${project.build.finalName}.war. You can set it to the location of any pre-built war file. - contextPath
-
The context path for your webapp. By default, this is set to
/. If using a custom value for this parameter, you should include the leading/, example/mycontext. - defaultsDescriptor
-
The path to a
webdefault.xmlfile that will be applied to your webapp before theweb.xml. If you don’t supply one, Jetty uses a default file baked into thejetty-ee10-webapp.jar. - overrideDescriptor
-
The path to a
web.xmlfile that Jetty applies after reading yourweb.xml. You can use this to replace or add configuration. - containerIncludeJarPattern
-
Defaults to
./jetty-jakarta-servlet-api-[/]\.jar$|.jakarta.servlet.jsp.jstl-[/]\.jar|.taglibs-standard-impl-.\.jar. This is a pattern that is applied to the names of the jars on the container’s classpath (ie the classpath of the plugin, not that of the webapp) that should be scanned for fragments, tlds, annotations etc. This is analogous to the context attribute org.eclipse.jetty.server.webapp.ContainerIncludeJarPattern that is documented here. You can define extra patterns of jars that will be included in the scan. - webInfIncludeJarPattern
-
Defaults to matching all of the dependency jars for the webapp (ie the equivalent of WEB-INF/lib). You can make this pattern more restrictive to only match certain jars by using this setter. This is analogous to the context attribute org.eclipse.jetty.server.webapp.WebInfIncludeJarPattern that is documented here.
- tempDirectory
-
The path to a dir that Jetty can use to expand or copy jars and jsp compiles when your webapp is running. The default is
${project.build.outputDirectory}/tmp. - contextXml
-
The path to a context xml file that is applied to your webapp AFTER the
webAppelement.
- stopPort
-
Optional. Port to listen on for stop commands. Useful to use in conjunction with the stop.
- stopKey
-
Optional. Used in conjunction with stopPort for stopping jetty. Useful to use in conjunction with the stop.
These additional configuration parameters are available when running in FORK or EXTERNAL mode:
- maxChildStartChecks
-
Default is
10. This is maximum number of times the parent process checks to see if the forked Jetty process has started correctly - maxChildStartCheckMs
-
Default is
200. This is the time in milliseconds between checks on the startup of the forked Jetty process.
jetty:stop
The stop goal stops a FORK or EXTERNAL mode running instance of Jetty. To use it, you need to configure the plugin with a special port number and key. That same port number and key will also be used by the other goals that start Jetty.
Configuration
- stopPort
-
A port number for Jetty to listen on to receive a stop command to cause it to shutdown.
- stopKey
-
A string value sent to the
stopPortto validate the stop command. - stopWait
-
The maximum time in seconds that the plugin will wait for confirmation that Jetty has stopped. If false or not specified, the plugin does not wait for confirmation but exits after issuing the stop command.
Here’s a configuration example:
<plugin>
<groupId>org.eclipse.jetty.ee10</groupId>
<artifactId>jetty-ee10-maven-plugin</artifactId>
<version>12.0.9-SNAPSHOT</version>
<configuration>
<stopPort>9966</stopPort>
<stopKey>foo</stopKey>
<stopWait>10</stopWait>
</configuration>
</plugin>Then, while Jetty is running (in another window), type:
mvn jetty:stop
The stopPort must be free on the machine you are running on.
If this is not the case, you will get an "Address already in use" error message after the "Started ServerConnector …" message.
jetty:effective-web-xml
This goal calculates a synthetic web.xml (the "effective web.xml") according to the rules of the Servlet Specification taking into account all sources of discoverable configuration of web components in your application: descriptors (webdefault.xml, web.xml, web-fragment.xml`s, `web-override.xml) and discovered annotations (@WebServlet, @WebFilter, @WebListener).
No programmatic declarations of servlets, filters and listeners can be taken into account.
You can calculate the effective web.xml for any pre-built war file by setting the <webApp><war> parameter, or you can calculate it for the unassembled webapp by setting all of the usual <webApp> parameters as for jetty:run.
Other useful information about your webapp that is produced as part of the analysis is also stored as context parameters in the effective-web.xml. The effective-web.xml can be used in conjunction with the Quickstart feature to quickly start your webapp (note that Quickstart is not appropriate for the mvn Jetty goals).
The effective web.xml from these combined sources is generated into a file, which by default is target/effective-web.xml, but can be changed by setting the effectiveWebXml configuration parameter.
Configuration
- effectiveWebXml
-
The full path name of a file into which you would like the effective web xml generated.
- webApp
-
- war
-
The location of the built WAR file. This defaults to
${project.build.directory}/${project.build.finalName}.war. You can set it to the location of any pre-built war file. Or you can leave it blank and set up the otherwebAppparameters as per jetty:run, as well as thewebAppSourceDirectory,classesandtestClassesparameters. - contextPath
-
The context path for your webapp. By default, this is set to
/. If using a custom value for this parameter, you should include the leading/, example/mycontext. - defaultsDescriptor
-
The path to a
webdefault.xmlfile that will be applied to your webapp before theweb.xml. If you don’t supply one, Jetty uses a default file baked into thejetty-ee10-webapp.jar. - overrideDescriptor
-
The path to a
web.xmlfile that Jetty applies after reading yourweb.xml. You can use this to replace or add configuration. - containerIncludeJarPattern
-
Defaults to
./jetty-jakarta-servlet-api-[/]\.jar$|.jakarta.servlet.jsp.jstl-[/]\.jar|.taglibs-standard-impl-.\.jar. This is a pattern that is applied to the names of the jars on the container’s classpath (ie the classpath of the plugin, not that of the webapp) that should be scanned for fragments, tlds, annotations etc. This is analogous to the context attribute org.eclipse.jetty.server.webapp.ContainerIncludeJarPattern that is documented here. You can define extra patterns of jars that will be included in the scan. - webInfIncludeJarPattern
-
Defaults to matching all of the dependency jars for the webapp (ie the equivalent of WEB-INF/lib). You can make this pattern more restrictive to only match certain jars by using this setter. This is analogous to the context attribute org.eclipse.jetty.server.webapp.WebInfIncludeJarPattern that is documented here.
- tempDirectory
-
The path to a dir that Jetty can use to expand or copy jars and jsp compiles when your webapp is running. The default is
${project.build.outputDirectory}/tmp. - contextXml
-
The path to a context xml file that is applied to your webapp AFTER the
webAppelement.
You can also generate the origin of each element into the effective web.xml file. The origin is either a descriptor eg web.xml,web-fragment.xml,override-web.xml file, or an annotation eg @WebServlet. Some examples of elements with origin attribute information are:
<listener origin="DefaultsDescriptor(file:///path/to/distro/etc/webdefault.xml):21">
<listener origin="WebDescriptor(file:///path/to/base/webapps/test-spec/WEB-INF/web.xml):22">
<servlet-class origin="FragmentDescriptor(jar:file:///path/to/base/webapps/test-spec/WEB-INF/lib/test-web-fragment.jar!/META-INF/web-fragment.xml):23">
<servlet-class origin="@WebServlet(com.acme.test.TestServlet):24">To generate origin information, use the following configuration parameters on the webApp element:
- originAttribute
-
The name of the attribute that will contain the origin. By default it is
origin. - generateOrigin
-
False by default. If true, will force the generation of the
originAttributeonto each element.
Using Overlaid wars
If your webapp depends on other war files, the jetty:run and jetty:start goals are able to merge resources from all of them. It can do so based on the settings of the maven-war-plugin, or if your project does not use the maven-war-plugin to handle the overlays, it can fall back to a simple algorithm to determine the ordering of resources.
With maven-war-plugin
The maven-war-plugin has a rich set of capabilities for merging resources.
The jetty:run and jetty:start goals are able to interpret most of them and apply them during execution of your unassembled webapp.
This is probably best seen by looking at a concrete example.
Suppose your webapp depends on the following wars:
<dependency>
<groupId>com.acme</groupId>
<artifactId>X</artifactId>
<type>war</type>
</dependency>
<dependency>
<groupId>com.acme</groupId>
<artifactId>Y</artifactId>
<type>war</type>
</dependency>Containing:
WebAppX: /foo.jsp /bar.jsp /WEB-INF/web.xml WebAppY: /bar.jsp /baz.jsp /WEB-INF/web.xml /WEB-INF/special.xml
They are configured for the maven-war-plugin:
<plugin>
<groupId>org.apache.maven.plugins</groupId>
<artifactId>maven-war-plugin</artifactId>
<version>12.0.9-SNAPSHOT</version>
<configuration>
<overlays>
<overlay>
<groupId>com.acme</groupId>
<artifactId>X</artifactId>
<excludes>
<exclude>bar.jsp</exclude>
</excludes>
</overlay>
<overlay>
<groupId>com.acme</groupId>
<artifactId>Y</artifactId>
<excludes>
<exclude>baz.jsp</exclude>
</excludes>
</overlay>
<overlay>
</overlay>
</overlays>
</configuration>
</plugin>Then executing jetty:run would yield the following ordering of resources: com.acme.X.war : com.acme.Y.war: ${project.basedir}/src/main/webapp.
Note that the current project’s resources are placed last in the ordering due to the empty <overlay/> element in the maven-war-plugin.
You can either use that, or specify the <baseAppFirst>false</baseAppFirst> parameter to the jetty-ee10-maven-plugin.
Moreover, due to the exclusions specified above, a request for the resource ` bar.jsp` would only be satisfied from com.acme.Y.war.
Similarly as baz.jsp is excluded, a request for it would result in a 404 error.
Without maven-war-plugin
The algorithm is fairly simple, is based on the ordering of declaration of the dependent wars, and does not support exclusions.
The configuration parameter <baseAppFirst> (see for example jetty:run for more information) can be used to control whether your webapp’s resources are placed first or last on the resource path at runtime.
For example, suppose our webapp depends on these two wars:
<dependency>
<groupId>com.acme</groupId>
<artifactId>X</artifactId>
<type>war</type>
</dependency>
<dependency>
<groupId>com.acme</groupId>
<artifactId>Y</artifactId>
<type>war</type>
</dependency>Suppose the webapps contain:
WebAppX: /foo.jsp /bar.jsp /WEB-INF/web.xml WebAppY: /bar.jsp /baz.jsp /WEB-INF/web.xml /WEB-INF/special.xml
Then our webapp has available these additional resources:
/foo.jsp (X) /bar.jsp (X) /baz.jsp (Y) /WEB-INF/web.xml (X) /WEB-INF/special.xml (Y)
Configuring Security Settings
You can configure LoginServices in the plugin.
Here’s an example of setting up the HashLoginService for a webapp:
<plugin>
<groupId>org.eclipse.jetty.ee10</groupId>
<artifactId>jetty-ee10-maven-plugin</artifactId>
<version>12.0.9-SNAPSHOT</version>
<configuration>
<scan>10</scan>
<webApp>
<contextPath>/test</contextPath>
</webApp>
<loginServices>
<loginService implementation="org.eclipse.jetty.security.HashLoginService">
<name>Test Realm</name>
<config>${project.basedir}/src/etc/realm.properties</config>
</loginService>
</loginServices>
</configuration>
</plugin>Using Multiple Webapp Root Directories
If you have external resources that you want to incorporate in the execution of a webapp, but which are not assembled into war files, you can’t use the overlaid wars method described above, but you can tell Jetty the directories in which these external resources are located. At runtime, when Jetty receives a request for a resource, it searches all the locations to retrieve the resource. It’s a lot like the overlaid war situation, but without the war.
Here is a configuration example:
<configuration>
<webApp>
<contextPath>/${build.finalName}</contextPath>
<resourceBases>
<resourceBase>src/main/webapp</resourceBase>
<resourceBase>/home/johndoe/path/to/my/other/source</resourceBase>
<resourceBase>/yet/another/folder</resourceBase>
</resourceBases>
</webApp>
</configuration>Running More than One Webapp
With jetty:run
You can use either a jetty.xml file to configure extra (pre-compiled) webapps that you want to deploy, or you can use the <contextHandlers> configuration element to do so.
If you want to deploy webapp A, and webapps B and C in the same Jetty instance:
Putting the configuration in webapp A’s pom.xml:
<plugin>
<groupId>org.eclipse.jetty.ee10</groupId>
<artifactId>jetty-ee10-maven-plugin</artifactId>
<version>12.0.9-SNAPSHOT</version>
<configuration>
<scan>10</scan>
<webApp>
<contextPath>/test</contextPath>
</webApp>
<contextHandlers>
<contextHandler implementation="org.eclipse.jetty.ee10.maven.plugin.MavenWebAppContext">
<war>${project.basedir}../../B.war</war>
<contextPath>/B</contextPath>
</contextHandler>
<contextHandler implementation="org.eclipse.jetty.ee10.maven.plugin.MavenWebAppContext">
<war>${project.basedir}../../C.war</war>
<contextPath>/C</contextPath>
</contextHandler>
</contextHandlers>
</configuration>
</plugin>|
If the |
Alternatively, add a jetty.xml file to webapp A.
Copy the jetty.xml file from the Jetty distribution, and then add WebAppContexts for the other 2 webapps:
<Ref refid="Contexts">
<Call name="addHandler">
<Arg>
<New class="org.eclipse.jetty.{ee-current}.maven.plugin.MavenWebAppContext">
<Set name="contextPath">/B</Set>
<Set name="war">../../B.war</Set>
</New>
</Arg>
</Call>
<Call>
<Arg>
<New class="org.eclipse.jetty.{ee-current}.maven.plugin.MavenWebAppContext">
<Set name="contextPath">/C</Set>
<Set name="war">../../C.war</Set>
</New>
</Arg>
</Call>
</Ref>Then configure the location of this jetty.xml file into webapp A’s Jetty plugin:
<plugin>
<groupId>org.eclipse.jetty.ee10</groupId>
<artifactId>jetty-ee10-maven-plugin</artifactId>
<version>12.0.9-SNAPSHOT</version>
<configuration>
<scan>10</scan>
<webApp>
<contextPath>/test</contextPath>
</webApp>
<jettyXml>src/main/etc/jetty.xml</jettyXml>
</configuration>
</plugin>For either of these solutions, the other webapps must already have been built, and they are not automatically monitored for changes. You can refer either to the packed WAR file of the pre-built webapps or to their expanded equivalents.
Setting System Properties
You can specify property name/value pairs that Jetty sets as System properties for the execution of the plugin. This feature is useful to tidy up the command line and save a lot of typing.
However, sometimes it is not possible to use this feature to set System properties - sometimes the software component using the System property is already initialized by the time that maven runs (in which case you will need to provide the System property on the command line), or by the time that Jetty runs. In the latter case, you can use the maven properties plugin to define the system properties instead. Here’s an example that configures the logback logging system as the Jetty logger:
<plugin>
<groupId>org.codehaus.mojo</groupId>
<artifactId>properties-maven-plugin</artifactId>
<executions>
<execution>
<goals>
<goal>set-system-properties</goal>
</goals>
<configuration>
<properties>
<property>
<name>logback.configurationFile</name>
<value>${project.baseUri}/resources/logback.xml</value>
</property>
</properties>
</configuration>
</execution>
</executions>
</plugin>|
If a System property is already set (for example, from the command line or by the JVM itself), then by default these configured properties DO NOT override them. However, they can override system properties set from a file instead, see specifying system properties in a file. |
Specifying System Properties in the POM
Here’s an example of how to specify System properties in the POM:
<plugin>
<groupId>org.eclipse.jetty.{ee-current}</groupId>
<artifactId>jetty-{ee-current}-maven-plugin</artifactId>
<configuration>
<systemProperties>
<fooprop>222</fooprop>
</systemProperties>
<webApp>
<contextPath>/test</contextPath>
</webApp>
</configuration>
</plugin>Specifying System Properties in a File
You can also specify your System properties in a file.
System properties you specify in this way do not override System properties that set on the command line, by the JVM, or directly in the POM via systemProperties.
Suppose we have a file called mysys.props which contains the following:
fooprop=222
This can be configured on the plugin like so:
<plugin>
<groupId>org.eclipse.jetty.{ee-current}</groupId>
<artifactId>jetty-{ee-current}-maven-plugin</artifactId>
<configuration>
<systemPropertiesFile>${project.basedir}/mysys.props</systemPropertiesFile>
<webApp>
<contextPath>/test</contextPath>
</webApp>
</configuration>
</plugin>You can instead specify the file by setting the System property jetty.systemPropertiesFile on the command line.
Jetty Jspc Maven Plugin
This plugin will pre-compile your JSP and works in conjunction with the Maven war plugin to put them inside an assembled war.
Configuration
Here’s the basic setup required to put the JSPC plugin into your build for the Jakarta EE ee10 environment:
<plugin>
<groupId>org.eclipse.jetty.ee10</groupId>
<artifactId>jetty-ee10-jspc-maven-plugin</artifactId>
<version>12.0.9-SNAPSHOT</version>
<executions>
<execution>
<id>jspc</id>
<goals>
<goal>jspc</goal>
</goals>
<configuration>
</configuration>
</execution>
</executions>
</plugin>The configurable parameters are as follows:
- webXmlFragment
-
Default value:
${project.basedir}/target/webfrag.xmlFile into which to generate the servlet declarations. Will be merged with an existing
web.xml. - webAppSourceDirectory
-
Default value:
${project.basedir}/src/main/webappRoot of resources directory where jsps, tags etc are located.
- webXml
-
Default value:
${project.basedir}/src/main/webapp/WEB-INF/web.xmlThe web.xml file to use to merge with the generated fragments.
- includes
-
Default value:
**/*.jsp, **/*.jspxThe comma separated list of patterns for file extensions to be processed.
- excludes
-
Default value:
**/.svn/**The comma separated list of patterns for file extensions to be skipped.
- classesDirectory
-
Default value:
${project.build.outputDirectory}Location of classes for the webapp.
- generatedClasses
-
Default value:
${project.build.outputDirectory}Location to put the generated classes for the jsps.
- insertionMarker
-
Default value: none
A marker string in the src
web.xmlfile which indicates where to merge in the generated web.xml fragment. Note that the marker string will NOT be preserved during the insertion. Can be left blank, in which case the generated fragment is inserted just before the line containing</web-app>. - useProvidedScope
-
Default value: false
If true, jars of dependencies marked with <scope>provided</scope> will be placed on the compilation classpath.
- mergeFragment
-
Default value: true
Whether or not to merge the generated fragment file with the source web.xml. The merged file will go into the same directory as the webXmlFragment.
- keepSources
-
Default value: false
If true, the generated .java files are not deleted at the end of processing.
- scanAllDirectories
-
Default value: true
Determines if dirs on the classpath should be scanned as well as jars. If true, this allows scanning for tlds of dependent projects that are in the reactor as unassembled jars.
- scanManifest
-
Default value: true
Determines if the manifest of JAR files found on the classpath should be scanned.
- sourceVersion
-
Java version of jsp source files. The default value depends on the version of the
jetty-ee10-jspc-maven-plugin. - targetVersion
-
Java version of class files generated from jsps. The default value depends on the version of the
jetty-ee10-jspc-maven-plugin. - tldJarNamePatterns
-
Default value:
.*taglibs[^/]*\.jar|.*jstl[^/]*\.jar$Patterns of jars on the 'system' (ie container) path that contain tlds. Use | to separate each pattern.
- jspc
-
Default value: the
org.apache.jasper.JspCinstance being configured.The JspC class actually performs the pre-compilation. All setters on the JspC class are available.
Taking all the default settings, here’s how to configure the war plugin to use the generated web.xml that includes all of the jsp servlet declarations:
<plugin>
<groupId>org.apache.maven.plugins</groupId>
<artifactId>maven-war-plugin</artifactId>
<configuration>
<webXml>${project.basedir}/target/web.xml</webXml>
</configuration>
</plugin>Precompiling only for Production Build
As compiling jsps is usually done during preparation for a production release and not usually done during development, it is more convenient to put the plugin setup inside a <profile> which which can be deliberately invoked during prep for production.
For example, the following profile will only be invoked if the flag -Dprod is present on the run line:
<profiles>
<profile>
<id>prod</id>
<activation>
<property><name>prod</name></property>
</activation>
<build>
<plugins>
<plugin>
<groupId>org.eclipse.jetty.ee10</groupId>
<artifactId>jetty-ee10-jspc-maven-plugin</artifactId>
<version>12.0.9-SNAPSHOT</version>
<!-- put your configuration in here -->
</plugin>
<plugin>
<groupId>org.apache.maven.plugins</groupId>
<artifactId>maven-war-plugin</artifactId>
<!-- put your configuration in here -->
</plugin>
</plugins>
</build>
</profile>
</profiles>The following invocation would cause your code to be compiled, the jsps to be compiled, the <servlet> and <servlet-mapping>s inserted in the web.xml and your webapp assembled into a war:
$ mvn -Dprod package
Precompiling Jsps with Overlaid Wars
Precompiling jsps with an overlaid war requires a bit more configuration.
This is because you need to separate the steps of unpacking the overlaid war and then repacking the final target war so the jetty-ee10-jspc-maven-plugin has the opportunity to access the overlaid resources.
In the following example the overlaid war will provide the web.xml file but the jsps will be in src/main/webapp (i.e. part of the project that uses the overlay).
The overlaid war file will be unpacked, the jsps compiled and their servlet definitions merged into the extracted web.xml, and everything packed into a war.
An example configuration of the war plugin that separates those phases into an unpack phase, and then a packing phase:
<plugin>
<artifactId>maven-war-plugin</artifactId>
<executions>
<execution>
<id>unpack</id>
<goals><goal>exploded</goal></goals>
<phase>generate-resources</phase>
<configuration>
<webappDirectory>target/foo</webappDirectory>
<overlays>
<overlay />
<overlay>
<groupId>org.eclipse.jetty.{ee-current}.demos</groupId>
<artifactId>jetty-{ee-current}-demo-jetty-webapp</artifactId>
</overlay>
</overlays>
</configuration>
</execution>
<execution>
<id>pack</id>
<goals><goal>war</goal></goals>
<phase>package</phase>
<configuration>
<warSourceDirectory>target/foo</warSourceDirectory>
<webXml>target/web.xml</webXml>
</configuration>
</execution>
</executions>
</plugin>Now you also need to configure the jetty-ee10-jspc-maven-plugin so that it can use the web.xml that was extracted by the war unpacking and merge in the generated definitions of the servlets.
This is in target/foo/WEB-INF/web.xml.
Using the default settings, the web.xml merged with the jsp servlet definitions will be put into target/web.xml.
<plugin>
<groupId>org.eclipse.jetty.ee10</groupId>
<artifactId>jetty-ee10-jspc-maven-plugin</artifactId>
<version>12.0.9-SNAPSHOT</version>
<executions>
<execution>
<id>jspc</id>
<goals>
<goal>jspc</goal>
</goals>
<configuration>
<webXml>target/foo/WEB-INF/web.xml</webXml>
<includes>**/*.foo</includes>
<excludes>**/*.fff</excludes>
</configuration>
</execution>
</executions>
</plugin>Appendix A: Jetty Architecture
Jetty Component Architecture
Applications that use the Jetty libraries (both client and server) create objects from Jetty classes and compose them together to obtain the desired functionalities.
A client application creates a ClientConnector instance, a HttpClientTransport instance and an HttpClient instance and compose them to have a working HTTP client that uses to call third party services.
A server application creates a ThreadPool instance, a Server instance, a ServerConnector instance, a Handler instance and compose them together to expose an HTTP service.
Internally, the Jetty libraries create even more instances of other components that also are composed together with the main ones created by applications.
The end result is that an application based on the Jetty libraries is a tree of components.
In server application the root of the component tree is a Server instance, while in client applications the root of the component tree is an HttpClient instance.
Having all the Jetty components in a tree is beneficial in a number of use cases. It makes possible to register the components in the tree as JMX MBeans so that a JMX console can look at the internal state of the components. It also makes possible to dump the component tree (and therefore each component’s internal state) to a log file or to the console for troubleshooting purposes.
Jetty Component Lifecycle
Jetty components typically have a life cycle: they can be started and stopped.
The Jetty components that have a life cycle implement the org.eclipse.jetty.util.component.LifeCycle interface.
Jetty components that contain other components implement the org.eclipse.jetty.util.component.Container interface and typically extend the org.eclipse.jetty.util.component.ContainerLifeCycle class.
ContainerLifeCycle can contain these type of components, also called beans:
-
managed beans,
LifeCycleinstances whose life cycle is tied to the life cycle of their container -
unmanaged beans,
LifeCycleinstances whose life cycle is not tied to the life cycle of their container -
POJO (Plain Old Java Object) beans, instances that do not implement
LifeCycle
ContainerLifeCycle uses the following logic to determine if a bean should be managed, unmanaged or POJO:
-
the bean implements
LifeCycle-
the bean is not started, add it as managed
-
the bean is started, add it as unmanaged
-
-
the bean does not implement
LifeCycle, add it as POJO
When a ContainerLifeCycle is started, it also starts recursively all its managed beans (if they implement LifeCycle); unmanaged beans are not started during the ContainerLifeCycle start cycle.
Likewise, stopping a ContainerLifeCycle stops recursively and in reverse order all its managed beans; unmanaged beans are not stopped during the ContainerLifeCycle stop cycle.
Components can also be started and stopped individually, therefore activating or deactivating the functionalities that they offer.
Applications should first compose components in the desired structure, and then start the root component:
class Monitor extends AbstractLifeCycle
{
}
class Root extends ContainerLifeCycle
{
// Monitor is an internal component.
private final Monitor monitor = new Monitor();
public Root()
{
// The Monitor life cycle is managed by Root.
addManaged(monitor);
}
}
class Service extends ContainerLifeCycle
{
// An instance of the Java scheduler service.
private ScheduledExecutorService scheduler;
@Override
protected void doStart() throws Exception
{
// Java's schedulers cannot be restarted, so they must
// be created anew every time their container is started.
scheduler = Executors.newSingleThreadScheduledExecutor();
// Even if Java scheduler does not implement
// LifeCycle, make it part of the component tree.
addBean(scheduler);
// Start all the children beans.
super.doStart();
}
@Override
protected void doStop() throws Exception
{
// Perform the opposite operations that were
// performed in doStart(), in reverse order.
super.doStop();
removeBean(scheduler);
scheduler.shutdown();
}
}
// Create a Root instance.
Root root = new Root();
// Create a Service instance.
Service service = new Service();
// Link the components.
root.addBean(service);
// Start the root component to
// start the whole component tree.
root.start();The component tree is the following:
Root
├── Monitor (MANAGED)
└── Service (MANAGED)
└── ScheduledExecutorService (POJO)When the Root instance is created, also the Monitor instance is created and added as bean, so Monitor is the first bean of Root.
Monitor is a managed bean, because it has been explicitly added to Root via ContainerLifeCycle.addManaged(…).
Then, the application creates a Service instance and adds it to Root via ContainerLifeCycle.addBean(…), so Service is the second bean of Root.
Service is a managed bean too, because it is a LifeCycle and at the time it was added to Root is was not started.
The ScheduledExecutorService within Service does not implement LifeCycle so it is added as a POJO to Service.
It is possible to stop and re-start any component in a tree, for example:
class Root extends ContainerLifeCycle
{
}
class Service extends ContainerLifeCycle
{
// An instance of the Java scheduler service.
private ScheduledExecutorService scheduler;
@Override
protected void doStart() throws Exception
{
// Java's schedulers cannot be restarted, so they must
// be created anew every time their container is started.
scheduler = Executors.newSingleThreadScheduledExecutor();
// Even if Java scheduler does not implement
// LifeCycle, make it part of the component tree.
addBean(scheduler);
// Start all the children beans.
super.doStart();
}
@Override
protected void doStop() throws Exception
{
// Perform the opposite operations that were
// performed in doStart(), in reverse order.
super.doStop();
removeBean(scheduler);
scheduler.shutdown();
}
}
Root root = new Root();
Service service = new Service();
root.addBean(service);
// Start the Root component.
root.start();
// Stop temporarily Service without stopping the Root.
service.stop();
// Restart Service.
service.start();Service can be stopped independently of Root, and re-started.
Starting and stopping a non-root component does not alter the structure of the component tree, just the state of the subtree starting from the component that has been stopped and re-started.
Container provides an API to find beans in the component tree:
class Root extends ContainerLifeCycle
{
}
class Service extends ContainerLifeCycle
{
private ScheduledExecutorService scheduler;
@Override
protected void doStart() throws Exception
{
scheduler = Executors.newSingleThreadScheduledExecutor();
addBean(scheduler);
super.doStart();
}
@Override
protected void doStop() throws Exception
{
super.doStop();
removeBean(scheduler);
scheduler.shutdown();
}
}
Root root = new Root();
Service service = new Service();
root.addBean(service);
// Start the Root component.
root.start();
// Find all the direct children of root.
Collection<Object> children = root.getBeans();
// children contains only service
// Find all descendants of root that are instance of a particular class.
Collection<ScheduledExecutorService> schedulers = root.getContainedBeans(ScheduledExecutorService.class);
// schedulers contains the service scheduler.You can add your own beans to the component tree at application startup time, and later find them from your application code to access their services.
|
The component tree should be used for long-lived or medium-lived components such as thread pools, web application contexts, etc. It is not recommended adding to, and removing from, the component tree short-lived objects such as HTTP requests or TCP connections, for performance reasons. If you need component tree features such as automatic export to JMX or dump capabilities for short-lived objects, consider having a long-lived container in the component tree instead. You can make the long-lived container efficient at adding/removing the short-lived components using a data structure that is not part of the component tree, and make the long-lived container handle the JMX and dump features for the short-lived components. |
Jetty Component Listeners
A component that extends AbstractLifeCycle inherits the possibility to add/remove event listeners for various events emitted by components.
A component that implements java.util.EventListener that is added to a ContainerLifeCycle is also registered as an event listener.
The following sections describe in details the various listeners available in the Jetty component architecture.
LifeCycle.Listener
A LifeCycle.Listener emits events for life cycle events such as starting, stopping and failures:
Server server = new Server();
// Add an event listener of type LifeCycle.Listener.
server.addEventListener(new LifeCycle.Listener()
{
@Override
public void lifeCycleStarted(LifeCycle lifeCycle)
{
System.getLogger("server").log(INFO, "Server {0} has been started", lifeCycle);
}
@Override
public void lifeCycleFailure(LifeCycle lifeCycle, Throwable failure)
{
System.getLogger("server").log(INFO, "Server {0} failed to start", lifeCycle, failure);
}
@Override
public void lifeCycleStopped(LifeCycle lifeCycle)
{
System.getLogger("server").log(INFO, "Server {0} has been stopped", lifeCycle);
}
});For example, a life cycle listener attached to a Server instance could be used to create (for the started event) and delete (for the stopped event) a file containing the process ID of the JVM that runs the Server.
Container.Listener
A component that implements Container is a container for other components and ContainerLifeCycle is the typical implementation.
A Container emits events when a component (also called bean) is added to or removed from the container:
Server server = new Server();
// Add an event listener of type LifeCycle.Listener.
server.addEventListener(new Container.Listener()
{
@Override
public void beanAdded(Container parent, Object child)
{
System.getLogger("server").log(INFO, "Added bean {1} to {0}", parent, child);
}
@Override
public void beanRemoved(Container parent, Object child)
{
System.getLogger("server").log(INFO, "Removed bean {1} from {0}", parent, child);
}
});A Container.Listener added as a bean will also be registered as a listener:
class Parent extends ContainerLifeCycle
{
}
class Child
{
}
// The older child takes care of its siblings.
class OlderChild extends Child implements Container.Listener
{
private Set<Object> siblings = new HashSet<>();
@Override
public void beanAdded(Container parent, Object child)
{
siblings.add(child);
}
@Override
public void beanRemoved(Container parent, Object child)
{
siblings.remove(child);
}
}
Parent parent = new Parent();
Child older = new OlderChild();
// The older child is a child bean _and_ a listener.
parent.addBean(older);
Child younger = new Child();
// Adding a younger child will notify the older child.
parent.addBean(younger);Container.InheritedListener
A Container.InheritedListener is a listener that will be added to all descendants that are also Containers.
Listeners of this type may be added to the component tree root only, but will be notified of every descendant component that is added to or removed from the component tree (not only first level children).
The primary use of Container.InheritedListener within the Jetty Libraries is MBeanContainer from the Jetty JMX support.
MBeanContainer listens for every component added to the tree, converts it to an MBean and registers it to the MBeanServer; for every component removed from the tree, it unregisters the corresponding MBean from the MBeanServer.
Jetty Threading Architecture
Writing a performant client or server is difficult, because it should:
-
Scale well with the number of processors.
-
Be efficient at using processor caches to avoid parallel slowdown.
-
Support multiple network protocols that may have very different requirements; for example, multiplexed protocols such as HTTP/2 introduce new challenges that are not present in non-multiplexed protocols such as HTTP/1.1.
-
Support different application threading models; for example, if a Jetty server invokes server-side application code that is allowed to call blocking APIs, then the Jetty server should not be affected by how long the blocking API call takes, and should be able to process other connections or other requests in a timely fashion.
Execution Strategies
The Jetty threading architecture can be modeled with a producer/consumer pattern, where produced tasks needs to be consumed efficiently.
For example, Jetty produces (among others) these tasks:
-
A task that wraps a NIO selection event, see the Jetty I/O architecture.
-
A task that wraps the invocation of application code that may block (for example, the invocation of a Servlet to handle an HTTP request).
A task is typically a Runnable object that may implement org.eclipse.jetty.util.thread.Invocable to indicate the behavior of the task (in particular, whether the task may block or not).
Once a task has been produced, it may be consumed using these modes:
Produce-Consume
In the Produce-Consume mode, the producer thread loops to produce a task that is run directly by the Producer Thread.

If the task is a NIO selection event, then this mode is the thread-per-selector mode which is very CPU core cache efficient, but suffers from the head-of-line blocking: if one of the tasks blocks or runs slowly, then subsequent tasks cannot be produced (and therefore cannot be consumed either) and will pay in latency the cost of running previous, possibly unrelated, tasks.
This mode should only be used if the produced task is known to never block, or if the system tolerates well (or does not care about) head-of-line blocking.
Produce-Execute-Consume
In the Produce-Execute-Consume mode, the Producer Thread loops to produce tasks that are submitted to a java.util.concurrent.Executor to be run by Worker Threads different from the Producer Thread.
The Executor implementation typically adds the task to a queue, and dequeues the task when there is a worker thread available to run it.
This mode solves the head-of-line blocking discussed in the Produce-Consume section, but suffers from other issues:
-
It is not CPU core cache efficient, as the data available to the producer thread will need to be accessed by another thread that likely is going to run on a CPU core that will not have that data in its caches.
-
If the tasks take time to be run, the
Executorqueue may grow indefinitely. -
A small latency is added to every task: the time it waits in the
Executorqueue.
Execute-Produce-Consume
In the Execute-Produce-Consume mode, the producer thread Thread 1 loops to produce a task, then submits one internal task to an Executor to take over production on thread Thread 2, and then runs the task in Thread 1, and so on.
This mode may operate like Produce-Consume when the take over production task run, for example, by thread Thread 3 takes time to be executed (for example, in a busy server): then thread Thread 2 will produce one task and run it, then produce another task and run it, etc. — Thread 2 behaves exactly like the Produce-Consume mode.
By the time thread Thread 3 takes over task production from Thread 2, all the work might already be done.
This mode may also operate similarly to Produce-Execute-Consume when the take over production task always finds a free CPU core immediately (for example, in a mostly idle server): thread Thread 1 will produce a task, yield production to Thread 2 while Thread 1 is running the task; Thread 2 will produce a task, yield production to Thread 3 while Thread 2 is running the task, etc.
Differently from Produce-Execute-Consume, here production happens on different threads, but the advantage is that the task is run by the same thread that produced it (which is CPU core cache efficient).
Adaptive Execution Strategy
The modes of task consumption discussed above are captured by the org.eclipse.jetty.util.thread.ExecutionStrategy interface, with an additional implementation that also takes into account the behavior of the task when the task implements Invocable.
For example, a task that declares itself as non-blocking can be consumed using the Produce-Consume mode, since there is no risk to stop production because the task will not block.
Conversely, a task that declares itself as blocking will stop production, and therefore must be consumed using either the Produce-Execute-Consume mode or the Execute-Produce-Consume mode.
Deciding between these two modes depends on whether there is a free thread immediately available to take over production, and this is captured by the org.eclipse.jetty.util.thread.TryExecutor interface.
An implementation of TryExecutor can be asked whether a thread can be immediately and exclusively allocated to run a task, as opposed to a normal Executor that can only queue the task in the expectation that there will be a thread available in the near future to run the task.
The concept of task consumption modes, coupled with Invocable tasks that expose their own behavior, coupled with a TryExecutor that guarantees whether production can be immediately taken over are captured by the default Jetty execution strategy, named org.eclipse.jetty.util.thread.AdaptiveExecutionStrategy.
|
|
Thread Pool
Jetty’s threading architecture requires a more sophisticated thread pool than what offered by Java’s java.util.concurrent.ExecutorService.
Jetty’s default thread pool implementation is QueuedThreadPool.
QueuedThreadPool integrates with the Jetty component model, implements Executor, provides a TryExecutor implementation (discussed in the adaptive execution strategy section), and supports virtual threads (introduced as a preview feature in Java 19 and Java 20, and as an official feature since Java 21).
Thread Pool Queue
QueuedThreadPool uses a BlockingQueue to store tasks that will be executed as soon as a thread is available.
It is common, but too simplistic, to think that an upper bound to the thread pool queue is a good way to limit the number of concurrent HTTP requests.
In case of asynchronous servers like Jetty, applications may have more than one thread handling a single request. Furthermore, the server implementation may produce a number of tasks that must be run by the thread pool, otherwise the server stops working properly.
Therefore, the "one-thread-per-request" model is too simplistic, and the real model that predicts the number of threads that are necessary is too complicated to produce an accurate value.
For example, a sudden large spike of requests arriving to the server may find the thread pool in an idle state where the number of threads is shrunk to the minimum. This will cause many tasks to be queued up, way before an HTTP request is even read from the network. Add to this that there could be I/O failures processing requests, which may be submitted as a new task to the thread pool. Furthermore, multiplexed protocols like HTTP/2 have a much more complex model (due to data flow control). For multiplexed protocols, the implementation must be able to write in order to progress reads (and must be able to read in order to progress writes), possibly causing more tasks to be submitted to the thread pool.
If any of the submitted tasks is rejected because the queue is bounded the server may grind to a halt, because the task must be executed, sometimes necessarily in a different thread.
For these reasons:
| The thread pool queue must be unbounded. |
There are better strategies to limit the number of concurrent requests, discussed in this section.
QueuedThreadPool configuration
QueuedThreadPool can be configured with a maxThreads value.
However, some of the Jetty components (such as the selectors) permanently steal threads for their internal use, or rather QueuedThreadPool leases some threads to these components.
These threads are reported by QueuedThreadPool.leasedThreads and are not available to run application code.
QueuedThreadPool can be configured with a reservedThreads value.
This value represents the maximum number of threads that can be reserved and used by the TryExecutor implementation.
A negative value for QueuedThreadPool.reservedThreads means that the actual value will be heuristically derived from the number of CPU cores and QueuedThreadPool.maxThreads.
A value of zero for QueuedThreadPool.reservedThreads means that reserved threads are disabled, and therefore the Execute-Produce-Consume mode is never used — the Produce-Execute-Consume mode is always used instead.
QueuedThreadPool always maintains the number of threads between QueuedThreadPool.minThreads and QueuedThreadPool.maxThreads; during load spikes the number of thread grows to meet the load demand, and when the load on the system diminishes or the system goes idle, the number of threads shrinks.
Shrinking QueuedThreadPool is important in particular in containerized environments, where typically you want to return the memory occupied by the threads to the operative system.
The shrinking of the QueuedThreadPool is controlled by two parameters: QueuedThreadPool.idleTimeout and QueuedThreadPool.maxEvictCount.
QueuedThreadPool.idleTimeout indicates how long a thread should stay around when it is idle, waiting for tasks to execute.
The longer the threads stay around, the more ready they are in case of new load spikes on the system; however, they consume resources: a Java platform thread typically allocates 1 MiB of native memory.
QueuedThreadPool.maxEvictCount controls how many idle threads are evicted for one QueuedThreadPool.idleTimeout period.
The larger this value is, the quicker the threads are evicted when the QueuedThreadPool is idle or has less load, and their resources returned to the operative system; however, large values may result in too much thread thrashing: the QueuedThreadPool shrinks too fast and must re-create a lot of threads in case of a new load spike on the system.
A good balance between QueuedThreadPool.idleTimeout and QueuedThreadPool.maxEvictCount depends on the load profile of your system, and it is often tuned via trial and error.
Virtual Threads
Virtual threads have been introduced in Java 19 and Java 20 as a preview feature, and have become an official feature since Java 21.
In Java versions where virtual threads are a preview feature, remember to add --enable-preview to the JVM command line options to use virtual threads.
|
QueuedThreadPool can be configured to use virtual threads by specifying the virtual threads Executor:
QueuedThreadPool threadPool = new QueuedThreadPool();
threadPool.setVirtualThreadsExecutor(Executors.newVirtualThreadPerTaskExecutor());
Server server = new Server(threadPool);|
Jetty cannot enforce that the |
AdaptiveExecutionStrategy makes use of this setting when it determines that a task should be run with the Produce-Execute-Consume mode: rather than submitting the task to QueuedThreadPool to be run in a platform thread, it submits the task to the virtual threads Executor.
|
Enabling virtual threads in Defaulting the number of reserved threads to zero ensures that the Produce-Execute-Consume mode is always used, which means that virtual threads will always be used for blocking tasks. |
Jetty I/O Architecture
The Jetty libraries (both client and server) use Java NIO to handle I/O, so that at its core Jetty I/O is completely non-blocking.
Jetty I/O: SelectorManager
The main class of The Jetty I/O library is SelectorManager.
SelectorManager manages internally a configurable number of ManagedSelectors.
Each ManagedSelector wraps an instance of java.nio.channels.Selector that in turn manages a number of java.nio.channels.SocketChannel instances.
| TODO: add image |
SocketChannel instances are typically created by the Jetty implementation, on client-side when connecting to a server and on server-side when accepting connections from clients.
In both cases the SocketChannel instance is passed to SelectorManager (which passes it to ManagedSelector and eventually to java.nio.channels.Selector) to be registered for use within Jetty.
It is possible for an application to create the SocketChannel instances outside Jetty, even perform some initial network traffic also outside Jetty (for example for authentication purposes), and then pass the SocketChannel instance to SelectorManager for use within Jetty.
This example shows how a client can connect to a server:
public void connect(SelectorManager selectorManager, Map<String, Object> context) throws IOException
{
String host = "host";
int port = 8080;
// Create an unconnected SocketChannel.
SocketChannel socketChannel = SocketChannel.open();
socketChannel.configureBlocking(false);
// Connect and register to Jetty.
if (socketChannel.connect(new InetSocketAddress(host, port)))
selectorManager.accept(socketChannel, context);
else
selectorManager.connect(socketChannel, context);
}This example shows how a server accepts a client connection:
public void accept(ServerSocketChannel acceptor, SelectorManager selectorManager) throws IOException
{
// Wait until a client connects.
SocketChannel socketChannel = acceptor.accept();
socketChannel.configureBlocking(false);
// Accept and register to Jetty.
Object attachment = null;
selectorManager.accept(socketChannel, attachment);
}Jetty I/O: EndPoint and Connection
SocketChannels that are passed to SelectorManager are wrapped into two related components: an EndPoint and a Connection.
EndPoint is the Jetty abstraction for a SocketChannel or a DatagramChannel: you can read bytes from an EndPoint, you can write bytes to an EndPoint , you can close an EndPoint, etc.
Connection is the Jetty abstraction that is responsible to read bytes from the EndPoint and to deserialize the read bytes into objects.
For example, an HTTP/1.1 server-side Connection implementation is responsible to deserialize HTTP/1.1 request bytes into an HTTP request object.
Conversely, an HTTP/1.1 client-side Connection implementation is responsible to deserialize HTTP/1.1 response bytes into an HTTP response object.
Connection is the abstraction that implements the reading side of a specific protocol such as HTTP/1.1, or HTTP/2, or HTTP/3, or WebSocket: it is able to read and parse incoming bytes in that protocol.
The writing side for a specific protocol may be implemented in the Connection but may also be implemented in other components, although eventually the bytes to write will be written through the EndPoint.
While there are primarily only two implementations of EndPoint,SocketChannelEndPoint for TCP and DatagramChannelEndPoint for UDP (used both on the client-side and on the server-side), there are many implementations of Connection, typically two for each protocol (one for the client-side and one for the server-side).
The EndPoint and Connection pairs can be chained, for example in case of encrypted communication using the TLS protocol.
There is an EndPoint and Connection TLS pair where the EndPoint reads the encrypted bytes from the socket and the Connection decrypts them; next in the chain there is an EndPoint and Connection pair where the EndPoint "reads" decrypted bytes (provided by the previous Connection) and the Connection deserializes them into specific protocol objects (for example HTTP/2 frame objects).
Certain protocols, such as WebSocket, start the communication with the server using one protocol (for example, HTTP/1.1), but then change the communication to use another protocol (for example, WebSocket).
EndPoint supports changing the Connection object on-the-fly via EndPoint.upgrade(Connection).
This allows to use the HTTP/1.1 Connection during the initial communication and later to replace it with a WebSocket Connection.
SelectorManager is an abstract class because while it knows how to create concrete EndPoint instances, it does not know how to create protocol specific Connection instances.
Creating Connection instances is performed on the server-side by ConnectionFactorys and on the client-side by ClientConnectionFactorys.
On the server-side, the component that aggregates a SelectorManager with a set of ConnectionFactorys is ServerConnector for TCP sockets, QuicServerConnector for QUIC sockets, and UnixDomainServerConnector for Unix-Domain sockets (see the server-side architecture section for more information).
On the client-side, the components that aggregates a SelectorManager with a set of ClientConnectionFactorys are HttpClientTransport subclasses (see the client-side architecture section for more information).
Jetty I/O: EndPoint
The Jetty I/O library use Java NIO to handle I/O, so that I/O is non-blocking.
At the Java NIO level, in order to be notified when a SocketChannel or DatagramChannel has data to be read, the SelectionKey.OP_READ flag must be set.
In the Jetty I/O library, you can call EndPoint.fillInterested(Callback) to declare interest in the "read" (also called "fill") event, and the Callback parameter is the object that is notified when such an event occurs.
At the Java NIO level, a SocketChannel or DatagramChannel is always writable, unless it becomes congested.
In order to be notified when a channel uncongests and it is therefore writable again, the SelectionKey.OP_WRITE flag must be set.
In the Jetty I/O library, you can call EndPoint.write(Callback, ByteBuffer…) to write the ByteBuffers and the Callback parameter is the object that is notified when the whole write is finished (i.e. all ByteBuffers have been fully written, even if they are delayed by congestion/uncongestion).
The EndPoint APIs abstract out the Java NIO details by providing non-blocking APIs based on Callback objects for I/O operations.
The EndPoint APIs are typically called by Connection implementations, see this section.
Jetty I/O: Connection
Connection is the abstraction that deserializes incoming bytes into objects, for example an HTTP request object or a WebSocket frame object, that can be used by more abstract layers.
Connection instances have two lifecycle methods:
-
Connection.onOpen(), invoked when theConnectionis associated with theEndPoint. -
Connection.onClose(Throwable), invoked when theConnectionis disassociated from theEndPoint, where theThrowableparameter indicates whether the disassociation was normal (when the parameter isnull) or was due to an error (when the parameter is notnull).
When a Connection is first created, it is not registered for any Java NIO event.
It is therefore typical to implement onOpen() to call EndPoint.fillInterested(Callback) so that the Connection declares interest for read events, and it is invoked (via the Callback) when the read event happens.
The abstract class AbstractConnection partially implements Connection and provides simpler APIs.
The example below shows a typical implementation that extends AbstractConnection:
// Extend AbstractConnection to inherit basic implementation.
class MyConnection extends AbstractConnection
{
public MyConnection(EndPoint endPoint, Executor executor)
{
super(endPoint, executor);
}
@Override
public void onOpen()
{
super.onOpen();
// Declare interest for fill events.
// When the fill event happens, method onFillable() below is invoked.
fillInterested();
}
@Override
public void onFillable()
{
// Invoked when a fill event happens.
}
}Jetty I/O: Connection.Listener
The Jetty I/O library allows applications to register event listeners for the Connection events "opened" and "closed" via the interface Connection.Listener.
This is useful in many cases, for example:
-
Gather statistics about connection lifecycle, such as time of creation and duration.
-
Gather statistics about the number of concurrent connections, and take action if a threshold is exceeded.
-
Gather statistics about the number of bytes read and written, and the number of "messages" read and written, where "messages" may mean HTTP/1.1 requests or responses, or WebSocket frames, or HTTP/2 frames, etc.
-
Gather statistics about the different types of connections being opened (TLS, HTTP/1.1, HTTP/2, WebSocket, etc.).
-
Etc.
Connection.Listener implementations must be added as beans to a server-side Connector, or to client-side HttpClient, WebSocketClient, HTTP2Client or HTTP3Client.
You can add as beans many Connection.Listener objects, each with its own logic, so that you can separate different logics into different Connection.Listener implementations.
The Jetty I/O library provides useful Connection.Listener implementations that you should evaluate before writing your own:
Here is a simple example of a Connection.Listener used both on the client and on the server:
class ThresholdConnectionListener implements Connection.Listener
{
private final AtomicInteger connections = new AtomicInteger();
private int threshold;
private boolean notified;
public ThresholdConnectionListener(int threshold)
{
this.threshold = threshold;
}
@Override
public void onOpened(Connection connection)
{
int count = connections.incrementAndGet();
if (count > threshold && !notified)
{
notified = true;
System.getLogger("connection.threshold").log(System.Logger.Level.WARNING, "Connection threshold exceeded");
}
}
@Override
public void onClosed(Connection connection)
{
int count = connections.decrementAndGet();
// Reset the alert when we are below 90% of the threshold.
if (count < threshold * 0.9F)
notified = false;
}
}
// Configure server-side connectors with Connection.Listeners.
Server server = new Server();
ServerConnector connector = new ServerConnector(server);
server.addConnector(connector);
// Add statistics.
connector.addBean(new ConnectionStatistics());
// Add your own Connection.Listener.
connector.addBean(new ThresholdConnectionListener(2048));
server.start();
// Configure client-side HttpClient with Connection.Listeners.
HttpClient httpClient = new HttpClient();
// Add statistics.
httpClient.addBean(new ConnectionStatistics());
// Add your own Connection.Listener.
httpClient.addBean(new ThresholdConnectionListener(512));
httpClient.start();Jetty I/O: TCP Network Echo
With the concepts above it is now possible to write a simple, fully non-blocking, Connection implementation that simply echoes the bytes that it reads back to the other peer.
A naive, but wrong, implementation may be the following:
class WrongEchoConnection extends AbstractConnection implements Callback
{
public WrongEchoConnection(EndPoint endPoint, Executor executor)
{
super(endPoint, executor);
}
@Override
public void onOpen()
{
super.onOpen();
// Declare interest for fill events.
fillInterested();
}
@Override
public void onFillable()
{
try
{
ByteBuffer buffer = BufferUtil.allocate(1024);
int filled = getEndPoint().fill(buffer);
if (filled > 0)
{
// Filled some bytes, echo them back.
getEndPoint().write(this, buffer);
}
else if (filled == 0)
{
// No more bytes to fill, declare
// again interest for fill events.
fillInterested();
}
else
{
// The other peer closed the
// connection, close it back.
getEndPoint().close();
}
}
catch (Exception x)
{
getEndPoint().close(x);
}
}
@Override
public void succeeded()
{
// The write is complete, fill again.
onFillable();
}
@Override
public void failed(Throwable x)
{
getEndPoint().close(x);
}
}
The implementation above is wrong and leads to StackOverflowError.
|
The problem with this implementation is that if the writes always complete synchronously (i.e. without being delayed by TCP congestion), you end up with this sequence of calls:
Connection.onFillable()
EndPoint.write()
Connection.succeeded()
Connection.onFillable()
EndPoint.write()
Connection.succeeded()
...
which leads to StackOverflowError.
This is a typical side effect of asynchronous programming using non-blocking APIs, and happens in the Jetty I/O library as well.
The callback is invoked synchronously for efficiency reasons.
Submitting the invocation of the callback to an Executor to be invoked in a different thread would cause a context switch and make simple writes extremely inefficient.
|
This side effect of asynchronous programming leading to StackOverflowError is so common that the Jetty libraries have a generic solution for it: a specialized Callback implementation named org.eclipse.jetty.util.IteratingCallback that turns recursion into iteration, therefore avoiding the StackOverflowError.
IteratingCallback is a Callback implementation that should be passed to non-blocking APIs such as EndPoint.write(Callback, ByteBuffer…) when they are performed in a loop.
IteratingCallback works by starting the loop with IteratingCallback.iterate().
In turn, this calls IteratingCallback.process(), an abstract method that must be implemented with the code that should be executed for each loop.
Method process() must return:
-
Action.SCHEDULED, to indicate whether the loop has performed a non-blocking, possibly asynchronous, operation -
Action.IDLE, to indicate that the loop should temporarily be suspended to be resumed later -
Action.SUCCEEDEDto indicate that the loop exited successfully
Any exception thrown within process() exits the loops with a failure.
Now that you know how IteratingCallback works, a correct implementation for the echo Connection is the following:
class EchoConnection extends AbstractConnection
{
private final IteratingCallback callback = new EchoIteratingCallback();
public EchoConnection(EndPoint endp, Executor executor)
{
super(endp, executor);
}
@Override
public void onOpen()
{
super.onOpen();
// Declare interest for fill events.
fillInterested();
}
@Override
public void onFillable()
{
// Start the iteration loop that reads and echoes back.
callback.iterate();
}
class EchoIteratingCallback extends IteratingCallback
{
private ByteBuffer buffer;
@Override
protected Action process() throws Throwable
{
// Obtain a buffer if we don't already have one.
if (buffer == null)
buffer = BufferUtil.allocate(1024);
int filled = getEndPoint().fill(buffer);
if (filled > 0)
{
// We have filled some bytes, echo them back.
getEndPoint().write(this, buffer);
// Signal that the iteration should resume
// when the write() operation is completed.
return Action.SCHEDULED;
}
else if (filled == 0)
{
// We don't need the buffer anymore, so
// don't keep it around while we are idle.
buffer = null;
// No more bytes to read, declare
// again interest for fill events.
fillInterested();
// Signal that the iteration is now IDLE.
return Action.IDLE;
}
else
{
// The other peer closed the connection,
// the iteration completed successfully.
return Action.SUCCEEDED;
}
}
@Override
protected void onCompleteSuccess()
{
// The iteration completed successfully.
getEndPoint().close();
}
@Override
protected void onCompleteFailure(Throwable cause)
{
// The iteration completed with a failure.
getEndPoint().close(cause);
}
@Override
public InvocationType getInvocationType()
{
return InvocationType.NON_BLOCKING;
}
}
}When onFillable() is called, for example the first time that bytes are available from the network, the iteration is started.
Starting the iteration calls process(), where a buffer is allocated and filled with bytes read from the network via EndPoint.fill(ByteBuffer); the buffer is subsequently written back via EndPoint.write(Callback, ByteBuffer…) — note that the callback passed to EndPoint.write() is this, i.e. the IteratingCallback itself; finally Action.SCHEDULED is returned, returning from the process() method.
At this point, the call to EndPoint.write(Callback, ByteBuffer…) may have completed synchronously; IteratingCallback would know that and call process() again; within process(), the buffer has already been allocated so it will be reused, saving further allocations; the buffer will be filled and possibly written again; Action.SCHEDULED is returned again, returning again from the process() method.
At this point, the call to EndPoint.write(Callback, ByteBuffer…) may have not completed synchronously, so IteratingCallback will not call process() again; the processing thread is free to return to the Jetty I/O system where it may be put back into the thread pool.
If this was the only active network connection, the system would now be idle, with no threads blocked, waiting that the write() completes. This thread-less wait is one of the most important features that make non-blocking asynchronous servers more scalable: they use less resources.
Eventually, the Jetty I/O system will notify that the write() completed; this notifies the IteratingCallback that can now resume the loop and call process() again.
When process() is called, it is possible that zero bytes are read from the network; in this case, you want to deallocate the buffer since the other peer may never send more bytes for the Connection to read, or it may send them after a long pause — in both cases we do not want to retain the memory allocated by the buffer; next, you want to call fillInterested() to declare again interest for read events, and return Action.IDLE since there is nothing to write back and therefore the loop may be suspended.
When more bytes are again available to be read from the network, onFillable() will be called again and that will start the iteration again.
Another possibility is that during process() the read returns -1 indicating that the other peer has closed the connection; this means that there will not be more bytes to read and the loop can be exited, so you return Action.SUCCEEDED; IteratingCallback will then call onCompleteSuccess() where you can close the EndPoint.
The last case is that during process() an exception is thrown, for example by EndPoint.fill(ByteBuffer) or, in more advanced implementations, by code that parses the bytes that have been read and finds them unacceptable; any exception thrown within process() will be caught by IteratingCallback that will exit the loop with a failure and call onCompleteFailure(Throwable) with the exception that has been thrown, where you can close the EndPoint, passing the exception that is the reason for closing prematurely the EndPoint.
|
Asynchronous programming is hard. Rely on the Jetty classes to implement |
Content.Source
The high-level abstraction that Jetty offers to read bytes is org.eclipse.jetty.io.Content.Source.
Content.Source offers a non-blocking demand/read model where a read returns a Content.Chunk (see also this section).
A Content.Chunk groups the following information:
-
A
ByteBufferwith the bytes that have been read; it may be empty. -
Whether the read reached end-of-file, via its
lastflag. -
A failure that might have happened during the read, via its
getFailure()method.
The Content.Chunk returned from Content.Source.read() can either be a normal chunk (a chunk containing a ByteBuffer and a null failure), or a failure chunk (a chunk containing an empty ByteBuffer and a non-null failure).
A failure chunk also indicates (via the last flag) whether the failure is a fatal (when last=true) or transient (when last=false) failure.
A transient failure is a temporary failure that happened during the read, it may be ignored, and it is recoverable: it is possible to call read() again and obtain a normal chunk (or a null chunk).
Typical cases of transient failures are idle timeout failures, where the read timed out, but the application may decide to insist reading until some other event happens.
The application may convert a transient failure into a fatal failure by calling Content.Source.fail(Throwable).
A Content.Source must be fully consumed by reading all its content, or failed by calling Content.Source.fail(Throwable) to signal that the reader is not interested in reading anymore, otherwise it may leak underlying resources.
Fully consuming a Content.Source means reading from it until it returns a Content.Chunk whose last flag is true.
Reading or demanding from an already fully consumed Content.Source is always immediately serviced with the last state of the Content.Source: a Content.Chunk with the last flag set to true, either an end-of-file chunk, or a failure chunk.
Once failed, a Content.Source is considered fully consumed.
Further attempts to read from a failed Content.Source return a failure chunk whose getFailure() method returns the exception passed to Content.Source.fail(Throwable).
When reading a normal chunk, its ByteBuffer is typically a slice of a different ByteBuffer that has been read by a lower layer.
There may be multiple layers between the bottom layer (where the initial read typically happens) and the application layer that calls Content.Source.read().
By slicing the ByteBuffer (rather than copying its bytes), there is no copy of the bytes between the layers, which yields greater performance.
However, this comes with the cost that the ByteBuffer, and the associated Content.Chunk, have an intrinsic lifecycle: the final consumer of a Content.Chunk at the application layer must indicate when it has consumed the chunk, so that the bottom layer may reuse/recycle the ByteBuffer.
Consuming the chunk means that the bytes in the ByteBuffer are read (or ignored), and that the application will not look at or reference that ByteBuffer ever again.
Content.Chunk offers a retain/release model to deal with the ByteBuffer lifecycle, with a simple rule:
A Content.Chunk returned by a call to Content.Source.read() must be released, except for Content.Chunks that are failure chunks.
Failure chunks may be released, but they do not need to be.
|
The example below is the idiomatic way of reading from a Content.Source:
public void read(Content.Source source)
{
// Read from the source in a loop.
while (true)
{
// Read a chunk, must be eventually released.
Content.Chunk chunk = source.read(); (1)
// If no chunk, demand to be called back when there are more chunks.
if (chunk == null)
{
source.demand(() -> read(source));
return;
}
// If there is a failure reading, handle it.
if (Content.Chunk.isFailure(chunk))
{
boolean fatal = chunk.isLast();
if (fatal)
{
// A fatal failure, such as a network failure.
handleFatalFailure(chunk.getFailure());
// No recovery is possible, stop reading
// by returning without demanding.
return;
}
else
{
// A transient failure such as a read timeout.
handleTransientFailure(chunk.getFailure());
// Recovery is possible, try to read again.
continue;
}
}
// A normal chunk of content, consume it.
consume(chunk);
// Release the chunk.
chunk.release(); (2)
// Stop reading if EOF was reached.
if (chunk.isLast())
return;
// Loop around to read another chunk.
}
}| 1 | The read() that must be paired with a release(). |
| 2 | The release() that pairs the read(). |
Note how the reads happen in a loop, consuming the Content.Source as soon as it has content available to be read, and therefore no backpressure is applied to the reads.
Calling Content.Chunk.release() must be done only after the bytes in the ByteBuffer returned by Content.Chunk.getByteBuffer() have been consumed.
When the Content.Chunk is released, the implementation may reuse the ByteBuffer and overwrite the bytes with different bytes; if the application looks at the ByteBuffer after having released the Content.Chunk is may see other, unrelated, bytes.
|
An alternative way to read from a Content.Source, to use when the chunk is consumed asynchronously, and you don’t want to read again until the Content.Chunk is consumed, is the following:
public void read(Content.Source source)
{
// Read a chunk, must be eventually released.
Content.Chunk chunk = source.read(); (1)
// If no chunk, demand to be called back when there are more chunks.
if (chunk == null)
{
source.demand(() -> read(source));
return;
}
// If there is a failure reading, always treat it as fatal.
if (Content.Chunk.isFailure(chunk))
{
// If the failure is transient, fail the source
// to indicate that there will be no more reads.
if (!chunk.isLast())
source.fail(chunk.getFailure());
// Handle the failure and stop reading by not demanding.
handleFatalFailure(chunk.getFailure());
return;
}
// Consume the chunk asynchronously, and do not
// read more chunks until this has been consumed.
CompletableFuture<Void> consumed = consumeAsync(chunk);
// Release the chunk.
chunk.release(); (2)
// Only when the chunk has been consumed try to read more.
consumed.whenComplete((result, failure) ->
{
if (failure == null)
{
// Continue reading if EOF was not reached.
if (!chunk.isLast())
source.demand(() -> read(source));
}
else
{
// If there is a failure reading, handle it,
// and stop reading by not demanding.
handleFatalFailure(failure);
}
});
}| 1 | The read() that must be paired with a release(). |
| 2 | The release() that pairs the read(). |
Note how the reads do not happen in a loop, and therefore backpressure is applied to the reads, because there is not a next read until the chunk from the previous read has been consumed (and this may take time).
Since the Chunk is consumed asynchronously, you may need to retain it to extend its lifecycle, as explained in this section.
You can use Content.Source static methods to conveniently read (in a blocking way or non-blocking way), for example via static Content.Source.asStringAsync(Content.Source, Charset), or via an InputStream using static Content.Source.asInputStream(Content.Source).
Refer to the Content.Source javadocs for further details.
Content.Chunk
Content.Chunk offers a retain/release API to control the lifecycle of its ByteBuffer.
When Content.Chunks are consumed synchronously, no additional retain/release API call is necessary, for example:
public void consume(Content.Chunk chunk) throws IOException
{
// Consume the chunk synchronously within this method.
// For example, parse the bytes into other objects,
// or copy the bytes elsewhere (e.g. the file system).
fileChannel.write(chunk.getByteBuffer());
if (chunk.isLast())
fileChannel.close();
}On the other hand, if the Content.Chunk is not consumed immediately, then it must be retained, and you must arrange for the Content.Chunk to be released at a later time, thus pairing the retain.
For example, you may accumulate the Content.Chunks in a List to convert them to a String when all the Content.Chunks have been read.
Since reading from a Content.Source is asynchronous, the String result is produced via a CompletableFuture:
// CompletableTask is-a CompletableFuture.
public class ChunksToString extends CompletableTask<String>
{
private final List<Content.Chunk> chunks = new ArrayList<>();
private final Content.Source source;
public ChunksToString(Content.Source source)
{
this.source = source;
}
@Override
public void run()
{
while (true)
{
// Read a chunk, must be eventually released.
Content.Chunk chunk = source.read(); (1)
if (chunk == null)
{
source.demand(this);
return;
}
if (Content.Chunk.isFailure(chunk))
{
handleFatalFailure(chunk.getFailure());
return;
}
// A normal chunk of content, consume it.
consume(chunk);
// Release the chunk.
// This pairs the call to read() above.
chunk.release(); (2)
if (chunk.isLast())
{
// Produce the result.
String result = getResult();
// Complete this CompletableFuture with the result.
complete(result);
// The reading is complete.
return;
}
}
}
public void consume(Content.Chunk chunk)
{
// The chunk is not consumed within this method, but
// stored away for later use, so it must be retained.
chunk.retain(); (3)
chunks.add(chunk);
}
public String getResult()
{
Utf8StringBuilder builder = new Utf8StringBuilder();
// Iterate over the chunks, copying and releasing.
for (Content.Chunk chunk : chunks)
{
// Copy the chunk bytes into the builder.
builder.append(chunk.getByteBuffer());
// The chunk has been consumed, release it.
// This pairs the retain() in consume().
chunk.release(); (4)
}
return builder.toCompleteString();
}
}| 1 | The read() that must be paired with a release(). |
| 2 | The release() that pairs the read(). |
| 3 | The retain() that must be paired with a release(). |
| 4 | The release() that pairs the retain(). |
Note how method consume(Content.Chunk) retains the Content.Chunk because it does not consume it, but rather stores it away for later use.
With this additional retain, the retain count is now 2: one implicitly from the read() that returned the Content.Chunk, and one explicit in consume(Content.Chunk).
However, just after returning from consume(Content.Chunk) the Content.Chunk is released (pairing the implicit retain from read()), so that the retain count goes to 1, and an additional release is still necessary.
Method getResult() arranges to release all the Content.Chunks that have been accumulated, pairing the retains done in consume(Content.Chunk), so that the retain count for the Content.Chunks goes finally to 0.
Content.Sink
The high-level abstraction that Jetty offers to write bytes is org.eclipse.jetty.io.Content.Sink.
The primary method to use is Content.Sink.write(boolean, ByteBuffer, Callback), which performs a non-blocking write of the given ByteBuffer, with the indication of whether the write is the last.
The Callback parameter is completed, successfully or with a failure, and possibly asynchronously by a different thread, when the write is complete.
Your application can typically perform zero or more non-last writes, and one final last write.
However, because the writes may be asynchronous, you cannot start a next write before the previous write is completed.
This code is wrong:
public void wrongWrite(Content.Sink sink, ByteBuffer content1, ByteBuffer content2)
{
// Initiate a first write.
sink.write(false, content1, Callback.NOOP);
// WRONG! Cannot initiate a second write before the first is complete.
sink.write(true, content2, Callback.NOOP);
}You must initiate a second write only when the first is finished, for example:
public void manyWrites(Content.Sink sink, ByteBuffer content1, ByteBuffer content2)
{
// Initiate a first write.
Callback.Completable resultOfWrites = Callback.Completable.with(callback1 -> sink.write(false, content1, callback1))
// Chain a second write only when the first is complete.
.compose(callback2 -> sink.write(true, content2, callback2));
// Use the resulting Callback.Completable as you would use a CompletableFuture.
// For example:
resultOfWrites.whenComplete((ignored, failure) ->
{
if (failure == null)
System.getLogger("sink").log(INFO, "writes completed successfully");
else
System.getLogger("sink").log(INFO, "writes failed", failure);
});
}When you need to perform an unknown number of writes, you must use an IteratingCallback, explained in this section, to avoid StackOverFlowErrors.
For example, to copy from a Content.Source to a Content.Sink you should use the convenience method Content.copy(Content.Source, Content.Sink, Callback).
For illustrative purposes, below you can find the implementation of copy(Content.Source, Content.Sink, Callback) that uses an IteratingCallback:
@SuppressWarnings("InnerClassMayBeStatic")
class Copy extends IteratingCallback
{
private final Content.Source source;
private final Content.Sink sink;
private final Callback callback;
private Content.Chunk chunk;
public Copy(Content.Source source, Content.Sink sink, Callback callback)
{
this.source = source;
this.sink = sink;
// The callback to notify when the copy is completed.
this.callback = callback;
}
@Override
protected Action process() throws Throwable
{
// If the last write completed, succeed this IteratingCallback,
// causing onCompleteSuccess() to be invoked.
if (chunk != null && chunk.isLast())
return Action.SUCCEEDED;
// Read a chunk.
chunk = source.read();
// No chunk, demand to be called back when there will be more chunks.
if (chunk == null)
{
source.demand(this::iterate);
return Action.IDLE;
}
// The read failed, re-throw the failure
// causing onCompleteFailure() to be invoked.
if (Content.Chunk.isFailure(chunk))
throw chunk.getFailure();
// Copy the chunk.
sink.write(chunk.isLast(), chunk.getByteBuffer(), this);
return Action.SCHEDULED;
}
@Override
public void succeeded()
{
// After every successful write, release the chunk.
chunk.release();
super.succeeded();
}
@Override
public void failed(Throwable x)
{
super.failed(x);
}
@Override
protected void onCompleteSuccess()
{
// The copy is succeeded, succeed the callback.
callback.succeeded();
}
@Override
protected void onCompleteFailure(Throwable failure)
{
// In case of a failure, either on the
// read or on the write, release the chunk.
chunk.release();
// The copy is failed, fail the callback.
callback.failed(failure);
}
@Override
public InvocationType getInvocationType()
{
return InvocationType.NON_BLOCKING;
}
}Non-blocking writes can be easily turned in blocking writes. This leads to perhaps code that is simpler to read, but that also comes with a price: greater resource usage that may lead to less scalability and less performance.
public void blockingWrite(Content.Sink sink, ByteBuffer content1, ByteBuffer content2) throws IOException
{
// First blocking write, returns only when the write is complete.
Content.Sink.write(sink, false, content1);
// Second blocking write, returns only when the write is complete.
// It is legal to perform the writes sequentially, since they are blocking.
Content.Sink.write(sink, true, content2);
}Jetty Listeners
The Jetty architecture is based on components, typically organized in a component tree. These components have an internal state that varies with the component life cycle (that is, whether the component is started or stopped), as well as with the component use at runtime. The typical example is a thread pool, whose internal state — such as the number of pooled threads or the job queue size — changes as the thread pool is used by the running client or server.
In many cases, the component state change produces an event that is broadcast to listeners. Applications can register listeners to these components to be notified of the events they produce.
This section lists the listeners available in the Jetty components, but the events and listener APIs are discussed in the component specific sections.
Listeners common to both client and server:
Listeners that are server specific:
Jetty JMX Support
The Java Management Extensions (JMX) APIs are standard API for managing and monitoring resources such as applications, devices, services, and the Java Virtual Machine itself.
The JMX API includes remote access, so a remote management console such as Java Mission Control can interact with a running application for these purposes.
Jetty architecture is based on components organized in a tree. Every time a component is added to or removed from the component tree, an event is emitted, and Container.Listener implementations can listen to those events and perform additional actions.
org.eclipse.jetty.jmx.MBeanContainer listens to those events and registers/unregisters the Jetty components as MBeans into the platform MBeanServer.
The Jetty components are annotated with Jetty JMX annotations so that they can provide specific JMX metadata such as attributes and operations that should be exposed via JMX.
Therefore, when a component is added to the component tree, MBeanContainer is notified, it creates the MBean from the component POJO and registers it to the MBeanServer.
Similarly, when a component is removed from the tree, MBeanContainer is notified, and unregisters the MBean from the MBeanServer.
The Maven coordinates for the Jetty JMX support are:
<dependency>
<groupId>org.eclipse.jetty</groupId>
<artifactId>jetty-jmx</artifactId>
<version>12.0.9-SNAPSHOT</version>
</dependency>Enabling JMX Support
Enabling JMX support is always recommended because it provides valuable information about the system, both for monitoring purposes and for troubleshooting purposes in case of problems.
To enable JMX support on the server:
Server server = new Server();
// Create an MBeanContainer with the platform MBeanServer.
MBeanContainer mbeanContainer = new MBeanContainer(ManagementFactory.getPlatformMBeanServer());
// Add MBeanContainer to the root component.
server.addBean(mbeanContainer);Similarly on the client:
HttpClient httpClient = new HttpClient();
// Create an MBeanContainer with the platform MBeanServer.
MBeanContainer mbeanContainer = new MBeanContainer(ManagementFactory.getPlatformMBeanServer());
// Add MBeanContainer to the root component.
httpClient.addBean(mbeanContainer);|
The MBeans exported to the platform MBeanServer can only be accessed locally (from the same machine), not from remote machines. This means that this configuration is enough for development, where you have easy access (with graphical user interface) to the machine where Jetty runs, but it is typically not enough when the machine where Jetty runs is remote, or only accessible via SSH or otherwise without graphical user interface support. In these cases, you have to enable JMX Remote Access. |
Enabling JMX Remote Access
There are two ways of enabling remote connectivity so that JMC can connect to the remote JVM to visualize MBeans.
-
Use the
com.sun.management.jmxremotesystem property on the command line. Unfortunately, this solution does not work well with firewalls and is not flexible. -
Use Jetty’s
ConnectorServerclass.
org.eclipse.jetty.jmx.ConnectorServer will use by default RMI to allow connection from remote clients, and it is a wrapper around the standard JDK class JMXConnectorServer, which is the class that provides remote access to JMX clients.
Connecting to the remote JVM is a two step process:
-
First, the client will connect to the RMI registry to download the RMI stub for the
JMXConnectorServer; this RMI stub contains the IP address and port to connect to the RMI server, i.e. the remoteJMXConnectorServer. -
Second, the client uses the RMI stub to connect to the RMI server (i.e. the remote
JMXConnectorServer) typically on an address and port that may be different from the RMI registry address and port.
The host and port configuration for the RMI registry and the RMI server is specified by a JMXServiceURL.
The string format of an RMI JMXServiceURL is:
service:jmx:rmi://<rmi_server_host>:<rmi_server_port>/jndi/rmi://<rmi_registry_host>:<rmi_registry_port>/jmxrmiDefault values are:
rmi_server_host = localhost
rmi_server_port = 1099
rmi_registry_host = localhost
rmi_registry_port = 1099With the default configuration, only clients that are local to the server machine can connect to the RMI registry and RMI server - this is done for security reasons. With this configuration it would still be possible to access the MBeans from remote using a SSH tunnel.
By specifying an appropriate JMXServiceURL, you can fine tune the network interfaces the RMI registry and the RMI server bind to, and the ports that the RMI registry and the RMI server listen to.
The RMI server and RMI registry hosts and ports can be the same (as in the default configuration) because RMI is able to multiplex traffic arriving to a port to multiple RMI objects.
If you need to allow JMX remote access through a firewall, you must open both the RMI registry and the RMI server ports.
JMXServiceURL common examples:
service:jmx:rmi:///jndi/rmi:///jmxrmi
rmi_server_host = local host address
rmi_server_port = randomly chosen
rmi_registry_host = local host address
rmi_registry_port = 1099
service:jmx:rmi://0.0.0.0:1099/jndi/rmi://0.0.0.0:1099/jmxrmi
rmi_server_host = any address
rmi_server_port = 1099
rmi_registry_host = any address
rmi_registry_port = 1099
service:jmx:rmi://localhost:1100/jndi/rmi://localhost:1099/jmxrmi
rmi_server_host = loopback address
rmi_server_port = 1100
rmi_registry_host = loopback address
rmi_registry_port = 1099|
When To control the IP address stored in the RMI stub you need to set the system property |
To allow JMX remote access, create and configure a ConnectorServer:
Server server = new Server();
// Setup Jetty JMX.
MBeanContainer mbeanContainer = new MBeanContainer(ManagementFactory.getPlatformMBeanServer());
server.addBean(mbeanContainer);
// Setup ConnectorServer.
// Bind the RMI server to the wildcard address and port 1999.
// Bind the RMI registry to the wildcard address and port 1099.
JMXServiceURL jmxURL = new JMXServiceURL("rmi", null, 1999, "/jndi/rmi:///jmxrmi");
ConnectorServer jmxServer = new ConnectorServer(jmxURL, "org.eclipse.jetty.jmx:name=rmiconnectorserver");
// Add ConnectorServer as a bean, so it is started
// with the Server and also exported as MBean.
server.addBean(jmxServer);
server.start();JMX Remote Access Authorization
The standard JMXConnectorServer provides several options to authorize access, for example via JAAS or via configuration files.
For a complete guide to controlling authentication and authorization in JMX, see the official JMX documentation.
In the sections below we detail one way to setup JMX authentication and authorization, using configuration files for users, passwords and roles:
Server server = new Server();
// Setup Jetty JMX.
MBeanContainer mbeanContainer = new MBeanContainer(ManagementFactory.getPlatformMBeanServer());
server.addBean(mbeanContainer);
// Setup ConnectorServer.
JMXServiceURL jmxURL = new JMXServiceURL("rmi", null, 1099, "/jndi/rmi:///jmxrmi");
Map<String, Object> env = new HashMap<>();
env.put("com.sun.management.jmxremote.access.file", "/path/to/users.access");
env.put("com.sun.management.jmxremote.password.file", "/path/to/users.password");
ConnectorServer jmxServer = new ConnectorServer(jmxURL, env, "org.eclipse.jetty.jmx:name=rmiconnectorserver");
server.addBean(jmxServer);
server.start();The users.access file format is defined in the $JAVA_HOME/conf/management/jmxremote.access file.
A simplified version is the following:
user1 readonly
user2 readwriteThe users.password file format is defined in the $JAVA_HOME/conf/management/jmxremote.password.template file.
A simplified version is the following:
user1 password1
user2 password2
The users.access and users.password files are not standard *.properties files — the user must be separated from the role or password by a space character.
|
Securing JMX Remote Access with TLS
The JMX communication via RMI happens by default in clear-text.
It is possible to configure the ConnectorServer with a SslContextFactory so that the JMX communication via RMI is encrypted:
Server server = new Server();
// Setup Jetty JMX.
MBeanContainer mbeanContainer = new MBeanContainer(ManagementFactory.getPlatformMBeanServer());
server.addBean(mbeanContainer);
// Setup SslContextFactory.
SslContextFactory.Server sslContextFactory = new SslContextFactory.Server();
sslContextFactory.setKeyStorePath("/path/to/keystore");
sslContextFactory.setKeyStorePassword("secret");
// Setup ConnectorServer with SslContextFactory.
JMXServiceURL jmxURL = new JMXServiceURL("rmi", null, 1099, "/jndi/rmi:///jmxrmi");
ConnectorServer jmxServer = new ConnectorServer(jmxURL, null, "org.eclipse.jetty.jmx:name=rmiconnectorserver", sslContextFactory);
server.addBean(jmxServer);
server.start();It is possible to use the same SslContextFactory.Server used to configure the Jetty ServerConnector that supports TLS also for the JMX communication via RMI.
The keystore must contain a valid certificate signed by a Certification Authority.
The RMI mechanic is the usual one: the RMI client (typically a monitoring console) will connect first to the RMI registry (using TLS), download the RMI server stub that contains the address and port of the RMI server to connect to, then connect to the RMI server (using TLS).
This also mean that if the RMI registry and the RMI server are on different hosts, the RMI client must have available the cryptographic material to validate both hosts.
Having certificates signed by a Certification Authority simplifies by a lot the configuration needed to get the JMX communication over TLS working properly.
If that is not the case (for example the certificate is self-signed), then you need to specify the required system properties that allow RMI (especially when acting as an RMI client) to retrieve the cryptographic material necessary to establish the TLS connection.
For example, trying to connect using the JDK standard JMXConnector with both the RMI server and the RMI registry via TLS to domain.com with a self-signed certificate:
// System properties necessary for an RMI client to trust a self-signed certificate.
System.setProperty("javax.net.ssl.trustStore", "/path/to/trustStore");
System.setProperty("javax.net.ssl.trustStorePassword", "secret");
JMXServiceURL jmxURL = new JMXServiceURL("service:jmx:rmi:///jndi/rmi://domain.com:1100/jmxrmi");
Map<String, Object> clientEnv = new HashMap<>();
// Required to connect to the RMI registry via TLS.
clientEnv.put(ConnectorServer.RMI_REGISTRY_CLIENT_SOCKET_FACTORY_ATTRIBUTE, new SslRMIClientSocketFactory());
try (JMXConnector client = JMXConnectorFactory.connect(jmxURL, clientEnv))
{
Set<ObjectName> names = client.getMBeanServerConnection().queryNames(null, null);
}Similarly, to launch JMC:
$ jmc -vmargs -Djavax.net.ssl.trustStore=/path/to/trustStore -Djavax.net.ssl.trustStorePassword=secret
These system properties are required when launching the ConnectorServer too, on the server, because it acts as an RMI client with respect to the RMI registry.
|
JMX Remote Access with Port Forwarding via SSH Tunnel
You can access JMX MBeans on a remote machine when the RMI ports are not open, for example because of firewall policies, but you have SSH access to the machine using local port forwarding via an SSH tunnel.
In this case you want to configure the ConnectorServer with a JMXServiceURL that binds the RMI server and the RMI registry to the loopback interface only: service:jmx:rmi://localhost:1099/jndi/rmi://localhost:1099/jmxrmi.
Then you setup the local port forwarding with the SSH tunnel:
$ ssh -L 1099:localhost:1099 <user>@<machine_host>Now you can use JConsole or JMC to connect to localhost:1099 on your local computer.
The traffic will be forwarded to machine_host and when there, SSH will forward the traffic to localhost:1099, which is exactly where the ConnectorServer listens.
When you configure ConnectorServer in this way, you must set the system property -Djava.rmi.server.hostname=localhost, on the server.
This is required because when the RMI server is exported, its address and port are stored in the RMI stub. You want the address in the RMI stub to be localhost so that when the RMI stub is downloaded to the remote client, the RMI communication will go through the SSH tunnel.
Jetty JMX Annotations
The Jetty JMX support, and in particular MBeanContainer, is notified every time a bean is added to the component tree.
The bean is scanned for Jetty JMX annotations to obtain JMX metadata: the JMX attributes and JMX operations.
// Annotate the class with @ManagedObject and provide a description.
@ManagedObject("Services that provide useful features")
class Services
{
private final Map<String, Object> services = new ConcurrentHashMap<>();
private boolean enabled = true;
// A read-only attribute with description.
@ManagedAttribute(value = "The number of services", readonly = true)
public int getServiceCount()
{
return services.size();
}
// A read-write attribute with description.
// Only the getter is annotated.
@ManagedAttribute(value = "Whether the services are enabled")
public boolean isEnabled()
{
return enabled;
}
// There is no need to annotate the setter.
public void setEnabled(boolean enabled)
{
this.enabled = enabled;
}
// An operation with description and impact.
// The @Name annotation is used to annotate parameters
// for example to display meaningful parameter names.
@ManagedOperation(value = "Retrieves the service with the given name", impact = "INFO")
public Object getService(@Name(value = "serviceName") String n)
{
return services.get(n);
}
}The JMX metadata and the bean are wrapped by an instance of org.eclipse.jetty.jmx.ObjectMBean that exposes the JMX metadata and, upon request from JMX consoles, invokes methods on the bean to get/set attribute values and perform operations.
You can provide a custom subclass of ObjectMBean to further customize how the bean is exposed to JMX.
The custom ObjectMBean subclass must respect the following naming convention: <package>.jmx.<class>MBean.
For example, class com.acme.Foo may have a custom ObjectMBean subclass named com.acme.jmx.FooMBean.
//package com.acme;
@ManagedObject
class Service
{
}
//package com.acme.jmx;
class ServiceMBean extends ObjectMBean
{
ServiceMBean(Object service)
{
super(service);
}
}The custom ObjectMBean subclass is also scanned for Jetty JMX annotations and overrides the JMX metadata obtained by scanning the bean class.
This allows to annotate only the custom ObjectMBean subclass and keep the bean class free of the Jetty JMX annotations.
//package com.acme;
// No Jetty JMX annotations.
class CountService
{
private int count;
public int getCount()
{
return count;
}
public void addCount(int value)
{
count += value;
}
}
//package com.acme.jmx;
@ManagedObject("the count service")
class CountServiceMBean extends ObjectMBean
{
public CountServiceMBean(Object service)
{
super(service);
}
private CountService getCountService()
{
return (CountService)super.getManagedObject();
}
@ManagedAttribute("the current service count")
public int getCount()
{
return getCountService().getCount();
}
@ManagedOperation(value = "adds the given value to the service count", impact = "ACTION")
public void addCount(@Name("count delta") int value)
{
getCountService().addCount(value);
}
}The scan for Jetty JMX annotations is performed on the bean class and all the interfaces implemented by the bean class, then on the super-class and all the interfaces implemented by the super-class and so on until java.lang.Object is reached.
For each type — class or interface, the corresponding *.jmx.*MBean is looked up and scanned as well with the same algorithm.
For each type, the scan looks for the class-level annotation @ManagedObject.
If it is found, the scan looks for method-level @ManagedAttribute and @ManagedOperation annotations; otherwise it skips the current type and moves to the next type to scan.
@ManagedObject
The @ManagedObject annotation is used on a class at the top level to indicate that it should be exposed as an MBean.
It has only one attribute to it which is used as the description of the MBean.
@ManagedAttribute
The @ManagedAttribute annotation is used to indicate that a given method is exposed as a JMX attribute.
This annotation is placed always on the getter method of a given attribute.
Unless the readonly attribute is set to true in the annotation, a corresponding setter is looked up following normal naming conventions.
For example if this annotation is on a method called String getFoo() then a method called void setFoo(String) would be looked up, and if found wired as the setter for the JMX attribute.
@ManagedOperation
The @ManagedOperation annotation is used to indicate that a given method is exposed as a JMX operation.
A JMX operation has an impact that can be INFO if the operation returns a value without modifying the object, ACTION if the operation does not return a value but modifies the object, and "ACTION_INFO" if the operation both returns a value and modifies the object.
If the impact is not specified, it has the default value of UNKNOWN.
@Name
The @Name annotation is used to assign a name and description to parameters in method signatures so that when rendered by JMX consoles it is clearer what the parameter meaning is.
Appendix B: Troubleshooting Jetty
TODO: introduction
Logging
The Jetty libraries (both client and server) use SLF4J as logging APIs.
You can therefore plug in any SLF4J logging implementation, and configure the logging category org.eclipse.jetty at the desired level.
When you have problems with Jetty, the first thing that you want to do is to enable DEBUG logging. This is helpful because by reading the DEBUG logs you get a better understanding of what is going on in the system (and that alone may give you the answers you need to fix the problem), and because Jetty developers will probably need the DEBUG logs to help you.
Jetty SLF4J Binding
The Jetty artifact jetty-slf4j-impl is a SLF4J binding, that is the Jetty implementation of the SLF4J APIs, and provides a number of easy-to-use features to configure logging.
The Jetty SLF4J binding only provides an appender that writes to System.err.
For more advanced configurations (for example, logging to a file), use LogBack, or Log4j2, or your preferred SLF4J binding.
| Only one binding can be present in the class-path or module-path. If you use the LogBack SLF4J binding or the Log4j2 SLF4J binding, remember to remove the Jetty SLF4J binding. |
The Jetty SLF4J binding reads a file in the class-path (or module-path) called jetty-logging.properties that can be configured with the logging levels for various logger categories:
# By default, log at INFO level all Jetty classes.
org.eclipse.jetty.LEVEL=INFO
# However, the Jetty client classes are logged at DEBUG level.
org.eclipse.jetty.client.LEVEL=DEBUGSimilarly to how you configure the jetty-logging.properties file, you can set the system property org.eclipse.jetty[.<package_names>].LEVEL=DEBUG to quickly change the logging level to DEBUG without editing any file.
The system property can be set on the command line, or in your IDE when you run your tests or your Jetty-based application and will override the jetty-logging.properties file configuration.
For example to enable DEBUG logging for all the Jetty classes (very verbose):
java -Dorg.eclipse.jetty.LEVEL=DEBUG --class-path ...If you want to enable DEBUG logging but only for the HTTP/2 classes:
java -Dorg.eclipse.jetty.http2.LEVEL=DEBUG --class-path ...JVM Thread Dump
TODO
Jetty Component Tree Dump
Jetty components are organized in a component tree.
At the root of the component tree there is typically a ContainerLifeCycle instance — typically a Server instance on the server and an HttpClient instance on the client.
ContainerLifeCycle has built-in dump APIs that can be invoked either directly or via JMX.
You can get more details from a Jetty’s QueuedThreadPool dump by enabling detailed dumps via queuedThreadPool.setDetailedDump(true).
|
Debugging
Sometimes, in order to figure out a problem, enabling DEBUG logging is not enough and you really need to debug the code with a debugger.
Debugging an embedded Jetty application is most easily done from your preferred IDE, so refer to your IDE instruction for how to debug Java applications.
Remote debugging can be enabled in a Jetty application via command line options:
java -agentlib:jdwp=transport=dt_socket,server=y,suspend=n,address=*:8000 --class-path ...The example above enables remote debugging so that debuggers (for example, your preferred IDE) can connect to port 8000 on the host running the Jetty application to receive debugging events.
| More technically, remote debugging exchanges JVM Tools Interface (JVMTI) events and commands via the Java Debug Wire Protocol (JDWP). |
Appendix C: Migration Guides
Migrating from Jetty 9.4.x to Jetty 10.0.x
Required Java Version Changes
| Jetty 9.4.x | Jetty 10.0.x |
|---|---|
Java 8 |
Java 11 |
WebSocket Migration Guide
Migrating from Jetty 9.4.x to Jetty 10.0.x requires changes in the coordinates of the Maven artifact dependencies for WebSocket. Some of these classes have also changed name and package. This is not a comprehensive list of changes but should cover the most common changes encountered during migration.
Maven Artifacts Changes
| Jetty 9.4.x | Jetty 10.0.x |
|---|---|
|
|
|
|
|
|
|
|
|
|
Class Names Changes
| Jetty 9.4.x | Jetty 10.0.x |
|---|---|
|
|
|
|
|
|
|
|
|
|
|
|
|
|
Example Code
| Jetty 9.4.x | Jetty 10.0.x |
|---|---|
|
|
Migrating from Jetty 11.0.x to Jetty 12.0.x
Required Java Version Changes
| Jetty 11.0.x | Jetty 12.0.x |
|---|---|
Java 11 |
Java 17 |
Maven Artifacts Changes
| Jetty 11.0.x | Jetty 12.0.x |
|---|---|
org.eclipse.jetty.fcgi:fcgi-client |
org.eclipse.jetty.fcgi:jetty-fcgi-client |
org.eclipse.jetty.fcgi:fcgi-server |
org.eclipse.jetty.fcgi:jetty-fcgi-server |
org.eclipse.jetty.http2:http2-client |
org.eclipse.jetty.http2:jetty-http2-client |
org.eclipse.jetty.http2:http2-common |
org.eclipse.jetty.http2:jetty-http2-common |
org.eclipse.jetty.http2:http2-hpack |
org.eclipse.jetty.http2:jetty-http2-hpack |
org.eclipse.jetty.http2:http2-http-client-transport |
org.eclipse.jetty.http2:jetty-http2-client-transport |
org.eclipse.jetty.http2:http2-server |
org.eclipse.jetty.http2:jetty-http2-server |
org.eclipse.jetty.http3:http3-client |
org.eclipse.jetty.http3:jetty-http3-client |
org.eclipse.jetty.http3:http3-common |
org.eclipse.jetty.http3:jetty-http3-common |
org.eclipse.jetty.http3:http3-http-client-transport |
org.eclipse.jetty.http3:jetty-http3-client-transport |
org.eclipse.jetty.http3:http3-qpack |
org.eclipse.jetty.http3:jetty-http3-qpack |
org.eclipse.jetty.http3:http3-server |
org.eclipse.jetty.http3:jetty-http3-server |
org.eclipse.jetty:jetty-osgi.* |
|
org.eclipse.jetty:jetty-proxy |
|
org.eclipse.jetty.quic:quic-client |
org.eclipse.jetty.quic:jetty-quic-client |
org.eclipse.jetty.quic:quic-common |
org.eclipse.jetty.quic:jetty-quic-common |
org.eclipse.jetty.quic:quic-quiche |
org.eclipse.jetty.quic:jetty-quic-quiche |
org.eclipse.jetty.quic:quic-server |
org.eclipse.jetty.quic:jetty-quic-server |
org.eclipse.jetty:jetty-unixsocket.* |
Removed — Use org.eclipse.jetty:jetty-unixdomain-server |
org.eclipse.jetty.websocket:websocket-core-client |
org.eclipse.jetty.websocket:jetty-websocket-core-client |
org.eclipse.jetty.websocket:websocket-core-common |
org.eclipse.jetty.websocket:jetty-websocket-core-common |
org.eclipse.jetty.websocket:websocket-core-server |
org.eclipse.jetty.websocket:jetty-websocket-core-server |
org.eclipse.jetty.websocket:websocket-jetty-api |
org.eclipse.jetty.websocket:jetty-websocket-jetty-api |
org.eclipse.jetty.websocket:websocket-jetty-client |
|
org.eclipse.jetty.websocket:websocket-jetty-common |
|
org.eclipse.jetty.websocket:websocket-jetty-server |
|
org.eclipse.jetty.websocket:websocket-jakarta-client |
org.eclipse.jetty.ee{8,9,10}.websocket:jetty-ee{8,9,10}-websocket-jakarta-client |
org.eclipse.jetty.websocket:websocket-jakarta-common |
org.eclipse.jetty.ee{8,9,10}.websocket:jetty-ee{8,9,10}-websocket-jakarta-common |
org.eclipse.jetty.websocket:websocket-jakarta-server |
org.eclipse.jetty.ee{8,9,10}.websocket:jetty-ee{8,9,10}-websocket-jakarta-server |
org.eclipse.jetty.websocket:websocket-servlet |
org.eclipse.jetty.ee{8,9,10}.websocket:jetty-ee{8,9,10}-websocket-servlet |
org.eclipse.jetty:apache-jsp |
org.eclipse.jetty.ee{8,9,10}:jetty-ee{8,9,10}-apache-jsp |
org.eclipse.jetty:jetty-annotations |
org.eclipse.jetty.ee{8,9,10}:jetty-ee{8,9,10}-annotations |
org.eclipse.jetty:jetty-ant |
Removed — No Replacement |
org.eclipse.jetty:jetty-cdi |
org.eclipse.jetty.ee{8,9,10}:jetty-ee{8,9,10}-cdi |
org.eclipse.jetty:glassfish-jstl |
org.eclipse.jetty.ee{8,9,10}:jetty-ee{8,9,10}-glassfish-jstl |
org.eclipse.jetty:jetty-jaspi |
org.eclipse.jetty.ee{8,9,10}:jetty-ee{8,9,10}-jaspi |
org.eclipse.jetty:jetty-jndi |
org.eclipse.jetty.ee{8,9,10}:jetty-ee{8,9,10}-jndi |
org.eclipse.jetty:jetty-jspc-maven-plugin |
org.eclipse.jetty.ee{8,9,10}:jetty-ee{8,9,10}-jspc-maven-plugin |
org.eclipse.jetty:jetty-maven-plugin |
org.eclipse.jetty.ee{8,9,10}:jetty-ee{8,9,10}-maven-plugin |
org.eclipse.jetty:jetty-plus |
org.eclipse.jetty.ee{8,9,10}:jetty-ee{8,9,10}-plus |
org.eclipse.jetty:jetty-quickstart |
org.eclipse.jetty.ee{8,9,10}:jetty-ee{8,9,10}-quickstart |
org.eclipse.jetty:jetty-runner |
org.eclipse.jetty.ee{8,9,10}:jetty-ee{8,9,10}-runner |
org.eclipse.jetty:jetty-servlet |
org.eclipse.jetty.ee{8,9,10}:jetty-ee{8,9,10}-servlet |
org.eclipse.jetty:jetty-servlets |
org.eclipse.jetty.ee{8,9,10}:jetty-ee{8,9,10}-servlets |
org.eclipse.jetty:jetty-webapp |
org.eclipse.jetty.ee{8,9,10}:jetty-ee{8,9,10}-webapp |
Class Packages/Names Changes
| Jetty 11.0.x | Jetty 12.0.x |
|---|---|
|
|
|
|
|
|
|
|
|
|
|
|
|
|
|
|
|
|
|
|
Migrate Servlets to Jetty Handlers
Web applications written using the Servlet APIs may be re-written using the Jetty Handler APIs.
The sections below outline the Jetty Handler APIs that correspond to the Servlet APIs.
For more information about why using the Jetty Handler APIs instead of the Servlet APIs, refer to this section.
For more information about replacing HttpServlets or Servlet Filters with Jetty Handlers, refer to this section.
Handler Request APIs
public class RequestAPIs extends Handler.Abstract
{
@Override
public boolean handle(Request request, Response response, Callback callback) throws Exception
{
// Gets the request method.
// Replaces:
// - servletRequest.getMethod();
String method = request.getMethod();
// Gets the request protocol name and version.
// Replaces:
// - servletRequest.getProtocol();
String protocol = request.getConnectionMetaData().getProtocol();
// Gets the full request URI.
// Replaces:
// - servletRequest.getRequestURL();
String fullRequestURI = request.getHttpURI().asString();
// Gets the request context.
// Replaces:
// - servletRequest.getServletContext()
Context context = request.getContext();
// Gets the context path.
// Replaces:
// - servletRequest.getContextPath()
String contextPath = context.getContextPath();
// Gets the request path.
// Replaces:
// - servletRequest.getRequestURI();
String requestPath = request.getHttpURI().getPath();
// Gets the request path after the context path.
// Replaces:
// - servletRequest.getServletPath() + servletRequest.getPathInfo()
String pathInContext = Request.getPathInContext(request);
// Gets the request query.
// Replaces:
// - servletRequest.getQueryString()
String queryString = request.getHttpURI().getQuery();
// Gets request parameters.
// Replaces:
// - servletRequest.getParameterNames();
// - servletRequest.getParameter(name);
// - servletRequest.getParameterValues(name);
// - servletRequest.getParameterMap();
Fields queryParameters = Request.extractQueryParameters(request, UTF_8);
Fields allParameters = Request.getParameters(request);
// Gets cookies.
// Replaces:
// - servletRequest.getCookies();
List<HttpCookie> cookies = Request.getCookies(request);
// Gets request HTTP headers.
// Replaces:
// - servletRequest.getHeaderNames()
// - servletRequest.getHeader(name)
// - servletRequest.getHeaders(name)
// - servletRequest.getDateHeader(name)
// - servletRequest.getIntHeader(name)
HttpFields requestHeaders = request.getHeaders();
// Gets the request Content-Type.
// Replaces:
// - servletRequest.getContentType()
String contentType = request.getHeaders().get(HttpHeader.CONTENT_TYPE);
// Gets the request Content-Length.
// Replaces:
// - servletRequest.getContentLength()
// - servletRequest.getContentLengthLong()
long contentLength = request.getLength();
// Gets the request locales.
// Replaces:
// - servletRequest.getLocale()
// - servletRequest.getLocales()
List<Locale> locales = Request.getLocales(request);
// Gets the request scheme.
// Replaces:
// - servletRequest.getScheme()
String scheme = request.getHttpURI().getScheme();
// Gets the server name.
// Replaces:
// - servletRequest.getServerName()
String serverName = Request.getServerName(request);
// Gets the server port.
// Replaces:
// - servletRequest.getServerPort()
int serverPort = Request.getServerPort(request);
// Gets the remote host/address.
// Replaces:
// - servletRequest.getRemoteAddr()
// - servletRequest.getRemoteHost()
String remoteAddress = Request.getRemoteAddr(request);
// Gets the remote port.
// Replaces:
// - servletRequest.getRemotePort()
int remotePort = Request.getRemotePort(request);
// Gets the local host/address.
// Replaces:
// - servletRequest.getLocalAddr()
// - servletRequest.getLocalHost()
String localAddress = Request.getLocalAddr(request);
// Gets the local port.
// Replaces:
// - servletRequest.getLocalPort()
int localPort = Request.getLocalPort(request);
// Gets the request attributes.
// Replaces:
// - servletRequest.getAttributeNames()
// - servletRequest.getAttribute(name)
// - servletRequest.setAttribute(name, value)
// - servletRequest.removeAttribute(name)
String name = "name";
Object value = "value";
Set<String> names = request.getAttributeNameSet();
Object attribute = request.getAttribute(name);
Object oldValue = request.setAttribute(name, value);
Object removedValue = request.removeAttribute(name);
request.clearAttributes();
Map<String, Object> map = request.asAttributeMap();
// Gets the request trailers.
// Replaces:
// - servletRequest.getTrailerFields()
HttpFields trailers = request.getTrailers();
// Gets the HTTP session.
// Replaces:
// - servletRequest.getSession()
// - servletRequest.getSession(create)
boolean create = true;
Session session = request.getSession(create);
callback.succeeded();
return false;
}
}Handler Request Content APIs
@Override
public boolean handle(Request request, Response response, Callback callback) throws Exception
{
// Non-blocking read the request content as a String.
// Use with caution as the request content may be large.
CompletableFuture<String> completable = Content.Source.asStringAsync(request, UTF_8);
completable.whenComplete((requestContent, failure) ->
{
if (failure == null)
{
// Process the request content here.
// Implicitly respond with status code 200 and no content.
callback.succeeded();
}
else
{
// Implicitly respond with status code 500.
callback.failed(failure);
}
});
return true;
}
@Override
public boolean handle(Request request, Response response, Callback callback) throws Exception
{
// Non-blocking read the request content as a ByteBuffer.
// Use with caution as the request content may be large.
CompletableFuture<ByteBuffer> completable = Content.Source.asByteBufferAsync(request);
completable.whenComplete((requestContent, failure) ->
{
if (failure == null)
{
// Process the request content here.
// Implicitly respond with status code 200 and no content.
callback.succeeded();
}
else
{
// Implicitly respond with status code 500.
callback.failed(failure);
}
});
return true;
}
@Override
public boolean handle(Request request, Response response, Callback callback) throws Exception
{
// Read the request content as an InputStream.
// Note that InputStream.read() may block.
try (InputStream inputStream = Content.Source.asInputStream(request))
{
while (true)
{
int read = inputStream.read();
// EOF was reached, stop reading.
if (read < 0)
break;
// Process the read byte here.
}
}
// Implicitly respond with status code 200 and no content.
callback.succeeded();
return true;
}
@Override
public boolean handle(Request request, Response response, Callback callback) throws Exception
{
CompletableTask<Void> reader = new CompletableTask<>()
{
@Override
public void run()
{
// Read in a loop.
while (true)
{
// Read a chunk of content.
Content.Chunk chunk = request.read();
// If there is no content, demand to be
// called back when more content is available.
if (chunk == null)
{
request.demand(this);
return;
}
// If a failure is read, complete with a failure.
if (Content.Chunk.isFailure(chunk))
{
Throwable failure = chunk.getFailure();
completeExceptionally(failure);
return;
}
if (chunk instanceof Trailers trailers)
{
// Possibly process the request trailers here.
// Trailers have an empty ByteBuffer and are a last chunk.
}
// Process the request content chunk here.
// After the processing, the chunk MUST be released.
chunk.release();
// If the last chunk is read, complete normally.
if (chunk.isLast())
{
complete(null);
return;
}
// Not the last chunk of content, loop around to read more.
}
}
};
// Initiate the read of the request content.
reader.start();
// When the read is complete, complete the Handler callback.
callback.completeWith(reader);
return true;
}Handler Response APIs
public class ResponseAPIs extends Handler.Abstract
{
@Override
public boolean handle(Request request, Response response, Callback callback) throws Exception
{
// Sets/Gets the response HTTP status.
// Replaces:
// - servletResponse.setStatus(code);
// - servletResponse.getStatus();
response.setStatus(HttpStatus.OK_200);
int status = response.getStatus();
// Gets the response HTTP headers.
// Replaces:
// - servletResponse.setHeader(name, value);
// - servletResponse.addHeader(name, value);
// - servletResponse.setDateHeader(name, date);
// - servletResponse.addDateHeader(name, date);
// - servletResponse.setIntHeader(name, value);
// - servletResponse.addIntHeader(name, value);
// - servletResponse.getHeaderNames()
// - servletResponse.getHeader(name)
// - servletResponse.getHeaders(name)
// - servletResponse.containsHeader(name)
HttpFields.Mutable responseHeaders = response.getHeaders();
// Sets an HTTP cookie.
// Replaces:
// - Cookie cookie = new Cookie("name", "value");
// - cookie.setDomain("example.org");
// - cookie.setPath("/path");
// - cookie.setMaxAge(24 * 3600);
// - cookie.setAttribute("SameSite", "Lax");
// - servletResponse.addCookie(cookie);
HttpCookie cookie = HttpCookie.build("name", "value")
.domain("example.org")
.path("/path")
.maxAge(Duration.ofDays(1).toSeconds())
.sameSite(HttpCookie.SameSite.LAX)
.build();
Response.addCookie(response, cookie);
// Sets the response Content-Type.
// Replaces:
// - servletResponse.setContentType(type)
responseHeaders.put(HttpHeader.CONTENT_TYPE, "text/plain; charset=UTF-8");
// Sets the response Content-Length.
// Replaces:
// - servletResponse.setContentLength(length)
// - servletResponse.setContentLengthLong(length)
responseHeaders.put(HttpHeader.CONTENT_LENGTH, 1024L);
// Sets/Gets the response trailers.
// Replaces:
// - servletResponse.setTrailerFields(() -> trailers)
// - servletResponse.getTrailerFields()
HttpFields trailers = HttpFields.build().put("checksum", 0xCAFE);
response.setTrailersSupplier(trailers);
Supplier<HttpFields> trailersSupplier = response.getTrailersSupplier();
// Gets whether the response is committed.
// Replaces:
// - servletResponse.isCommitted()
boolean committed = response.isCommitted();
// Resets the response.
// Replaces:
// - servletResponse.reset();
response.reset();
// Sends a redirect response.
// Replaces:
// - servletResponse.encodeRedirectURL(location)
// - servletResponse.sendRedirect(location)
String location = Request.toRedirectURI(request, "/redirect");
Response.sendRedirect(request, response, callback, location);
// Sends an error response.
// Replaces:
// - servletResponse.sendError(code);
// - servletResponse.sendError(code, message);
Response.writeError(request, response, callback, HttpStatus.SERVICE_UNAVAILABLE_503, "Request Cannot be Processed");
callback.succeeded();
return true;
}
}Handler Response Content APIs
@Override
public boolean handle(Request request, Response response, Callback callback) throws Exception
{
// Produces an implicit response with status code 200
// with no content when returning from this method.
// The Handler callback must be completed when returning true.
callback.succeeded();
return true;
}
@Override
public boolean handle(Request request, Response response, Callback callback) throws Exception
{
// Produces an implicit response with status 204
// with no content when returning from this method.
response.setStatus(HttpStatus.NO_CONTENT_204);
// The Handler callback must be completed when returning true.
callback.succeeded();
return true;
}
@Override
public boolean handle(Request request, Response response, Callback callback) throws Exception
{
// Produces an explicit response with status 204 with no content.
response.setStatus(HttpStatus.NO_CONTENT_204);
// This explicit first write() writes the response status code and headers.
// It is also the last write (as specified by the first parameter)
// and writes an empty content (the second parameter, a null ByteBuffer).
// When this write completes, the Handler callback is completed.
response.write(true, null, callback);
return true;
}
@Override
public boolean handle(Request request, Response response, Callback callback) throws Exception
{
response.setStatus(HttpStatus.OK_200);
ByteBuffer content = UTF_8.encode("Hello World");
// Explicit first write that writes the response status code, headers and content.
// When this write completes, the Handler callback is completed.
response.write(true, content, callback);
return true;
}
@Override
public boolean handle(Request request, Response response, Callback callback) throws Exception
{
response.setStatus(HttpStatus.OK_200);
ByteBuffer content = UTF_8.encode("Hello World");
response.getHeaders().put(HttpHeader.CONTENT_LENGTH, content.remaining());
// Flush the response status code and the headers (no content).
// This is the fist but non-last write.
Callback.Completable completable = new Callback.Completable();
response.write(false, null, completable);
// When the first write completes, perform the second (and last) write.
completable.whenComplete((ignored, failure) ->
{
if (failure == null)
{
// Now explicitly write the content as the last write.
// When this write completes, the Handler callback is completed.
response.write(true, content, callback);
}
else
{
// Implicitly respond with status code 500.
callback.failed(failure);
}
});
return true;
}
@Override
public boolean handle(Request request, Response response, Callback callback) throws Exception
{
response.setStatus(HttpStatus.OK_200);
// Utility method to write UTF-8 string content.
// When this write completes, the Handler callback is completed.
Content.Sink.write(response, true, "Hello World", callback);
return true;
}
@Override
public boolean handle(Request request, Response response, Callback callback) throws Exception
{
response.setStatus(HttpStatus.OK_200);
// Utility method to echo the content from the request to the response.
// When the echo completes, the Handler callback is completed.
Content.copy(request, response, callback);
return true;
}
@Override
public boolean handle(Request request, Response response, Callback callback) throws Exception
{
response.setStatus(HttpStatus.OK_200);
// The trailers must be set on the response before the first write.
HttpFields.Mutable trailers = HttpFields.build();
response.setTrailersSupplier(trailers);
// Explicit first write that writes the response status code, headers and content.
// The trailers have not been written yet; they will be written with the last write.
ByteBuffer content = UTF_8.encode("Hello World");
Callback.Completable completable = new Callback.Completable();
response.write(false, content, completable);
completable.whenComplete((ignored, failure) ->
{
if (failure == null)
{
// Update the trailers
trailers.put("Content-Checksum", 0xCAFE);
// Explicit last write to write the trailers
// and complete the Handler callback.
response.write(true, null, callback);
}
else
{
// Implicitly respond with status code 500.
callback.failed(failure);
}
});
return true;
}APIs Changes
HttpClient
The Jetty 11 Request.onResponseContentDemanded(Response.DemandedContentListener) API has been replaced by Request.onResponseContentSource(Response.ContentSourceListener) in Jetty 12.
However, also look at Request.onResponseContentAsync(Response.AsyncContentListener) and Request.onResponseContent(Response.ContentListener) for simpler usages.
The Jetty 11 model was a "demand+push" model: the application was demanding content; when the content was available, the implementation was pushing content to the application by calling DemandedContentListener.onContent(Response, LongConsumer, ByteBuffer, Callback) for every content chunk.
The Jetty 12 model is a "demand+pull" model: when the content is available, the implementation calls once Response.ContentSourceListener.onContentSource(Content.Source); the application can then pull the content chunks from the Content.Source.
For more information about the new model, see this section.
WebSocket
The Jetty WebSocket APIs have been vastly simplified, and brought in line with the style of other APIs.
The Jetty 12 WebSocket APIs are now fully asynchronous, so the Jetty 11 SuspendToken class has been removed in favor of an explicit (or automatic) demand mechanism in Jetty 12 (for more information, refer to this section).
The various Jetty 11 WebSocket*Listener interfaces have been replaced by a single interface in Jetty 12, Session.Listener.AutoDemanding (for more information, refer to this section).
The Jetty 11 RemoteEndpoint APIs have been merged into the Session APIs in Jetty 12.
The Jetty 11 WriteCallback class has been renamed to just Callback in Jetty 12, because it is now also used when receiving binary data.
Note that this Callback interface is a different interface from the org.eclipse.jetty.util.Callback interface, which cannot be used in the Jetty WebSocket APIs due to class loader visibility issues.
On the server-side, the Jetty WebSocket APIs have been made independent of the Servlet APIs.
Jetty 11 JettyWebSocketServerContainer has been replaced by ServerWebSocketContainer in Jetty 12, with similar APIs (for more information, refer to this section).
On the client-side the WebSocketClient APIs are practically unchanged, as most of the changes come from the HttpClient changes described above.